Page is loading ...

R1725 MOTOR ASSEMBLY
R1725 MOTOR
FOR USE WITH R1730 & R1735 REMOTE CONTROLS
programming instructions
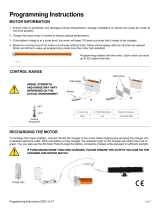
CONTROL RANGE
Transmitting distance may be affected due to environment.
L1
Rolling
L2
Rolling
L1 Open L2 Partition Emission frequency
100V-240V 200m 35m 433.92/868 MHz
Insert motor into the roller tube.
INSTALLATION
Manufacture the blind according to instructions and t using brackets supplied.
DRIVE ADAPTER INSTALLATION
Place crown
Motorplate
Slide the crown up the tube to the control
end.
Drive
Crown
Drive
Screw the drive to the opposite end
and t Circlip.
1) 2) 3)
Blue=Neutral
Red=Live

Portable 15 Channel Remote Unit
1-15 (O operates all blinds)
2 jogs = 1 movement, up AND down
STEP 1 - PAIRING THE HANDSET WITH THE MOTOR
NOTE: During the setting procedure, the time between two
operations
must not exceed 10 seconds as this will cause the setting up
process to quit.
2 jogs = 1 movement, up AND down.
• Switch on the power to the motor
• Remove the battery cover on the reverse of the remote. There are
two
setting buttons (P2) on either side of the battery, press either
one
• Select a channel from 1- 15 on the remote by pressing
Channel < or >
• Press the button on the motor and the motor will jog
up and
down
• Press P2 twice then the Up or Down button once. The
motor
will jog and beep
The motor and remote are now paired.
• Check direction
• To change direction press and hold the button on the motor for
4 jogs
• Move to a midway position
STEP 2 - SETTING THE LIMITS
Select the same channel and set the limits.
• You can select either position rst
• Press P2, then the Up button followed by P2 again, the motor
will jog and beep
• Press the Up button and the blind will start to rise
• Press P2 when the blind is close to the top and the blind will go into
slow jog mode
• If you do not get the correct position press down and repeat by going
up
• Press the Stop button on the remote and the blind will stop
• Hold the Stop button down until the motor jogs twice, this will
set the top limit
• Press the Down button and the blind will start to go down
• Press P2 and the blind will go into slow jog mode
• Press the Stop button on the remote and the blind will stop
Press and hold the stop button down until the motor jogs, this
will set the lower limit.
Setting is complete. For more blinds, select another channel on the
remote and repeat from Step 2.
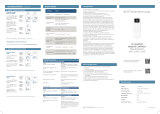
Down button
Channel <
Stop Button
Up Button
LCD
Screen
Channel >
Setting Button
STEP 3 - SETTING A THIRD POSITION
• Move the blind using the Up and Down buttons on the remote to the desired position (press Stop)
• Press Stop followed by the P2 button then Stop twice more, this will cause the motor to jog twice
• To operate the third position, press and hold the Stop button and the blind will move to its third position
• To delete the third position, press P2, followed by the Stop button twice, the motor will jog twice
DELETING A LIMIT
• To delete a limit, press P2 followed by the Down button then press P2 again, the motor will jog twice
DELETING A HANDSET
• To delete a handset, press P2 then the Stop button followed by P2 again, the motor will jog twice
ADDING A HANDSET
• To add a handset, press P2 twice on the existing handset. Then press P2 once on the new handset, the motor will jog twice
• To perform a factory reset press and hold the button on the motor for 6 jogs
CAUTION
RISK OF EXPLOSION IF BATTERY IS REPLACED BY AN
INCORRECT TYPE. DISPOSE OF USED BATTERIES
ACCORDING TO THE INSTRUCTIONS.
Technical specication
Input voltage: 3V (CR2450) X 1
Transmitting frequency: 433MHz
Transmitting power: 10 milliwatt
Operating temperature: -10
0
c to 50
0
c
Transmission distance: 200 metres open ofce, 35 metres on two walls
R1730 REMOTE CONTROL
for use with R1725
Notice: Do not expose the unit to moisture or heat. When
you use the control unit, if operation distance becomes
short and less effective then please replace batteries.
Please recycle old batteries.
R1735 REMOTE CONTROL

R1730 REMOTE CONTROL
Portable 15 Channel Remote Unit
1-15 (O operates all blinds)
2 jogs = 1 movement, up AND down
STEP 1 - PAIRING THE HANDSET WITH THE MOTOR
NOTE: During the setting procedure, the time between
two operations must not exceed 10 seconds as this will
cause the setting up process to quit.
• Switch on the power to the motor
• Always press O and + together
• Select a channel from 1 - 15 on the handset by
pressing + or -
• Press the button on the motor and the motor will
jog and beep
• On the remote, press O and + together twice then
the
up or down button once. The motor will jog
twice each
time and beep
The motor and remote are now paired.
• To change direction press and hold the button on
the
motor for 4 jogs
STEP 2 - SETTING THE LIMITS
Select the same channel and set the the limit.
• Press O and + together, then the up button followed by O and
+ together again, the motor will jog and beep
• Press the Up button and the blind will start to rise
• Press O and + together and the blind will go into slow jog mode
• Press the Stop button on the remote and the blind will stop
• Press and hold the Stop button down until the motor jogs
and beeps, this will set the top limit
• Press the Down button and the blind will start to go down
• Press O and + together and the blind will go into slow jog mode
• Press the Stop button on the remote and the blind will stop
• Press and hold the Stop button down until the motor jogs twice
and beeps, this will set the lower limit
Setting is complete. For more blinds, select another channel on the remote
and repeat step 2.
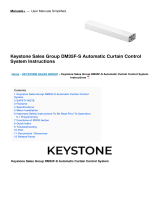
Down Button
Channel + (& Setting Button)
Channel -
Setting Button
Stop Button
Up Button
STEP 3 - SETTING A THIRD POSITION
• Move the blind using the Up and Down buttons the remote to the desired position press Stop
• Then O and + together followed by the Stop button twice more, this will cause the motor to do 2 jogs and beep
• To operate the third position, press and hold the Stop button and the blind will move to its third position
• To delete the third position, press O and + together, followed by the Stop button twice, the motor will do 2 jogs
DELETING A LIMIT
• To delete a limit, press O and + together followed by the Down button then press O and + together again, the motor will do 2 jogs
DELETING A HANDSET
• To delete a handset, press O and + together then the stop button followed by O and + together again, the motor will jog twice and beep
ADDING A HANDSET
• To add a handset, press O and + together twice on the existing handset. Then press O and + together on the new handset, the motor
will jog twice
• To perform a factory reset press and hold the button on the motor for 6 jogs
Notice: Do not expose the unit to moisture or heat. When
you use the control unit, if operation distance becomes
short and less effective then please replace batteries.
Please recycle old batteries.
CAUTION
RISK OF EXPLOSION IF BATTERY IS REPLACED BY AN
INCORRECT TYPE. DISPOSE OF USED BATTERIES
ACCORDING TO THE INSTRUCTIONS.
Input voltage: 3V (CR2430) x1
Transmitting frequency: 433MHz
Transmitting power: 10 milliwatt
Operating temperature: -10
0
c to 50
0
c
Transmission distance: 200 metres open ofce, 35 metres on two walls
Technical specication
R1735 REMOTE CONTROL
for use with R1725

WARNING: Important safety instructions. Follow all instructions, since incorrect installation can lead to severe injury.
Please save these Instructions.
Before installing the drive, remove any unnecessary cords and remove any equipment not needed for powered operation.
Install the actuating member of a manual release at a height less than 1.8m.
1. Instructions for use are provided with the appliance so that the appliance can be used safely.
2. Appliance must only be used to drive blinds.
3. Only use supplied driven parts for use with this motor appliance.
4. Keep the product number and data plate in a safe place.
5. This appliance is not intended for use by persons (including children) with reduced physical, sensory or mental capabilities, or lack
of experience and knowledge, unless they have been given supervision or instruction concerning use of the appliance by a person
responsible for their safety.
6. Children should be supervised to ensure that they do not play with the appliance.
7. Do not allow children to play with xed controls. Keep remote controls away from children.
8. Frequently examine the installation for imbalance and signs of wear or damage to cables and springs. Do not use if repair or adjustment
if necessary.
9. Do not store the motor with strong acid, alkaline, dirty or eroding materials.
10. Do not use the motor in a humid or damp environment.
11. Do not start the motor frequently or overload it as it might reduce the life of the motor.
12. Do not turn the regulating knob or the driving sleeve at non-operation state.
13.
If you wish to open the blind under power-off circumstance, you may choose the E series products which carries manual functions, and invite
qualied persons to install the handling crank and locks. Please note that the manual function doesn’t work when motor is powered on.
14. Do not operate the blinds during maintenance (such as window cleaning) is being carried out in the vicinity etc.
15. The power supply cord should not be exposed to sunlight or rain directly during installation. H05VV of the motor power supply cord can
only be used for indoor installations, H05RR or H05RN rubber power cable can be used in outdoor installation; black ordinary tough
rubber sheathed cord (60245 IEC 53) is suitable alternative cord for outdoor use, provided that sheath contains at least 2% of carbon in
accordance with clause 11 of IEC60811 4 1 (EN 60335 2 97).
16. For installation of blinds, a horizontal distance of at least 0.4m is to be maintained between the fully unrolled driven part and any
permanent object.
17. Fixed controls have to be visibly installed.
18. The rate operating time is 10 minutes. The appliance cannot be restarted until the temperature of motor has reached ambient.
19. If it is a remote controlled blind, during maintenance, please disable/close the remote control and power off.
20. When operating the manual release people must take care, since a blind may drop rapidly due to weak or broken springs.
21. If the supply cord is damaged, it must be replaced by the manufacturer, its service agent or similarly qualied persons in order to avoid
a hazard.
22. The supply cord of the drive can only be replaced by the same type of cable supplied by the manufacturer of the drive (appliance).
23. If the power supply cord is too short do not use an extension cord, have a qualied electrician install an outlet near the drapery operator.
24. There must be a minimum tube diameter of 27.00mm for tubular drive.
CAUTION: In order to avoid a hazard due to inadvertent resetting of the thermal cutout, this appliance must not be supplied through an
external switching device, such as a timer, or connected to a circuit that is regularly switched on and off by the utility.
R1725 SAFETY INSTRUCTIONS
110-240V, 50/60 Hz, 0.13 A, 13.9w
Technical specication
Oct 2017
/