Page is loading ...

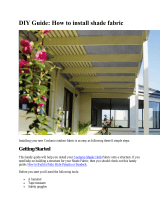
Congratulations on the purchase of your Coolaroo® Simple Lift™ Outdoor Roller Shade. Whether you choose to install it in your apartment or home on a
window, balcony, patio, porch or deck, simply follow the directions included here to create a safer, more enjoyable environment with increased privacy.
Your Simple Lift™ Outdoor Roller Shade is fully assembled and only needs to be installed before it can be used. Before beginning the steps below, please
take a moment to review the parts list you will need to hang the shade.
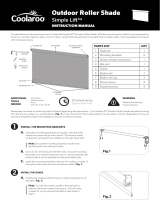
Your Simple Lift™ Outdoor Roller Shade can either be hung from the top of a surface (i.e. window frame, (Fig. 1) or side mounted on the inside surface of a
wall, patio or porch. Regardless of how you choose to install the shade, the installation instructions remain the same.
INSTALL THE MOUNTING BRACKETS
A. Using the mounting bracket as your guide, mark the holes where the
screws will go with a pencil. The tension wheel bracket will need to be
installed on the right hand side.
Note: Be sure the brackets on both ends are level and in
line with each other.
B. Use a 3/16” drill bit to pre-drill the holes. If you are mounting the
shade on a material other than wood The optional wall anchors which
can be inserted into the pre-drilled holes are included.
C. Mount the installation brackets to the ceiling or wall using the wood
screws provided. (Fig. 1)
INSTALL THE SHADE
A. Next, position the shade so that the tension wheel side of the roller
shade is on the right. (Fig. 2)
Note: You will also want to position the head rail (roll) so that
the red tension brake is facing you. This will make it easier for
you to remove the brake as described in Step E.
2
1
ADDITIONAL TOOLS
NEEDED
Screwdriver
Measuring tape
Pencil
Drill with 3/16” drill bit
PARTS LIST QTY
1 Head rail 1
2 Mounting brackets 2
3 Tension wheel component 1
4 Idle end 1
5 Shade 1
6 Bottom rail 1
7 Bottom rail cap 2
8 Wood screws 4
9 Drywall anchors 4
20 minute set up
(approximate time)
Fig.1
Fig.2
(1) Head rail
(3) Tension wheel
component
(4) Idle end
(5) Shade
(6) Bottom rail
(7) Bottom
rail cap
(8) Wood
screws
(9) Drywall
anchors
(2) Mounting
brackets
Outdoor Roller Shade
Simple Li
TM
INSTRUCTION MANUAL

© by Gale Pacific Limited. All rights reserved. Coolaroo® is a registered trademark of Gale Pacific Limited.
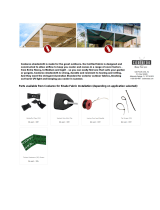
Roll up your sun shade when not in use, or before strong storms, to prevent damage.
RAISING AND LOWERING THE SHADE
Having successfully followed the steps above, your shade should be in the retracted position (rolled up)
and ready to use.
To lower the shade, place one hand in the center of the bottom rail and pull down to any desired height.
To raise the shade, place one hand in the center of the bottom rail and gently guide the shade up, as you
lift the bottom rail upwards the shade will stop at the desired position once you remove your hand from the
bottom rail. (Fig. 7)
TENSION ADJUSTMENT
If the retraction speed of your roller shade is either too fast or too slow, you can adjust the tension of the
spring in the head rail. To increase or decrease the retraction speed of your roller shade:
A. To increase the tension on the spring, use the tension wheel by turning it 1-2 rotations
(counterclockwise) on the left side of the shade. (Fig. 8)
B. To decrease tension on the spring, use the tension wheel by turning it 1-2 rotations (clockwise). (Fig. 8)
Continue Steps 3 or 4, checking the tension every 1 -2 rotations until you have set the desired tension.
C. Test the roller shade for desired function repeat steps A and B if necessary.
Note: Again, be sure to save the tension wheel brake after removing it because you will
need it if you want to re-adjusted the shade at a later time.
Questions or Comments? Contact us at:
Gale Pacific USA, Inc. | www.coolaroousa.com | 1-800-560-4667
MAINTENANCE: Your sun shade has been made of the finest materials and, when properly cared
for, will provide years of shade and privacy. To clean your shade, simply rinse with water, scrub with
mild soap or any nonabrasive cleaner, rinse and allow to dry. Call us for missing parts or mechanical
problems. Do not store shade wet. In moist areas, roll shade down frequently to air dry.
CAUTION: Use of solvents or abrasive cleaners may damage the fabric and will void your warranty.
Do not use bleach or chlorine.
3
4
B. Install the right side of the roller by inserting the tab on the right bracket into tension wheel. (Fig. 3)
C. Install the left side by sliding the idle end into the idle end bracket. (Fig. 4)
D. Once the roller shade is mounted, remove the blue tape from the tension wheel end. (Fig. 5)
E. Gently pull down on shade until red tension wheel break is completely removed from tension wheel. (Fig. 6)
Note: Be sure to save the tension wheel brake after removing it because you will need it if you
want to re-adjusted the tension at a later time.
Fig.3
Fig.7
Register and Order
Replacement Parts Online:
www.coolaroousa.com
5.04.004.270
Fig.4
Fig.5
Fig.8 Fig.6
/