Page is loading ...

Sun Shade
with Full Valance
10-minute set up
(approximate time)
(2) Clutch Plug
(1) Clutch Unit
(4) Chain
(3) Bracket Covers
(5) Bottom
Rail Cap
(6) Tie Downs
(7) Bottom Rail
(8) Shade
(9) Idle End
Unit
(10) Idle End Plug
(11) Aluminum Tube
(2) Clutch Plug
(1) Clutch Unit
(4) Chain
(3) Bracket Covers
(5) Bottom
Rail Cap
(7) Bottom Rail
(8) Shade
(9) Idle End
Unit
(10) Idle End Plug
(11) Aluminum Tube
(2) Clutch Plug
(1) Clutch Unit
(4) Wand
(3) Bracket Covers
(5) Bottom
Rail Cap
(7) Bottom Rail
(8) Shade
(9) Idle End
Unit
(10) Idle End Plug
(11) Aluminum Tube
(2) Clutch Plug
(1) Clutch Unit
(3) Wand
(4) Bottom
Rail Cap
(6) Bottom Rail
(7) Shade
(8) Idle End
Unit
(9) Idle End Plug
(10) Aluminum Tube
(2) Clutch Plug
(1) Clutch Unit
(3) Wand
(4) Bottom
Rail Cap
(6) Bottom Rail
(1) Shade
(8) Idle
End
Unit
(9) Idle End Plug
(10) Aluminum Tube
(3) Bottom
Rail Cap
(5) Bottom Rail
(2) Wand
(1) Full Valance
(6) Receiver
Zone 1
Zone 2
Zone 3
Zone 1
Zone 2
Zone 3
(4) Bungee
(8) Brackets
(2) Clutch Plug
(1) Clutch Unit
(4) Chain
(3) Bracket Covers
(5) Bottom
Rail Cap
(6) Tie Downs
(7) Bottom Rail
(8) Shade
(9) Idle End
Unit
(10) Idle End Plug
(11) Aluminum Tube
(2) Clutch Plug
(1) Clutch Unit
(4) Chain
(3) Bracket Covers
(5) Bottom
Rail Cap
(7) Bottom Rail
(8) Shade
(9) Idle End
Unit
(10) Idle End Plug
(11) Aluminum Tube
(2) Clutch Plug
(1) Clutch Unit
(4) Wand
(3) Bracket Covers
(5) Bottom
Rail Cap
(7) Bottom Rail
(8) Shade
(9) Idle End
Unit
(10) Idle End Plug
(11) Aluminum Tube
(2) Clutch Plug
(1) Clutch Unit
(3) Wand
(4) Bottom
Rail Cap
(6) Bottom Rail
(7) Shade
(8) Idle End
Unit
(9) Idle End Plug
(10) Aluminum Tube
(2) Clutch Plug
(1) Clutch Unit
(3) Wand
(4) Bottom
Rail Cap
(6) Bottom Rail
(1) Shade
(8) Idle
End
Unit
(9) Idle End Plug
(10) Aluminum Tube
(3) Bottom
Rail Cap
(5) Bottom Rail
(2) Wand
(1) Full Valance
(6) Receiver
Zone 1
Zone 2
Zone 3
Zone 1
Zone 2
Zone 3
(4) Bungee
(8) Brackets
Exterior
INSTALLATION
INSTRUCTIONS
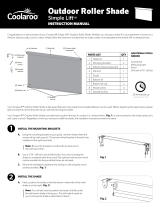
DETERMINE DESIRED MOUNTING METHOD
This two-in-one valance design allows you to easily mount the
sun shade to either a ceiling (fig. 1) or a wall (fig. 2).
For ease and flexibility in mounting, the three quick-connect
brackets can be positioned anywhere inside each of their three
61 cm (24
in) zones.
Be sure to keep each of the three brackets inside these zones for
proper balance and weight distribution of the valance.
OR
fig. 1 fig. 2
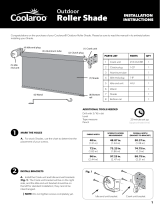
WARNING: If you do not ensure the quick mount brackets are positioned with the release button in the correct direction (fig. 4 and fig. 5), removing
the shade may be difficult. The brackets must be positioned and installed level to ensure the shade hangs level and functions properly.
ADDITIONAL TOOLS NEEDED
Drill with 3/16 in bit
Level
Tape Measure
Pencil
PARTS LIST PARTS QTY
1 Sun Shade with Full Valance 1
2
Control Wand
Z 13-CH 1
3 Bottom Rail Caps with Rings 11-BRC 2
4 Bungee Tie Downs 11-BUNGEE TD 2
5 Bottom Rail 1
6 Bungee Receiver 1-RECEIVER 2
7 Wood Screws 4-WS 10
8 Brackets Z-14-FCIBW 3
9 Anchors 10
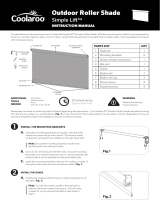
INSTALL QUICK CONNECT BRACKETS AND SUN SHADE
IMPORTANT: The screws included in your hardware kit are for use with wood
only. Call Customer Service (1-800-560-4667) for mounting recommendations when
attaching your shade to any other material.
a. In the desired locations, attach Quick Connect Brackets (fig. 3) with screws, into
wooden stud.
b. Install the Shade by snapping the unit securely into place.
fig. 3
This side goes on
mounting surface
(2) Clutch Plug
(1) Clutch Unit
(4) Chain
(3) Bracket Covers
(5) Bottom
Rail Cap
(6) Tie Downs
(7) Bottom Rail
(8) Shade
(9) Idle End
Unit
(10) Idle End Plug
(11) Aluminum Tube
(2) Clutch Plug
(1) Clutch Unit
(4) Chain
(3) Bracket Covers
(5) Bottom
Rail Cap
(7) Bottom Rail
(8) Shade
(9) Idle End
Unit
(10) Idle End Plug
(11) Aluminum Tube
(2) Clutch Plug
(1) Clutch Unit
(4) Wand
(3) Bracket Covers
(5) Bottom
Rail Cap
(7) Bottom Rail
(8) Shade
(9) Idle End
Unit
(10) Idle End Plug
(11) Aluminum Tube
(2) Clutch Plug
(1) Clutch Unit
(3) Wand
(4) Bottom
Rail Cap
(6) Bottom Rail
(7) Shade
(8) Idle End
Unit
(9) Idle End Plug
(10) Aluminum Tube
(2) Clutch Plug
(1) Clutch Unit
(3) Wand
(4) Bottom
Rail Cap
(6) Bottom Rail
(1) Shade
(8) Idle End
Unit
(9) Idle End Plug
(10) Aluminum Tube
(3) Bottom
Rail Cap
(5) Bottom Rail
(2) Control
Wand
(1) Full Valance
(6) Receiver
(4) Bungee
(7) Screws
(8) Brackets

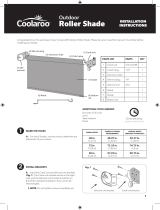
INSTALL TIE DOWNS (optional)
Tie Downs have been provided to secure your sun shade in mild to moderate wind
conditions.
a. Thread the Bungee through the End Cap Ring and back through itself making a
lark’s head knot (fig. 7).
b. Install the Receiver (fig. 8) approximately 13 cm (5 in) below where the shade
will stop, to allow for proper tension of Bungee cord.
c. Attach Bungee to Receiver to secure Shade.
NOTE: Wood screws have been provided. If installing into any material other than
wood, additional screws may be needed.
Roll up your sun shade when not in use, or before strong storms, to prevent damage.
Questions or Comments? Contact us at:
Gale Pacific USA, Inc. | www.coolaroousa.com | 1-800-560-4667
Register and Order
Replacement Parts Online:
www.coolaroousa.com
5.04.004.267
MAINTENANCE:
Your sun shade has been made of the finest materials and, when properly cared for, will provide
years of shade and privacy. To clean your shade, simply rinse with water, scrub with mild soap or any
nonabrasive cleaner, rinse and allow to dry. Call us for missing parts or mechanical problems. Do not
store shade wet. In moist areas roll shade down frequently to air dry.
CAUTION: Use of solvents or abrasive cleaners may damage the fabric and will void your warranty.
Do not use bleach or chlorine.
fig. 4 fig. 5
fig. 6
fig. 7
NOTE: If installing to a ceiling (fig. 4) ensure the tab on the bracket is facing towards you. If installing to a wall (fig. 5) ensure that the tab on the bracket
is facing downward. Allow at least 5.08 cm (2 in) of clearance between the bracket and wall or ceiling to allow space to snap shade onto bracket.
If brackets are installed upside down or backwards, the blind WILL NOT FIT.
Tabs forward.
Ceiling Mount
Wall Mount
Tabs downward.

Extérieur
avec boîte à rideau complète
Installé en 10
minutes
(temps approximatif)
Store
INSTRUCTIONS
D’INSTALLATION
AVERTISSEMENT : Si vous ne vérifiez pas que les supports à connexion rapide sont positionnés de manière à ce que le bouton de déverrouillage
soit dans la bonne direction (fig. 5 et fig. 4), il peut être difficile de retirer le store. Les supports doivent être positionnés et installés de niveau pour que
le store descende de niveau et qu’il fonctionne correctement.
OUTILS NÉCESSAIRES
SUPPLÉMENTAIRES
Perceuse avec mèche 3/16 po
Niveau
Mètre à ruban
Crayon
(1) Store
(3) Embout
de traverse
inférieure
(5) Tringle
inférieure
(2) Baguette
(1) Boîte à rideau complète
(6) Ancre à cordon
élastique
(4) Tendeur d’arrimage
(8) Supports
(7) Vis à bois
LISTE DES PIÈCES PIÈCES QT
1 Store avec boîte à rideau
complète
1
2 Baguette Z 13-CH 1
3 Embout de traverse inférieure 11-BRC 2
4 Tendeur d’arrimage 11-BUNGEE TD 2
5 Tringle inférieure 1
6 Ancre à cordon élastique 1-RECEIVER 2
7 Vis à bois 4-WS 10
8 Supports Z-14-FCIBW 3
9 Chevilles 10
(2) Clutch Plug
(1) Clutch Unit
(4) Chain
(3) Bracket Covers
(5) Bottom
Rail Cap
(6) Tie Downs
(7) Bottom Rail
(8) Shade
(9) Idle End
Unit
(10) Idle End Plug
(11) Aluminum Tube
(2) Clutch Plug
(1) Clutch Unit
(4) Chain
(3) Bracket Covers
(5) Bottom
Rail Cap
(7) Bottom Rail
(8) Shade
(9) Idle End
Unit
(10) Idle End Plug
(11) Aluminum Tube
(2) Clutch Plug
(1) Clutch Unit
(4) Wand
(3) Bracket Covers
(5) Bottom
Rail Cap
(7) Bottom Rail
(8) Shade
(9) Idle End
Unit
(10) Idle End Plug
(11) Aluminum Tube
(2) Clutch Plug
(1) Clutch Unit
(3) Wand
(4) Bottom
Rail Cap
(6) Bottom Rail
(7) Shade
(8) Idle End
Unit
(9) Idle End Plug
(10) Aluminum Tube
(2) Clutch Plug
(1) Clutch Unit
(3) Wand
(4) Bottom
Rail Cap
(6) Bottom Rail
(1) Shade
(8) Idle
End
Unit
(9) Idle End Plug
(10) Aluminum Tube
(3) Bottom
Rail Cap
(5) Bottom Rail
(2) Wand
(1) Full Valance
(6) Receiver
Zone 1
Zone 2
Zone 3
Zone 1
Zone 2
Zone 3
(4) Bungee
(8) Brackets
(2) Clutch Plug
(1) Clutch Unit
(4) Chain
(3) Bracket Covers
(5) Bottom
Rail Cap
(6) Tie Downs
(7) Bottom Rail
(8) Shade
(9) Idle End
Unit
(10) Idle End Plug
(11) Aluminum Tube
(2) Clutch Plug
(1) Clutch Unit
(4) Chain
(3) Bracket Covers
(5) Bottom
Rail Cap
(7) Bottom Rail
(8) Shade
(9) Idle End
Unit
(10) Idle End Plug
(11) Aluminum Tube
(2) Clutch Plug
(1) Clutch Unit
(4) Wand
(3) Bracket Covers
(5) Bottom
Rail Cap
(7) Bottom Rail
(8) Shade
(9) Idle End
Unit
(10) Idle End Plug
(11) Aluminum Tube
(2) Clutch Plug
(1) Clutch Unit
(3) Wand
(4) Bottom
Rail Cap
(6) Bottom Rail
(7) Shade
(8) Idle End
Unit
(9) Idle End Plug
(10) Aluminum Tube
(2) Clutch Plug
(1) Clutch Unit
(3) Wand
(4) Bottom
Rail Cap
(6) Bottom Rail
(1) Shade
(8) Idle
End
Unit
(9) Idle End Plug
(10) Aluminum Tube
(3) Bottom
Rail Cap
(5) Bottom Rail
(2) Wand
(1) Full Valance
(6) Receiver
Zone 1
Zone 2
Zone 3
Zone 1
Zone 2
Zone 3
(4) Bungee
(8) Brackets
OU
fig. 1 fig. 2
CHOISIR LA
MÉTHODE DE MONTAGE DÉSIRÉE
La conception double fonction de la boîte à rideau vous permet
de monter facilement le store soit au plafond (fig. 1) ou au mur
(fig. 2).
Pour rendre le montage plus facile et flexible, les trois supports
à connexion rapide peuvent être positionnés n’importe où à
l’intérieur de chacune de leurs trois 61 cm (24 po) zones.
Assurez-vous de garder chacun des trois supports à l’intérieur
de ces zones pour maintenir un bon équilibre et une bonne
répartition du poids de la boîte à rideau.
INSTALLER LES SUPPORTS À CONNEXION RAPIDE ET LES STORES
IMPORTANT : Les vis fournies dans votre kit de quincaillerie doivent être utilisées uniquement
avec du bois.
Appelez le service à la clientèle (1-800-560-4667) pour des conseils de montage lors de la
fixation de votre store à tout autre matériau.
a.
Aux endroits souhaités, fixez les supports à connexion rapide (fig. 4) dans les montants de
bois avec les vis.
b.
Installez le store en enclenchant l’unité solidement en place.
fig. 3
Ce côté va sur
la surface de montage

con guardamalleta completa
Instalación en 10 minutos
(Tiempo aproximado)
Exterior
INSTRUCCIONES
DE INSTALACIÓN
DETERMINE EL MÉTODO DE INSTALACIÓN DESEADO
El diseño de guardamalleta dos en uno le permite instalar fácilmente
la persiana ya sea a un cielo raso (fig. 1) o a una pared (fig. 2).
Para mayor facilidad y flexibilidad en la instalación, los tres soportes
de
de conexión rápida se pueden colocar en cualquier lugar dentro
c
ada uno de sus tres 61 cm (24 pulg) áreas.
Asegúrese de mantener cada uno de los tres soportes dentro de
estas áreas para mantener un equilibrio adecuado y la distribución
del peso de la guardamalleta.
(2) Clutch Plug
(1) Clutch Unit
(4) Chain
(3) Bracket Covers
(5) Bottom
Rail Cap
(6) Tie Downs
(7) Bottom Rail
(8) Shade
(9) Idle End
Unit
(10) Idle End Plug
(11) Aluminum Tube
(2) Clutch Plug
(1) Clutch Unit
(4) Chain
(3) Bracket Covers
(5) Bottom
Rail Cap
(7) Bottom Rail
(8) Shade
(9) Idle End
Unit
(10) Idle End Plug
(11) Aluminum Tube
(2) Clutch Plug
(1) Clutch Unit
(4) Wand
(3) Bracket Covers
(5) Bottom
Rail Cap
(7) Bottom Rail
(8) Shade
(9) Idle End
Unit
(10) Idle End Plug
(11) Aluminum Tube
(2) Clutch Plug
(1) Clutch Unit
(3) Wand
(4) Bottom
Rail Cap
(6) Bottom Rail
(7) Shade
(8) Idle End
Unit
(9) Idle End Plug
(10) Aluminum Tube
(2) Clutch Plug
(1) Clutch Unit
(3) Wand
(4) Bottom
Rail Cap
(6) Bottom Rail
(1) Persiana
(8) Idle End
Unit
(9) Idle End Plug
(10) Aluminum Tube
(3) Tapas del
riel inferiores
(5) Riel Inferior
(2) Vara
(1) Guardamalleta completa
(6) Receptor
(4) Amarre
(8) Soportes
(7) Tornillos
PRECAUCIÓN: Si no se asegura que los soportes de instalación rápida estén ubicados con el botón de desenganche en la dirección correcta
(fig. 4 y fig. 5), puede ser difícil quitar la persiana. Los soportes deben ser colocados e instalados a nivel para garantizar que la persiana cuelgue de
forma pareja y funcione correctamente.
HERRAMIENTOS ADICIONALES
NECESARIAS
Taladro con broca de 3/16 pulgadas
Nivelador
Cinta Métrica
Lápiz
LISTA DE PARTES PARTES CT
1
Persiana parasol con
guardamalleta completa
1
2 Vara Z 13-CH 1
3 Tapas del riel inferior con
anillos
11-BRC 2
4 Amarres elásticos 11-BUNGEE TD 2
5 Riel inferior 1
6 Receptor del amarre 1-RECEIVER 2
7 Tornillos para madera 4-WS 10
8 Soportes Z-14-FCIBW 3
9 Anclajes 10
(2) Clutch Plug
(1) Clutch Unit
(4) Chain
(3) Bracket Covers
(5) Bottom
Rail Cap
(6) Tie Downs
(7) Bottom Rail
(8) Shade
(9) Idle End
Unit
(10) Idle End Plug
(11) Aluminum Tube
(2) Clutch Plug
(1) Clutch Unit
(4) Chain
(3) Bracket Covers
(5) Bottom
Rail Cap
(7) Bottom Rail
(8) Shade
(9) Idle End
Unit
(10) Idle End Plug
(11) Aluminum Tube
(2) Clutch Plug
(1) Clutch Unit
(4) Wand
(3) Bracket Covers
(5) Bottom
Rail Cap
(7) Bottom Rail
(8) Shade
(9) Idle End
Unit
(10) Idle End Plug
(11) Aluminum Tube
(2) Clutch Plug
(1) Clutch Unit
(3) Wand
(4) Bottom
Rail Cap
(6) Bottom Rail
(7) Shade
(8) Idle End
Unit
(9) Idle End Plug
(10) Aluminum Tube
(2) Clutch Plug
(1) Clutch Unit
(3) Wand
(4) Bottom
Rail Cap
(6) Bottom Rail
(1) Shade
(8) Idle
End
Unit
(9) Idle End Plug
(10) Aluminum Tube
(3) Bottom
Rail Cap
(5) Bottom Rail
(2) Wand
(1) Full Valance
(6) Receiver
Zone 1
Zone 2
Zone 3
Zone 1
Zone 2
Zone 3
(4) Bungee
(8) Brackets
(2) Clutch Plug
(1) Clutch Unit
(4) Chain
(3) Bracket Covers
(5) Bottom
Rail Cap
(6) Tie Downs
(7) Bottom Rail
(8) Shade
(9) Idle End
Unit
(10) Idle End Plug
(11) Aluminum Tube
(2) Clutch Plug
(1) Clutch Unit
(4) Chain
(3) Bracket Covers
(5) Bottom
Rail Cap
(7) Bottom Rail
(8) Shade
(9) Idle End
Unit
(10) Idle End Plug
(11) Aluminum Tube
(2) Clutch Plug
(1) Clutch Unit
(4) Wand
(3) Bracket Covers
(5) Bottom
Rail Cap
(7) Bottom Rail
(8) Shade
(9) Idle End
Unit
(10) Idle End Plug
(11) Aluminum Tube
(2) Clutch Plug
(1) Clutch Unit
(3) Wand
(4) Bottom
Rail Cap
(6) Bottom Rail
(7) Shade
(8) Idle End
Unit
(9) Idle End Plug
(10) Aluminum Tube
(2) Clutch Plug
(1) Clutch Unit
(3) Wand
(4) Bottom
Rail Cap
(6) Bottom Rail
(1) Shade
(8) Idle
End
Unit
(9) Idle End Plug
(10) Aluminum Tube
(3) Bottom
Rail Cap
(5) Bottom Rail
(2) Wand
(1) Full Valance
(6) Receiver
Zone 1
Zone 2
Zone 3
Zone 1
Zone 2
Zone 3
(4) Bungee
(8) Brackets
Ó
fig. 1 fig. 2
fig. 3
Este lado va en la
superficie de instalación
INSTALACIÓN DE LOS SOPORTES DE CONEXIÓN RÁPIDA Y LA PERSIANA PARASOL
IMPORTANTE: Los tornillos incluidos en el kit de accesorios son para uso con madera
solamente. Llame a Servicio al cliente (1-800-560-4667) para obtener recomendaciones
de instalación si va a instalar la persiana parasol sobre cualquier otro material.
a. En los lugares deseados, fije los soportes de conexión rápida (fig. 4) con tornillos al
travesaño de madera.
b. Instale la persiana encajando la unidad de forma segura.
Persiana Parasol
Área
Área
Área
/