© by Gale Pacific Limited. All rights reserved. Coolaroo® is a registered trademark of Gale Pacific Limited.
To prevent damage, roll up your sun shade when not in use, or before strong storms.
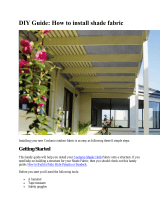
RAISING AND LOWERING THE SHADE
Having successfully followed the steps above, your shade should be in the retracted position
(rolled up) and ready to use.
To lower the shade, place one hand in the center of the bottom rail and pull down to your
desired height.
To raise the shade, place one hand in the center of the bottom rail and gently pull down on the
shade. To stop the shade in your desired position, gently down on the bottom rail and the shade
will lock into place. (Fig. 7)
TENSION ADJUSTMENT
If the shade is not retracting to your desired speed use the steps below to
increase or decrease as needed.
A. To increase the tension on the spring, turn the tensioning wheel
component 1-2 full rotations (counterclockwise) on the right side
of the shade. (Fig. 8)
B. To decrease the tension on the spring, turn the tensioning wheel
component 1-2 full rotations (clockwise) on the right side of the
shade. (Fig. 8)
Questions or Comments? Contact us at:
Gale Pacific USA, Inc. | www.coolaroousa.com | 1-800-560-4667
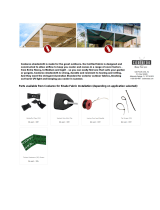
MAINTENANCE: Your sun shade has been made of the finest materials and, when properly cared
for, will provide years of shade and privacy. To clean your shade, simply rinse with water, scrub with
mild soap or any nonabrasive cleaner, rinse and allow to dry. Call us for missing parts or mechanical
problems. Do not store shade wet. In moist areas, roll shade down frequently to air dry.
CAUTION: Use of solvents or abrasive cleaners may damage the fabric and will void your warranty.
Do not use bleach or chlorine.
3
4
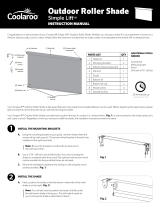
B. Insert the right side of the roller shade first. (Fig. 3)
C. Install the left side of the shade by sliding the idle end into the mounting bracket. (Fig. 4)
D. Once the roller shade is installed, remove the tape from the tension wheel component.
(Fig. 5)
E. Pull down the shade until the red tensioning brake is completely removed. (Fig. 6)
Fig.3
Register and Order
Replacement Parts Online:
www.coolaroousa.com
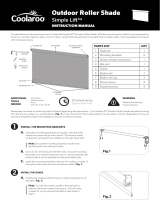
5.04.004.270
Fig.4
Fig.5
Fig.8
Fig.6
ADDITIONAL
TENSIONING
MAY BE
REQUIRED AFTER
INSTALLATION
Fig.7