Page is loading ...

Easy Release
with Full Valance
10-minute set up
(approximate time)
(3) Bracket Covers
(6) Tie Downs
(7) Bottom Rail
(8) Shade
(9) Idle End
Unit
(10) Idle End Plug
(11) Aluminum Tube
(3) Bracket Covers
(7) Bottom Rail
(8) Shade
(9) Idle End
Unit
(10) Idle End Plug
(11) Aluminum Tube
(4) Wand
(3) Bracket Covers
(5) Bottom
Rail Cap
(7) Bottom Rail
(8) Shade
(9) Idle End
Unit
(10) Idle End Plug
(11) Aluminum Tube
(3) Wand
(4) Bottom
Rail Cap
(6) Bottom Rail
(7) Shade
(8) Idle End
Unit
(9) Idle End Plug
(10) Aluminum Tube
(2) Clutch Plug
(3) Wand
(4) Bottom
Rail Cap
(6) Bottom Rail
(1) Shade
(8) Idle End
Unit
(9) Idle End Plug
(10) Aluminum Tube
(2) Bottom
Rail Caps
with rings
(4) Bottom Rail
(1) Full Valance
(5) Receiver
(3) Bungee
(6) Wood
Screws
(7) Brackets
(9) Tension
adjustment
tool
(10) sola panel
(11) mounting
bracket
(12) solar panel clip
(13) screw
(14) nut screw
(8) Anchors
(1) Clutch Unit
(2) Clutch Plug
(1) Clutch Unit
(4) Chain
(5) Bottom
Rail Cap
(2) Clutch Plug
(1) Clutch Unit
(2) Clutch Plug
(1) Clutch Unit
(2) Clutch Plug
(1) Clutch Unit
(4) Chain
(5) Bottom
Rail Cap
(3) Bracket Covers
(6) Tie Downs
(7) Bottom Rail
(8) Shade
(9) Idle End
Unit
(10) Idle End Plug
(11) Aluminum Tube
(3) Bracket Covers
(7) Bottom Rail
(8) Shade
(9) Idle End
Unit
(10) Idle End Plug
(11) Aluminum Tube
(4) Wand
(3) Bracket Covers
(5) Bottom
Rail Cap
(7) Bottom Rail
(8) Shade
(9) Idle End
Unit
(10) Idle End Plug
(11) Aluminum Tube
(3) Wand
(4) Bottom
Rail Cap
(6) Bottom Rail
(7) Shade
(8) Idle End
Unit
(9) Idle End Plug
(10) Aluminum Tube
(2) Clutch Plug
(3) Wand
(4) Bottom
Rail Cap
(6) Bottom Rail
(1) Shade
(8) Idle End
Unit
(9) Idle End Plug
(10) Aluminum Tube
(2) Bottom
Rail Caps
with rings
(4) Bottom Rail
(1) Full Valance
(5) Receiver
(3) Bungee
(6) Wood
Screws
(7) Brackets
(9) Tension
adjustment
tool
(10) sola panel
(11) mounting
bracket
(12) solar panel clip
(13) screw
(14) nut screw
(8) Anchors
(1) Clutch Unit
(2) Clutch Plug
(1) Clutch Unit
(4) Chain
(5) Bottom
Rail Cap
(2) Clutch Plug
(1) Clutch Unit
(2) Clutch Plug
(1) Clutch Unit
(2) Clutch Plug
(1) Clutch Unit
(4) Chain
(5) Bottom
Rail Cap
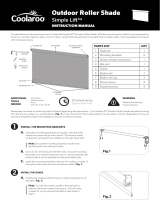
Outdoor Roller Shade
INSTALLATION
INSTRUCTIONS
DETERMINE DESIRED MOUNTING METHOD
This two-in-one valance design allows you to easily mount the sun shade to either a
ceiling (Fig. 1) or a wall (Fig. 2).
For ease and flexibility in mounting divide your shade into three even zones, the three
quick-connect brackets can be positioned anywhere inside each of these three zones.
Be sure to keep each of the three brackets inside these zones for proper balance and
weight distribution of the valance.
WARNING: If you do not ensure the quick mount brackets are positioned
with the release button in the correct direction (Fig. 4 and Fig. 5), removing
the shade may be difficult. The brackets must be positioned and installed level
to ensure the shade hangs level and functions properly.
OR
Fig. 1 Fig. 2
Fig. 4
Fig. 5
NOTE: If installing to a ceiling (Fig. 4) ensure the tab on
the bracket facing towards you. If installing to a wall (Fig. 5)
ensure that the tab on the bracket is facing downward.
Allow at least 5.08 cm (2 in) of clearance between the
bracket and wall or ceiling to allow space to snap shade
onto bracket.
If brackets are installed upside down or backwards, the
blind WILL NOT FIT.
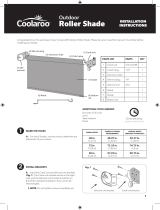
ADDITIONAL TOOLS NEEDED
Drill with 3/16 in bit
Level
Tape Measure
Pencil
Tabs forward
Ceiling mount
Wall mount
Tabs downward
PARTS LIST PARTS QTY
1 Full valance 1
2 Bottom rail caps with rings 11-BRC 2
3 Bungee 11-BUNGEE TD 2
4 Bottom rail 1
5 Receiver 1-RECEIVER 2
6 Wood Screws 4-WS 10
7 Brackets Z-14-FCIBW 3
8 Anchors 10
9 Tension adjustment tool 1
INSTALL QUICK CONNECT BRACKETS AND SUN SHADE
IMPORTANT: The screws included in your hardware kit are for use with
wood only. Call Customer Service (1-800-560-4667) for mounting
recommendations when attaching your shade to any other material.
A. In the desired locations, attach Quick Connect Brackets (Fig. 3) with screws,
into wooden stud.
B. Install the Shade by snapping the unit securely into place.
Fig. 3
This side goes on
mounting surface
2
(3) Bracket Covers
(6) Tie Downs
(7) Bottom Rail
(8) Shade
(9) Idle End
Unit
(10) Idle End Plug
(11) Aluminum Tube
(3) Bracket Covers
(7) Bottom Rail
(8) Shade
(9) Idle End
Unit
(10) Idle End Plug
(11) Aluminum Tube
(4) Wand
(3) Bracket Covers
(5) Bottom
Rail Cap
(7) Bottom Rail
(8) Shade
(9) Idle End
Unit
(10) Idle End Plug
(11) Aluminum Tube
(3) Wand
(4) Bottom
Rail Cap
(6) Bottom Rail
(7) Shade
(8) Idle End
Unit
(9) Idle End Plug
(10) Aluminum Tube
(2) Clutch Plug
(3) Wand
(4) Bottom
Rail Cap
(6) Bottom Rail
(1) Shade
(8) Idle End
Unit
(9) Idle End Plug
(10) Aluminum Tube
(2) Bottom
Rail Caps
with rings
(4) Bottom Rail
(1) Full Valance
(5) Receiver
(3) Bungee
(6) Wood
Screws
(7) Brackets
(9) Tension
adjustment
tool
(10) sola panel
(11) mounting
bracket
(12) solar panel clip
(13) screw
(14) nut screw
(8) Anchors
(1) Clutch Unit
(2) Clutch Plug
(1) Clutch Unit
(4) Chain
(5) Bottom
Rail Cap
(2) Clutch Plug
(1) Clutch Unit
(2) Clutch Plug
(1) Clutch Unit
(2) Clutch Plug
(1) Clutch Unit
(4) Chain
(5) Bottom
Rail Cap
1

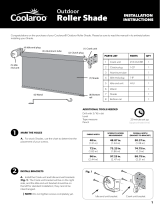
INSTALL TIE DOWNS (optional)
Tie downs have been provided to secure your sun shade in mild to moderate
wind conditions.
A. Thread the bungee through the end cap ring and back through itself
making a lark’s head knot. (Fig.6)
B. Install the receiver (Fig. 7) approximately 13 cm (5 in) below where the
shade will stop, to allow for proper tension of bungee cord.
C. Attach bungee to receiver to secure shade.
NOTE: Wood screws have been provided. If installing into any
material other than wood, additional screws may be needed.
TOP POSITION
If your shades top position needs to be higher/lower please follow the following
steps.
A. To lower the top position, use the adjustment tool provided and turn the
spring loaded system 1 – 2 full rotations (counterclockwise) on the left of the
shade. (Fig. 9)
B. To raise the top position, use the adjustment tool provided and turn the
spring loaded system 1 – 2 full rotations (clockwise) on the left of the shade. (Fig. 9)
TENSION ADJUSTMENT (SPEED ADJUSTMENT)
If your shades retraction speed needs increased/decreased please follow the
following steps.
A. To increase the tension on the spring, use the tension adjustment tool
provided and turn the spring loaded system 1 – 2 full rotations (counterclockwise)
on the right of the shade. (Fig. 8)
B. To decrease tension on the spring, use the tension adjustment tool and turn
the spring loaded system 1 – 2 rotations on the right of the shade clockwise. (Fig. 8)
RAISING AND LOWERING THE SHADE
A. Having successfully followed the steps above, your shade should be in the
retracted position (rolled up) and ready to use.
B. To lower the shade, place one hand in the center of the bottom rail and pull
down to any desired height.
C. To raise the shade, place one hand in the center of the bottom rail and pull
down slightly. The shade will automatically retract to the original position.
Fig. 6
Fig. 7
© by Gale Pacific Limited. All rights reserved. Coolaroo® is a registered trademark of Gale Pacific Limited.
Questions or Comments? Contact us at:
Gale Pacific USA, Inc. | www.coolaroousa.com | 1-800-560-4667
MAINTENANCE: Your sun shade has been made of the finest materials and, when properly cared
for, will provide years of shade and privacy. To clean your shade, simply rinse with water, scrub with
mild soap or any nonabrasive cleaner, rinse and allow to dry. Call us for missing parts or mechanical
problems. Do not store shade wet. In moist areas, roll shade down frequently to air dry.
CAUTION: Use of solvents or abrasive cleaners may damage the fabric and will void your warranty.
Do not use bleach or chlorine.
Register and Order
Replacement Parts Online:
www.coolaroousa.com
Retract your roller shade when not in use, or before strong storms, to prevent damage.
5.04.004.267
Fig. 8
Fig. 9
3
4
5
6

Dégagement rapide
avec la cantonnière
(3) Bracket Covers
(6) Tie Downs
(7) Bottom Rail
(8) Shade
(9) Idle End
Unit
(10) Idle End Plug
(11) Aluminum Tube
(3) Bracket Covers
(7) Bottom Rail
(8) Shade
(9) Idle End
Unit
(10) Idle End Plug
(11) Aluminum Tube
(4) Wand
(3) Bracket Covers
(5) Bottom
Rail Cap
(7) Bottom Rail
(8) Shade
(9) Idle End
Unit
(10) Idle End Plug
(11) Aluminum Tube
(3) Wand
(4) Bottom
Rail Cap
(6) Bottom Rail
(7) Shade
(8) Idle End
Unit
(9) Idle End Plug
(10) Aluminum Tube
(2) Clutch Plug
(3) Wand
(4) Bottom
Rail Cap
(6) Bottom Rail
(1) Shade
(8) Idle End
Unit
(9) Idle End Plug
(10) Aluminum Tube
(2) Bottom
Rail Caps
with rings
(4) Bottom Rail
(1) Full Valance
(5) Receiver
(3) Bungee
(6) Wood
Screws
(7) Brackets
(9) Tension
adjustment
tool
(10) sola panel
(11) mounting
bracket
(12) solar panel clip
(13) screw
(14) nut screw
(8) Anchors
(1) Clutch Unit
(2) Clutch Plug
(1) Clutch Unit
(4) Chain
(5) Bottom
Rail Cap
(2) Clutch Plug
(1) Clutch Unit
(2) Clutch Plug
(1) Clutch Unit
(2) Clutch Plug
(1) Clutch Unit
(4) Chain
(5) Bottom
Rail Cap
(3) Bracket Covers
(6) Tie Downs
(7) Bottom Rail
(8) Shade
(9) Idle End
Unit
(10) Idle End Plug
(11) Aluminum Tube
(3) Bracket Covers
(7) Bottom Rail
(8) Shade
(9) Idle End
Unit
(10) Idle End Plug
(11) Aluminum Tube
(4) Wand
(3) Bracket Covers
(5) Bottom
Rail Cap
(7) Bottom Rail
(8) Shade
(9) Idle End
Unit
(10) Idle End Plug
(11) Aluminum Tube
(3) Wand
(4) Bottom
Rail Cap
(6) Bottom Rail
(7) Shade
(8) Idle End
Unit
(9) Idle End Plug
(10) Aluminum Tube
(2) Clutch Plug
(3) Wand
(4) Bottom
Rail Cap
(6) Bottom Rail
(1) Shade
(8) Idle End
Unit
(9) Idle End Plug
(10) Aluminum Tube
(2) Bottom
Rail Caps
with rings
(4) Bottom Rail
(1) Full Valance
(5) Receiver
(3) Bungee
(6) Wood
Screws
(7) Brackets
(9) Tension
adjustment
tool
(10) sola panel
(11) mounting
bracket
(12) solar panel clip
(13) screw
(14) nut screw
(8) Anchors
(1) Clutch Unit
(2) Clutch Plug
(1) Clutch Unit
(4) Chain
(5) Bottom
Rail Cap
(2) Clutch Plug
(1) Clutch Unit
(2) Clutch Plug
(1) Clutch Unit
(2) Clutch Plug
(1) Clutch Unit
(4) Chain
(5) Bottom
Rail Cap
Store à enroulement
automatique d’extérieur
INSTRUCTIONS
POUR L’INSTALLATION
CHOIX DE LA MÉTHODE D’INSTALLATION DÉSIRÉE
Ce concept de cantonnière deux en un vous permet de fixer facilement le store pare-
soleil au plafond (Fig. 1) ou au mur (Fig. 2).
Pour profiter d’une simplicité et d’une flexibilité de montage supérieures, divisez
votre store en trois zones égales.
Vous pouvez placer les supports à assemblage rapide n’importe où dans chacune de
ces trois zones. Assurez-vous de garder chacun des trois supports à l’intérieur de ces
zones pour garantir la répartition du poids et l’équilibre adéquats de la cantonnière.
AVERTISSEMENT: Si vous ne vous assurez pas que les supports à assemblage
rapide sont positionnés dans le bon sens par rapport au bouton de dégagement
(Fig. 4 et Fig. 5), le store pourrait être difficile à retirer. Vous devez positionner
et installer les supports de niveau afin que le store soit lui aussi de niveau et qu’il
fonctionne correctement.
OR
Fig. 1 Fig. 2
Fig. 4
Fig. 5
Languettes vers l’avant
Installation au plafond
Installation murale
Languettes vers le bas
PARTS LIST PARTS QTY
1 Cantonnière 1
2 Embout de traverse inférieure 11-BRC 2
3 Tendeur 11-BUNGEE TD
2
4 Traverse inférieure 1
5 Récepteur 1-RECEIVER 2
6 Vis à bois 4-WS 10
7 Support Z-14-FCIBW 3
8 Cheville d’ancrage 10
9 Outil de réglage de la tension 1
INSTALLATION DES SUPPORTS À ASSEMBLAGE RAPIDE ET DU STORE
PARE-SOLEIL
IMPORTANT: Vous ne pouvez visser les vis incluses dans votre trousse de
quincaillerie que dans du bois. Si vous désirez fixer le store à tout autre matériau,
communiquez avec le service à la clientèle (1 800 560-4667) pour obtenir des
recommandations d’installation.
A. Aux endroits désirés, fixez les supports à assemblage rapide (Fig. 3) dans
le montant de bois à l’aide de vis.
B. Installez le store en enclenchant l’unité solidement en place.
Fig. 3
Ce côté doit
être orienté vers
la surface de
montage.
2
OUTILSSUPPLÉMENTAIRES
NÉCESSAIRES
Perceuse et foret de 3/16 po
Niveau
Ruban à mesurer
Crayon
Installé en 10 minutes
(temps approximatif)
REMARQUE: En cas d’installation au plafond (Fig. 4), assurez-vous que la
languette du support est orientée vers vous.En cas d’installation sur un mur
(Fig. 5), assurez-vous que la languette du support est orientée vers le bas.
Laissez un écart d’au moins 5,08 cm (2 po) entre le support et le mur ou le
plafond afin d’avoir suffisamment d’espace pour fixer le store au support.
Si vous installez les supports à l’envers, le store NE S’ENCLENCHERA PAS.
(2) Clutch Plug
(1) Clutch Unit
(4) Chain
(3) Bracket Covers
(5) Bottom
Rail Cap
(6) Tie Downs
(7) Bottom Rail
(8) Shade
(9) Idle End
Unit
(10) Idle End Plug
(11) Aluminum Tube
(2) Clutch Plug
(1) Clutch Unit
(4) Chain
(3) Bracket Covers
(5) Bottom
Rail Cap
(7) Bottom Rail
(8) Shade
(9) Idle End
Unit
(10) Idle End Plug
(11) Aluminum Tube
(2) Clutch Plug
(1) Clutch Unit
(4) Wand
(3) Bracket Covers
(5) Bottom
Rail Cap
(7) Bottom Rail
(8) Shade
(9) Idle End
Unit
(10) Idle End Plug
(11) Aluminum Tube
(2) Clutch Plug
(1) Clutch Unit
(3) Wand
(4) Bottom
Rail Cap
(6) Bottom Rail
(7) Shade
(8) Idle End
Unit
(9) Idle End Plug
(10) Aluminum Tube
(2) Clutch Plug
(1) Clutch Unit
(3) Wand
(4) Bottom
Rail Cap
(6) Bottom Rail
(1) Store
(8) Idle End
Unit
(9) Idle End Plug
(10) Aluminum Tube
(2) Embout
de traverse
inférieure
(4) Traverse
inférieure
(1) Cantonnière
(5) Récepteur
(3) Tendeur
(6) Vis à bois
(7) Support
(9) Outil de
réglage de la
tension
(10) sola panel
(11) mounting
bracket
(12) solar panel clip
(13) screw
(14) nut screw
(8) Cheville
d’ancrage
1

Liberación fácil
con Cenefa Completa
Configuración de
10 minutos
(tiempo aproximado)
(3) Bracket Covers
(6) Tie Downs
(7) Bottom Rail
(8) Shade
(9) Idle End
Unit
(10) Idle End Plug
(11) Aluminum Tube
(3) Bracket Covers
(7) Bottom Rail
(8) Shade
(9) Idle End
Unit
(10) Idle End Plug
(11) Aluminum Tube
(4) Wand
(3) Bracket Covers
(5) Bottom
Rail Cap
(7) Bottom Rail
(8) Shade
(9) Idle End
Unit
(10) Idle End Plug
(11) Aluminum Tube
(3) Wand
(4) Bottom
Rail Cap
(6) Bottom Rail
(7) Shade
(8) Idle End
Unit
(9) Idle End Plug
(10) Aluminum Tube
(2) Clutch Plug
(3) Wand
(4) Bottom
Rail Cap
(6) Bottom Rail
(1) Shade
(8) Idle End
Unit
(9) Idle End Plug
(10) Aluminum Tube
(2) Bottom
Rail Caps
with rings
(4) Bottom Rail
(1) Full Valance
(5) Receiver
(3) Bungee
(6) Wood
Screws
(7) Brackets
(9) Tension
adjustment
tool
(10) sola panel
(11) mounting
bracket
(12) solar panel clip
(13) screw
(14) nut screw
(8) Anchors
(1) Clutch Unit
(2) Clutch Plug
(1) Clutch Unit
(4) Chain
(5) Bottom
Rail Cap
(2) Clutch Plug
(1) Clutch Unit
(2) Clutch Plug
(1) Clutch Unit
(2) Clutch Plug
(1) Clutch Unit
(4) Chain
(5) Bottom
Rail Cap
(3) Bracket Covers
(6) Tie Downs
(7) Bottom Rail
(8) Shade
(9) Idle End
Unit
(10) Idle End Plug
(11) Aluminum Tube
(3) Bracket Covers
(7) Bottom Rail
(8) Shade
(9) Idle End
Unit
(10) Idle End Plug
(11) Aluminum Tube
(4) Wand
(3) Bracket Covers
(5) Bottom
Rail Cap
(7) Bottom Rail
(8) Shade
(9) Idle End
Unit
(10) Idle End Plug
(11) Aluminum Tube
(3) Wand
(4) Bottom
Rail Cap
(6) Bottom Rail
(7) Shade
(8) Idle End
Unit
(9) Idle End Plug
(10) Aluminum Tube
(2) Clutch Plug
(3) Wand
(4) Bottom
Rail Cap
(6) Bottom Rail
(1) Shade
(8) Idle End
Unit
(9) Idle End Plug
(10) Aluminum Tube
(2) Bottom
Rail Caps
with rings
(4) Bottom Rail
(1) Full Valance
(5) Receiver
(3) Bungee
(6) Wood
Screws
(7) Brackets
(9) Tension
adjustment
tool
(10) sola panel
(11) mounting
bracket
(12) solar panel clip
(13) screw
(14) nut screw
(8) Anchors
(1) Clutch Unit
(2) Clutch Plug
(1) Clutch Unit
(4) Chain
(5) Bottom
Rail Cap
(2) Clutch Plug
(1) Clutch Unit
(2) Clutch Plug
(1) Clutch Unit
(2) Clutch Plug
(1) Clutch Unit
(4) Chain
(5) Bottom
Rail Cap
Persiana en rollo para exteriores
INSTRUCCIONES DE
INSTALACIÓN
DETERMINE EL MÉTODO DE INSTALACIÓN DESEADO
Este diseño de cenefa dos en uno le permite montar fácilmente un parasol ya sea en
un techo (Fig. 1) o en una pared (Fig. 2).
Para facilitar y flexibilizar el montaje, divida la persiana en tres zonas uniformes, las tres
abrazaderas de conexión rápida se pueden ubicar en cualquier lugar en el interior
de cada una de estas tres zonas. Asegúrese de mantener cada una de estas tres
abrazaderas en el interior de las zonas para obtener un equilibrio y una distribución
del peso adecuados para la cenefa.
ADVERTENCIA: Si no se asegura de que las abrazaderas de conexión rápida
estén ubicadas con el botón de liberación en la dirección correcta (Fig. 4 y
Fig. 5), podría ser difícil retirar la persiana. Las abrazaderas se deben ubicar e
instalar de manera nivelada para garantizar que la persiana cuelgue de manera
nivelada y funcione adecuadamente.
OR
Fig. 1 Fig. 2
Fig. 4
Fig. 5
NOTA: si va a realizar la instalación en un techo (Fig. 4)
asegúrese de que la lengüeta en la abrazadera esté orientada
hacia usted. Si va a realizar la instalación en una pared (Fig. 5)
asegúrese de que la lengüeta en la abrazadera esté orientada
hacia abajo. Deje al menos 5,08 cm (2 pulg.) de separación
entre la abrazadera y la pared o el techo para dejar espacio
para empalmar la persiana en la abrazadera.
Si las abrazaderas se instalan de manera invertida o al revés,
la persiana NO ENCAJARÁ
HERRAMIENTAS ADICIONALES
NECESARIAS
Taladro con broca de 3/16 pulg
Nivel
Cinta métrica
Lápiz
Lengüetas hacia adelante
Montaje en el techo
Montaje en pared
Lengüetas hacia abajo
PARTS LIST PARTS QTY
1 Cenefa completa 1
2 Tapas de riel inferior 11-BRC 2
3 Elástico 11-BUNGEE TD
2
4 Riel inferior 1
5 Receptor 1-RECEIVER 2
6 Tornillos para madera 4-WS 10
7 Abrazaderas Z-14-FCIBW 3
8 Anclas de expansión 10
9 Herramienta de ajuste de tensión 1
INSTALE LAS ABRAZADERAS DE CONEXIÓN RÁPIDA Y EL PARASOL
IMPORTANTE: los tornillos incluidos en el kit de aditamentos solo deben
utilizarse en madera. Llame al Departamento de Servicio al Cliente (1-800-
560-4667) para conocer recomendaciones de instalación cuando fije la
persiana en cualquier otro material.
A. Fije las abrazaderas de conexión rápida (Fig. 3) en una viga de madera con tornillos
en las ubicaciones deseadas.
B. Instale la persiana colocando la unidad a presión en su lugar de manera segura.
Fig. 3
Este lado va en
la superficie de
montaje.
2
(4) Chain
(3) Bracket Covers
(5) Bottom
Rail Cap
(6) Tie Downs
(7) Bottom Rail
(8) Shade
(9) Idle End
Unit
(10) Idle End Plug
(11) Aluminum Tube
(2) Clutch Plug
(1) Clutch Unit
(4) Chain
(3) Bracket Covers
(5) Bottom
Rail Cap
(7) Bottom Rail
(8) Shade
(9) Idle End
Unit
(10) Idle End Plug
(11) Aluminum Tube
(1) Clutch Unit
(4) Wand
(3) Bracket Covers
(5) Bottom
Rail Cap
(7) Bottom Rail
(8) Shade
(9) Idle End
Unit
(10) Idle End Plug
(11) Aluminum Tube
(3) Wand
(4) Bottom
Rail Cap
(6) Bottom Rail
(7) Shade
(8) Idle End
Unit
(9) Idle End Plug
(10) Aluminum Tube
(2) Clutch Plug
(1) Clutch Unit
(4) Bottom
Rail Cap
(6) Bottom Rail
(1) Persiana
(8) Idle End
Unit
(9) Idle End Plug
(10) Aluminum Tube
(2) Tapas de
riel inferior
(4) Riel inferior
(5) Receptor
(3) Elástico
(6) Tornillos para
madera
(7) Abrazaderas
(9) Herramienta
de ajuste de
tensión
(10) sola panel
(11) mounting
bracket
(12) solar panel clip
(13) screw
(14) nut screw
(8) Anclas de
expansión
(3) Wand
(2) Clutch Plug
(2) Clutch Plug
(1) Clutch Unit
(2) Clutch Plug
(1) Clutch Unit
(1) Cenefa completa
1
/