
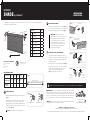
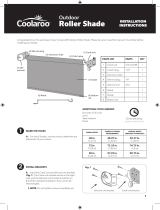
INSTALL BRACKETS
A. Identify the Bracket-to-Bracket position of your Shade
(Fig. 1).
B. Use the the center of the screw holes to allow for
movement if necessary to provide a snug fit. Crank
unit bracket will be on the right side, and the Idle end
unit bracket should be on the le side; they cannot be
interchanged (Fig. 2).
INSTALLATION
INSTRUCTIONS
SHADE
EXTERIOR
by Coolaroo®
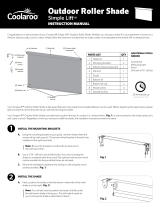
Congratulations on the purchase of your Exterior Shade by Coolaroo
®
. Please be sure to read the manual in its
entirety before installing your Shade.
ADDITIONAL TOOLS NEEDED
Drill with 3/16 in. bit
Level
Tape measure
Pencil
PARTS LIST QTY
1 Crank unit 1
2 Crank plug 1
3 Headrail 1
4 Idle end plug 1
5 Idle end unit 1
6 Wand 1
7 Shade 1
8 Bottom rail 1
(2) Crank plug
(1) Crank unit
(8) Bottom
rail
(6) Wand
(7) Shade
(5) Idle
end unit
(4) Idle end plug
(3) Headrail
20 minute set up
(approximate time)
1
Fig. 2
Idle end unit bracket
Crank unit bracket
PRODUCT WIDTH
36 in.
(91 cm)
48 in.
(122 cm)
60 in.
(152 cm)
72 in.
(183 cm)
96 in.
(244 cm)
MATERIAL WIDTH
33 in.
(84 cm)
45 in.
(114 cm)
57 in.
(145 cm)
69 in.
(175 cm)
93 in.
(236 cm)
OVERALL WIDTH
BRACKET-TO-
BRACKET
36 in.
(91 cm)
48 in.
(122 cm)
60 in.
(152 cm)
72 in.
(183 cm)
96 in.
(244 cm)
Fig. 1
Bracket-to-Bracket
Order replacement
parts online:
www.coolaroousa.com
Snap Idle end plug
into Idle end unit
Fig. 4
© by GALE Pacific Limited. All rights reserved. Coolaroo
®
is a registered trademark of GALE Pacific Limited.
Questions or Comments? Contact us at:
GALE Pacific USA | www.coolaroousa.com | 1-800-560-4667
MAINTENANCE: Your exterior Shade has been made of the finest materials
and, when properly cared for, will provide years of shade and privacy. To clean
your Shade, simply rinse with water, scrub with mild soap or any nonabrasive
cleaner, rinse and allow to dry. Call us for missing parts or mechanical problems.
Do not store Shade wet. In moist areas, roll Shade down frequently to air dry.
CAUTION: Use of solvents or abrasive cleaners may damage the fabric and will
void your warranty. Do not use bleach or chlorine.
Retract your exterior shade when not in use, or before strong storms, to prevent damage.
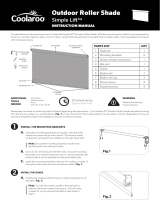
CHANGE TO A TOP CEILING MOUNT
If you want your Shade to hang from the top (for
example, the ceiling), you will need to make a simple
change to your Crank unit and Idle end unit before
you install your Shade.
A. Remove the two screws from both brackets (Fig. 5).
B. Turn the Crank unit 90° so the crank eyelet hangs
straight down. Now turn the Idle end unit so the
opening is facing away from the window
(Fig. 6), then put the screws back in.
Remove screws
Fig. 5
Rotate
Crank
unit 90°
Rotate
Idle end
unit 90°
Fig. 6
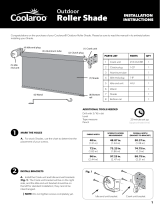
Crank plug
Fig. 3
IMPORTANT: With the shade in place
adjust the brackets so they provide a snug
fit. Now go back and tighten the bracket
screws completely. The screws included
in your hardware kit are for use with
wood only. See your retailer for mounting
recommendations when attaching your
Shade to any other material.
MEASUREMENT GUIDE
NOTE: Do not tighten screws completely yet.
ATTACHING THE SHADE
A. Insert the Crank plug into the Crank unit (Fig. 3).
Then insert the Idle end plug into the Idle end unit and
snap the Idle end plug securely into place (Fig. 4).
2

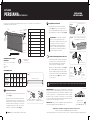
INSTALE LOS SOPORTES
A. Identifique la posición de soporte a soporte de su
persiana (Fig. 1).
B. Utilize el centro de los orificios para tornillos para
permitir el movimiento si es necesario y proporcionar
un ajuste perfecto. Al instalar, el soporte de la Unidad
de manivela estará en el lado derecho, y el soporte de
la Unidad del extremo inactivo debe estar en el lado
izquierdo; no se pueden intercambiar (Fig. 2).
LISTA DE PIEZAS CANT.
1 Unidad de manivela 1
2 Tapón de manivela 1
3 Cortinero 1
4 Tapón terminal inactivo 1
5 Unidad del extremo inactivo 1
6 Vara 1
7 Persiana 1
8 Riel inferior 1
Configuración de
20 minutos
(tiempo aproximado)
(2) Tapón
de manivela
(1) Unidad de
manivela
(8) Riel
inferior
(6) Vara
(7) Persiana
(5) Unidad
del extremo
inactivo
(4) Tapón terminal
inactivo
(3) Cortinero
Felicitaciones por la compra de su persiana para exteriores de Coolaroo
®
. Asegúrese de leer el manual en su
totalidad antes de instalar su persiana.
Fig. 2
Soporte de la Unidad
del extremo inactivo
Soporte de la
Unidad de manivela
HERRAMIENTAS ADICIONALES
NECESARIAS
Taladro con broca de 3/16 pulg
Nivel
Cinta métrica
Lápiz
1
INSTALACIÓN
INSTRUCCIONES
PERSIANA
EXTERIOR
de Coolaroo
®
ANCHO DEL
PRODUCTO
36 pulg.
(91 cm)
48 pulg.
(122 cm)
60 pulg.
(152 cm)
72 pulg.
(183 cm)
96 pulg.
(244 cm)
ANCHO DEL
MATERIAL
33
pulg.
(84 cm)
45 pulg.
(114 cm)
57 pulg.
(145 cm)
69 pulg.
(175 cm)
93 pulg.
(236 cm)
ANCHO TOTAL
DE SOPORTE A
SOPORTE
36 pulg.
(91 cm)
48 pulg.
(122 cm)
60 pulg.
(152 cm)
72 pulg.
(183 cm)
96 pulg.
(244 cm)
Fig. 1
De soporte a soporte
Presione el Tapón terminal inactivo
en la Unidad del extremo inactivo
Fig. 4
Solicite piezas de
repuesto en línea:
www.coolaroousa.com
MANTENIMIENTO: La persiana exterior está fabricada con los materiales
más finos y, cuando se cuida adecuadamente, proporciona años de sombra
y privacidad. Para limpiar la persiana, simplemente enjuáguela con agua,
cepíllela con jabón suave o con cualquier limpiador no abrasivo, enjuague
nuevamente y deje secar. Llámenos si faltan piezas o si tiene problemas
mecánicos. No almacene la persiana húmeda. En zonas húmedas, desenrolle
la persiana con frecuencia para que se seque al aire.
PRECAUCIÓN: El uso de solventes o limpiadores abrasivos puede dañar la
tela y anulará la garantía. No utilice blanqueador ni cloro.
Retraiga la persiana exterior cuando no la utilice o antes de tormentas intensas para evitar que se dañe.
¿Preguntas o comentarios? O póngase en contacto con nosotros en:
GALE Pacific USA | www.coolaroousa.com | 1-800-560-4667
© by GALE Pacific Limited. Todos los derechos reservados. Coolaroo
®
es una marca registrada de GALE Pacific Limited.
CAMBIE A UN MONTAJE SUPERIOR DE TECHO
Si desea que su persiana cuelgue de la parte superior
(por ejemplo, el techo), deberá realizar un cambio
simple en la unidad de manivela y la Unidad del
extremo inactivo antes de instalar su persiana.
A. Retire los dos tornillos de ambos soportes (Fig. 5).
B. Gire la Unidad de manivela 90° para que el ojal
del Tapón cuelgue hacia abajo. Ahora gire la Unidad
del extremo inactivo de manera que la abertura quede
hacia afuera de la ventana (Fig. 6), luego vuelva a
colocar los tornillos.
Fig. 5
Gire la
Unidad de
manivela
90°
Gire la
Unidad del
extremo
inactivo 90°
Fig. 6
Tapón de manivela
Fig. 3
IMPORTANTE: Con la persiana en su lugar,
ajuste los soportes para un ajuste ceñido.
Ahora regrese y apriete los tornillos del soporte
por completo. Los tornillos incluidos en el
kit de aditamentos solo deben utilizarse en
madera. Consulte al minorista para obtener
recomendaciones de montaje cuando fije la
persiana a cualquier otro material.
NOTA: No apriete completamente los tornillos todavía.
Retire los tornillos
5.04.004.270
ADJUNTANDO LA PERSIANA
A. Inserte el Tapón de manivela en la Unidad de
manivela (Fig. 3). Luego, inserte el Tapón terminal
inactivo en la Unidad del extremo inactivo y presione el
Tapón terminal inactivo con firmeza en su lugar (Fig. 4).
2
GUÍA DE MEDICIÓN
-
 1
1
-
 2
2


Ask a question and I''ll find the answer in the document
Finding information in a document is now easier with AI
in other languages
- español: Coolaroo 472764 Guía de instalación
Related papers
-
 Coolaroo shade fabric Operating instructions
-
Coolaroo 799870436049 User manual
-
 Coolaroo 462130 Installation guide
-
 Coolaroo 435967 User manual
-
 Coolaroo 457211 User manual
-
Coolaroo 462178 Installation guide
-
Coolaroo 458362 Installation guide
-
 Coolaroo 448912 Measurement Guide
-
 Coolaroo 454166 Installation guide
-
 Coolaroo 457181 Installation guide


Other documents
-
HOME basics WS14022D-3464 Installation guide
-
-
-
 SeaSun SS.7215 Installation guide
-
Home Decorators Collection 10793478858415 Installation guide
-
Keystone Choice Collection HDPE Fabric Installation guide
-
Allen + Roth 78749 Installation guide
-
Allen + Roth RPETBOWT280360 Installation guide
-
-
allen+roth 54795 User manual
