Page is loading ...

Revised 4 June 07
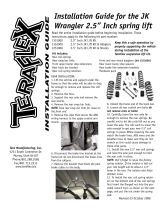
The angle bracket that is part of
the sway bar link hardware can be
installed under the body mount to
provide a “park” location for the sway
bar link when it is disconnected for
off-road use. The angle bracket is
assembled by putting the threaded
end of the smaller pin through the
small hole of the bracket and install-
ing the jam nut. Then remove the
factory body mount nut and install the
bracket on to the body mount stud
with the new nyloc nut. This pin is
used to “park” the sway bar link when
the link is disconnceted.
Installation Guide for the
JK Quick Disconnects
Part #001753010, 0-3” of lift
Part #001753000, 4-6” of lift
Tera Manufacturing, Inc.
5251 South Commerce Dr.
Murray, Utah 84107
Phone/801.288.2585
Fax/801.713.2313
www.teraex.biz
The front sway bar link
supplied in your kit may
be either a xed link or
an adjustable link. The
adjustable link must be set
tightened.
INSTALLATION GUIDE
Remove the factory sway bar link. Insert the sleeve into
the upper bushing. Put the at washer on the bolt, then
the bolt through the sleeve and then through the sway
bar. Install the stover nut and tighten.
The lower pin mounts through the factory link mount on
the axle, then slide the sway bar link into place, install
the large diameter at washer and the retaining clip.
Note: Factory offset wheels with larger tires
may rub on the QD link. Different off-set
wheels or wheel spacers will be required.
/