Page is loading ...

CXX-UM-01850-EN-01 (February 2018)
User Manual
Flow Computer
Model 4050

CXX-UM-01850-EN-01
Flow Computer, Model 4050
Page ii February 2018

CXX-UM-01850-EN-01
CONTENTS
Scope of This Manual . . . . . . . . . . . . . . . . . . . . . . . . . . . . . . . . . . . . . . . . . . . . . . . . . . . . . . . . . . . . . . . . . . . . 5
Typographic Conventions . . . . . . . . . . . . . . . . . . . . . . . . . . . . . . . . . . . . . . . . . . . . . . . . . . . . . . . . . . . . . . 5
Safety Considerations. . . . . . . . . . . . . . . . . . . . . . . . . . . . . . . . . . . . . . . . . . . . . . . . . . . . . . . . . . . . . . . . . . . .5
Terminology and Symbols . . . . . . . . . . . . . . . . . . . . . . . . . . . . . . . . . . . . . . . . . . . . . . . . . . . . . . . . . . . . . . 5
Safety Rules and Precautionary Measures . . . . . . . . . . . . . . . . . . . . . . . . . . . . . . . . . . . . . . . . . . . . . . . . . . . . . . . 5
Description . . . . . . . . . . . . . . . . . . . . . . . . . . . . . . . . . . . . . . . . . . . . . . . . . . . . . . . . . . . . . . . . . . . . . . . . . . 7
Optional Cards and Features . . . . . . . . . . . . . . . . . . . . . . . . . . . . . . . . . . . . . . . . . . . . . . . . . . . . . . . . . . . . 7
Installation. . . . . . . . . . . . . . . . . . . . . . . . . . . . . . . . . . . . . . . . . . . . . . . . . . . . . . . . . . . . . . . . . . . . . . . . . . .8
Wiring. . . . . . . . . . . . . . . . . . . . . . . . . . . . . . . . . . . . . . . . . . . . . . . . . . . . . . . . . . . . . . . . . . . . . . . . . . .8
Manifold . . . . . . . . . . . . . . . . . . . . . . . . . . . . . . . . . . . . . . . . . . . . . . . . . . . . . . . . . . . . . . . . . . . . . . . . . 9
Operating the Flow Computer . . . . . . . . . . . . . . . . . . . . . . . . . . . . . . . . . . . . . . . . . . . . . . . . . . . . . . . . . . . . . 10
Front Panel Keypad . . . . . . . . . . . . . . . . . . . . . . . . . . . . . . . . . . . . . . . . . . . . . . . . . . . . . . . . . . . . . . . . . 10
Remote Control. . . . . . . . . . . . . . . . . . . . . . . . . . . . . . . . . . . . . . . . . . . . . . . . . . . . . . . . . . . . . . . . . . . .11
Using the Remote Control or Front Panel Keypad . . . . . . . . . . . . . . . . . . . . . . . . . . . . . . . . . . . . . . . . . . . . . . 14
Manifold System . . . . . . . . . . . . . . . . . . . . . . . . . . . . . . . . . . . . . . . . . . . . . . . . . . . . . . . . . . . . . . . . . . . 14
Menu Flowchart . . . . . . . . . . . . . . . . . . . . . . . . . . . . . . . . . . . . . . . . . . . . . . . . . . . . . . . . . . . . . . . . . . . 15
Navigating the Menus . . . . . . . . . . . . . . . . . . . . . . . . . . . . . . . . . . . . . . . . . . . . . . . . . . . . . . . . . . . . . . . . . . 16
Primary Menu . . . . . . . . . . . . . . . . . . . . . . . . . . . . . . . . . . . . . . . . . . . . . . . . . . . . . . . . . . . . . . . . . . . . .16
Secondary Menu . . . . . . . . . . . . . . . . . . . . . . . . . . . . . . . . . . . . . . . . . . . . . . . . . . . . . . . . . . . . . . . . . . .16
Changing the Menu Option Names and Unit Labels . . . . . . . . . . . . . . . . . . . . . . . . . . . . . . . . . . . . . . . . . . . . 18
Programming Mode. . . . . . . . . . . . . . . . . . . . . . . . . . . . . . . . . . . . . . . . . . . . . . . . . . . . . . . . . . . . . . . . . . . .19
Enter Programming Mode . . . . . . . . . . . . . . . . . . . . . . . . . . . . . . . . . . . . . . . . . . . . . . . . . . . . . . . . . . . . . 19
Exit Programming Mode . . . . . . . . . . . . . . . . . . . . . . . . . . . . . . . . . . . . . . . . . . . . . . . . . . . . . . . . . . . . . . 19
Programming Mode Options . . . . . . . . . . . . . . . . . . . . . . . . . . . . . . . . . . . . . . . . . . . . . . . . . . . . . . . . . . . 19
Setup Auto/Manifold Auto-ranging Trip Points . . . . . . . . . . . . . . . . . . . . . . . . . . . . . . . . . . . . . . . . . . . . . . . .20
Setup Comms . . . . . . . . . . . . . . . . . . . . . . . . . . . . . . . . . . . . . . . . . . . . . . . . . . . . . . . . . . . . . . . . . . . . .20
Edit Curve . . . . . . . . . . . . . . . . . . . . . . . . . . . . . . . . . . . . . . . . . . . . . . . . . . . . . . . . . . . . . . . . . . . . . . . 21
Ch Setup . . . . . . . . . . . . . . . . . . . . . . . . . . . . . . . . . . . . . . . . . . . . . . . . . . . . . . . . . . . . . . . . . . . . . . . . 21
Clear Totals. . . . . . . . . . . . . . . . . . . . . . . . . . . . . . . . . . . . . . . . . . . . . . . . . . . . . . . . . . . . . . . . . . . . . . .22
Sort Curve . . . . . . . . . . . . . . . . . . . . . . . . . . . . . . . . . . . . . . . . . . . . . . . . . . . . . . . . . . . . . . . . . . . . . . . 22
Analog Inputs . . . . . . . . . . . . . . . . . . . . . . . . . . . . . . . . . . . . . . . . . . . . . . . . . . . . . . . . . . . . . . . . . . . . .22
Set Viscosity/Set SG . . . . . . . . . . . . . . . . . . . . . . . . . . . . . . . . . . . . . . . . . . . . . . . . . . . . . . . . . . . . . . . . . 22
Sort Vis/SG/Temp. . . . . . . . . . . . . . . . . . . . . . . . . . . . . . . . . . . . . . . . . . . . . . . . . . . . . . . . . . . . . . . . . . .23
Relays . . . . . . . . . . . . . . . . . . . . . . . . . . . . . . . . . . . . . . . . . . . . . . . . . . . . . . . . . . . . . . . . . . . . . . . . . . 23
User Manual
Page iii February 2018

CXX-UM-01850-EN-01
Cards Fitted . . . . . . . . . . . . . . . . . . . . . . . . . . . . . . . . . . . . . . . . . . . . . . . . . . . . . . . . . . . . . . . . . . . . . . 23
RS232/RS485 . . . . . . . . . . . . . . . . . . . . . . . . . . . . . . . . . . . . . . . . . . . . . . . . . . . . . . . . . . . . . . . . . . . . . . . . 24
Command Structure. . . . . . . . . . . . . . . . . . . . . . . . . . . . . . . . . . . . . . . . . . . . . . . . . . . . . . . . . . . . . . . . .24
General Address . . . . . . . . . . . . . . . . . . . . . . . . . . . . . . . . . . . . . . . . . . . . . . . . . . . . . . . . . . . . . . . . . . . 24
Computer Interface Information . . . . . . . . . . . . . . . . . . . . . . . . . . . . . . . . . . . . . . . . . . . . . . . . . . . . . . . . . . . 25
Pin Settings . . . . . . . . . . . . . . . . . . . . . . . . . . . . . . . . . . . . . . . . . . . . . . . . . . . . . . . . . . . . . . . . . . . . . . 25
Code Example. . . . . . . . . . . . . . . . . . . . . . . . . . . . . . . . . . . . . . . . . . . . . . . . . . . . . . . . . . . . . . . . . . . . .25
Special Instructions . . . . . . . . . . . . . . . . . . . . . . . . . . . . . . . . . . . . . . . . . . . . . . . . . . . . . . . . . . . . . . . . . . . . 27
Calibrating the PT100 . . . . . . . . . . . . . . . . . . . . . . . . . . . . . . . . . . . . . . . . . . . . . . . . . . . . . . . . . . . . . . . .27
Description of Unit Calculations . . . . . . . . . . . . . . . . . . . . . . . . . . . . . . . . . . . . . . . . . . . . . . . . . . . . . . . . . 27
K-Factor Calculation . . . . . . . . . . . . . . . . . . . . . . . . . . . . . . . . . . . . . . . . . . . . . . . . . . . . . . . . . . . . . . . . . 27
Hz/u – K-factor system . . . . . . . . . . . . . . . . . . . . . . . . . . . . . . . . . . . . . . . . . . . . . . . . . . . . . . . . . . . . . . . 29
Specications . . . . . . . . . . . . . . . . . . . . . . . . . . . . . . . . . . . . . . . . . . . . . . . . . . . . . . . . . . . . . . . . . . . . . . . .30
Flow Computer, Model 4050
Page iv February 2018

CXX-UM-01850-EN-01
SCOPE OF THIS MANUAL
This manual describes how to install and program the Model 4050 flow computer. The electronic version of this manual is
available on our website at www.badgermeter.com.
MPORTANTI
Read this manual carefully before attempting any installation or operation.
Typographic Conventions
• Items in bold text and all capitals are items on the software screens that you need to select or choose by pressing a key,
highlighting an option, checking a box or another similar way.
Example: Press the View Report key.
• Items that are italicized are names of options, boxes, columns and fields. In most cases, first letters are capitalized.
Example: The value displays in the Status Information field.
• Messages and special markings are shown in quotation marks.
Example: “Service Stopped” displays in the title bar.
OTE:N Names, addresses and other customer-related information displayed in screen examples were created for
demonstration purposes. No actual customer information is included.
Unpacking and Inspection
When you open the shipping container, visually inspect the product and applicable accessories for any physical damage such
as scratches, loose or broken parts, or any other sign of damage that may have occurred during shipment.
OTE:N If you find damage, request an inspection by the carrier’s agent within 48 hours of delivery and file a claim with the
carrier. A claim for equipment damage in transit is the sole responsibility of the purchaser.
SAFETY CONSIDERATIONS
Terminology and Symbols
Indicates a hazardous situation, which, if not avoided, is estimated to be capable of causing death or serious
personal injury.
Indicates a hazardous situation, which, if not avoided, could result in severe personal injury or death.
Indicates a hazardous situation, which, if not avoided, is estimated to be capable of causing minor to moderate personal
injury or damage to property.
SAFETY RULES AND PRECAUTIONARY MEASURES
The manufacturer accepts no responsibility whatsoever if the following safety rules and precaution instructions, and the
procedures as described in this manual, are not followed.
• Modifications of the flow computer implemented without preceding written consent from the manufacturer will result in
the immediate termination of product liability and warranty period.
• Installation, use, maintenance, and servicing of this equipment must be carried out by authorized technicians.
• Check the mains voltage and information on the manufacturer’s nameplate before installing the flow computer.
• Check all connections, settings, and technical specifications of the various peripheral devices supplied with the
flow computer.
• Never open the enclosure.
• Never touch the electronic components (ESD sensitivity).
Scope of This Manual
Page 5 February 2018

CXX-UM-01850-EN-01
• Never expose the system to heavier conditions than allowed according to the casing classification (see
manufacturer’s nameplate).
• If the operator detects errors or dangers, or disagrees with the safety precautions taken, inform the owner or the principal
responsible party.
• Adhere to the local labor and safety laws and regulations.
Safety Rules and Precautionary Measures
Page 6 February 2018

CXX-UM-01850-EN-01
DESCRIPTION
Designed to meet the ever-changing requirements of flow metering, the Model 4050 flow computer can be tailored to
virtually any flow application. It can accept up to three meters, correct for temperature changes and produce a usable output
in any flow unit. The Model 4050 flow computer can work with manifold systems and switch relays with adjustable trigger
points. This output can be used to change valve states and select active flow meters.
Each Model 4050 flow computer is programmed to your individual requirements, and software is written for each unit when
required. Each Model 4050 flow computer comes standard with a frequency input card, an analog input card, a relay card and
a communication card. Other cards are optional as shown below. Please contact your distributor for additional options.
Optional Cards and Features
Frequency Input Card 3 frequency inputs
32-point linearization curve
Programmable factor for unit conversion
Programmable cutoff points down to 0.02 seconds
Analog Input Card
16-bit resolution
Six analog process
inputs
Used for temperature, flow, density, viscosity, and pressure (absolute, barometric,
gauge or differential) sensors
0…10V or 4…20 mA
5-point linearization curve
Programmable mass factor for unit conversion
Analog Output Card
16-bit resolution
Three analog outputs
Used for connection to remote facilities such as alarms, indicators, chart recorders,
Programmable Logic Controllers (PLCs) and more
0…10V or 4…20 mA
Configurable analog output reference parameter
Pulse Output Card Three collector outputs
Transistor-transistor Logic (TTL) or Open
Used for retransmission of rate or output of pulses per unit volume of total
Can connect to remote indicators, totalizers or Programmable Logic Controllers(PLCs)
Relay Card Three volt-free relays
Deployable for alarm purposes
Can be used to control solenoid valves or pump starters with a batching unit
or controller
Communication Card
RS232 and RS485
interfaces
Monitor parameters or program calibration data
Serial or parallel port
Connection to panel or desk-mounted printers
Option of time and date indication
Main Display
Alphanumeric with red dot matrix characters
Exceptionally wide
viewing range
5.98 in. (152 mm) × 0.71 in. (18 mm)
Three display fields
Left: five characters for parameter identity or designation
Center: readout of quantity being measured
Right: units of measurement
Customization
Units
Test Routines
Buzzer
Data Entry
All calibration data is entered using the handheld infrared remote control after a successful passcode entry
To prevent incorrect data entry, when two Model 4050 flow computers are positioned in close proximity, the
reception of the computer that is not being addressed can be inhibited by a sequence of keystrokes on the
front panel of that computer (See "Disabling and Enabling the Remote Control" on page 13 for
more information)
Description
Page 7 February 2018

CXX-UM-01850-EN-01
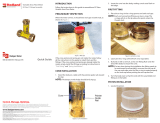
INSTALLATION
Wiring
The Wiring section describes how to wire the manifold and metering system to the flow computer terminals.
Diagram of the Flow Computer Back
Figure 1: Chart of terminals
Terminals
Terminal Number
Terminal Name
RELAYS ANALOG IN FREQUENCY
Slot 3 Slot 2 Slot 1
1 NO RELAY 1 +SIG 1V OR I SPECIAL IP
2 C RELAY 1 0V SPECIAL IP
3 NO RELAY 2 +SIG 2V OR I EXITATION VOLTAGE
4 C RELAY 2 0V + SIGNAL 1
5 NO RELAY 3 +RTD PROBE - SIGNAL 1 or 0V
6 C RELAY 3 0V 0V
7 — +RTD PROBE EXITATION VOLTAGE
8 — 0V + SIGNAL 2
9 — -RTD - SIGNAL 2 or 0V
10 — 0V 0V
11 — -RTD EXITATION VOLTAGE
12 — 0V + SIGNAL 3
13 — +12V Output - SIGNAL 3 or 0V
14 — 0V 0V
Installation
Page 8 February 2018

CXX-UM-01850-EN-01
Mcon1 Inputs
Mcon1 Input
1 +24V DC input 100…200 mA (depends on cards fitted)
2 0V
3 0V
4 +24V DC output repeated from input 1 or when on Main supply
5 Optional relay C
6 Optional relay NO
Mains input 80…265 AC auto. Fuse 1.0 A.
Hub Connector Setup
Hub Connector Setup
1 Fused 5V DC
2 Open Collector Output
3 SW1 input
4 SW2 input
5 SW3 input
6 0V
Total Inhibit Input
By shorting SW1 terminals 3 and 6 on the Hub Connector, the totalization on all inputs are inhibited from counting up.
Manifold
High ow
Meter 3
Relay 2
S3
P 3, 4
S2
P 5,7,9,11
S1
P 3,4,5
Relay 1
S3
P 1,2
S1
P 11,12,13
Channel 3
High Flow
Channel 2
Medium Flow
Channel 1
Low Flow
S1
P 7,8,9
Mid ow
Meter 2
Low ow
Meter 1
RTD
V2
V1
Flow
Flow
R2
R1
S = Slot
V = Valve
R = Relay
P = Pins
Figure 2: Manifold system installation example
Installation
Page 9 February 2018

CXX-UM-01850-EN-01
OPERATING THE FLOW COMPUTER
Use the front panel keypad (Figure 3) and the remote control (Figure 4) to program the Model 4050 flow computer. The remote
has more functions than the front panel keypad.
Front Panel Keypad
Figure 3: Front panel keypad
Key
Key Name Key Function
Up Arrow
Down Arrow
Scrolls through information screens.
Left Arrow
Right Arrow
Toggles between Primary and Secondary menus.
ALTER Selects option to be changed.
F1/START Activates function 1
F2/STOP Activates function 2
F3/RESET Activates function 3
Operating the Flow Computer
Page 10 February 2018

CXX-UM-01850-EN-01
Remote Control
Figure 4: Remote control
KEEP THE REMOTE CONTROL IN A SAFE AND SECURE PLACE FOR COMPLETE SECURITY.
Key Key Name Description
Up Arrow
Down Arrow
Scrolls through information screens.
Left Arrow
Right Arrow
Toggles between Primary and Secondary menus.
ALTER Selects option to be changed.
SHIFT
Prepares the remote to execute a secondary function for a key, noted in the
sub-label on each key.
ENTER Used to enter information or back out of a menu.
CLEAR Used to clear data.
Operating the Flow Computer
Page 11 February 2018

CXX-UM-01850-EN-01
Key Key Name Description
EXP/UNIT
Used to set an exponent when entering numbers. Sub-function is used to
change the unit type.
. +/–
Used to enter a decimal point when entering numbers. Sub-function is used
to change a value to negative or positive.
0/PRE- Used to enter 0.
1/BATCH Used to enter 1. Sub-function activates batching function.
2/F1 Used to enter 2. Sub-function activates function 1.
3/F2 Used to enter 3. Sub-function activates function 2.
4/F3 Used to enter 4. Sub-function activates function 3.
5/F4 Used to enter 5. Sub-function activates function 4.
6/CODE
Used to enter 6. Sub-function lets you enter a code to enter Programming
mode.
7/TEST Used to enter 7.
8/HELP Used to enter 8.
9/FACTOR Used to enter 9.
Operating the Flow Computer
Page 12 February 2018

CXX-UM-01850-EN-01
Front Panel Test Mode
OTE:N You must use the front panel keypad to enter Front Panel Test mode.
Use Front Panel Test mode to enable or disable the remote, test the remote reception, view the Serial number, and turn the
audible keyclick ON or OFF.
Press LEFT/RIGHT arrows on the front panel at the same time to enter Front Panel Test mode. Press UP/DOWN arrows to
display the menu options. Press ALTER to toggle each option.
Menu Option Description
ENABLE IR Enable or disable the remote control
KEY CLICK Enable or disable the audible keyclick
TEST REMOTE Test the remote control. The last input is displayed on the right
MAN 0000 Display the serial number of your computer
ALTER TO EXIT Press ALTER to exit Front Panel Test mode
Disabling and Enabling the Remote Control
Since the remote control works with any COX computer, it may be necessary to disable the remote control function on
one computer when there are multiple computers in close proximity. Use Front Panel Test mode to disable the remote
control function:
1. Press LEFT/RIGHT arrows on the front panel at the same time to enter the Front Panel Test mode.
2. Press UP/DOWN arrows to highlight ENABLE IR.
3. Press ALTER to select N for ENABLE IR.
Once locked out, the lock LED light in the lower square panel of the flow computer lights up and the remote control does not
affect the locked computer.
OTE:N With the remote off, the menus of the flow computer can be viewed using the front panel keypad, but anything that
requires the remote is not available.
To restore remote control function, use the same process, but select Y for the ENABLE IR option.
Troubleshooting the Remote Control
If you enter a code to access the programming mode and the computer displays WRONG CODE, check the code and re-enter. If
the code is correct and the computer still shows WRONG CODE, the remote control batteries may need changing.
If you are experiencing key bounce or you are unable to use the remote control keys, there is probably interference. Problems
may occur when trying to operate the remote control in direct sunlight, or while using sodium lights or other specialized
lighting. If problems continue, please contact your supplier.
Operating the Flow Computer
Page 13 February 2018

CXX-UM-01850-EN-01
Using the Remote Control or Front Panel Keypad
You can use the remote control or the front panel keypad interchangeably, as long as your choice has the keys that you need.
For example, some menus require you to enter numbers and the front panel keypad does not have number keys. In those
situations, use the remote control. It may be easier to use the remote control exclusively.
THE INSTRUCTIONS IN THIS MANUAL ARE WRITTEN FOR THE REMOTE CONTROL UNLESS OTHERWISE INDICATED.
Manifold System
The flow computer can be used to control a manifold system like the one in Figure 5. See the Turbine Meter Manifold System
data sheet, available in the Resource Library at www.badgermeter.com, for more information. The flow computer receives
signals from the meter measuring flow. The flow computer can then calculate the valves that should be open or closed, and
opens or closes the valves automatically, if necessary.
Using the example in Figure 5, Valve 2 is closed and Valve 1 is open. If the flow increases past a pre-defined threshold, the
computer sees the change in the signal from Meter 2. The computer then opens Valve 2 and starts monitoring the signal from
Meter 3. Now the liquid can flow as it should. If the flow decreases, the computer closes Valve 2.
Figure 5: Manifold system example
Operating the Flow Computer
Page 14 February 2018

CXX-UM-01850-EN-01
Menu Flowchart
This chart shows the menu structure of the Model 4050 Flow Computer.
Boot Screen
Serial Number Displayed
Primary Menu/
Computed Data
Temp
Visc
S.G.
R
M
V
W
Setup Auto
1 up 2
2 up 3
3 down 2
2 down 1
Clear Totals
0=Clear Volume
0=Clear Mass
Ch Setup
Cal Temp
Alpha
Time Base
Up Date Time
Frq Cut O
Vol Cut O
Mass Cut O
Vol Factor
Mass Factor
DP
Frq Constant
Setup Comms
BAUD
Read Only
ID
RS485
Comms
Sort Curve
0=Yes
Analog Inputs
Pt100 Factor
Set Viscosity
V01 0.0° C
V01 0.0 CTS
V02 0.0° C
V02 0.0 CTS
Set SG
SG01 0.0° C
SG01 0.0
SG02 0.0° C
SG02 0.0
Sort Vis/SG/Temp
0=Sort Vis.
0=Sort S.G.
Edit Curve
C1 01 F/V
C1 01 Kf
C1 02 F/V
C1 02 Kf
Secondary Menu/
Oaw Data
Date
Time
Manifold
Channel
Volume
F
Ros
Str
Kf
R
Relays
Front Panel
Test Mode
Enable IR
Key Click
Test Remote
Man 1234
Alter to Exit
Programming
Mode
Relays
Clear to Exit
Cards Fitted
Main
Menu
Figure 6: Menu flowchart
Operating the Flow Computer
Page 15 February 2018

CXX-UM-01850-EN-01
NAVIGATING THE MENUS
OTE:N Refer to "Menu Flowchart" on page 15 for a visual representation.
THE INSTRUCTIONS IN THIS MANUAL ARE WRITTEN FOR THE REMOTE CONTROL UNLESS OTHERWISE INDICATED.
When the computer is powered up, the serial number displays for approximately 5 seconds, then the first menu displays.
Press LEFT/RIGHT arrows to toggle between the Primary and Secondary menus.
Press UP/DOWN arrows to scroll through menu options.
OTE:N The order of each menu depends on the order of the cards in the flow computer.
Primary Menu
The Primary menu displays the flow computer status and measurements. The menu options cannot be changed.
Menu Option Description Default Units
r
1
, r
2
or r
3
Volume Flow Rate for channel 1, 2 or 3 L/hr
m
1
, m
2
or m
3
Mass Flow of turbine 1, 2 or 3 kg/hr
v
1
, v
2
or v
3
Total Volume of turbine 1, 2 or 3 L
w
1
, w
2
or w
3
Total Weight of turbine 1, 2 or 3 kg/hr
Temp Temperature from Pt100 ° C
Visc Viscosity of fluid CTS
S.G. Specific Gravity of fluid —
Secondary Menu
The Secondary menu options that you can alter are described in the following sections.
Menu Option Description Default Units
Date Date dd/mm/yyyy
Time Time hr:min:s
Manifold Manifold status ON or OFF
Channel Current running channel 1, 2 or 3
Volume or Mass Volume or Mass is currently selected —
f
1
, f
2
or f
3
Frequency for channel 1, 2 or 3 Hz
Ros
1
, Ros
2
or Ros
3
Corrected Roshkoe factor for turbine 1, 2 or 3 —
Str
1
, Str
2
or Str
3
Calculated Strouhal value for turbine 1, 2 or 3 —
Kf
1
, Kf
2
or Kf
3
Corrected K-factor for turbine 1, 2 or 3 —
R
1
Ohms from Pt100
Relays Current state of the relays —
Navigating the Menus
Page 16 February 2018

CXX-UM-01850-EN-01
Manifold
Use this option to turn the Auto-Manifold System on or off. The Auto-Manifold System allows the flow computer to change
channels automatically. The selected channel determines which valves are open or closed, which relays are active and which
meter the flow computer takes readings from.
FOR SAFETY REASONS, YOU MUST USE THE REMOTE CONTROL TO CHANGE THE STATE OF THE MANIFOLD SYSTEM.
When Manifold is ON, switching channels is automatic, based on the user entered values. These trip points are in frequency for
any Hz/u meter. You can set the flow computer for multiple meters and a relay state change at particular setpoints.
When Manifold is OFF, switching channels is manual. Change meters with the Channel menu option.
1. Navigate to the Manifold menu option.
2. Press ALTER to toggle this option ON or OFF.
Channel
Use Channel to change which channel is active. This option displays the current channel number. Press ALTER to change the
channel number.
OTE:N To use this option, make sure Manifold is set to OFF, otherwise the system will automatically change the channel.
Channel Number Effect
Channel 1 Valves 1 and 2 closed, Low flow meter
Channel 2 Valve 2 closed, Medium flow meter
Channel 3 Valves open, High flow meter
High ow
Meter 3
Relay 2
S3
P 3, 4
S2
P 5,7,9,11
S1
P 3,4,5
Relay 1
S3
P 1,2
S1
P 11,12,13
Channel 3
High Flow
Channel 2
Medium Flow
Channel 1
Low Flow
S1
P 7,8,9
Mid ow
Meter 2
Low ow
Meter 1
RTD
V2
V1
Flow
Flow
R2
R1
S = Slot
V = Valve
R = Relay
P = Pins
Figure 7: Common installation channels
Vol On / Mass On
Use this option to select the flow rate units. Press ALTER to select VOLUME or MASS. Each time the channel changes, the
screen displays the new channel and the volume or mass flow rate. If the computer is fitted with the right card, the analog
output represents volume or mass flow rate.
Navigating the Menus
Page 17 February 2018

CXX-UM-01850-EN-01
Date and Time
User this option to set the real time clock.
1. Navigate to either Date or Time.
2. Press ALTER. The cursor begins ashing on the screen.
3. Use the number keys to enter the information, or use LEFT/RIGHT arrows to highlight a digit, then use UP/DOWN arrows
to change the digit.
4. Press ENTER to save your changes. The computer returns to the Secondary menu.
Changing the Menu Option Names and Unit Labels
In the Primary or Secondary menus, you can change the menu option names and unit labels of any menu option with units.
For example, you could change r 0.0 L/hr to vfr 0.0 GPH.
1. Press UP/DOWN arrows to select a menu option.
2. Press SHIFT, then EXP/UNIT. The cursor begins to ash at the far right side of the screen.
3. Change the unit labels.
a. Press LEFT/RIGHT arrows to change the cursor position.
b. Press UP/DOWN arrows to select the character for that position.
4. Change menu option name.
a. Press ALTER to move the cursor to the left side of the screen.
b. Press LEFT/RIGHT arrows to change the cursor position.
c. Press UP/DOWN arrows to select the character for that position.
5. Press ENTER to store your changes.
MPORTANTI
Where a maximum number of digits are to be displayed (for example, when displaying a total), limit the menu option name to four
or fewer characters so the name and numbers do not overlap. If they overlap, the screen can appear to be corrupted.
OTE:N In some cases, the computer display is fixed and cannot be changed.
If you are in a curve menu and you change the units only, all points in that curve are changed.
Navigating the Menus
Page 18 February 2018

CXX-UM-01850-EN-01
PROGRAMMING MODE
Use Programming mode to set up and program Auto-Manifold and other features of the flow computer.
THE INSTRUCTIONS IN THIS MANUAL ARE WRITTEN FOR THE REMOTE CONTROL UNLESS OTHERWISE INDICATED.
Enter Programming Mode
1. Navigate to the code entry screen using one of two methods:
◊ Press LEFT/RIGHT arrows until Secondary displays on the screen, then press ALTER, or
◊ Press SHIFT, then the 6/CODE key.
2. When the screen displays CODE ****, enter the four-digit serial number using the number keys. The serial number is on the
back of the computer, on the screen when the computer is rst powered up, or on the screen in the Front Panel Test mode.
3. If you enter the wrong code, press CLEAR to clear the entry. Then try again.
The Programming menu opens when the correct code is entered.
Exit Programming Mode
Press CLEAR to exit programming mode when you are finished programming.
If you press the ALTER key by mistake while selecting the secondary menu, wait 20 seconds and the primary menu displays.
Automatic Lockout
In some cases the flow computer itself inhibits the ALTER key as it may be performing a sequence of events that cannot be
interrupted, like batching. Wait until the flow computer is finished with the process.
Programming Mode Options
Menu Option Description
Setup Auto Opens the menu to set up setpoints for automatic switching
Setup Comms Set up the Port settings
Edit Curve
1
, Edit Curve
2
or Edit Curve
3
K-Factor programming for channel 1, 2 or 3
Ch
1
,
Ch
2
or Ch
3
Setup Channel setup for channel 1, 2 or 3
Clear Totals
1
, Clear Totals
2
or Clear Totals
3
Use to clear measurement totals for channel 1, 2 or 3
Sort Curve
1
, Sort Curve
2
or Sort Curve
3
Use the sort function on curve 1, 2 or 3
Analog Inputs Calibrate the PT100 card
Set Viscosity Program fluid viscosity
Set SG Program fluid specific gravity
Sort Vis/SG/Temp Use the sort function on viscosity, specific gravity or temperature
Relays Manually open or close relays
Clear to Exit Press CLEAR to return to the Primary Menu
Cards Fitted Displays installed cards
Programming Mode
Page 19 February 2018

CXX-UM-01850-EN-01
Setup Auto/Manifold Auto-ranging Trip Points
Use Setup Auto to set values as setpoints. Use setpoints to let the flow computer know when to change channels. See
"Manifold System" on page 14 for more information about channels.
1. Navigate to the SETUP AUTO option.
2. Press ALTER to display the auto-ranging setpoints.
3. Press UP/DOWN arrows to access each point.
4. Press CLEAR to clear the setting and enter a new number, or just enter a number to replace the old one.
5. Press ENTER to save the new number.
Press ALTER to back out of the menu and revert to the previous number.
Press CLEAR to delete any number you entered to start over.
Menu Option Unit Description
up 0.0 Hz Shows the trip point in Hertz to change from channel 1 (low flow) to channel 2 (medium flow)
up 0.0 Hz Shows the trip point in Hertz to change from channel 2 (medium flow) to channel 3 (high flow)
down 0.0 Hz Shows the trip point in Hertz to change from channel 3 (high flow) to channel 2 (medium flow)
down 0.0 Hz Shows the trip point in Hertz to change from channel 2 (medium flow) to channel 1 (low flow)
When setting these values, leave some leeway between setpoints. For example, if channel 1 is set and calibrated for
20…800 Hz and channel 2 for 500…1200 Hz, set setpoint 1 to 2 at about 600 Hz and set setpoint 2 to 1 at about 550 Hz. This
allows room for variance and avoids getting the flow computer into a switching loop.
Automatic Switching
When a setpoint is activated, the flow computer changes the selected channel. The flow computer then powers up a relay and
closes a valve, or powers down a relay and opens a valve. In fail safe mode, the valves automatically open with no power and
close with power.
Event Result
Low flow signal from meter 1 Relays 1 and 2 powered up, closing valves for channels 2 and 3
Medium flow signal from meter 2 Relay 2 powered up, closing the valve for channel 3
High flow signal from meter 3 Both relays powered down
Setup Comms
Use this menu to configure communications with the PC.
1. Navigate to SETUP COMMS.
2. Press ALTER to open the Setup Communications sub menu.
3. Press UP/DOWN arrows to cycle between sub menu options. Press ALTER to change individual settings.
4. Press ENTER to exit.
Option Settings Description
BAUD 9600, 1200 or 19200 Baud rate
READ ONLY The system is currently set to read only
ID a, b, c and more Select ID to scan from a…z lower case only
RS485 FAST, MEDIUM or SLOW Delay for bus transceiver
COMMS FAST, MEDIUM or SLOW Delay between Char output
Programming Mode
Page 20 February 2018
/