Page is loading ...

CXX-UM-03060-EN-01 (April 2019)
User Manual
Flow Processor
EC80

Flow Processor, EC80
April 2019CXX-UM-03060-EN-01Page ii

CONTENTS
Description. . . . . . . . . . . . . . . . . . . . . . . . . . . . . . . . . . . . . . . . . . . . . . 5
Safety information . . . . . . . . . . . . . . . . . . . . . . . . . . . . . . . . . . . . . . . . .5
Safety Symbol Explanations . . . . . . . . . . . . . . . . . . . . . . . . . . . . . . . . 5
Unpacking and Inspection . . . . . . . . . . . . . . . . . . . . . . . . . . . . . . . . . . . . 5
Operating Principle . . . . . . . . . . . . . . . . . . . . . . . . . . . . . . . . . . . . . . . . 6
Installation . . . . . . . . . . . . . . . . . . . . . . . . . . . . . . . . . . . . . . . . . . . . . .7
Precautions . . . . . . . . . . . . . . . . . . . . . . . . . . . . . . . . . . . . . . . . . . 7
Typical Congurations . . . . . . . . . . . . . . . . . . . . . . . . . . . . . . . . . . . 8
Input. . . . . . . . . . . . . . . . . . . . . . . . . . . . . . . . . . . . . . . . . . . . . . . . . 10
Analog Input . . . . . . . . . . . . . . . . . . . . . . . . . . . . . . . . . . . . . . . . 10
Outputs . . . . . . . . . . . . . . . . . . . . . . . . . . . . . . . . . . . . . . . . . . . . . . . 11
Wiring and Jumpers . . . . . . . . . . . . . . . . . . . . . . . . . . . . . . . . . . . . . . . 12
RM1 . . . . . . . . . . . . . . . . . . . . . . . . . . . . . . . . . . . . . . . . . . . . . . 12
RM2 . . . . . . . . . . . . . . . . . . . . . . . . . . . . . . . . . . . . . . . . . . . . . . 14
XP1 . . . . . . . . . . . . . . . . . . . . . . . . . . . . . . . . . . . . . . . . . . . . . . 15
Dimensions . . . . . . . . . . . . . . . . . . . . . . . . . . . . . . . . . . . . . . . . . . . . 17
RM1 Conguration. . . . . . . . . . . . . . . . . . . . . . . . . . . . . . . . . . . . . 17
RM2 Conguration. . . . . . . . . . . . . . . . . . . . . . . . . . . . . . . . . . . . . 17
XP1 Conguration . . . . . . . . . . . . . . . . . . . . . . . . . . . . . . . . . . . . . 18
Specications . . . . . . . . . . . . . . . . . . . . . . . . . . . . . . . . . . . . . . . . . . . 19
Using the IFC Software . . . . . . . . . . . . . . . . . . . . . . . . . . . . . . . . . . . . . 20
Password Initialization . . . . . . . . . . . . . . . . . . . . . . . . . . . . . . . . . . 20
Establish Link Via RS485 . . . . . . . . . . . . . . . . . . . . . . . . . . . . . . . . . 21
Establish Link Via Ethernet . . . . . . . . . . . . . . . . . . . . . . . . . . . . . . . . 22
Prole . . . . . . . . . . . . . . . . . . . . . . . . . . . . . . . . . . . . . . . . . . . . . . . . 22
Creating, Saving and Loading Proles. . . . . . . . . . . . . . . . . . . . . . . . . 22
Uploading a Prole . . . . . . . . . . . . . . . . . . . . . . . . . . . . . . . . . . . . 22
Prole Programming. . . . . . . . . . . . . . . . . . . . . . . . . . . . . . . . . . . . . . . 23
Table Data Entry . . . . . . . . . . . . . . . . . . . . . . . . . . . . . . . . . . . . . . 25
User Manual
Page iii CXX-UM-03060-EN-01April 2019

Linearization . . . . . . . . . . . . . . . . . . . . . . . . . . . . . . . . . . . . . . . . 26
Rotor Ratio. . . . . . . . . . . . . . . . . . . . . . . . . . . . . . . . . . . . . . . . . . 28
Pressure Calibration . . . . . . . . . . . . . . . . . . . . . . . . . . . . . . . . . . . . 29
Temperature Compensation. . . . . . . . . . . . . . . . . . . . . . . . . . . . . . . 29
Conguring Flow processor Outputs and Inputs . . . . . . . . . . . . . . . . . . . . . 30
Frequency Outputs (1 and 2) . . . . . . . . . . . . . . . . . . . . . . . . . . . . . . 30
Analog Output (Channels 1, 2, 3 and 4). . . . . . . . . . . . . . . . . . . . . . . . 31
Conguring Analog Input . . . . . . . . . . . . . . . . . . . . . . . . . . . . . . . . 32
Conguring Liquid Properties. . . . . . . . . . . . . . . . . . . . . . . . . . . . . . . . . 33
Temperature vs Viscosity Table . . . . . . . . . . . . . . . . . . . . . . . . . . . . . 34
Temperature vs Density Table. . . . . . . . . . . . . . . . . . . . . . . . . . . . . . 35
Liquid Pressure Compensation . . . . . . . . . . . . . . . . . . . . . . . . . . . . . 35
Hardware Conguration . . . . . . . . . . . . . . . . . . . . . . . . . . . . . . . . . . . . 36
Model Information. . . . . . . . . . . . . . . . . . . . . . . . . . . . . . . . . . . . . 36
General Hardware Information . . . . . . . . . . . . . . . . . . . . . . . . . . . . . 36
Oscillation . . . . . . . . . . . . . . . . . . . . . . . . . . . . . . . . . . . . . . . . . . 37
Meter Selection (BUS ID) . . . . . . . . . . . . . . . . . . . . . . . . . . . . . . . . . 37
Real-time Monitoring . . . . . . . . . . . . . . . . . . . . . . . . . . . . . . . . . . . . . . 38
Real-Time Report Display. . . . . . . . . . . . . . . . . . . . . . . . . . . . . . . . . 39
Flow processor Programming . . . . . . . . . . . . . . . . . . . . . . . . . . . . . . . . . 40
Downloading Proles . . . . . . . . . . . . . . . . . . . . . . . . . . . . . . . . . . . 40
Locating Multiple EC80 Flow Processors . . . . . . . . . . . . . . . . . . . . . . . 41
Commands . . . . . . . . . . . . . . . . . . . . . . . . . . . . . . . . . . . . . . . . . 42
Conguration Options . . . . . . . . . . . . . . . . . . . . . . . . . . . . . . . . . . . . . 42
General . . . . . . . . . . . . . . . . . . . . . . . . . . . . . . . . . . . . . . . . . . . . 42
Report Display . . . . . . . . . . . . . . . . . . . . . . . . . . . . . . . . . . . . . . . 43
Communication (Comm.) . . . . . . . . . . . . . . . . . . . . . . . . . . . . . . . . 43
Database, Gator Display, Gator Report and Real Time Clock (RTC) . . . . . . . 43
Version Information . . . . . . . . . . . . . . . . . . . . . . . . . . . . . . . . . . . . . . . 43
Flow Processor, EC80
April 2019CXX-UM-03060-EN-01Page iv

Description
Page 5 CXX-UM-03060-EN-01April 2019
DESCRIPTION
The EC80 Flow Processor provides a state-of-the-art interface for today’s flow
meters. With multiple frequency inputs and one temperature input in a compact
design, the flow processor is compatible with single and dual rotor turbine flow
meters for precise calculation and output of flow rate or accumulated flow.
The linearization, viscosity and density correction features improve flowmeter
accuracy to the highest levels available today. Our newest feature allows the flow
processor, with a Cox Auto Viscosity Turbine Meter, to automatically measure and
compensate for kinematic liquid viscosity.
SAFETY INFORMATION
The installation of the flow processor must comply with all applicable federal,
state and local rules, regulations and codes.
Failure to read and follow these instructions can lead to misapplication or misuse
of the flow processor, resulting in personal injury and damage to equipment.
Safety Symbol Explanations
DANGER
INDICATES A HAZARDOUS SITUATION, WHICH, IF NOT AVOIDED WILL RESULT
IN DEATH OR SERIOUS PERSONAL INJURY.
INDICATES A HAZARDOUS SITUATION, WHICH, IF NOT AVOIDED COULD
RESULT IN DEATH OR SERIOUS PERSONAL INJURY.
INDICATES A HAZARDOUS SITUATION, WHICH, IF NOT AVOIDED COULD
RESULT IN MINOR OR MODERATE PERSONAL INJURY OR DAMAGE TO
PROPERTY.
UNPACKING AND INSPECTION
Upon opening the shipping container, visually inspect the product and applicable
accessories for any physical damage such as scratches, loose or broken parts, or
any other sign of damage that may have occurred during shipment.
OTE:N If damage is found, request an inspection by the carrier's agent within 48
hours of delivery and file a claim with the carrier. A claim for equipment
damage in transit is the sole responsibility of the purchaser.

Operating Principle
April 2019CXX-UM-03060-EN-01Page 6
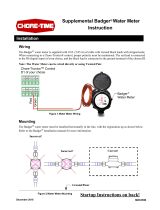
OPERATING PRINCIPLE
The EC80 Flow Processor accepts all types of square wave pulse inputs. Fully
compensated and linearized volumetric flow rates, totals and temperature are
examples of flow parameters that can be viewed through serial communications,
included software program or an embedded rate indicator (depending on
product configuration).
The EC80 Flow Processor can use a universal viscosity curve to compensate for
varying liquid temperature and viscosity conditions. It can also use
Strouhal-Roshko algorithms for a more comprehensive compensation method,
taking into consideration all the secondary effects to which the meter is sensitive
like the expansion and contraction of the meter bore diameter. The flow processor
extracts the density value of a known liquid from a stored temperature/density
table and multiplies by the volumetric flow rate to get the inferred mass flow rate.
RTD
Fa
Rotor A
Rotor B
Fb
Fsum
Ro
act
Ro
ref
St
ref
St
act
v
Q
supply
Temp
Measure
Temperature
Lookup Table
Temperature
vs Counts
Lookup Table
Strouhol vs
Roshko
Lookup Table
Viscosity vs
Temperature
Fsum
v
1+2(alpha)(deltaT)
1-3(alpha)( delta T)
Calculate
Flow Rate
Measure
Frequency
Fa+Fb
Measure
Frequency
Counts
Temp
Figure 1: Flow Processor Calculations

Installation
Page 7 CXX-UM-03060-EN-01April 2019
INSTALLATION
Precautions
• Turn off power supply prior to making any connections to the flow processor.
• Verify that the power supply is rated to deliver enough current for
your application.
• Do not submerge or place flow processor in moisture-prone environments.
• Do not place the flow processor in close proximity to high voltage and/or
current carrying lines. It is sensitive to Electro-Magnetic Interference (EMI).
• Verify that all terminations at the flow processor are free from frayed wires and
terminate with proper insulation at terminal blocks.
• Before applying supply power, make sure the power setting is not in excess
of the flow processor’s rating. A setting over the rating will cause the flow
processor to fail and not be covered under the warranty.
• Tighten all terminal block connections with reasonable firmness. Do not
over-tighten the screw down terminals.
• Use adequately gauged wires for transferring signals to and from the flow
processor printed circuit board (PCB).
• Make sure the PCB will not be exposed to excessive shock.
• Make sure the PCB will not be exposed to heat that exceeds the temperature
rating of the flow processor electronics.
• Pay careful attention to the grounding scheme for your application. Use low
impedance grounds, common to all electronics.
• If the PCB is exposed, be careful that debris, loose conductor strands or any
other foreign matter does not come in contact with terminals and/or electrical
components and connections.

Installation
April 2019CXX-UM-03060-EN-01Page 8
Typical Congurations
RM1
CABLE
PT02E-12-14P
IS TYPICAL FOR RF INPUT.
* CONFIGURATION SHOWN
PT02E-12-8P
(NOT INCLUDED)
C
ABLE
(NOT INCLUDED)
2.4
2X 4.92
4X.17
2X 1.42
Figure 2: RM1 Configuration
RM2
N
* CONFIGURATION SHOWN
IS TYPICAL FOR RF INPUT.
CABLE (NOT INCLUDED)
CABLE (NOT INCLUDED)
PT02E-12-8P
3
PT02E-12-14P
3
.55
2X 6.37 3.74
2X .33
2X 2.50
4X .16
DETAIL N
REMOVE ANODIZATION
TO EXPOSE ALUMINUM
Figure 3: RM2 Configuration

Installation
Page 9 CXX-UM-03060-EN-01April 2019
XP1
IS TYPICAL FOR RF INPUT.
* CONFIGURATION SHOWN
2X 4.7
B-9541 CABLE WITH 6907K13
CORD GRIP. (NOT INCLUDED)
Figure 4: XP1 Configuration

Input
April 2019CXX-UM-03060-EN-01Page 10
INPUT
The flow processor has inputs for turbine meters (both single and dual rotor) and
temperature. The flow processor calculates mass flow rates based on volumetric
flow with temperature compensation.
Analog Input
You can configure the analog input for different types of temperature transducers.
The flow processor is supplied with a 10 kΩ thermistor but can be
jumper-configured for 0…5V DC, 0…10V DC or 4…20 mA temperature
transducers. Consult the factory if you need to incorporate the analog input for
reasons other than temperature acquisition. See “Installation” on page7 and
“Wiring and Jumpers” on page12 to select a particular temperature transducer.
A
H
G
F
E
D
C
B
Figure 5: Input diagram
Function/Signal
Pinout
RM1 RM2
RF PICKOFF A A A
RF A RETURN B B
RF PICKOFF B C C
RF B RETURN D D
RF PICKOFF Q N/A N/A
RF Q RETURN N/A N/A
RTD EX+ E E
RTD + F F
RTD – G G
RTD EX- H H

Outputs
Page 11 CXX-UM-03060-EN-01April 2019
OUTPUTS
You can configure all flow processor outputs for different parameters, and can
do so independently of other channels. Use the IFC15 software to program the
following output parameters:
Frequency
• Linearized Flow Rate (Volumetric or Mass)
• Raw Frequency Rotor A
• Raw Frequency Rotor B
• Raw Sum; Frequency A + Frequency B (Dual Rotor Applications)
• Total Flow (Accumulation)
Analog
• Linearized Flow Rate
• Temperature
A
P
N
M
L
K
J
H
F
E
D
C
B
R
Figure 6: Output diagram
Function/Signal
Pinout
RM1 RM2
PWR + A A
PWR RETURN B B
RS-485 + C C
RS-485 – D D
RAW A OUT E E
RAW B OUT F F
GND H H
FREQ 1 OUT J J
FREQ 2 OUT K K
GND L L
ANALOG 1 VOLTAGE OUT M M
ANALOG 2 VOLTAGE OUT N N
AGND P P
ANALOG 4-20 mA RETURN – P P
ANALOG 4-20 mA OUT + R R

Wiring and Jumpers
April 2019CXX-UM-03060-EN-01Page 12
WIRING AND JUMPERS
RM1
JMP
-B
J1
EF4295 TERMINAL BLOCK LAYOUT
J5
J2
PGM PORT
J4
JMP
-C
JMP
-A
JMP-1
EC80 Flow Computer to PT02E-12-14P
EC80 B-9541 CABLE PT02E-12-14P
SCALING UNITS FUNCTION/SIGNAL J1 J4 J5 WIRE COLOR PINOUT
N/A
VDC+ PWR + 1 RED A
VDC- PWR RETURN 2 BLK B
N/A
N/A RS-485 + 5 WHT C
N/A RS-485 – 6 WHT/BLK D
N/A Hz RAW A OUT 1 ORG E
N/A Hz RAW B OUT 2 RED/WHT F
N/A Hz GND 3 ORG/BLK H
Hz FREQ 1 OUT 4 GRN J
Hz FREQ 2 OUT 5 GRN/WHT K
N/A Hz GND 6 GRN/BLK L
V ANALOG 1 VOLTAGE OUT 9 BLU M
V ANALOG 2 VOLTAGE OUT 8 BLU/WHT N
N/A N/A AGND 7 BLU/BLK P
N/A N/A ANALOG 4-20 mA RETURN – 3 RED/BLK P
mA ANALOG 4-20 mA OUT + 4 BLK/WHT R

Wiring and Jumpers
Page 13 CXX-UM-03060-EN-01April 2019
Flow-Meter to EC80 Flow Computer
B-9541 WIRE COLOR FUNCTION/SIGNAL J2 J5 PT02E-12-8P PINOUT
WHT RF PICKOFF A 1 A
WHT RF A RETURN 2 B
BLU RF PICKOFF B 3 C
BLU RF B RETURN 4 D
GRN RF PICKOFF Q 5 N/A
GRN RF Q RETURN 6 N/A
ORG RTD EX+ 4 E
ORG RTD + 3 F
ORG RTD – 2 G
ORG RTD EX- 1 H
JMP-1 Pickoff Jumper Table
JMP-A ON ROTOR A 4 OHMS
JMP-A OFF ROTOR A 10 OHMS
JMP-B ON ROTOR B 4 OHMS
JMP-B OFF ROTOR B 10 OHMS
JMP-C ON ROTOR Q 4 OHMS
JMP-C OFF ROTOR Q 10 OHMS

Wiring and Jumpers
April 2019CXX-UM-03060-EN-01Page 14
RM2
J2 J1
JMP-1
PGM PORT
EF4295 TERMINAL BLOCK LAYOUT
J5
J4
JMP-B
JMP-A
JMP-C
EC80 Flow Computer to PT02E-12-14P
EC80 B-9541 CABLE PT02E-12-14P
SCALING UNITS FUNCTION/SIGNAL J1 J4 J5 WIRE COLOR PINOUT
N/A
VDC+ PWR + 1 RED A
VDC- PWR RETURN 2 BLK B
N/A
N/A RS-485 + 5 WHT C
N/A RS-485 – 6 WHT/BLK D
N/A Hz RAW A OUT 1 ORG E
N/A Hz RAW B OUT 2 RED/WHT F
N/A Hz GND 3 ORG/BLK H
Hz FREQ 1 OUT 4 GRN J
Hz FREQ 2 OUT 5 GRN/WHT K
N/A Hz GND 6 GRN/BLK L
V ANALOG 1 VOLTAGE OUT 9 BLU M
V ANALOG 2 VOLTAGE OUT 8 BLU/WHT N
N/A N/A AGND 7 BLU/BLK P
N/A N/A ANALOG 4-20 mA RETURN – 3 RED/BLK P
mA ANALOG 4-20 mA OUT + 4 BLK/WHT R
Flow-Meter to EC80 Flow Computer
B-954 WIRE COLOR FUNCTION/SIGNAL J2 J5 PT02E-12-8P PINOUT
WHT RF PICKOFF A 1 A
WHT RF A RETURN 2 B
BLU RF PICKOFF B 3 C
BLU RF B RETURN 4 D
GRN RF PICKOFF Q 5 N/A
GRN RF Q RETURN 6 N/A
ORG RTD EX+ 4 E
ORG RTD + 3 F
ORG RTD – 2 G
ORG RTD EX- 1 H

Wiring and Jumpers
Page 15 CXX-UM-03060-EN-01April 2019
JMP-1 Pickoff Jumper Table
JMP-A ON ROTOR A 4 OHMS
JMP-A OFF ROTOR A 10 OHMS
JMP-B ON ROTOR B 4 OHMS
JMP-B OFF ROTOR B 10 OHMS
JMP-C ON ROTOR Q 4 OHMS
JMP-C OFF ROTOR Q 10 OHMS
XP1
J2
J4
J1
EF4295 TERMINAL BLOCK LAYOUT
JMP 1
PGM PORT
J
5
JMP-B
JMP A
JMP-C
EC80 Flow Computer to B-9541 Cable
EC B-9541
SCALING UNITS FUNCTION/SIGNAL J1 J4 J5 WIRE COLOR
N/A
VDC+ PWR + 1 RED
VDC- PWR RETURN 2 BLK
N/A
N/A RS-485 + 5 WHT
N/A RS-485 – 6 WHT/BLK
N/A Hz RAW A OUT 1 ORG
N/A Hz RAW B OUT 2 RED/WHT
N/A Hz GND 3 ORG/BLK
Hz FREQ 1 OUT 4 GRN
Hz FREQ 2 OUT 5 GRN/WHT
N/A Hz GND 6 GRN/BLK
V ANALOG 1 VOLTAGE OUT 12 BLU
V ANALOG 2 VOLTAGE OUT 11 BLU/WHT
N/A N/A AGND 10 BLU/BLK
mA ANALOG 4-20 mA OUT + 4 RED/BLK
N/A N/A ANALOG 4-20 mA OUT – 3 BLK/WHT

Wiring and Jumpers
April 2019CXX-UM-03060-EN-01Page 16
JMP-1 Pickoff Jumper Table
JMP-A ON ROTOR A 4 OHMS
JMP-A OFF ROTOR A 10 OHMS
JMP-B ON ROTOR B 4 OHMS
JMP-B OFF ROTOR B 10 OHMS
JMP-C ON ROTOR Q 4 OHMS
JMP-C OFF ROTOR Q 10 OHMS
Flow-Meter to EC80 Flow Computer
WIRE COLOR FUNCTION/SIGNAL J2 J5
WHT RF PICKOFF A 1
WHT RF A RETURN 2
WHT RF PICKOFF B 3
WHT RF B RETURN 4
WHT RF PICKOFF Q 5
WHT RF Q RETURN 6
RED OR YLW RTD EX+ 4
RED OR YLW RTD + 3
WHT OR YLW RTD – 2
WHT OR YLW RTD EX- 1

Dimensions
Page 17 CXX-UM-03060-EN-01April 2019
DIMENSIONS
RM1 Conguration
B
A
C
A
B
Front View
Side View
Front View Side View
A 3.40 in (86.36 mm) 1.22 in. (30.99 mm)
B 2.38 in. (60.45 mm) 5.43 in. (137.92 mm)
C — 0.16 in (4.06 mm)
RM2 Conguration
A
B
C
C
B
A
D
Front View
Side View
Front View Side View
A 4.75 in (120.65 mm) 2.18 in. (55.37 mm)
B 3.74 in. (95.00 mm) 1.99 in. (50.55 mm)
C 5.71 in. (145.03 mm) 6.81 in. (172.97 mm)
D — 0.06 in. (1.52 mm)

Dimensions
April 2019CXX-UM-03060-EN-01Page 18
XP1 Conguration
A
C
B
A
B
C
Front View Side View
Front View Side View
A 4.70 in. (119.38 mm) 2.71 in. (68.83 mm)
B 2.80 in. (71.12 mm) 4.70 in. (119.38 mm)
C 2.80 in. (71.12 mm) 0.80 in. (20.32 mm)

Specications
Page 19 CXX-UM-03060-EN-01April 2019
SPECIFICATIONS
Performance
Linearized Frequency ± 0.1% of reading
Linearized Analog
Output
± 0.1% of full scale
Process Latency 100 s
Input Power
Nominal 24V DC, 2w maximum
With Digital Output 7…32V DC
With Analog Output 12…32V DC
Temperature Environment
Operating –40…185° F (–40…85° C)
Storage –67…257° F (–55…125° C)
Humidity 0…80% RH, non-condensing
Flow Meter Input Type (A and B)
(Two Independent Channels)
Pulse TTL Compatible
(A and B)
Frequency range: 5 Hz…5.0 kHz
RF Carrier
4 or 10 Ohm Pickup
Carrier frequency range: 25…65 kHz
Frequency range: 5 Hz…5.0 kHz
RTD Temperature Input
4-Wire
Type 100 Ohm platinum, 0.00385 alpha
Useable Range –65…365° F (–55…185° C)
Analog Input
(For Temperature)
5 Hz Sine Response
Voltage 0…5V or 0…10V DC
ADC Resolution 12 bit (1/4096)
Input Impedance >100k Ohms
Frequency Output
(Two Independent Channels)
0…5V, TTL, 1…20,000 Hz, square wave
50% duty cycle
Minimum Load
Impedance
10k Ohm
Analog Outputs
(Two Independent Channels)
16-bit resolution
Channel One 4…20 mA, 0…5V DC or 0…10V DC
Channel Two 0…5V DC or 0…10V DC
Load Impedance
(4…20 mA)
500 Ohms maximum
EIA-485 Serial Data
Baud 115k
Update Rate Selectable, 0.1 sec minimum
Data Bits 8
Stop Bit 1
Parity None
Raw Frequency Output
(Two Independent Channels)
0…5V, TTL, 5…3500 Hz, square wave
5k Ohm minimum load
Enclosure
Environmental Rating
Remote
Aluminum enclosure with
weatherproof mounting flange
Remote with Display
Aluminum enclosure with
weatherproof mounting flange
Blind Integral
NEMA 4 (IP65)
Class 1, Groups C and D
Class 2, Groups E, F and G
Class 3, WET LOC — Cast Aluminum
Remote Cable Length
Flow Meter to EC80 20 ft (6.1 m)
EC80 to DAQ or Control
System
100 ft (30.5 m)
Software Conforms to SAE ARP4990 calculations for temperature

Using the IFC Software
April 2019CXX-UM-03060-EN-01Page 20
USING THE IFC SOFTWARE
OTE:N When you first run the program, if any error messages display, close them
out. The IFC configuration has not been initialized yet.
Password Initialization
The Password feature allows only users with permission to access or manipulate
the data in the configuration profile and flow processor.
If multiple users are interfacing with the software, set a default User Name
and Password that is easily remembered. For example: User Name=admin;
Password=admin
Un-installing or re-installing does not erase any set users.
To set the password for the first time, or to add a user name later:
1. Click the Options icon in the upper left portion of the toolbar of the main
GUI screen.
Options Icon
Options Icon
Figure 7: Options icon
2. Select the General tab to view the password options.
OTE:N The General options are also available from File > Options > General.
Figure 8: General options
3. Enter a Company name and Technician name. These two elds remain the same
when opening the Options window, and are not protected.
4. Enter a Login name and Password to be associated with a specic prole.
/