Page is loading ...

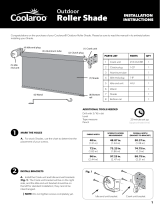
Motor Operated Solar Shade with Valance
Installation and Care Instructions
Bottom Tube Plug
(BTP09)
Qty: 2
Remote Control
(RCS-RC12)
Qty: 1
Shade Cloth
(SC)
Qty: 1
Valance
(RCS-V12)
Qty:1
Cable
(RCS-CAB12)
Qty: 2
Valance Bracket
(VB09)
Qty: 3
1.2 inch Screw
(S09)
Qty: 6
Adjustment Tool
(RCS-AT12)
Qty: 1
Read carefully and retain for future use. Installation video is available online.
Tools required: Philips head screwdriver (not included), tape measure (not included), leveling device (not included), wire cutters (not included), adjustable wrench (not included),
Hex Key (included).
Before you begin……
There are several steps to installing your motorized shade. Some of the decisions you make during the early stages of the
installation can have an effect on the later stages of installation (and vice versa). As a result, we suggest reading through the
entire manual prior to beginning the installation. We also recommend that this shade be installed by two (2) or more people.
Hex Lock
(RCS-HL12)
Qty: 2
Cable Bolt
(RCS-BOLT12)
Qty: 2
Cable Bolt Nut
(RCS-NUT12)
Qty: 2
Cable Bracket
(RCS-CB12)
Qty: 2
Step 1: Identify the parts of your shade (parts shown are not to scale)
This device complies with Part 15 of the
FCC Rules. Operation is subject to the
following two conditions: (1) this device
may not cause harmful interference, and
(2) this device must accept any
interference received, including
interference that may cause undesired
operation.
Battery for
Remote Control
(RCS-BATRC12)
Qty: 1
Remote Control
Holder
(RCS-RCH12)
Qty : 1
Hex Key for
Cable Bolt
(RCS-HK12)
Qty : 1
Remote Control
Holder Bracket
(RCS-RCB12)
Qty: 1
0.6 inch Remote
Control Bracket Screw
(RCS-S12)
Qty: 2
1 inch Cable
Bracket Screw
(RCS-SCB12)
Qty: 4

WALL INSTALLATION
CEILING INSTALLATION
Fig B
Fig C
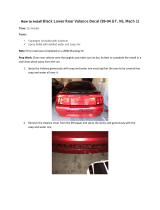
Step 2: Install Valance Brackets
Your shade can be hung as either a wall or ceiling installation. See Figures B and C (to the
right) to determine your type of installation.
Your shade includes two (2) or three (3) Valance Brackets (depending on the size of your
shade), you must install at least two (2) of them. Install one (1) Valance Bracket near each end
of the shade. Note: the Valance Brackets cannot be installed on the extreme edges of the shade,
you will need to allow at least 2 inches (5.08 cm) at the ends of each side. We recommend
installing the brackets on the stud closest to each end of the shade, remembering to allow at
least 2 inches (5.08 cm) from each end. If you are installing a third bracket, install the bracket
(ideally on a wood stud) near the center of the shade. It needs to be aligned with the other two
(2) Valance Brackets. If wood studs are not available, you will need to use anchors (not
included). See your local hardware store for more information.
Some shade models include a paper template to help align your pilot holes. If your shade
includes a template, temporarily adhere it to your installation area, making sure it is straight
and level, then mark and drill your pilot holes. Note: the paper template is the same width as
your valance. Remove the paper template before installing your Valance Brackets.
WALL INSTALLATION
For wall installations, if there is a ceiling that overhangs the shade,
you need to allow at least 1 inch (2.54 cm) of clearance above the
Valance Bracket to allow the Valance to hook onto the Valance
Bracket. See Figure D.
Make sure the plastic tabs on your Valance Brackets are pointing
towards the ground (Fig E). Use the 1.2 inch Valance Bracket
screws to install your Valance Brackets.
CEILING INSTALLATION
It is very important that all brackets are perfectly aligned with
each other.
Fig C
Fig D
Fig E
For ceiling installations, if there is a wall behind the shade,
you need to allow at least 1 inch (2.54 cm) of clearance
behind the Valance Bracket to allow the Valance to hook
onto the Valance Bracket. See Figure F.
Make sure the plastic tabs on your Valance Brackets are
pointing out, towards you (Fig G). Use the 1.2 inch
screws to install your Valance Brackets.
Fig F
Fig G
Important: Do Not Cut the Antenna
Your shade has an antenna that allows the Remote Control to
communicate with the shade motor. Please do not cut the
antenna (see Fig A, antenna shown in red circle).
Fig A

Step 3: Install the Shade
WALL INSTALLATION
For ceiling installations, first hook the
back of the Valance on the back of the
Valance Brackets (Fig J), then rotate the
Valance upwards and click it into place
(Fig K).
Note: you may need to push the plastic
tabs on the Valance Brackets to help the
shade click into place.
Fig J
Fig K
CEILING INSTALLATION
Step 4: Connect Shade to Power
Your shade plugs into a standard 110V electrical outlet.
Step 5: Install Battery in Remote Control
Your Remote Control requires a CR2430 (3V) lithium battery
(included). To install the Battery, slide the battery cover off the
Remote Control and insert the battery with the positive (+) side of the
battery facing the backside of the remote (see Fig L).
If the battery is installed correctly, the red light in the upper right
corner of the Remote Control should illuminate when you press the
stop button.
Your Remote Control has three (3) buttons, Up,
Down, and Stop. Please see Figure M to
familiarize yourself with these buttons.
For wall installations, first hook the back of
the Valance on the top of the Valance
Brackets (Fig H), then rotate the shade down
and click into place (Fig I).
Note: you may need to push the plastic tabs
on the Valance Brackets to help the shade
click into place.
Fig H
Fig I
Up Button
Stop Button
Down Button
Top of Remote
Fig L
Fig M
Your shade is shipped with a protective film to
prevent scratching during shipping. Please
remove this film prior to installation.

ADJUSTING THE FABRIC “TOP LIMIT”
If your shade is not already rolled up, push the “Up” button on your remote to roll the fabric up completely. The point
where the fabric stops rolling up (approximately 4’’ below the Valance) is called the “Fabric Top Limit”. We do NOT
recommend adjusting the Fabric Top Limit (up or down). If you need to adjust your Fabric Top Limit, please contact us.
ADJUSTING THE FABRIC “BOTTOM LIMIT”
Start by pressing the “Down” button once on your remote control to roll your fabric down
to its pre-programmed Bottom Limit of 96’’ below the Valance.
To raise the Fabric Bottom Limit, make sure the fabric is fully lowered, then insert the
Adjustment Tool into the Red Limit Adjuster (located near power cord, inside Valance, see
Fig N) and turn the Adjustment Tool in a clockwise motion. Each half turn of your wrist
will raise the Fabric Bottom Limit approximately 1.5’’. So, for example, if you make six
(6) half turns of your wrist, the Fabric Bottom Limit will rise approximately 9’’. You can
test the new Fabric Bottom Limit by rolling the shade up completely (by pushing the Up
bottom on your remote) then lowering the shade again. Continue this process if you need to
continue raising the Fabric Bottom Limit to your desired position.
To lower the Fabric Bottom Limit, make sure the fabric is fully lowered, then insert the
Adjustment Tool into the red Limit Adjuster (see Fig N) and turn the Adjustment Tool in a
counterclockwise motion. With each turn of your wrist, the fabric will move downwards to
indicate the new Fabric Bottom Limit. Important, if you choose to lower your Fabric
Bottom Limit beyond the pre-programmed 96” Fabric Bottom Limit, please note that we
recommend leaving at least one roll of fabric wrapped around the top tube.
Step 6: Program the Fabric Top and Bottom Limits (optional step)
When rolling your shade up or down, you have the option of stopping the fabric at any position by pushing the stop button on
your Remote Control. Your shade is pre-programmed with a “Fabric Top Limit” and a “Fabric Bottom Limit”. These are the
points where the fabric will stop rolling without you pushing the “stop” button. The default “Fabric Top Limit” is
approximately 4’’ below the valance. The default “Fabric Bottom Limit” is approximately 96’’ below the Valance. If you
are satisfied with these pre-programmed limits, you can skip to Step 7.
Fig N
Fig O
Your shade includes a Remote Control
Holder that allows you to mount your
Remote Control to a wall/beam.
Important: if you mount your Remote
Control, please make sure the remote is
in a covered location. The Remote
Control should not be exposed to rain,
snow or direct sunlight.
Step 7: Mount Remote Control to Wall (optional step)
Place the Remote Control Bracket against the installation surface with the narrow side against the wall/beam and install it
using the two 0.6 inch Remote Control Bracket Screws (see Fig O). Next, slide the Remote Control Holder onto the Remote
Control Bracket (see Fig P). Finally, slide the Remote Control into the Remote Control Holder (see Fig Q).
Fig P
Fig Q

Step 8: Install Cable Tie Down System (optional step)
Your shade includes a Cable Tie Down System to keep your shade secured during mild wind conditions. If you will be using
your shade indoors and do not plan to use the Cable System, you can skip to Step 9. If you intend on installing the Cable Tie
Down System, you must first determine if your particular application is suitable for the Cable System.
ACCEPTABLE CABLE INSTALLATION
UNACCEPTABLE CABLE INSTALLATION
If you cannot anchor the bottom of your Cable directly underneath the point where the Cable enters the Valance (see Fig R),
then you will not be able to use the provided Cable system. Please see Figure R for illustrations showing appropriate and
inappropriate Cable installations. If you cannot use the Cable System, you will need to find another way to secure your
shade during windy conditions. We offer a Bungee Tie Down System for purchase on our website that may better suit your
application. Contact us for more information.
Fig R
To install your
Cable Tie Down
System, start by
screwing the Cable
into your Valance
(See Fig T).
Fig T
Next, roll your Fabric
down to your desired
Bottom Limit (if you
haven’t already
programmed your
Bottom Limit, please
refer to Step 6) and
make a horizontal mark
below both Bottom Tube
Plugs (see Fig S).
Fig S

Maintenance
To clean your fabric, simply rinse with water and soap and scrub with a soft brush. Note: Using bleach or an abrasive cleaner
will void your warranty. Roll the shade down to air dry. Your shade should be rolled up during high wind conditions.
www.keystonefabrics.com Made in China_M1007-E1010 Carbon Court, Unit D. Erie CO 80516_303.652.6164 (p)
Step 8: (continued)
Fig U
Fig V
Fig W
Next, thread the Cable through the Bottom Tube Plug and make a vertical mark where the Cable intersects the horizontal
mark (see Fig U). Note: you may need to roll the Fabric up to complete this part of the process.
Align the top of the Cable Bracket with the horizontal line and centered on the vertical line you created using the Cables (see
Fig V) and install using the provided 1 inch Screws (two screws per Cable Bracket). Note: the Cable Bolt and Cable Bolt
Nut will need to be removed before you can install the Cable Bracket.
Loosen the Hex Lock (using the Hex Key) and thread the Cable through the Cable Bolt. Pull the Cable taut and tighten both
the Cable Bolt Nut using a wrench (not included) and Hex Lock using the provided Hex Key (see Fig W). Cut any excess
Cable slack underneath the Cable Bracket with wire cutters.
Additional assistance needed?
This manual does not explain the following procedures:
Ÿ Re-programming your remote (in the event you lose or break your remote and purchase a new one)
Ÿ Adjusting the Fabric top limit
Downloadable manuals are available on our website to assist with the procedures listed above.
UL Safety Information
To reduce the risk of electric shock, this equipment has a grounding type plug, that has a third (grounding) pin. This plug
will only fit into a grounding type outlet. If the plug does not fit into the outlet, contact a qualified electrician to install the
proper outlet. Do not change the plug in any way.
To reduce the risk of electric shock the operator power is to be provided from a weatherproof outlet in the case of attachment
plug connection or weatherproof junction box in the case of permanent wiring per 314.15 of the National Electric Code,
NFPA70.
If the supply cord is damaged, it must be replaced by a specially prepared cord available from the manufacturer or its service
agent
/