Page is loading ...

1 of 6 Line of Sight | (800) 463-7731 | los.workriteergo.com
Line of Sight Workcenter
#2 tip Phillips screwdriver or drill/driver
Drill with ⅛" drill bit
CPU Width
CPU Height
CPU Width
CPU Height
0.322"
#2 Drive
0.115
"5/8"
0.164"
#8 Screw Size
A Small, Mini Tower CPU
Holder
Qty: 1
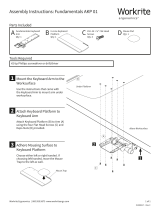
Line of Sight Small, Mini Tower CPU Holder Installation
Instructions: VE-CPU-SMALL
Parts Included
Required, Sold Separately
Tools Needed
B #8 ⅝" Phillips
Head Screws
Qty: 4 C Foam Pads
Qty: 12 D Template Page 6
Qty: 1
Note: CPU placement will depend on your over all
room configuration, Switch locations, Grommet Power
choices and in some instances, cable lengths. Consider
all wiring objectives prior to installing CPU Holders.
Single User Workstations can be configured with the
CPU on either the le or right side of the Chassis. Dual
User Workstations can be configured le, right, inside or
outside. Make sure you anticipate all cabling needs and
install the CPU Holder(s) accordingly.
Single Le
Dual Le
Dual Outside
(preferred)
Single Right
Dual Right
Dual Inside
(avoid-may conflict with USB & switch)
1 Remove Track Stop then Track from CPU Holder
1.1 Press on the Track Stop tabs to bow the Track Stop so it can be removed from the Track.
1.2 With Track Stop removed, slide the Track o of the CPU Holder Glides.
Track Stop
CPU Holder
Track
Tab
Press Track Stop tabs
1.1
1.1
1.2

2 of 6 Line of Sight | (800) 463-7731 | los.workriteergo.com
CPU Height
CPU Height
CPU Width
CPU Height
Note: Make sure this template
is printed at 100% scale. Select
"None" in Page Scaling menu
in printer dialog box.
245 mm
210 mm
128 mm
65 mm
ø 3 mm × 15 mm deep Pilot Hole
>¾"
CPU Width
CPU Height
4 Insert CPU Holder into Track & Install Track Stop
4.1 Insert the CPU Holder (A) assembly into
the installed Track.
4.2 Install Track Stop into the end of the
Track.
3 Apply Foam Pads to CPU Holder
Apply the eight Foam Pads (C) to the CPU Holder (A), placing four
in the corners of the Base and four on the INSIDE of the Clamp.
2 Postion and Attach Track to Worksurface
2.1 Position the Track Template (D, page 6) on the underside of the worksurface where you would like the CPU
Holder to be installed. See the Template Positioning Guidelines on page 4.
2.2 Use a ⅛" drill bit to drill pilot holes at the four drill locations in the template. You may wish to mark your drill bit
so you do not drill any more than ¾" deep and damage your worksurface.
Do not drill all the way through worksurface!
2.3 Attach at the four locations using four #8 × ⅝" Phillips Head Screws(B). If you use an electric screwdriver, be sure
it is on the lowest torque setting to avoid stripping the holes in the top.
A
4.1
4.2
C
Four on INSIDE
of Clamp
Four on Base
A
View from below worksurface View from above worksurface
Mark drill!
Track
B
F
1.1
2.3
2.2
Track
Track Stop

3 of 6 Line of Sight | (800) 463-7731 | los.workriteergo.com
CPU Width
CPU Height
CPU Width
CPU Height
6 Route Cables– Guidelines
Note: Cabling and mounting of the CPU is a diicult process and unique to each situation. Use these guidelines
as a reference, making sure to keep all cabling away from interfering with the Monitor Li.
6.1 Remove the Front and Rear Panel from your Line
of Sight Chassis for access to route the cables.
6.2 Route cables in the best direction using front
Chassis Grommet access for larger CPU's and over
the top of the chassis for smaller CPU's.
6.3 Use the Wire Loom to route cables from the CPU to
the Keyboard Tray for keyboard and mouse.
6.4 Route all power to the shared power area which
may include installed Power Tracks or Power Bars.
6.5 Use the bottom Trough to bundle any excess
cabling.
6.6 Use the Desktop Grommets to route power and
data to the desktop as needed.
6.7 Once routed, secure all cabling with P-Loops,
Cable Clips and Wire Ties provided with the
Chassis hardware.
Note: In some cases, extension cabels may be required.
5 Adjust and Install CPU
5.1 Pull out the Height Adjustment Pin to adjust the CPU Base to
the height of the CPU. The Height Adjustment Pin is captive
and spring loaded, so simply release at the correct height and
confirm mechanism is engaged and secure.
5.2 With the height set, turn the Width Adjustment Lever up
(counter-clockwise) to loosen.
5.3 Slide the CPU in between the Clamp Plate and CPU Holder and
center on the Base.
5.4 Clamp the CPU in place by pressing on the Lever while closing.
The Clamp should hold the CPU securely.
5.5 Front to back and rotation on the
CPU can be performed by using
the Knob or by simply moving
the secure CPU.
Note: Position the CPU to access
the ports for cabling in the next
step.
Top of Chassis
Desktop
Grommet
Keyboard
& Mouse
Wire
Loom
Power &
Data Out
Chassis
Grommet
Shared Power
Bottom Trough
Monitor Out &
Monitor Power
CPU
CPU Port
locations
will vary
CPU Power
6.2
6.2
6.3
6.4
6.5
6.6
5.1 5.2
5.3
5.4
5.5
Apply pressure
at top of clamp
behind lever
Knob
Base
Centered on Base

4 of 6 Line of Sight | (800) 463-7731 | los.workriteergo.com
A
B
B
A
B
B
A
B
BA
B
B
A
B
B
A
B
B
A
A
B
B
A
B
B
A
B
B
A
B
B
½ CPU
½ CPU
½ CPU
½ CPU
✓ Template Positioning Guidelines
Anticipate the needs for your complete installation and follow a "measure/place/repeat" methodology for
consistency. Position the Track Template (next page) on the underside of the worksurface, exactly where you
would like the CPU Holder to be installed.
A – for front to back track mounting:
Position the template flush or slightly under the front edge of the worksurface and parallel to the Top Bracket,
keeping the distance from the side and front, consistent throughout the installation.
Note: Confirm as best as possible that a fully installed front-to-back CPU with all cabling will not interfere with
the Top Bracket or Grommet and that cabling will be routed properly in Step 6. If the Track interferes with
Grommet, consider side-to-side mounting.
B - for side to side track mounting:
Position the template half the depth of the CPU and perpendicular to the front edge of the worksurface, keeping
the distance from the side and front, consistent throughout the installation.
Note: Confirm as best as possible that a fully installed side-to-side CPU and all cabling will not interfere with the
Bracket or seated user and that cabling will be routed properly in Step 6. If the Track interferes with Top Bracket
or seated User, consider front-to-back mounting.
Single Le
Dual Le
Dual Outside (preferred)
Single Right
Dual Right
Dual Inside
(avoid-may conflict with USB & Switch)
Flush or slightly
under front edge
Grommet
Top Bracket

5 of 6 Line of Sight | (800) 463-7731 | los.workriteergo.com
This page intentionally le blank.

#1500399 Rev A
Note: Make sure this template
is printed at 100% scale. Select
"None" in Page Scaling menu
in printer dialog box.
245 mm
210 mm
128 mm65 mm
ø 3 mm × 15 mm deep Pilot Hole
/