Kohler 16213-4A-BV Installation guide

Category
Sanitary ware
Type
Installation guide
Installation Guide
Two-Handle Bath/Shower Faucet
M product numbers are for Mexico (i.e. K-12345M)
Los números de productos seguidos de
M corresponden a México (Ej.
K-12345M)
Français, page“ Français-1”
Español, página“ Español-1”
K–16213 K-16214
K-16217
1025256-2-B
Tools and Materials
Thank You For Choosing Kohler Company
We appreciate your commitment to Kohler quality. Please take a few
minutes to review this manual before you start installation. If you
encounter any installation or performance problems, please don’t
hesitate to contact us. Our phone numbers and website are listed on
the back cover. Thanks again for choosing Kohler Company.
Before You Begin
Please read all instructions before you begin.
Observe all local plumbing and building codes.
Shut off the main water supply.
Before installation, unpack the new faucet and inspect it for
damage. Return the faucet to the carton until you are ready to
install.
Kohler Co. reserves the right to make revisions in the design of
faucets without notice, as specified in the Price Book.
Tube CutterDrillAdjustable
Wrench
Strap
Wrench
Propane
Torch
Hex
Wrench
Thread
Sealant
Plumbers
Putty
Assorted
Screwdrivers
Torque
Wrench
Solder
1025256-2-B 2 Kohler Co.
1. Install the Valve - Floor Supplies
CAUTION: Risk of product damage. Remove the thread
protectors, valve units, and aspirator before applying heat to the
yoke.
Determine the location of the support framing for the yoke,
spout, and the showerhead.
Install the support framing as needed.
The yoke has two union joints that can be used with either 1/2
N.P.T. pipe or copper tubing.
Connect the hot and cold supplies to the yoke. They should be
2-1/4 (5.7 cm) minimum and 3 (7.6 cm) maximum from the
finished wall.
Reinstall everything that was removed before soldering.
48" (122 cm) to Floor
72" (182.9 cm) –
78" (198.1 cm) to
Floor (Typical)
72" (182.9 cm) –
78" (198.1 cm) to
Floor (Typical)
Bath/Shower Installation
Shower Installation
4" (10.2 cm)
8" (20.3 cm)
Valve Units
1/2" NPT Pipe or
Copper Tubing
Thread
Protector
3" (7.6 cm)
Max.
2-1/4" (5.7 cm)
Min.
Union
Joints
Finished
Wall
Kohler Co. 3 1025256-2-B
2. Install the Valve - Ceiling Supplies
NOTE: This section applies to ceiling installations only.
Remove the aspirator with a 3/8 hex wrench.
Turn the yoke over so that the supplies connect from the top of
yoke.
For bath and shower installations, reinstall the aspirator at the top
of yoke. Do not overtighten.
For bath only or shower only installations, discard the aspirator.
NOTE: Reversing the yoke will reverse the direction the lever
handles close. For proper lever handle operation, reverse the valve
units.
Before removing the valves, make sure they are in the open
position.
Torque the valves to 23-30 ft. lbs. (31-40.6 Newton/m) and turn to
the closed position.
Turn the hot valve counterclockwise and the cold valve clockwise.
Remove the thread protectors and reverse the valves.
Replace the thread protectors.
Aspirator
Hot
Cold
Valve Unit
Ceiling
Supplies
Thread
Protector
1025256-2-B 4 Kohler Co.
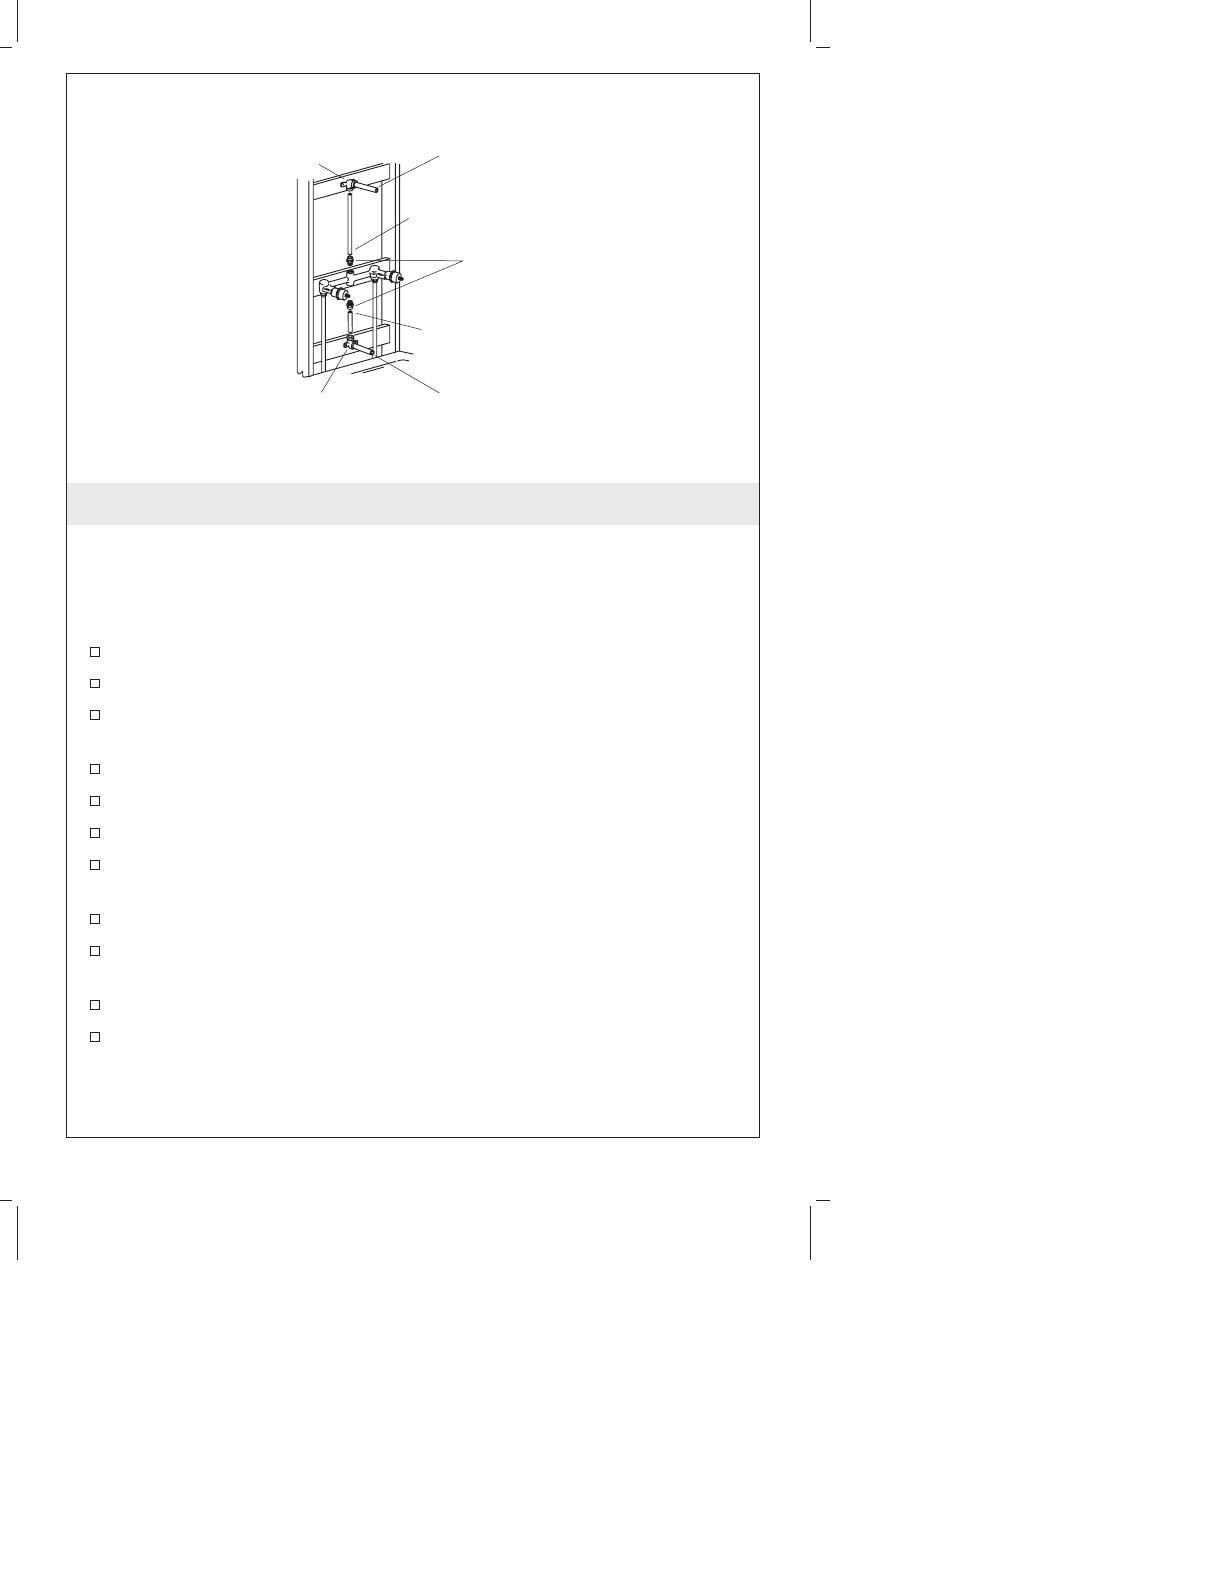
3. Complete the Valve Installation
NOTE: This section applies to all valve installation styles.
IMPORTANT! For bath-only or shower-only installations: Remove
and discard the aspirator. Apply thread sealant to a plug and install
it into the yoke in place of the shower or bath piping.
Plumb using 1/2 N.P.T. copper tubing, elbows, and adapters.
Use thread sealant on all threaded connections.
Secure the bath and/or shower piping to the support framing and
install temporary nipples.
Install caps on the temporary nipples.
Turn on the hot and cold water supplies, and check for leaks.
Remove the caps from the temporary nipples.
Open the valve controls and cycle the controls through their
operating range. Check for leaks.
Turn the valve control off.
If the valve has stop valves, rotate both stop adjustments fully
clockwise.
Open the valve controls. Water should not flow.
Close the valve controls, and rotate both stop adjustments fully
counterclockwise.
Elbow
Elbow
Adapters
1/2" NPT
Copper Tubing
1/2" NPT
Copper Tubing
Temporary
Nipple
Temporary
Nipple
Kohler Co. 5 1025256-2-B
4. Install the Handles
Attach the stem extension to the valve stem with the provided
screw.
Place the skirt on the valve stem extension and turn the handle to
the closed position.
Remove the handle assembly, apply a ring of plumbers putty to
the base, and replace it with the handle situated in the desired
closed position.
Hold the handle in place and thread the skirt onto the valve until
it is firmly in place.
Repeat with second handle.
Screw
Valve Stem
Skirt
Handle
Stem
Extension
Apply
plumbers
putty.
1025256-2-B 6 Kohler Co.
5. Install the Spout
Remove the temporary nipple.
Install a 1/2 N.P.T. nipple to extend 1/2 (1.3 cm) beyond the
finished wall.
Apply thread sealant to the nipple threads.
Apply a bead of plumbers putty or other sealant around the inlet
of the spout according to the putty manufacturer’s instructions.
Carefully tighten the spout with a clean strap wrench.
Remove all excess putty.
Flush hot and cold water through the spout for one minute.
Nipple
1/2"
(1.3 cm)
Apply plumbers putty.
Kohler Co. 7 1025256-2-B
6. Install the Showerhead
CAUTION: Risk of product damage. To avoid plugging the
showerhead spray outlets, use thread sealant tape on the shower
arm threads. Do not use thread sealant compound (pipe dope).
Remove the temporary nipple.
Loosen the setscrew and apply a bead of plumbers putty or other
sealant around the wall flange according to putty manufacturer’s
instructions.
Slip the wall flange over the shower arm.
Place thread sealant on the shower arm threads and thread the
shower arm into the elbow.
Tighten with a clean strap wrench. Do not overtighten.
Flush out the system with the showerhead removed. Apply
thread sealant to the threads, and thread the showerhead onto the
shower arm.
Apply thread sealant to the threads, and thread the showerhead
onto the shower arm.
Press the wall flange tight against the wall and secure with the
setscrew.
7. Complete the Installation
Ensure that all connections are tight.
Open the drain.
Elbow
Showerhead
Shower Arm
Setscrew
Apply plumbers
putty
Wall Flange
1025256-2-B 8 Kohler Co.
Complete the Installation (cont.)
Turn on the main water supply and check for leaks.
Open the hot and cold valves and check for leaks.
Run the water for about a minute.
Turn the hot and cold water valves off.
Kohler Co. 9 1025256-2-B
  • Page 1 1
  • Page 2 2
  • Page 3 3
  • Page 4 4
  • Page 5 5
  • Page 6 6
  • Page 7 7
  • Page 8 8
  • Page 9 9
  • Page 10 10
  • Page 11 11
  • Page 12 12
  • Page 13 13
  • Page 14 14
  • Page 15 15
  • Page 16 16
  • Page 17 17
  • Page 18 18
  • Page 19 19
  • Page 20 20
  • Page 21 21
  • Page 22 22
  • Page 23 23
  • Page 24 24
  • Page 25 25
  • Page 26 26
  • Page 27 27
  • Page 28 28

Kohler 16213-4A-BV Installation guide

Category
Sanitary ware
Type
Installation guide

Ask a question and I''ll find the answer in the document

Finding information in a document is now easier with AI