
Industrial Secure Router User’s Manual
Second Edition, August 2013
www.moxa.com/product
© 2013 Moxa Inc. All rights reserved.
Reproduction without permission is prohibited.

Industrial Secure Router User’s Manual
The software described in this manual is furnished under a license agreement and may be used only in accordance with
the terms of that agreement.
Copyright Notice
Copyright ©2013 Moxa Inc.
All rights reserved.
Reproduction without permission is prohibited.
Trademarks
The MOXA logo is a registered trademark of Moxa Inc.
All other trademarks or registered marks in this manual belong to their respective manufacturers.
Disclaimer
Information in this document is subject to change without notice and does not represent a commitment on the part of
Moxa.
Moxa provides this document as is, without warranty of any kind, either expressed or implied, including, but not limited
to, its particular purpose. Moxa reserves the right to make improvements and/or changes to this manual, or to the
products and/or the programs described in this manual, at any time.
Information provided in this manual is intended to be accurate and reliable. However, Moxa assumes no responsibility for
its use, or for any infringements on the rights of third parties that may result from its use.
This product might include unintentional technical or typographical errors. Changes are periodically made to the
information herein to correct such errors, and these changes are incorporated into new editions of the publication.
Technical Support Contact Information
www.moxa.com/support
Moxa Americas
Toll
-free: 1-888-669-2872
Tel:
+1-714-528-6777
Fax:
+1-714-528-6778
Moxa China (Shanghai office)
Toll
-free: 800-820-5036
Tel:
+86-21-5258-9955
Fax:
+86-21-5258-5505
Moxa Europe
Tel:
+49-89-3 70 03 99-0
Fax: +49-89-3 70 03 99-99
Moxa Asia
-Pacific
Tel:
+886-2-8919-1230
Fax: +886-2-8919-1231

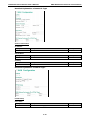
Table of Contents
1. Introduction ...................................................................................................................................... 1-1
Overview ........................................................................................................................................... 1-2
Package Checklist ............................................................................................................................... 1-2
Features ............................................................................................................................................ 1-2
Industrial Networking Capability .................................................................................................... 1-2
Designed for Industrial Applications ............................................................................................... 1-2
Useful Utility and Remote Configuration ......................................................................................... 1-2
2. Getting Started.................................................................................................................................. 2-1
RS-232 Console Configuration (115200, None, 8, 1, VT100) .................................................................... 2-2
Using Telnet to Access the Industrial Secure Router’s Console .................................................................. 2-3
Using a Web Browser to Configure the Industrial Secure Router ............................................................... 2-4
3. EDR-810 Series Features and Functions ............................................................................................ 3-1
Quick Setting Profile ............................................................................................................................ 3-2
System .............................................................................................................................................. 3-5
System Information ..................................................................................................................... 3-5
User Account .............................................................................................................................. 3-6
Date and Time ............................................................................................................................ 3-8
Warning Notification .................................................................................................................... 3-9
SettingCheck ............................................................................................................................ 3-13
System File Update—by Remote TFTP .......................................................................................... 3-14
System File Update—by Local Import/Export ................................................................................ 3-15
Restart ..................................................................................................................................... 3-16
Reset to Factory Default ............................................................................................................. 3-16
Port ................................................................................................................................................ 3-16
Port Settings ............................................................................................................................. 3-16
Link Aggregation ....................................................................................................................... 3-18
The Port Trunking Concept ......................................................................................................... 3-18
Port Mirror ................................................................................................................................ 3-19
Using Virtual LAN .............................................................................................................................. 3-20
The VLAN Concept ..................................................................................................................... 3-20
Configuring Virtual LAN .............................................................................................................. 3-21
Multicast .......................................................................................................................................... 3-23
The Concept of Multicast Filtering ................................................................................................ 3-23
IGMP Snooping ......................................................................................................................... 3-26
IGMP Snooping Settings ............................................................................................................. 3-26
IGMP Table ............................................................................................................................... 3-26
Stream Table ............................................................................................................................ 3-27
Static Multicast MAC .................................................................................................................. 3-27
QoS and Rate Control ........................................................................................................................ 3-28
QoS Classification ...................................................................................................................... 3-28
CoS Mapping ............................................................................................................................ 3-29
ToS/DSCP Mapping .................................................................................................................... 3-30
Rate Limiting ............................................................................................................................ 3-30
MAC Address Table ........................................................................................................................... 3-31
Interface ......................................................................................................................................... 3-32
WAN ........................................................................................................................................ 3-32
LAN ......................................................................................................................................... 3-35
Network Service ............................................................................................................................... 3-35
DHCP Settings .......................................................................................................................... 3-35
SNMP Settings .......................................................................................................................... 3-39
Dynamic DNS ........................................................................................................................... 3-41
Security ........................................................................................................................................... 3-42
User Interface Management ........................................................................................................ 3-42
Authentication Certificate ........................................................................................................... 3-43
Trusted Access .......................................................................................................................... 3-43
RADIUS Server Settings ............................................................................................................. 3-44
Monitor............................................................................................................................................ 3-44
Interface Statistics .................................................................................................................... 3-44
Port Statistics ........................................................................................................................... 3-45
Event Log ................................................................................................................................. 3-46
4. EDR-G902/G903 Series Features and Functions................................................................................ 4-1
Overview ........................................................................................................................................... 4-2
Configuring Basic Settings ................................................................................................................... 4-3
System Identification ................................................................................................................... 4-3
Accessible IP ............................................................................................................................... 4-4
Password.................................................................................................................................... 4-5
Time .......................................................................................................................................... 4-6

SettingCheck .............................................................................................................................. 4-8
System File Update—by Remote TFTP .......................................................................................... 4-10
System File Update—by Local Import/Export ................................................................................ 4-10
Restart ..................................................................................................................................... 4-11
Reset to Factory Default ............................................................................................................. 4-11
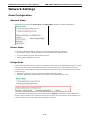
Network Settings .............................................................................................................................. 4-12
Mode Configuration ................................................................................................................... 4-12
WAN1 Configuration .................................................................................................................. 4-13
WAN2 Configuration (includes DMZ Enable) .................................................................................. 4-15
Using DMZ Mode ....................................................................................................................... 4-19
LAN Interface............................................................................................................................ 4-19
Communication Redundancy .............................................................................................................. 4-20
WAN Backup (EDR-G903 only) .................................................................................................... 4-20
Monitor............................................................................................................................................ 4-22
System Log ...................................................................................................................................... 4-23
EventLog .................................................................................................................................. 4-23
Syslog ..................................................................................................................................... 4-24
5. Routing ............................................................................................................................................. 5-1
Unicast Routing .................................................................................................................................. 5-2
Static Routing ............................................................................................................................. 5-2
RIP (Routing Information Protocol) ................................................................................................ 5-3
Routing Table ............................................................................................................................. 5-4
6. Network Redundancy ........................................................................................................................ 6-1
Layer 2 Redundant Protocols (EDR-810 series only) ................................................................................ 6-2
Configuring STP/RSTP .................................................................................................................. 6-2
Configuring Turbo Ring V2 ............................................................................................................ 6-4
Layer 3 Redundant Protocols ................................................................................................................ 6-6
VRRP Settings ............................................................................................................................. 6-6
7. Network Address Translation ............................................................................................................ 7-1
Network Address Translation (NAT) ....................................................................................................... 7-2
NAT Concept ............................................................................................................................... 7-2
1-to-1 NAT ................................................................................................................................. 7-2
N-to-1 NAT ................................................................................................................................. 7-4
Port Forward ............................................................................................................................... 7-5
8. Firewall ............................................................................................................................................. 8-1
Policy Concept .................................................................................................................................... 8-2
Policy Overview .................................................................................................................................. 8-2
Policy Configuration ............................................................................................................................ 8-2
Layer 2 Policy Setup (Only in Bridge Mode for EDR-G902/G903) ....................................................... 8-4
Quick Automation Profile .............................................................................................................. 8-6
Policy Check ............................................................................................................................... 8-8
Modbus TCP Policy ............................................................................................................................ 8-10
Denial of Service (DoS) Defense ......................................................................................................... 8-13
9. Virtual Private Network (VPN) .......................................................................................................... 9-1
Overview ........................................................................................................................................... 9-2
IPSec Configuration ............................................................................................................................ 9-2
Global Settings ........................................................................................................................... 9-2
IPSec Settings ............................................................................................................................ 9-3
IPSec Status ............................................................................................................................... 9-7
X.509 Certificate ......................................................................................................................... 9-7
L2TP Server (Layer 2 Tunnel Protocol) ................................................................................................. 9-10
L2TP Configuration .................................................................................................................... 9-10
Examples for Typical VPN Applications ................................................................................................. 9-11
10. Diagnosis ........................................................................................................................................ 10-1
Ping ................................................................................................................................................ 10-2
LLDP ............................................................................................................................................... 10-2
A. MIB Groups ....................................................................................................................................... A-1

1
1. Introduction
Welcome to the Moxa Industrial Secure Router series, the EDR-G902, EDR-G902, and EDR-810. The all-in-one
Firewall/NAT/VPN secure routers are designed for connecting Ethernet-enabled devices with network IP
security.
The following topics are covered in this chapter:
Overview
Package Checklist
Features
Industrial Networking Capability
Designed for Industrial Applications
Useful Utility and Remote Configuration

Industrial Secure Router User's Manual Introduction
1-2
Overview
As the world’s network and information technology becomes more mature, the trend is to use Ethernet as the
major communications interface in many industrial communications and automation applications. In fact, a
entirely new industry has sprung up to provide Ethernet products that comply with the requirements of
demanding industrial applications.
Moxa’s Industrial Secure Router series is a Gigabit speed, all-in-one Firewall/VPN/Router for Ethernet security
applications in sensitive remote control and monitoring networks. The Industrial Secure Router supports one
WAN, one LAN, and a user-configurable WAN/DMZ interface (EDR-G903) that provides high flexibility for
different applications, such as WAN redundancy or Data/FTP server security protection.
The Quick Automation Profile function of the Industrial Secure Router’s firewall supports most common
Fieldbus protocols, including EtherCAT, EtherNet/IP, FOUNDATION Fieldbus, Modbus/TCP, and PROFINET.
Users can easily create a secure Ethernet Fieldbus network from a user-friendly web UI with a single click. In
addition, wide temperature models are available that operate reliably in hazardous, -40 to 75°C environments.
Package Checklist
The Industrial Secure Routers are shipped with the following items. If any of these items are missing or
damaged, please contact your customer service representative for assistance.
• 1 Moxa Industrial Secure Router
• RJ45 to DB9 console port cable
• Protective caps for unused ports
• DIN rail mounting kit (attached to the Industrial Secure Router’s rear panel by default)
• Hardware installation guide (printed)
• CD-ROM with user’s manual and Windows utility
• Warranty card
Features
Industrial Networking Capability
• Router/Firewall/VPN all in one
• 1 WAN, 1 LAN, and 1 user-configurable WAN or DMZ interface
• Network address translation (N-to-1, 1-to-1, and port forwarding)
Designed for Industrial Applications
• Dual WAN redundancy function
• Firewall with Quick Automation Profile for Fieldbus protocols
• Intelligent PolicyCheck and SettingCheck tools
• -40 to 75°C operating temperature (T models)
• Long-haul transmission distance of 40 km or 80 km (with optional mini-GBIC)
• Redundant, dual 12 to 48 VDC power inputs
• IP30, rugged high-strength metal case
• DIN rail or panel mounting ability
Useful Utility and Remote Configuration
• Configurable using a Web browser and Telnet/Serial console
• Send ping commands to identify network segment integrity

2
2. Getting Started
This chapter explains how to access the Industrial Secure Router for the first time. There are three ways to
access the router: (1) serial console, (2) Telnet console, and (3) web browser. The serial console connection
method, which requires using a short serial cable to connect the Industrial Secure Router to a PC’s COM port,
can be used if you do not know the Industrial Secure Router’s IP address. The Telnet console and web browser
connection methods can be used to access the Industrial Secure Router over an Ethernet LAN, or over the
Internet. A web browser can be used to perform all monitoring and administration functions, but the serial
console and Telnet console only provide basic functions.
The following topics are covered in this chapter:
RS-232 Console Configuration (115200, None, 8, 1, VT100)
Using Telnet to Access the Industrial Secure Router’s Console
Using a Web Browser to Configure the Industrial Secure Router

Industrial Secure Router User's Manual Getting Started
2-2
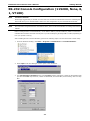
RS-232 Console Configuration (115200, None, 8,
1, VT100)
NOTE
Connection Caution!
We strongly suggest that you do NOT use more than one connection method at the same time. Following this
advice will allow you to maintain better control over the configuration of your
Industrial Secure Router
NOTE
We recommend using Moxa PComm Terminal Emulator, which can be downloaded free of charge from Moxa’s
website.
Before running PComm Terminal Emulator, use an RJ45 to DB9-F (or RJ45 to DB25-F) cable to connect the
Industrial Secure Router’s RS-232 console port to your PC’s COM port (generally COM1 or COM2, depending on
how your system is set up).
After installing PComm Terminal Emulator, perform the following steps to access the RS-232 console utility.
1. From the Windows desktop, click Start Programs PCommLite1.3 Terminal Emulator.
2. Select Open in the Port Manager menu to open a new connection.
3. The Communication Parameter page of the Property window will appear. Select the appropriate COM
port from the Ports drop-down list, 115200 for Baud Rate, 8 for Data Bits, None for Parity, and 1 for Stop
Bits.

Industrial Secure Router User's Manual Getting Started
2-3
4. Click the Terminal tab, select VT100 for Terminal Type, and then click OK to continue.
5. The Console login screen will appear. Use the keyboard to enter the login account (admin or user), and
then press Enter to jump to the Password field. Enter the console Password (the same as the Web
Browser password; leave the Password field blank if a console password has not been set), and then press
Enter.
NOTE
The default password for the EDR series with firmware v3.0 and later is
“moxa”. For previous firmware
versions, the
default passwor
d is blank. For greater security, please change the default password after the first
log in.
6. Enter a question mark (?) to display the command list in the console.
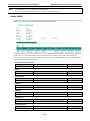
The following table lists commands that can be used when the Industrial Secure Router is in console (serial or
Telnet) mode:
Login by Admin Account
Command Description
quit Exit Command Line Interface
exit Exit Command Line Interface
reload Halt and Perform a Cold Restart
terminal Configure Terminal Page Length
copy
Import or Export File
save Save Running Configuration to Flash
ping Send Echo Messages
clear Clear Information
show Show System Information
configure Enter Configuration Mode
Using Telnet to Access the Industrial Secure
Router’s Console
You may use Telnet to access the Industrial Secure Router’s console utility over a network. To access the EDR’s
functions over the network (by either Telnet or a web browser) from a PC host that is connected to the same
LAN as the Industrial Secure Router, you need to make sure that the PC host and the Industrial Secure Router
are on the same logical subnet. To do this, check your PC host’s IP address and subnet mask. By default, the
LAN IP address is 192.168.127.254 and the Industrial subnet mask is 255.255.255.0 (for a Class C subnet). If
you do not change these values, and your PC host’s subnet mask is 255.255.0.0, then its IP address must have

Industrial Secure Router User's Manual Getting Started
2-4
the form 192.168.xxx.xxx. On the other hand, if your PC host’s subnet mask is 255.255.255.0, then its IP
address must have the form, 192.168.127.xxx.
NOTE
To use the
Industrial Secure Router
’s management and monitoring functions from a PC host connected to the
same LAN as the
Industrial Secure Router, you must make sure that the PC host and the
Industrial Secure
R
outer are connected to the same logical subnet.
NOTE
Before
accessing the console utility via Telnet, first connect the Industrial Secure Router
’s RJ45 Ethernet LAN
ports to your Ethernet LAN, or directly to your PC’s Ethernet card (NIC). You can use either a straight
-
through
or cross
-over Ethernet cable.
NOTE
The
Industrial Secure Router’s default LAN IP address is 192.168.127.254.
Perform the following steps to access the console utility via Telnet.
1. Click Start Run, and then telnet to the Industrial Secure Router’s IP address from the Windows Run
window. (You may also issue the Telnet command from the MS-DOS prompt.)
2. Refer to instructions 6 and 7 in the RS-232 Console Configuration (115200, None, 8, 1, VT100)
section on page 2-2.
Using a Web Browser to Configure the Industrial
Secure Router
The Industrial Secure Router’s web browser interface provides a convenient way to modify the router’s
configuration and access the built-in monitoring and network administration functions. The recommended web
browser is Microsoft Internet Explorer 6.0 with JVM (Java Virtual Machine) installed.
NOTE
To use the
Industrial Secure Router
’s management and monitoring functions from a PC host connected to the
same LAN as the
Industrial Secure Router, you must make sure that the PC host and the
Industrial Secure
R
outer are connected to the same logical subnet.
NOTE
Before accessing the
Industrial Secure Router’s web browser, first connect the Industrial Secure Router’s
RJ45 Ethernet LAN ports to your Ethernet LAN, or directly to your PC’s Ethernet card (NIC). You can use either
a straight
-through or cross-over Ethernet cable.
NOTE
The
Industrial Secure Router’s default LAN IP address is 192.168.127.254.
Perform the following steps to access the Industrial Secure Router’s web browser interface.
1. Start Internet Explorer and type the Industrial Secure Router’s LAN IP address in the Address field. Press
Enter to establish the connection.

Industrial Secure Router User's Manual Getting Started
2-5
2. The web login page will open. Select the login account (Admin or User) and enter the Password (the same
as the Console password), and then click Login to continue. Leave the Password field blank if a password
has not been set.
NOTE
The default password for the EDR series with firmware v3.0 and later is
“moxa”. For previous firmware
versions, the
default password is blank. For greater security, please change the default password after the
first log in.
You may need to wait a few moments for the web page to be downloaded to your computer. Use the menu tree
on the left side of the window to open the function pages to access each of the router’s functions.

3
3. EDR-810 Series Features and Functions
In this chapter, we explain how to access the Industrial Secure Router’s configuration options, perform
monitoring, and use administration functions. There are three ways to access these functions: (1) RS-232
console, (2) Telnet console, and (3) web browser.
The web browser is the most user-friendly way to configure the Industrial Secure Router, since you can both
monitor the Industrial Secure Router and use administration functions from the web browser. An RS-232 or
Telnet console connection only provides basic functions. In this chapter, we use the web browser to introduce
the Industrial Secure Router’s configuration and monitoring functions.
The following topics are covered in this chapter:
Quick Setting Profile
System
System Information
User Account
Date and Time
Warning Notification
SettingCheck
System File Update—by Remote TFTP
System File Update—by Local Import/Export
Restart
Reset to Factory Default
Port
Port Settings
Link Aggregation
The Port Trunking Concept
Port Mirror
Using Virtual LAN
The VLAN Concept
Configuring Virtual LAN
Multicast
The Concept of Multicast Filtering
IGMP Snooping
IGMP Snooping Settings
IGMP Table
Stream Table
Static Multicast MAC
QoS and Rate Control
ToS/DSCP Mapping
MAC Address Table
Interface
WAN
LAN
Network Service
DHCP Settings
SNMP Settings
Dynamic DNS
Security
User Interface Management
Authentication Certificate
Trusted Access
RADIUS Server Settings
Monitor
Interface Statistics
Port Statistics
Event Log

Industrial Secure Router User's Manual EDR-810 Series Features and Functions
3-2
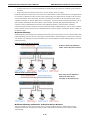
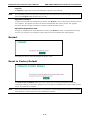
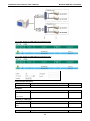
Quick Setting Profile
The EDR-810 series supports WAN Routing Quick Setting, which creates a routing function between LAN ports
and WAN ports defined by users. Follow the wizard’s instructions to configuring the LAN and WAN ports.
Step 1: Define the WAN ports and LAN ports
Click on the ports in the figure to define the WAN ports and LAN ports.
Step 2: Configure the LAN IP address of the EDR-810 and the subnet address of
the LAN ports
Configure the LAN IP address of the EDR-810 to define the subnet of the LAN ports on the secure router. The
default IP address of the EDR-810 on the LAN side is 192.168.127.254, and the default subnet address is
192.168.127.0/24.

Industrial Secure Router User's Manual EDR-810 Series Features and Functions
3-3
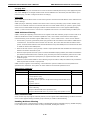
Step 3: Configure the WAN port type
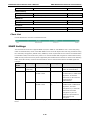
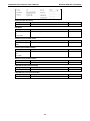
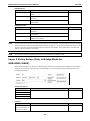
Configure the WAN port type to define how the secure router switch connects to the WAN.
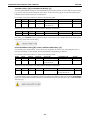
Connect Type
Setting Description Factory Default
Dynamic IP Get the WAN IP address from a DHCP server or via a PPTP
connection.
Dynamic IP
Static IP Set a specific static WAN IP address or create a connection to
a
PPTP server with a specific IP address.
PPPoE Get the WAN IP address through PPPoE Dialup.
Dynamic IP

Industrial Secure Router User's Manual EDR-810 Series Features and Functions
3-4
Static IP
PPPoE
Step 4: Enable services
Check Enable DHCP Server to enable the DHCP server for LAN devices. The default IP address range will be
set automatically. To modify the IP range, go to the DHCP Server page. N-1 NAT will be also enabled by
default.

Industrial Secure Router User's Manual EDR-810 Series Features and Functions
3-5
Step 5: Activate the settings
Click the Activate button.
NOTE
An existing
configuration will be overwritten by new settings when processing WAN Routing Quick Setting
.
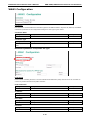
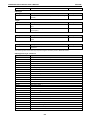
System
The System section includes the most common settings required by administrators to maintain and control a
Moxa switch.
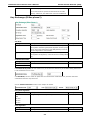
System Information
Defining System Information items to make different switches easier to identify that are connected to your
network.
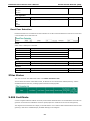
Router Name
Setting Description Factory Default
Max. 30 characters This option is useful for differentiating between the roles or
applications of different units. Example: Factory Switch 1.
Firewall/VPN Router
Router Location
Setting Description Factory Default
Max. 80 characters
This option is useful for differentiating between the locations of
different units. Example: production line 1.
Device Location
Router Description
Setting Description Factory Default
Max. 30 characters This option is useful for recording a more detailed description of
the unit.
None
Maintainer Contact Info
Setting Description Factory Default
Max. 30 characters This option is useful for providing information about who is
responsible for maintaining this unit and how to contact this
person.
None
Web Configuration
Setting Description Factory Default
http or https
Enable HTTP and HTTPS
http or https
https only Enable HTTPS only

Industrial Secure Router User's Manual EDR-810 Series Features and Functions
3-6
User Account
The Moxa industrial secure router supports the management of accounts, including establishing, activating,
modifying, disabling and removing accounts. There are two levels of configuration access, admin and user. The
account belongs to admin privilege has read/write access of all configuration parameters, while the account
belongs to user authority has read access to view the configuration only.
NOTE
1.
In consideration of higher security level, strongly suggest to change the defaul
t password after first log in
2.
The user with ‘admin’ account name can’t be deleted and disabled by default
Active
Setting Description Factory Default
Checked The Moxa switch can be accessed by the activated user name Enabled
Unchecked The Moxa switch can’t be accessed by the non-activated user
Authority
Setting Description Factory Default
admin The account has read/write access of all configuration
parameters.
admin
user The account can only read configuration but without any
modification.

Industrial Secure Router User's Manual EDR-810 Series Features and Functions
3-7
Create New Account
Input the user name, password and assign the authority to the new account. Once apply the new setting, the
new account will be shown under the Account List table.
Setting Description Factory Default
User Name
(Max. of 30 characters)
User Name None
Password Password for the user account.
Minimum requirement is 4 characters, maximum of 16
characters
None
Modify Existing Account
Select the existing account from the Account List table. Modify the details accordingly then apply the setting to
save the configuration.
Delete Existing Account
Select the existing account from the Account List table. Press delete button to delete the account.

Industrial Secure Router User's Manual EDR-810 Series Features and Functions
3-8
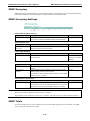
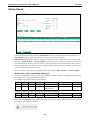
Date and Time
The Moxa industrial secure router has a time calibration function based on information from an NTP server or
user specified time and date. Functions such as automatic warning emails can therefore include time and date
stamp.
NOTE
The Moxa industrial secure router does not have a real time clock. The user must update the Current Time and
Cur
rent Date to set the initial time for the Moxa switch after each reboot, especially when there is no NTP
server on the LAN or Internet connection.
System Up Time
Indicates how long the Moxa industrial secure router remained up since the last cold start.
Current Time
Setting Description Factory Default
User-specified time
Indicates time in yyyy-mm-dd format.
None
Clock Source
Setting Description Factory Default
Local Configure clock source from local time Local
NTP Configure clock source from NTP
SNTP Configure clock source from SNTP
Time Zone
Setting Description Factory Default
Time zone Specifies the time zone, which is used to determine the local
time offset from GMT (Greenwich Mean Time).
GMT (Greenwich
Mean Time)
Daylight Saving Time
The Daylight Saving Time settings are used to automatically set the Moxa switch’s time forward according to
national standards.

Industrial Secure Router User's Manual EDR-810 Series Features and Functions
3-9
Start Date
Setting Description Factory Default
User-specified date Specifies the date that Daylight Saving Time begins. None
End Date
Setting Description Factory Default
User-specified date Specifies the date that Daylight Saving Time ends. None
Offset
Setting Description Factory Default
User-specified hour Specifies the number of hours that the time should be set
forward during Daylight Saving Time.
None
NOTE
Changing the time zone will automatically correct the current time. Be sure to set the time zone before setting
the time.
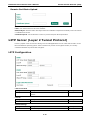
Time Server IP/Name
Setting
Description
Factory Default
IP address or name of
time server
The IP or domain address (e.g., 192.168.1.1,
time.stdtime.gov.tw, or time.nist.gov).
None
IP address or name of
secondary time server
The Moxa switch will try to locate the secondary NTP server if
the first NTP server fails to connect.
Enable NTP/SNTP Server
Setting Description Factory Default
Enable/Disable Enables SNTP/NTP server functionality for clients Disabled
Warning Notification
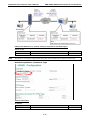
Since industrial Ethernet devices are often located at the endpoints of a system, these devices will not always
know what is happening elsewhere on the network. This means that an industrial secure router that connects
to these devices must provide system maintainers with real-time alarm messages. Even when control
engineers are out of the control room for an extended period of time, they can still be informed of the status of
devices almost instantaneously when exceptions occur. The Moxa industrial secure router supports different
approaches to warn engineers automatically, such as email, trap, syslog and relay output. It also supports one
digital input to integrate sensors into your system to automate alarms by email and relay output.
Page is loading ...
Page is loading ...
Page is loading ...
Page is loading ...
Page is loading ...
Page is loading ...
Page is loading ...
Page is loading ...
Page is loading ...
Page is loading ...
Page is loading ...
Page is loading ...
Page is loading ...
Page is loading ...
Page is loading ...
Page is loading ...
Page is loading ...
Page is loading ...
Page is loading ...
Page is loading ...
Page is loading ...
Page is loading ...
Page is loading ...
Page is loading ...
Page is loading ...
Page is loading ...
Page is loading ...
Page is loading ...
Page is loading ...
Page is loading ...
Page is loading ...
Page is loading ...
Page is loading ...
Page is loading ...
Page is loading ...
Page is loading ...
Page is loading ...
Page is loading ...
Page is loading ...
Page is loading ...
Page is loading ...
Page is loading ...
Page is loading ...
Page is loading ...
Page is loading ...
Page is loading ...
Page is loading ...
Page is loading ...
Page is loading ...
Page is loading ...
Page is loading ...
Page is loading ...
Page is loading ...
Page is loading ...
Page is loading ...
Page is loading ...
Page is loading ...
Page is loading ...
Page is loading ...
Page is loading ...
Page is loading ...
Page is loading ...
Page is loading ...
Page is loading ...
Page is loading ...
Page is loading ...
Page is loading ...
Page is loading ...
Page is loading ...
Page is loading ...
Page is loading ...
Page is loading ...
Page is loading ...
Page is loading ...
Page is loading ...
Page is loading ...
Page is loading ...
Page is loading ...
Page is loading ...
Page is loading ...
Page is loading ...
Page is loading ...
Page is loading ...
Page is loading ...
Page is loading ...
Page is loading ...
Page is loading ...
Page is loading ...
Page is loading ...
Page is loading ...
Page is loading ...
Page is loading ...
Page is loading ...
Page is loading ...
Page is loading ...
Page is loading ...
Page is loading ...
Page is loading ...
Page is loading ...
Page is loading ...
Page is loading ...
Page is loading ...
Page is loading ...
Page is loading ...
Page is loading ...
Page is loading ...
Page is loading ...
Page is loading ...
Page is loading ...
-
 1
1
-
 2
2
-
 3
3
-
 4
4
-
 5
5
-
 6
6
-
 7
7
-
 8
8
-
 9
9
-
 10
10
-
 11
11
-
 12
12
-
 13
13
-
 14
14
-
 15
15
-
 16
16
-
 17
17
-
 18
18
-
 19
19
-
 20
20
-
 21
21
-
 22
22
-
 23
23
-
 24
24
-
 25
25
-
 26
26
-
 27
27
-
 28
28
-
 29
29
-
 30
30
-
 31
31
-
 32
32
-
 33
33
-
 34
34
-
 35
35
-
 36
36
-
 37
37
-
 38
38
-
 39
39
-
 40
40
-
 41
41
-
 42
42
-
 43
43
-
 44
44
-
 45
45
-
 46
46
-
 47
47
-
 48
48
-
 49
49
-
 50
50
-
 51
51
-
 52
52
-
 53
53
-
 54
54
-
 55
55
-
 56
56
-
 57
57
-
 58
58
-
 59
59
-
 60
60
-
 61
61
-
 62
62
-
 63
63
-
 64
64
-
 65
65
-
 66
66
-
 67
67
-
 68
68
-
 69
69
-
 70
70
-
 71
71
-
 72
72
-
 73
73
-
 74
74
-
 75
75
-
 76
76
-
 77
77
-
 78
78
-
 79
79
-
 80
80
-
 81
81
-
 82
82
-
 83
83
-
 84
84
-
 85
85
-
 86
86
-
 87
87
-
 88
88
-
 89
89
-
 90
90
-
 91
91
-
 92
92
-
 93
93
-
 94
94
-
 95
95
-
 96
96
-
 97
97
-
 98
98
-
 99
99
-
 100
100
-
 101
101
-
 102
102
-
 103
103
-
 104
104
-
 105
105
-
 106
106
-
 107
107
-
 108
108
-
 109
109
-
 110
110
-
 111
111
-
 112
112
-
 113
113
-
 114
114
-
 115
115
-
 116
116
-
 117
117
-
 118
118
-
 119
119
-
 120
120
-
 121
121
-
 122
122
-
 123
123
-
 124
124
-
 125
125
-
 126
126
-
 127
127
-
 128
128
-
 129
129


Ask a question and I''ll find the answer in the document
Finding information in a document is now easier with AI
Related papers
-
Moxa Technologies EtherDevice EDR-G902 User manual
-
-
Moxa TN-5500A Series User manual
-
-
Moxa ICS-G7826A Series User manual
-
-
-
-
-
 Moxa Technologies SDS-3008 Series User manual

Other documents
-
Comtrend Corporation WAP-5813n User manual
-
MicroNet SP881 User manual
-
 Moxa Technologies PT-7528 User manual
-
Allnet ALL1297 User guide
-
 Moxa Technologies EtherDevice EDR-G903 Hardware Installation Manual
-
 Zycoo IP Audio Center Management System User guide
-
LevelOne FBR-2000 User manual
-
-
Moxa Technologies Switch EDS-726 User manual
-
ADTRAN PPTP VPN Pass-through on TA 600 Owner's manual


