Page is loading ...

CONCOURS 2
PAINT GUN REBUILD KIT
INSTRUCTIONS
Item #16294

2 Eastwood Technical Assistance: 800.343.9353 >> techelp@eastwood.com
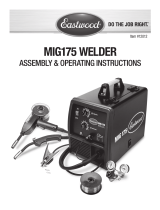
The EASTWOOD CONCOURS 2 PAINT GUN REBUILD KIT includes the common wear parts necessary
to restore like-new performance to your #16287, Eastwood Concours 2 Paint Gun.
CONTENTS
(1) Air Cap Gasket [A]
(1) Air Cap Seal Ring [B]
(1) Airflow Isolation Ring [C]
(1) Nozzle Seal [D]
(2) Circlip [E]
(1) Spring Washer [F]
(1) Needle Tension Spring [G]
(1) Needle Tension Spring Bushing [H]
(1) Needle Packing [J]
(1) Needle Packing Spring [K]
(1) Needle Packing Nut [L]
(1) Air Valve Seal [M]
(1) Air Valve Spring Bushing [N]
(1) Air Valve Spring [P]
(1) Paint Cup Filter [R]
A B C
D
E
F G HLKJ
R
M
P
N

To order parts and supplies: 800.343.9353 >> eastwood.com 3
PAINT GUN
DISASSEMBLY
FOR REBUILD
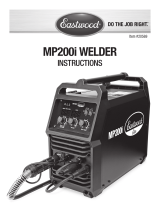
AIR CAP
• Unthread and remove Air Cap assembly.
• Pick Air Cap Seal Ring [B] from aluminum
Air Cap (FIG 1).
• Using a small screwdriver (not included),
remove Snap Ring from Air Cap
assembly (FIG 2).
• Remove Air Cap Gasket [A] from
aluminum Air Cap ring (FIG 3).
FIG. 1
FIG. 2
FIG. 3
B
✓
Snap
Ring
A
✓
✓

4 Eastwood Technical Assistance: 800.343.9353 >> techelp@eastwood.com
NOZZLE
• Unthread Nozzle from gun body with the
10mm notch of the paint gun wrench
(included with Paint Gun).
• Pull Nozzle Seal [D] from threaded end of
the Nozzle (FIG 4).
• Remove tan plastic Airflow Isolation Ring
[C] from gun body (FIG 5).
TRIGGER
• Lay the gun body on its side and using a
small screwdriver (not included), remove
one Circlip [F] from pivot shaft (FIG 6).
• Pull pivot shaft out of gun body and trig-
ger. Set trigger and pivot shaft aside for
re-installation (FIG 7).
FIG. 4
FIG. 5
FIG. 6
FIG. 7
✓
D
✓
Nozzle
C
✓
✓
✓
E
F
E

To order parts and supplies: 800.343.9353 >> eastwood.com 5
FIG. 8
FIG. 9
FIG. 10
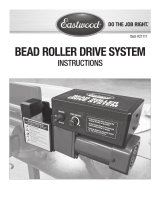
FLUID CONTROL/NEEDLE
• Unthread and remove Fluid Control Knob
from rear of gun body and set aside for
re-installation.
• Carefully remove Needle with Needle
Tension Spring [G] & Needle Tension
Spring Bushing [H] by firmly gripping rear
of Needle and pulling out through rear of
gun body (FIG 8). Set Needle aside for
re-installation.
PACKING
• Unthread Needle Packing Nut [L] from gun
body with the 6mm notch of the paint gun
wrench (included with Paint Gun).
• Withdraw the Needle Packing [J], Needle
Packing Spring [K] & Needle Packing Nut
[L] (FIG 9).
AIR VALVE PLUNGER
• Unthread Air Valve from gun body with
the 13mm notch of the paint gun wrench.
(included with Paint Gun).
• Pull Air Valve Seal [M] from end of Air
Valve along with Air Valve Spring [P] & Air
Valve Spring Bushing [N] (FIG 10).
Inspect and clean Gun Body as required.
Eastwood #12846Z Aerosol Injected Paint
Gun Cleaner is excellent for this purpose.
✓
Needle
HG
✓
✓
J L
K
✓
✓
✓
P N M
✓
✓
✓

6 Eastwood Technical Assistance: 800.343.9353 >> techelp@eastwood.com
REASSEMBLY
AIR VALVE PLUNGER
• Place Air Valve Seal [M] on notched end of
Air Valve and align the Air Valve Spring [P]
and Air Valve Spring Bushing [N] on end of
plunger (FIG 11).
• Thread Air Valve into gun body and tighten
with the 13mm notch of the paint gun
wrench. (included with Paint Gun).
PACKING
• Partially slide the end of the needle into
the bore to help with alignment then stack
the Needle Packing [J], Needle Packing
Spring [K] & Needle Packing Nut [L] over
it (FIG 12).
• Thread the Needle Packing Nut [L] into gun
body and tighten with the 6mm notch of the
paint gun wrench (included with Paint Gun).
DO NOT OVERTIGHTEN! Slide the Needle in
and out as the Packing Nut is tightened to
check packing compression. Only a slight
amount of drag should be felt when sliding
the needle. Excessive tightness will cause
binding of the needle during Paint Gun
operation.
FLUID CONTROL/NEEDLE
• Push Needle in fully until it seats.
• Snap the Needle Tension Spring Bushing
[H] into the Needle Spring [G] and with the
Bushing at the outward end, slide them over
the Needle (FIG 13).
• Set the Fluid Control Knob over the Needle,
Spring and Bushing then thread in the Knob.
FIG . 11
FIG. 12
FIG. 13
P N M Air Valve
✓
✓
✓
✓
L
✓
KJ
✓
✓
Needle
✓
Needle G
H
✓
✓
✓

To order parts and supplies: 800.343.9353 >> eastwood.com 7
TRIGGER/PIVOT SHAFT
• If both Circlips [E] were removed at disas-
sembly, snap one in place into a groove of
the shaft and place the Spring Washer [F]
over it (FIG 14).
• Hold the Trigger in place with the holes
aligned with the hole through the gun
body and insert the shaft through them.
• Snap the remaining Circlip [F] into the
shaft groove.
NOZZLE
• Snap Nozzle Seal [D] into threaded end of
Nozzle (FIG 15).
• Set tan plastic Airflow Isolation Ring [C]
into oval recess gun body (FIG 16).
• Thread the Nozzle into the gun body and
tighten with the 10mm notch of the paint
gun wrench (included with Paint Gun).
FIG. 14
E
E
F
✓
✓
FIG. 15
FIG. 16
D
Nozzle
✓
✓
C
✓

© Copyright 2018 Easthill Group, Inc. 11/18 Instruction item #16294Q Rev 1
If you have any questions about the use of this product, please contact
The Eastwood Technical Assistance Service Department: 800.343.9353 >> email: techelp@eastwood.com
PDF version of this manual is available at eastwood.com
The Eastwood Company 263 Shoemaker Road, Pottstown, PA 19464, USA
800.343.9353 eastwood.com
AIR CAP
• Gently fit the Air Cap Gasket [A] into place
against the flange of the aluminum Air Cap
Ring (FIG 17).
• Set the brass Air Nozzle into the aluminum
Air Cap Ring so that the snap ring groove is
visible (FIG 18).
• Install the Snap Ring by working it around
and into the groove (FIG 19).
• Work the Air Cap Seal [B] into the groove
of the aluminum Air Cap Ring (FIG 20).
• Thread Air Cap assembly onto gun body.
Your Eastwood Concours Pro Paint Gun is
now rebuilt and ready for use. Refer to the
instruction manual included with the #16287
Eastwood Concours 2 Paint Gun Kit for set-up
and adjustment procedures.
If Instructions are unavailable or lost,
contact Eastwood at 1-800-343-9353 or
www.eastwood.com and request
document #16287Q.
FIG. 17
FIG. 18
FIG. 19
FIG. 20
A
✓
B
✓
Snap
Ring
✓
/