Page is loading ...

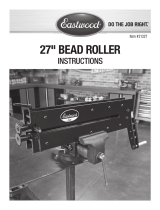
BEAD ROLLER DRIVE SYSTEM
INS TRUCTIONS
Item # 21111

2 Eastwood Technical Assistance: 800.343.9353 >> techelp@eastwood.com
The EASTWOOD BEAD ROLLER DRIVE SYSTEM KIT features a powerful 1.65-amp motor with an integral 75:1 gear reduction. A 3 Position Toggle Switch with
an infinitely variable Speed Control and Foot Switch provide much greater convenience and one-person operation. Fits all Eastwood Bead Rollers and others
with a plate steel frame and 50mm bearing block bolt pattern.
Visit the Bead Roller Drive Systems product page at Eastwood.com for video instructions.
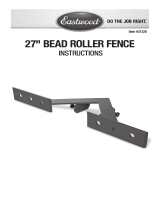
CONTENTS
(1) Motor/Controller/Bracket Assembly with Foot Switch - [A]
(1) Shaft Coupling - [B]
(1) Gear Guard - [C]
(2) M12X1.75 – 55mm Bracket Mounting Bolts - [D]
(2) Mounting Spacers - [E]
(6) Washers (Used in addition to the Mounting Spacers for use on 27” Eastwood Elite Bead Roller and others) - [F]
TOOLS REQUIRED (Not Included)
• 18mm wrench
• 3mm Hex Key
• 4mm Hex Key
A
B
C
D
E
F

READ INSTRUCTIONS
• Thoroughly read and understand these product instructions before using this tool. Failure to follow all warnings can result in tool
damage or serious physical injury.
• Keep these product instructions for future reference.
PINCH AND CRUSH HAZARD!
• This Bead Roller Drive System has rotating components that generates crushing and bending forces when in use which can quickly
cause severe injury! Keep fingers and hands away from moving parts when operating.
CUT HAZARD!
• Handling sharp metal can cause serious cuts. Wear thick, well-fitting work gloves to prevent cuts from handling sharp metal.
EYE INJURY HAZARD!
• Metal particles can be ejected from the metal surface when bending. Sheet metal edges and corners are sharp and can injure eyes.
Always wear ANSI approved eye protection when operating this tool.
• Before beginning ANY work with this tool, it is absolutely necessary that the base bead roller be installed in a vise properly secured
to a sturdy workbench anchored to the floor or wall.
To order parts and supplies: 800.343.9353 >> eastwood.com 3
DANGER indicates a hazardous situation which, if not avoided, will result in death or serious injury.
WARNING indicates a hazardous situation which, if not avoided, could result in death or serious injury.
CAUTION used with the safety alert symbol, indicates a hazardous situation which, if not avoided, could result in minor or moderate injury.
NOTICE is used to address practices not related to personal injury.
SAFETY INFORMATION
The following explanations are displayed in this manual, on the labeling, and on all other information provided with this product:

4 Eastwood Technical Assistance: 800.343.9353 >> techelp@eastwood.com
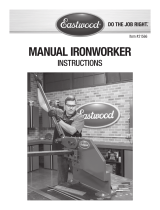
SET-UP
1. Remove existing Hand crank from bead roller and file any burrs
remaining on shaft.
2. Back out the set screws on both bores of the Shaft Coupling [B]
with a 3mm hex key (Not Included) so that they are not protruding
into the I.D (FIG 1).
3. Loosen and remove the crank/gear-side bearing block retaining
bolts of the existing Bead Roller. The Bead Roller should resemble
the following figure (FIG 2) at this point with the longer shaft
located at the bottom of the bead roller. (If necessary, unbolt the
upper and lower shafts from the Bead Roller frame and re-install
them with the longer shaft at the bottom).
4. Slide the smaller I.D of the Shaft Coupling [B] 1/2” to 5/8” [13-
16mm] over the motor shaft with the keyway aligned with the
shaft key. 3mm Hex Key (not included) to tighten the set-screws
(FIG 3).
It is strongly recommended that for greater ease of installation and safety, the Bead Roller (not included) be securely mounted in a
vise. Follow instructions included with the specific Bead Roller being used for proper mounting procedures and safety warnings.
FIG. 1
FIG. 2

To order parts and supplies: 800.343.9353 >> eastwood.com 5
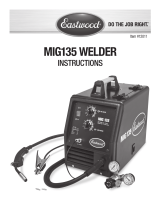
ASSEMBLY
1.
While holding the Motor/Controller/Bracket Assembly [A] in place behind the bead roller frame, insert the two M12X1.75 – 55mm Bracket Mounting Bolts [D]
into the slotted mounting holes of the Bracket then slip the two Mounting Spacers [E] over the bolt threads (if installing on 21327 Eastwood Elite 27” Bead
Roller, use each Mounting Spacer with 3 Washers [F]) (FIG 3).
NOTE: Additional Washers (included) may be required as spacers in some Bead Roller applications.
2.
Pass the Bolts [D] through the holes in the Bead Roller frame then thread them into the bearing blocks (FIG 4). At the same time, align the Set-Screw of the
Coupling [B] to the flat of the shaft and slip the larger 25mm bore of the Shaft Coupling [B] over the lower Bead Roller shaft (FIG 5).
3.
The Shaft Coupling must extend over the Bead Roller shaft by 1/2" to 5/8” [13-16mm] to allow sufficient engagement of the set screws (FIG 6). The elon-
gated holes of the Bracket will accommodate “in-and out” horizontal adjustment (FIG 7). NOTE: The Motor/Controller/Bracket Assembly must be in exact
horizontal alignment with the Bead Roller to prevent any mis-alignment in the Shaft Coupling. Once this is accomplished, use an 18mm wrench (not included)
to tighten the Bracket Mounting Bolts and a 3mm Hex Key (not included) to tighten the set-screws. At this point, the assembly should appear as in (FIG 8).
The following steps will require performing three actions at the same time. It is strongly advised to obtain the assistance
of a helper while performing these following steps.
FIG. 3
FIG. 5
FIG. 7
FIG. 4
FIG. 6
FIG. 8
Fully
Install
✓
✓
✓
✓
1/2” to 5/8”

6 Eastwood Technical Assistance: 800.343.9353 >> techelp@eastwood.com
INSTALL GEAR GUARD
1. With a 4mm hex key (not included) loosen and remove the two outer Motor Mounting Screws (FIG 9).
2. Position the Gear Guard [C] so that it covers the gears and the two holes are aligned with the Bracket to Motor mounting holes and reinstall the previously
removed Motor Mounting Screws (FIG 10).
3. The bead roller is now motorized and ready for use.
FIG. 9 FIG. 10

To order parts and supplies: 800.343.9353 >> eastwood.com 7
OPERATION
• The 3 Position Toggle Switch located at the left of the Control Box can be positioned at “OFF”, “FORWARD” or “REVERSE”. Check to make sure the
3 Position Toggle Switch is set to the center, “OFF” position (FIG 11) before plugging unit into a properly grounded 110 VAC, 60 hz power source.
• To begin use, set the Toggle Switch to the up, “FORWARD” position (FIG 12).
• The Speed Control Knob is then set to the desired speed. Note: It is best to set the Speed Control Knob to a lower speed while becoming familiar with
the “feel” of the unit.
• The Foot Switch must be depressed to run the motor. Note: this switch may be actuated by holding it in the hand or pressing it by foot.
• To reverse the direction of the bead roller, first release the Foot Switch, then move the Toggle Switch to “REVERSE”. Depress the Remote-Control Switch
as needed then release.
Always allow the motion of the bead roller to come to a complete stop before reversing direction or permanent motor gearbox
damage can occur.
PINCH AND CRUSH HAZARD!
This Bead Roller Drive System has gear reduction driven, rotating components that generate crushing and bending forces when
in use which can quickly cause severe injury! Keep fingers and hands away from moving parts when operating.
FIG. 11 FIG. 12

ADDITIONAL ITEMS
#11797 Eastwood Throatless Bench Shear
#20198 Eastwood 8” Straight Shear
#14042 Eastwood Versa-Bend Sheet Metal Brake
#20257 Eastwood Sheet Metal Layout Kit – 5 Piece Set
© Copyright 2018 Easthill Group, Inc. 3/18 Instruction item #21111Q Rev 1
If you have any questions about the use of this product, please contact
The Eastwood Technical Assistance Service Department: 800.343.9353 >> email: techelp@eastwood.com
PDF version of this manual is available at eastwood.com
The Eastwood Company 263 Shoemaker Road, Pottstown, PA 19464, USA 800.343.9353 eastwood.com
MAINTENANCE
• Keep the bead roller with mounted Motor Drive System in a clean and dry environment. DO NOT store it in or expose it to a damp or wet environment.
• Check all mounting hardware for tightness and all components for signs of fatigue or other damage before each use.
/