PRELIMINARY
1
Extender AKM MAAP • Installation Guide
68-1031-01 Rev. B
06 09
Extender AKM MAAP Installation Guide
This guide provides instructions for an experienced technician to install the Extron
Extender AKM MAAP into an Ackermann
®
floor box that accepts a GB2 or GB3 insert.
C
To ensure correct equipment placement and operation, this installation procedure should
be performed by authorized personnel only.
Preparing the Installation Site
Take the following steps to prepare the installation site:
1. Determine and obtain the electronics, MAAPs (Mini Architectural Adapter Plates), and
cables required for this installation.
2. Turn off all equipment, including the Extender, and disconnect it from the power source.
3. Select an installation site that allows cable runs without interference. Allow enough depth
for both the floor box and the cables.
4. Install the floor box in accordance with the instructions Ackermann provided with the floor box.
5. Route all cables required for the installation through the floor box and terminate the cables
with connectors, if needed.
C
Exposed cable shields (braids or foil) are potential sources of short circuits. To prevent short circuits, shields should be trimmed
back or insulated with heat shrink. Both braided and foil shields should be connected to an
equipment ground at the other end of the cable.
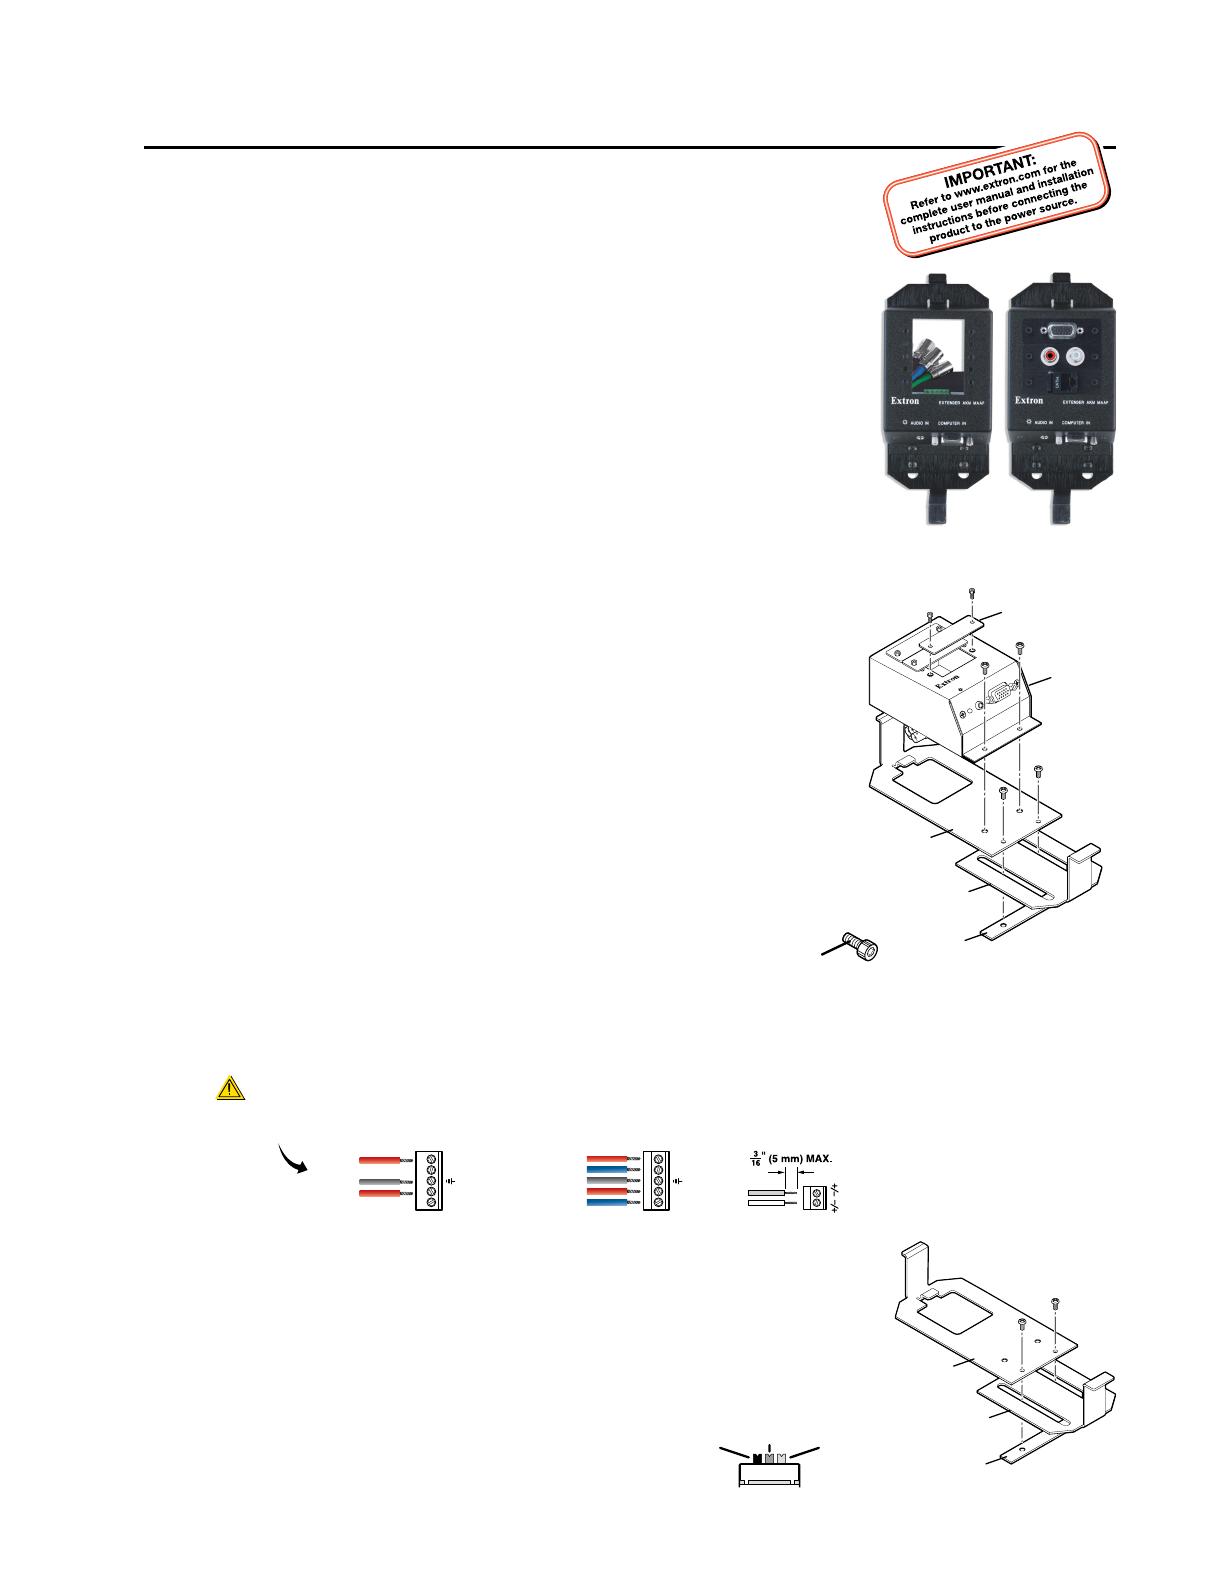
Identifying the Parts
The Extender AKM MAAP assembly, shown at right, consists of the four metal pieces
(main enclosure, upper mounting plate, lower mounting plate, and nut bar), the blank
MAAP plates, an Extender line driver, and the screws that hold it all together.
Installation and Cabling
N
The Extender must be cabled, optional MAAPs must be installed and cabled, and
both the Extender and MAAPs must be tested before attaching mounting plates to
the enclosure and mounting the assembly into the floor box.
1. Unpack the Extender AKM MAAP and any optional MAAPs. Save all the screws for
later use.
• Each faceplate assembly has four #6-32 x ¼" to
3
/8" long Phillips pan head screws.
• Each MAAP faceplate or module requires at least two socket-head cap screws
(#4-40 x ¼") for securing the MAAP to a faceplate. Six of these
screws are included with the Extender AKM MAAP along with a
small Allen (hex socket) wrench. The hex nuts for these machine
screws are built into the Extender AKM MAAP’s faceplate.
2. Route the cables up out of the Ackermann floor box and through the opening in the upper mounting plate.
3. Connect audio output and power cables to the Extender’s direct insertion captive screw connectors. See the illustrations
below and refer to the Extender Series User’s Manual (available at www.extron.com).
L
+
L
-
R
+
R
-
L
+
L
-
R
+
R
-
Unbalanced Audio Output
Tip
Sleeve(s)
NO Ground Here
NO Ground Here
Tip
Tip
Sleeve(s)
Ring
Ring
Tip
Balanced Audio Output
CAUTION
For unbalanced audio, connect the sleeve(s)
to the ground contact. DO NOT connect the
sleeve(s) to the negative (-) contacts.
+ or –
– or +
9-18 VDC
Power
Do not tin the wires!
Power Input
C
Use a 9 to 12 VDC power supply only. Polarity is not important. For best results and
to reduce the risk of short circuits, trim just 3/16” (5 mm) of the jacket from the wires.
Do not tin the wires.
4. Loosely attach the upper mounting plate to the lower mounting plate and
the nut bar using the two provided Phillips pan head screws as shown at right.
5. Set the Extender’s gain switch, which will be inaccessible after installation. The gain
switch is located at the rear of the Extender, between the two circuit boards. Slide this
switch to select the level of video gain that yields the
sharpest picture. Refer to the Extender Series User’s Manual
(available at www.extron.com).
EXTENDER AKM MAAP
AUDIO IN COMPUTER IN
Main
Enclosure
Upper Mounting
Plate
Lower Mounting
Plate
Nut Bar
MAAP Blank Plate
Upper Mounting
Plate
Lower Mounting
Plate
Nut Bar
Maximum
Max. peaking
& gain
Medium – Mid-level
peaking & gain
Normal
Unity
gain
Preparing the Installation Site ............................................................................................. 1
Identifying the Parts ................................................................................................................... 1
Installation and Cabling ........................................................................................................... 1
Mounting the Extender AKM MAAP Assembly into the Floor Box ............... 2
Extron Contact Information ................................................................................................... 2


