
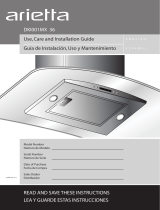
Telescopic Chimney
Applicable models:
DEKOR GLASS 30
DEKOR GLASS 36
DKW001MX 30
DKW001MX 36
CHN001MX 30
CHN001MX 36
FI1F7B
1

WARNING:
• Read entire instructions before proceeding and Save These Instructions.
• Approved for Residential Appliances only.
• PLEASE READ ENTIRE INSTRUCTIONS BEFORE PROCEEDING.
• INSTALLER: Please leave these Instructions with this unit for the owner.
• OWNER: Please retain these instructions for future reference.
• Turn off power circuit at service panel and lock out panel before installing this kit to the appliance.
• Installation must comply with all local codes.
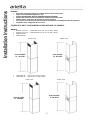
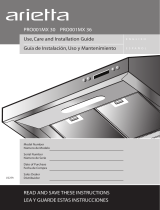
TELESCOPIC DUCT COVER INSTALLATION OPTIONS, BY MODELS
MODELS
• DEKOR GLASS 30 • CHN001MX30 (Only for 9' to 10' high ceilings).
• DEKOR GLASS 36 • CHN001MX36 (Only for 9' to 10' high ceilings).
• DKW001MX 30
• DKW001MX 36
Visible Grids Hidden Grids
From 31 28/32”
To 52 22/32”
From 28 7/32”
To 48 27/32”
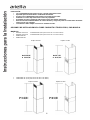
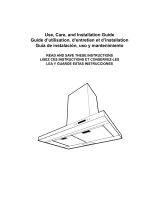
• CHN001MX 30 (Only for 8' to 9' high ceilings).
• CHN001MX 36 (Only for 8' to 9' high ceilings).
2
Visible Grids Hidden Grids
From 19 11/32”
To 29 31/32”
From 19 17/32”
To 33 26/32”

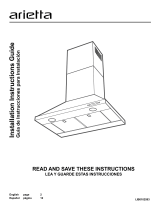
INSTALLATION INSTRUCTIONS
1) Uninstall the fixed duct cover (if present), duct cover bracket, air deflectors (if present) and ductworks, in
accordance with the hood manual.
2) Find the centerline of the cook top. Use a level to draw a vertical straight pencil line on the wall.
CHECK TO BE SURE THE LINE IS PERFECTLY PERPENDICULAR TO THE HORIZONTAL COOKING
SURFACE.
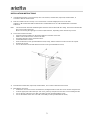
Note: The duct bracket should be installed against the back wall and flush with the ceiling. This bracket will hold the
duct cover in place at the top.
Make sure of using the right type of screws and/or fasteners, depending of the material of your wall.
3) Secure the bracket to the wall:
• Align the marked centerline on the bracket with the centerline on the wall.
• Mark 2 hole locations for the screws in the wall.
• Drill 5/16" pilot holes in the marked locations.
• Install wall fastener anchors.
• Drive the bracket screws (provided with the hood) slowly, into the fasteners to allow anchors to expand.
• Remove the screws.
• Secure the bracket to the wall with the bracket screws (provided with the hood).
4) Reinstall the air deflectors (if present) and ductworks, in accordance with the hood manual.
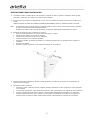
5) Mounting the duct cover
• Position the duct cover over the mounted hood, sliding the bottom of the duct cover into the assigned area.
• Grab the upper part of the telescopic duct cover, pull it up, and place it in the duct cover mounting bracket.
• Secure the top of the duct cover with 2 assembly screws (provided with the hood).
• Secure the bottom of the duct cover with 2 assembly screws (provided with the hood).
3
Page is loading ...
Page is loading ...
-
 1
1
-
 2
2
-
 3
3
-
 4
4
-
 5
5


arietta KIT01609/1 Operating instructions
- Type
- Operating instructions
- This manual is also suitable for
Ask a question and I''ll find the answer in the document
Finding information in a document is now easier with AI
in other languages
Related papers
-
 arietta CHN001MX36 Operating instructions
-
 arietta KIT0102873 Installation guide
-
 arietta Dekor Glass 30 Installation guide
-
 arietta DKI001MX36 Installation guide
-
 arietta PRO001MX36 Installation guide
-
 arietta DKW001MX36 Installation guide
-
 arietta ALS436SS Installation guide
-
 arietta ASG430SSA Installation guide


Other documents
-
Best WC34E90SB User manual
-
-
-
Best WC35E90SB User manual
-
-
ELICA EVR630S1 Installation guide
-
-
Best WC44IQ90SB Installation guide
-
ELICA EPL636S1 Installation guide
-