Page is loading ...

Setup Guide — SW VGArs / Ars Series switchers
This card provides quick start instructions for an experienced
installer to set up and operate an Extron
SW VGArs / Ars Series switcher.
Installation
Step 1 — Configuration (required only
for use with VSW I AAP)
N
Step 1 is required only if your installation includes one or more VSW I AAP remote control
accessories. If your installation does not include a VSW I AAP, skip to step 2.
N
Newer switchers can work with the VSW I AAP’s “Show Me” feature. It is more
convenient to check your switcher’s compatibility and configure it before mounting the
switcher and making connections. Check and configure your switcher as follows:
a.
Remove the eight screws from the switcher (three on each side of the switcher and two on
top). Remove the two connector nuts from the switcher’s Remote connector and each VGA
connector. Lift the top cover off of the switcher.
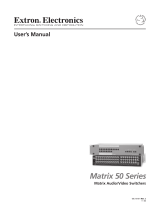
b. See the revision label on the board, which list the board’s part number. If the board’s part
number is not 20-1118-0n, your SW VGA/Ars is not compatible with the VSW I AAP.
c. See the table in the figure above. If an input is connected via a VSW I AAP, that input’s
jumper should be installed to allow the VSW I AAP’s “show me” signal to select that input.
When an input is not connected via a VSW I AAP, remove that input’s jumper.
d.
Reinstall the top cover, using all screws and nuts removed in step 1a.
N
The switcher must be in normal switch mode when using the switcher with one or more
VSW I AAP remote controls. If the switcher is in auto switch mode, the input cannot be
selected using the “show me” function. See “Select switch mode — Normal (default) or
Auto“, on the reverse of this sheet.
On the VSW I AAP, you must also ensure jumper J6 is installed.
Step 2 — Mounting
Turn off or disconnect all equipment power sources and mount the switcher as required.
Rear Panel
EXTRON 20-1118-02 A
ER:- nnnnnnnn nnnn
Revision label
Board:
Version:
The ER number and final digit
of the part number may change.
JMP5
JMP7
JMP11
JMP15
JMP9
JMP13
EXTRON 20-1118-02 A
ER:- nnnnnnnn nnnn
NOTE
Jumper
Input 1
Input 2
Input 3
JMP5
JMP7
JMP9
Jumper
VSW I AAP
connected to:
VSW I AAP
connected to:
Input 4
Input 5
Input 6
JMP11
JMP13
JMP15
Setup Guide — SW VGArs / Ars Series switchers, cont’d
68-646-50
Rev. B 09 09
Step 3 — Video and audio inputs
• Connect up to six video input cables, depending on the model.
• (Arsmodelsonly)Connect up to six balanced or unbalanced
stereo audio or mono audio devices, depending on the model.
N
If using one or more VSW I AAPs (with “Show Me” buttons), connect the video and audio
input devices through the VSW I AAPs and configure the switcher in accordance with step 1.
Step 4 — Video and audio outputs
• Connect a video
display to the
switcher’s video
Output port.
• (Arsmodelsonly)
Connect an audio device to the switcher’s audio Output
port. Wire the audio output connector as shown at right.
Step 5 — Remote connector (optional)
Connect an RS-232 OR a contact closure controller, wired as shown in
the table at right. The port’s RS-232 communications protocols are:
•9800baud •8databits
•1stopbit,noparity •noowcontrol.
Step 6 — Power
Plug an IEC power cord between the switcher’s power
connector and a 100 VAC/240 VAC, 50-60 Hz source. Power
on the equipment in the following order: output devices,
switcher, contact closure/RS-232 controller, and input devices.
Operation
Select switch mode — Normal (default) or Auto
1. Press and hold the Input 1/Mode button.
2. While holding the Input 1/Mode button, press and release either the Input 2/Normal
(normal switch mode) or Input 3/Auto (auto switch mode) button.
3. Release the Input 1/Mode button.
The Auto Switch Active LED lights when the switcher is in auto switch mode.
N
In auto switch mode, the switcher outputs the highest numbered input that has a sync signal
present. The selected input’s LED lights. If no sync is present, input #1 is selected by default.
Select an input
Press and release an input button to select that input. The lit button indicates the selected input.
N
The switcher must be in Normal mode to manually select an input.
Lock front panel (Executive mode)
To toggle the front panel lock on and off, press and hold the Input 2/Normal button and
theInput3/Autobuttonforapproximately3seconds.AllfrontpanelLEDsashthree
times to indicate the mode change.
N
All input LEDs blink once if you attempt a front panel operation while the panel is locked.
Extron USA - West
Headquarters
+800.633.9876
Inside USA / Canada Only
+1.714.491.1500
+1.714.491.1517 FAX
Extron USA - East
+800.633.9876
Inside USA / Canada Only
+1.919.863.1794
+1.919.863.1797 FAX
Extron Europe
+800.3987.6673
Inside Europe Only
+31.33.453.4040
+31.33.453.4050 FAX
Extron Asia
+800.7339.8766
Inside Asia Only
+65.6383.4400
+65.6383.4664 FAX
Extron Japan
+81.3.3511.7655
+81.3.3511.7656 FAX
Extron China
+400.883.1568
Inside China Only
+86.21.3760.1568
+86.21.3760.1566 FAX
Extron Middle East
+971.4.2991800
+971.4.2991880 FAX
©2009ExtronElectronics.Allrightsreserved.
For unbalanced audio output,
connect the sleeve(s) to the ground
contact. DO NOT connect the
sleeve(s) to the negative (-) contacts).
Unbalanced Stereo Output
Ring
Sleeve (s)
Tip
Tip
Ring
Sleeve (s)
Tip
Tip
Balanced Stereo Output
NO GROUND.
NO GROUND.
CAUTION
REMOTE
PIN
RS-232
Contact
Closure
Function
1
— In #1 Input #1
Input #2
Input #3
Input #4
Input #5
Input #6
2
TX —Transmit data
3
RX — Receive data
4
— In #2
5
Gnd Gnd Ground
6
— In #3
7
— In #4
8
— In #5
9
— In #6
1
Video Input
Connector
Audio Input
Connector
OUTPUT
/