Smith & Noble Petite Wall Mount Single Rod Installation guide
- Type
- Installation guide

STEP BY STEP INSTALLATION INSTRUCTIONS
Wall Mount
Single Rod Set
Petite Hardware

2
800.248.8888
1smithandnoble.com
A Smooth Set-Up
We want you to love your new hardware and that includes having
800.248.8888
Customer Service Hours
Monday — Friday: 6am — 6pm PT
Saturday — Sunday: 7am — 4pm PT
smithandnoble.com
Everything
You Need
Table of Contents
Step 1 - ....................................3
Overview - Wall Mount Single Rod Set ..........................4
Step 2 - ..............................5
Step 3 - .......................6
Step 4 - ........................7
Accessories - ......................................8
Accessories - Tiebacks ..........................................9
. . . . . . . . . . . . . . . . . . . . . . . . . . . . . . . . . . . . . . . . . . . . . . .10
Warranty . . . . . . . . . . . . . . . . . . . . . . . . . . . . . . . . . . . . . . . . . . . . .

34
smithandnoble.com
800.248.8888
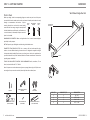
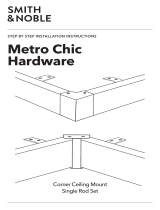
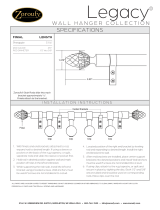
STEP 1 - GETTING STARTED OVERVIEW
Wall Mount Single Rod Set
ROD
ROD QTY BRACKET QTY ROD WIDTH
1 2 24"— 60"
1 3 601
8
2 3 841
8
2 5 961
8
WALLBOARD OR PLASTER:
METAL: Prepare by pre-drilling holes and then using the included screws.
CONCRETE, STONE, BRICK OR TILE:
TOOLS YOU WILL NEED TO INSTALL YOUR HARDWARE: ¼" nut
764" drill bit.
Note: It’s important to monitor the amount of pressure you apply when using a drill. If the screws
are too ght this may cause the screw itself to break o in the wall or window frame.
wood studs that are strong enough to securely bond
piece is not included.
MOLLY
BOLT
SELF DRILLING
ANCHOR
TOGGLE
BOLT

56
smithandnoble.com
800.248.8888
2"
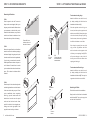
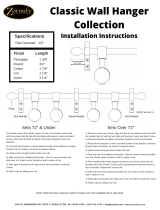
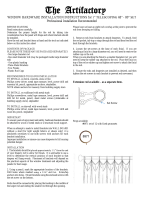
STEP 2 - MOUNTING BRACKETS STEP 3 - ATTACHING THE FINIALS & RINGS
Mounng the Brackets
STEP 1:
Place the panel on the rod. To ensure it
drapes at the correct length, hold it up to
the spot you wish to install it. Raise or lower
your treatment as desired. After you’ve
located the ideal location, use a pencil to
mark the wall above the window or door
frame where the top of the rod is resting.
STEP 2:
Remove the panel from the rod and then
center the rod over the window opening at
the desired height. Using the pencil, mark
where the ends of each rod are positioned;
if you’re using a center bracket, note the
middle point between these two spots as
well. Measure 2" inward from the marks
you’ve made on both ends and mark those
spots. This is where the brackets will be
installed.
STEP 3:
Place the top of the bracket directly at the
marked height and then mark the location
of the screw holes with your pencil. Once
you’ve established where everything
should go, put the bracket aside and
double-check to make sure the pencil
marks are level with each other. Next,
pre-drill the holes in their assigned spot,
making sure it’s the right depth for the
supplied screws. Install your brackets.
For treatments using rings:
Attach the nial to one end of the rod,
(1) .
Place the required number of rings on
the rod, and then cap the opposite end
with the second nial. When placing the
rod on the bracket, if drape is opening
from the center, leave one ring between
the nial and bracket on each side.
If the drape is opening from one side
only, put the ring between the nial
and the bracket on the opposite side
of where you are opening from (2). This
will prevent drapery to be pulled all
the way to one side or the other when
opening and closing it.
For treatments without rings:
Attach the nial to one end of the rod,
(1). Then cap the
opposite end with the second nial.
(1)
(2)
(1)
ROD
THREADED
Aaching the Finials
Finials will come with a threaded base.
(1). Then cap the opposite
end with the second nial.
Center Rod over
window and mark
the ends & center.
2"

78
smithandnoble.com
800.248.8888
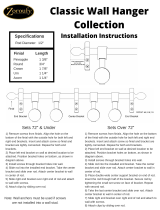
Rod Connector
have received a rod connector. A rod
connector is a two sided plug screw that
connects the rods together.
STEP 1:
Push the two sided plug screw connector
to one end of the rod.
STEP 2:
Push in the second rod to the other side
of the two sided plug screw unl both
rods are ghtly together and there is no
visible gap.
STEP 4 - ROD CONNECTOR ACCESSORIES
NO
GAP
by the clip.
Push clip through
drape clip
WAND
DRAPE
ROD
ROD
SEGMENT
STEP 1:
ROD
SEGMENT 1
ROD
SEGMENT 2
STEP 2:
ROD CONNECTED WITH
NO VISIBLE GAP

910
smithandnoble.com
800.248.8888
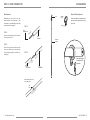
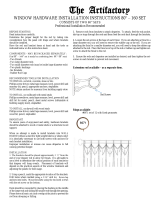
ACCESSORIES CARE & CLEANING
Tiebacks (Oponal)
STEP 1
In order to locate where to install your
tiebacks, measure the height of the
window and divide this by two. Using
the previous calculation, mark that spot
on the wall with a pencil. To ensure you
like the way the panel drapes, gather
one side and sweep it over to the
approximate proposed location. Once
you’re sure the tieback is in the perfect
location, use your pencil to mark the
spot to install it. Measure the distance
from the bottom or top of the window
to the tieback to mark the other side
and ensure they’re even. Now remove
mounting plate and center it inside of
the circle outline on wall. Mark the
screw hole locations for all brackets,
See Figure B.
Attach the metal mounting plate to the
wall, aligning the holes in the plate with
the marks made in the previous step,
See Figure B. Be sure and attach the
plate to the wall with the appropriate
mounting hardware. (It is always rec-
ommended to try and attach to the
wood studs inside the wall. Where this
is not possible please use a wall anchor
suitable to carry the weight of your
draperies.)
STEP 2
Attach the tieback base onto the
mounting plate. Then attach the tie-
back stem to base See Figure C. And
repeat these steps for next one, if you
are using multiple tiebacks.
2" POST TIEBACK
Shown with Knob Finial
4" POST TIEBACK
Shown with Knob Finial
FIGURE B
Mark all holes
needed showing
locations of screw
holes for all brackets.
MOUNTING
PLATE
STEM
MOUNTING
PLATE
BASEMOUNTING
SCREWS
HEX
SCREW
FINIAL
FIGURE C

© 2021 Smith & Noble Home, Inc. All Rights Reserved SN0321
Warranty Service
-
 1
1
-
 2
2
-
 3
3
-
 4
4
-
 5
5
-
 6
6
-
 7
7


Smith & Noble Petite Wall Mount Single Rod Installation guide
- Type
- Installation guide
Ask a question and I''ll find the answer in the document
Finding information in a document is now easier with AI
Related papers
-
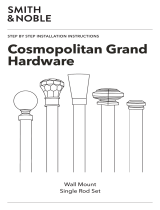 Smith & Noble Cosmopolitan Grand Wall Mount Single Rod Installation guide
-
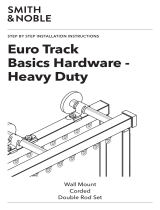 Smith & Noble Euro Track Heavy Duty Corded Wall Mount Double Rod Installation guide
-
 Smith & Noble Metro Track Flat Aluminum Hardware Installation Instructions Manual
-
 Smith & Noble Metro Track Flat Aluminum Hardware Installation Instructions Manual


Other documents
-
 Zoroufy Classic Wall Hanger Collection User manual
-
 Zoroufy Classic Tapestry Wall Hanger Collection User manual
-
Pro Space BXG1836W Installation guide
-
 Zoroufy Grand Regency Operating instructions
-
Kmart 41436646 User manual
-
 Zoroufy LEGACY User manual
-
Art Decor I-56R-3728-6128-VB Installation guide
-
 The Artifactory 8787-3-75-75 Installation guide
-
 The Artifactory 8669-40-40 Installation guide
-
Rod Desyne 150-52-10FT-2 Installation guide


