Page is loading ...

USER GUIDE
NETCOMM GATEWAY SERIES
ADSL2+/3G Wireless N300
4-Port Modem Router

ADSL2+/3G Wireless N300 4-Port Modem Router YML15WN
2 www.netcomm.com.au
Preface
This manual provides information related to the installation, operation, and application of this device. The individual reading this manual is
presumed to have a basic understanding of telecommunications terminology and concepts.
If you nd the product to be broken or malfunctioning, please contact technical support for immediate service by email at
For product update, new product release, manual revision, or software upgrades, please visit our website at http://www.Netcomm.com.au
Important Safety Instructions
With reference to unpacking, installation, use and maintenance of your electronic device, the following basic guidelines are recommended:
• Do not use or install this product near water, to avoid re or shock hazard. For example, near a bathtub, kitchen sink or laundry tub,
or near a swimming pool. Also, do not expose the equipment to rain or damp areas (e.g. a wet basement).
• Do not connect the power supply cord on elevated surfaces. Allow it to lie freely. There should be no obstructions in its path and no
heavy items should be placed on the cord. In addition, do not walk on, step on or mistreat the cord.
• Use only the power cord and adapter that are shipped with this device.
• To safeguard the equipment against overheating, make sure that all openings in the unit that offer exposure to air are not blocked.
• Avoid using a telephone (other than a cordless type) during an electrical storm. There may be a remote risk of electric shock from
lightening. Also, do not use the telephone to report a gas leak in the vicinity of the leak.
• Never install telephone wiring during stormy weather conditions.
WARNING
• Disconnect the power line from the device before servicing.
Copyright
Copyright©2008 NetComm Limited. All rights reserved. The information contained herein is proprietary to NetComm Limited. No part of
this document may be translated, transcribed, reproduced, in any form, or by any means without prior written consent of NetComm Limited
NOTE:This document is subject to change without notice.
Save Our Environment
When this equipment has reached the end of its useful life, it must be taken to a recycling centre and processed separate from domestic
waste.
The cardboard box, the plastic contained in the packaging, and the parts that make up this router can be recycled in accordance with
regionally established regulations. Never dispose of this electronic equipment along with your household waste. You may be subject to
penalties or sanctions under the law. Instead, ask for disposal instructions from your municipal government.
Please be responsible and protect our environment.

YML15WN ADSL2+/3G Wireless N300 4-Port Modem Router
www.netcomm.com.au 3
NetComm Gateway Series - ADSL2+/3G Wireless N300 4-Port Modem Router
Table of Contents
Introduction ............................................................................................................................................................................................... 5
Your 3G15Wn – ADSL2+/3G Wireless N300 4-Port Modem Router .................................................................................................................................6
Package contents ............................................................................................................................................................................................................ 6
Key features ..................................................................................................................................................................................................................... 6
Placement of your 3G15Wn ...................................................................................................................................................................... 7
Router placement ............................................................................................................................................................................................................. 8
Avoid obstacles and interference ...................................................................................................................................................................................... 8
Cordless phones .............................................................................................................................................................................................................. 8
Choose the “quietest” channel for your wireless network .................................................................................................................................................. 9
Product Layout ........................................................................................................................................................................................ 10
Getting to know your 3G15Wn ....................................................................................................................................................................................... 11
Minimum system requirements ....................................................................................................................................................................................... 12
Do I need a Microlter? .................................................................................................................................................................................................. 12
Default settings .............................................................................................................................................................................................................. 13
Restore factory default Settings ...................................................................................................................................................................................... 13
Connecting the 3G15Wn ................................................................................................................................................................................................ 13
Quick ADSL setup .......................................................................................................................................................................................................... 14
Quick 3G setup .............................................................................................................................................................................................................. 15
Establish a wireless connection ...................................................................................................................................................................................... 15
Advanced Conguration ......................................................................................................................................................................... 16
What can you do from here ............................................................................................................................................................................................ 17
Logging into the user interface ....................................................................................................................................................................................... 17
Web User Interface .................................................................................................................................................................................. 18
What can you do from here ............................................................................................................................................................................................ 19
Logg on to the web user interface .................................................................................................................................................................................. 19
Basic ........................................................................................................................................................................................................ 20
Quick Setup ...................................................................................................................................................................................................................21
Home ............................................................................................................................................................................................................................. 21
3G Settings .............................................................................................................................................................................................. 23
3G Interface ................................................................................................................................................................................................................... 24
3G WAN Service ............................................................................................................................................................................................................ 24
PIN Conguration ........................................................................................................................................................................................................... 24
3G Backup Cong.......................................................................................................................................................................................................... 25
3G 25
Wireless ................................................................................................................................................................................................... 26
Setup/Basic ................................................................................................................................................................................................................... 27
Security ..........................................................................................................................................................................................................................28
Conguration.................................................................................................................................................................................................................. 28
MAC lter .......................................................................................................................................................................................................................30
Wireless bridge ..............................................................................................................................................................................................................31
Station info ..................................................................................................................................................................................................................... 31
Management ............................................................................................................................................................................................ 32
Device Settings .............................................................................................................................................................................................................. 33
Backup .................................................................................................................................................................................................................... 33
Update .................................................................................................................................................................................................................... 33
Restore Default ........................................................................................................................................................................................................ 33
Update Firmware ..................................................................................................................................................................................................... 34
SNMP ............................................................................................................................................................................................................................ 34
TR-069 client ................................................................................................................................................................................................................. 35
SNTP ............................................................................................................................................................................................................................. 36
Access Control ............................................................................................................................................................................................................... 36
Services ................................................................................................................................................................................................................... 36
Passwords ............................................................................................................................................................................................................... 36
Save/Reboot .................................................................................................................................................................................................................. 37
Advanced ................................................................................................................................................................................................. 38
ATM interface .................................................................................................................................................................................................................39
WAN service .................................................................................................................................................................................................................. 39
LAN ...............................................................................................................................................................................................................................40
NAT ................................................................................................................................................................................................................................41
Port Forwarding ....................................................................................................................................................................................................... 41
Port Triggering ......................................................................................................................................................................................................... 41
Security ..........................................................................................................................................................................................................................43
IP Filtering ................................................................................................................................................................................................................ 43
Parental Control ............................................................................................................................................................................................................. 45
Time Restriction ....................................................................................................................................................................................................... 45

ADSL2+/3G Wireless N300 4-Port Modem Router YML15WN
4 www.netcomm.com.au
URL lter .................................................................................................................................................................................................................. 45
Quality of Service ........................................................................................................................................................................................................... 46
Queue conguration ................................................................................................................................................................................................. 46
QoS classication .................................................................................................................................................................................................... 47
Routing .......................................................................................................................................................................................................................... 48
Default gateway ....................................................................................................................................................................................................... 48
Static route .............................................................................................................................................................................................................. 48
Policy routing ........................................................................................................................................................................................................... 49
Dynamic router ........................................................................................................................................................................................................ 49
DNS ............................................................................................................................................................................................................................... 50
DNS server .............................................................................................................................................................................................................. 50
Dynamic DNS .......................................................................................................................................................................................................... 50
DSL................................................................................................................................................................................................................................ 50
UPnP ............................................................................................................................................................................................................................. 51
DNS proxy ..................................................................................................................................................................................................................... 51
USB Storage .................................................................................................................................................................................................................. 52
Print Server .................................................................................................................................................................................................................... 52
Interface grouping .......................................................................................................................................................................................................... 53
LAN ports ......................................................................................................................................................................................................................53
Status ....................................................................................................................................................................................................... 54
Diagnostics .................................................................................................................................................................................................................... 55
System Log .................................................................................................................................................................................................................... 56
Statistics ........................................................................................................................................................................................................................ 57
LAN ......................................................................................................................................................................................................................... 57
WAN ........................................................................................................................................................................................................................ 57
ATM ......................................................................................................................................................................................................................... 58
ADSL ....................................................................................................................................................................................................................... 58
Route ............................................................................................................................................................................................................................. 60
ARP ............................................................................................................................................................................................................................... 60
DHCP ............................................................................................................................................................................................................................ 60
Appendix A – Print Server ....................................................................................................................................................................... 62
Appendix B – USB Storage ..................................................................................................................................................................... 68
Legal and regulatory information ............................................................................................................................................................ 70

INTRODUCTION

ADSL2+/3G Wireless N300 4-Port Modem Router YML15WN
6 www.netcomm.com.au
Introduction
Your 3G15Wn – ADSL2+/3G Wireless N300 4-Port Modem Router
Congratulations on your purchase of a NetComm 3G15Wn – ADSL2+/3G Wireless N300 4-Port Modem Router. This product is a high-
performance ADSL2+ Modem Router combined with a 3G router that provides high-speed wireless N networking and Internet connectivity
for your home, ofce or public space. The NetComm 3G15Wn gives you the option to plug directly into an ADSL service to deliver Internet
to users or connect via 3G with its support for an external 3G USB Modem. The choice is yours. Both methods will allow you to share your
Internet connection amongst multiple users with either the 4 LAN ports for wired connections or via high-speed Wireless N.
The 3G15Wn also allows for a 3G Mobile Broadband connection provided by a 3G USB modem to act as a backup Internet connection to your
xed line service, providing automatic Internet failover to 3G in the event that the ADSL service fails. Should you have access to both connection
methods, the 3G15Wn will ensure you are “always on” which is vital to some individuals and business that perform Internet critical operations.
The USB port not only has the capability to support an external 3G USB Modem, but it is also able to be used for the purpose of print and
mass storage server. By simply plugging in a USB printer or a USB hard drive to the router, the functionality of these products will be able to
be shared with everyone connected to the 3G15Wn.
The 3G15Wn features the latest standards of wireless security, with wireless security enabled by default on each router. An advanced
rewall and VPN pass-through functionality allows for maximum security and caters for the encrypted Point-to-Point communications from
connected computers through the 3G15Wn to a VPN Server.
The Port Forwarding and UPnP functionality provided by the 3G15Wn make it easier for today’s Internet users to setup and congure the various
Network Port Rules needed by Internet applications such as On-Line Gaming, Peer-To-Peer le sharing and Instant Messaging services
Package contents
Your 3G15Wn contains the following items:
• 3G15Wn – ADSL2+/3G Wireless N300 4-Port Modem Router
• 12VDC, 1.5A Power Supply
• RJ-11 ADSL Line connection cable
• RJ-45 Ethernet cable
• Removable Antenna
• User Guide (on CD)
• Printed Quick Start Guide
Key features
• Fully featured ADSL2+ Modem Router
• USB port for alternative connection to the Internet via a 3G USB Modem
• Supports auto Internet failover from ADSL to 3G
• Wireless N access point – high speed wireless up to 300Mbps
• 2 Transmit and 2 Receive antennas
• 4 LAN ports for multiple wired connections
• Browser based interface for conguration and management: OS independent and easy to use
• Full wireless security - WEP, WPA, WPA2

PLACEMENT

ADSL2+/3G Wireless N300 4-Port Modem Router YML15WN
8 www.netcomm.com.au
Placement
Placement of your 3G15Wn
When Connecting With 3G
Just like your mobile phone, a 3G USB Modem’s location will affect its signal strength to the 3G Mobile Base Station (Cell Tower). The data
speed achievable from a 3G USB modem is relative to this signal strength, which is affected by many environmental factors. Please keep
in mind that the 3G USB Modem will need adequate signal strength in order to provide Internet connectivity whilst choosing a location to
place your 3G15Wn – ADSL2+/3G Wireless N300 4-Port Modem Router.
Similarly to the 3G USB Modem, the wireless connection between the Router and your Wi-Fi devices will be stronger the closer your
connected devices are to your Router. Your wireless connection and performance will degrade as the distance between your Router and
connected devices increases. This may or may not be directly noticeable, and is greatly affected by the individual installation environment.
If you have concerns about your network’s performance that might be related to range or obstruction factors, try moving the computer to
a position between three to ve meters from the Router in order to see if distance is the problem. If difculties persist even at close range,
please contact NetComm Technical Support.
Note: While some of the items listed below can affect network performance, they will not prohibit your wireless network from functioning; if you are concerned that your network is
not operating at its maximum effectiveness, this checklist may help.
Router placement
Place your Router as close as possible to the centre of your wireless network devices. To achieve the best wireless network coverage for
your “wireless clients” (i.e., computers with built in or USB Wireless Adapters, Laptops with Built-in Wireless, Wireless PDA / iPhone, etc):
• Ensure that your Router’s antennas are parallel to each other, and are positioned vertically (toward the ceiling). If your Router itself
is positioned vertically, point the antennas in an upward direction as much as possible.
• In multi-storey homes, place the Router on a oor that is as close to the centre of the home as possible. This may mean placing
the Router on an upper oor.
• Try not to place the Router near a cordless telephone that operates at the same radio frequency as the 3G15Wn (2.4GHz).
Avoid obstacles and interference
Avoid placing your Router near devices that may emit radio “noise,” such as microwave ovens. Dense objects that can inhibit wireless
communication include:
• Refrigerators
• Washers and/or dryers
• Metal cabinets
• Large aquariums
• Metallic-based, UV-tinted windows
If your wireless signal seems weak in some spots, make sure that objects such as these are not blocking the signal’s path (between your
devices and Router).
Cordless phones
If the performance of your wireless network is impaired after considering the above issues, and you have a cordless phone:
• Try moving cordless phones away from your Router and your wireless-enabled computers.
• Unplug and remove the battery from any cordless phone that operates on the 2.4GHz band (check manufacturer’s information). If
this xes the problem, your phone may be interfering with the Wi-Fi Router.
• If your phone supports channel selection, change the channel on the phone to the farthest channel from your wireless network.
For example, change the phone to channel 1 and move your Router to channel 11. See your phones user manual for detailed
instructions.
• If necessary, consider switching to a 900MHz or 5GHz cordless phone.

YML15WN ADSL2+/3G Wireless N300 4-Port Modem Router
www.netcomm.com.au 9
NetComm Gateway Series - ADSL2+/3G Wireless N300 4-Port Modem Router
Choose the “quietest” channel for your wireless network
In locations where homes or ofces are close together, such as apartment buildings or ofce complexes, there may be wireless networks
nearby that can conict with your wireless network.
Use the Site Survey capabilities found in the Wireless Utility of your wireless adapter to locate any other wireless networks that are available
(see your wireless adapter’s user manual), and switch your Router and computers to a channel as far away from other networks as
possible.
• Experiment with more than one of the available channels, in order to nd the clearest connection and avoid interference from
neighbouring cordless phones or other wireless devices.
• For NetComm wireless networking products, use the detailed Site Survey and wireless channel information included with your
wireless network card. See your network card’s user guide for more information.
These guidelines should allow you to cover the maximum possible area with your Router. Should you need to cover an even wider area, you
should consider looking at building a hybrid network by combining your wireless network with a HomePlug Network. See the NetComm
website for more details on HomePlug products

Product Layout

YML15WN ADSL2+/3G Wireless N300 4-Port Modem Router
www.netcomm.com.au 11
NetComm Gateway Series - ADSL2+/3G Wireless N300 4-Port Modem Router
Product Layout
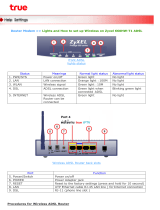
Getting to know your 3G15Wn
It is recommended that you take a moment to acquaint yourself with the indicator lights, ports and default settings of the 3G15Wn prior to
commencing with installation.
LED Colour Mode Function
Power Green On The router is powered on
Off The router is not powered
LAN 1-4 Green On Ethernet link is established
Off There is no Ethernet link established
Blinking Data transmitting/receiving over Ethernet
Wi-Fi Green On Wireless module is ready
Off Wireless Module is not installed
Blinking Data transmitting/receiving over Wi-Fi
ADSL Green On The ADSL link is established
Off The is no ADSL link established
Blinking The ADSL line is training if it is blinking rapidly, The ADSL line is not connected if it is blinking slowly.
Internet Red On Device attempted to obtain an IP address and failed (no DHCP response, no PPPoE response, PPPoE
authentication failed, no IP address from IPCP etc.) For bridged mode, this LED remains off. If the IP or
PPPoE session is dropped due to an idle timeout, the LED will remain green if an ADSL connection is
still present. If the session is dropped for any other reason, the LED is turned off. The LED will turn red
when it attempts to reconnect and DHCP or PPPoE fails
Off Modem is in bridged mode or ADSL connection is not present
Green Blinking IP connected and data is passing through the device (either direction)
USB Green On A USB device is plugged into the USB port
Off There is no USB device plugged into the USB port
Port
Name
Function
Power Connect the supplied power adapter
On/Off Push to turn the 3G15Wn on and off
USB Connect your external 3G USB Modem for a 3G connection or USB Storage/USB Printer
Reset Reset button. Depress for 10 seconds to return your 3G15Wn to factory default settings
LAN x 4 4 x 10/100 Ethernet switch to connect wired devices
DSL Telephone jack (RJ-11) to connect to your telephone wall socket (ADSL Line)
Wi-Fi Wi-Fi antenna for distributing wireless Internet signal

ADSL2+/3G Wireless N300 4-Port Modem Router YML15WN
12 www.netcomm.com.au
Minimum system requirements
Different aspects of the 3G15Wn have different requirements, so let’s look at them in turn. We’ll start with your computer, which ought to
match the following requirements if you are to enjoy the benets of a high-speed ADSL connection and use of 3G and Wireless Networking.
PC Requirements:
• Any computer running Windows 98/2000/Me/XP/Vista/7 or Macintosh OSX
• Ethernet or Wireless Network card
• CD-ROM drive
• Web browser e.g.
• Internet Explorer 5.1 (or better)
• Netscape Navigator
• Mozilla FireFox 1.0.4 (or better)
ADSL Requirement:
• ADSL broadband connection to an ISP (Internet Service Provider)
• ADSL In-line Splitter/Filter (Please refer to “Do I need a micro lter?” for more information)
Note: Connection at ADSL2 or 2+ rates depends on the service offered by your ISP; the device will operate at standard ADSL rates in the absence of the 2 or 2+ service.
Consult your ISP for details.
3G Requirement:
• Compatible 3G USB Modem with Active SIM/Data Service if you want to use 3G Broadband service.
Note: Subject to terms and conditions from your 3G Mobile Broadband Service Provider.
Wireless Computer/Device Requirements
• Computer/device with a working 802.11b, 802.11g or 802.11n wireless adapter.
Do I need a micro lter?
Micro lters are used to prevent interference between phones and fax machines, and your ADSL service. If your ADSL-enabled phone
line is being used with any equipment other than your ADSL Modem then you will need to use one Micro lter for each phone device in
use. Telephones and/or facsimiles in other rooms that are using the same line will also require Microlters. A suitable Microlter can be
purchased from NetComm or your Service Provider, if required.

YML15WN ADSL2+/3G Wireless N300 4-Port Modem Router
www.netcomm.com.au 13
NetComm Gateway Series - ADSL2+/3G Wireless N300 4-Port Modem Router
Default settings
LAN (Management)
Static IP Address: 192.168.1.1
Subnet Mask: 255.255.255.0
Default Gateway: 192.168.1.1
WAN (Internet)
WAN mode: DHCP
Wireless
SSID: NetComm Wireless
Channel: auto
Security: WEP, 64bit
WEP Key: a1b2c3d4e5
Interface Access
Username: admin
Password: admin
Restore Factory Default Settings
Restoring factory defaults will reset the 3G15Wn to its factory default conguration. Occasions may present themselves where you need to
restore the factory defaults on your 3G15Wn such as:
• You have lost your username and password and are unable to login to your 3G15Wn’s web conguration page;
• You have purchased your 3G15Wn from someone else and need to recongure the device to work with your ISP;
• You are asked to perform a factory reset by NetComm Support staff
In order to restore your 3G15Wn to its factory default settings, please follow these steps:
• Ensure that your 3G15Wn is powered on (for at least 10 seconds);
• Use a paper clip or a pencil tip to depress the reset button for ten seconds and release. At this point, the reset is in progress. Do not
power off the unit at this point;
• When indicator lights return to steady green, reset is complete. The default settings are now restored. The entire process takes
about 45 seconds to complete;
• Once you have reset your 3G15Wn to its default settings you will be able to access the device’s conguration web interface using
http://192.168.1.1 with username ‘admin’ and password ‘admin’;
Connecting the 3G15Wn
300Mbps Wireless Link
LAN 1 LAN 2 LAN 3 LAN 4
3G Tower
3G15Wn
3G USB Modem
ADSL2+
Telephone
Exchange

ADSL2+/3G Wireless N300 4-Port Modem Router YML15WN
14 www.netcomm.com.au
Quick Setup
1. Connect the supplied RJ-11 cable to the DSL port on the back of your router to the phone port that supplies your ADSL.
2. And/or, attach a compatible 3G USB modem into the USB port on the back of the router
3. Connect the supplied RJ-45 Ethernet cable from one of the LAN ports on the back of the router to your computer
4. Screw the supplied detachable antenna to the Wi-Fi connector on the back of the router
5. Connect the supplied power adapter to your router and press the on/off button to power the router on.
Login to the web interface
• Open a web browser (Internet Explorer, Firefox, and Safari) and type 192.168.1.1 into the address bar.
• At the login screen type admin into both the username and password elds. Then click submit. This will take you directly to the
Quick Setup page

YML15WN ADSL2+/3G Wireless N300 4-Port Modem Router
www.netcomm.com.au 15
NetComm Gateway Series - ADSL2+/3G Wireless N300 4-Port Modem Router
Connecting With ADSL
1. Select the ADSL only box and click Next
2. Enter the user ID/Password on this screen as supplied by your ISP
3. Click on Next to use these settings
4. You will then be asked to enter additional setup details.
Connecting with 3G
1. Select the 3G only box and click Next
2. Your modem will auto detect if it is compatible: This information can be seen at the top of the page
3. From the drop down Prole box select your 3G ISP, which will auto-ll your APN setting
4. Enter the username/password supplied by your 3G ISP.
Note: Not all 3G users will have a username/password. Only enter this information if you have been supplied one by your 3G ISP
5. Click on Next to use these settings
6. You will then be asked to enter additional setup details. This will be explained from Wireless Quick Setup
Conguring 3G backup
1. Select the ADSL with 3G backup box and click Next
2. Follow the instructions listed above for both ADSL and 3G to set up both connections
3. Check the Enable 3G Backup box and enter your desired backup settings
4. Click on Next to use these settings
5. You will then be asked to enter additional setup details. This will be explained from Wireless Quick Setup

ADSL2+/3G Wireless N300 4-Port Modem Router YML15WN
16 www.netcomm.com.au
Wireless Quick Setup
1. All the default settigns already appear on the wireless quick setup page
2. You can enable/disable your wireless
3. You can change your wireless SSID. If you do, be sure to remember the new name or write it down so you know what network to
connect to
4. You can also select the level of wireless security and change the wireless password
5. Once you have completed entering your wireless settings click Next
USB Storage
1. If a USB device is plugged into the USB port, it will be detected and you will have the choice to Enable USB storage
2. If you enable USB storage you will be shown the netbios and Directory name, you can change these to anything you want
3. Click Next once you are happy with the settings
4. To access the storage device open a web browser and type \\Netbios\Directory\. So using the defaults \\3G15Wn\USB-
Storage\
USB Print Server
1. If a USB device is plugged into the USB port, it will be detected and you will have the choice to Enable on-board print server
2. If you enable the device to work as a print server you will be asked to enter the printer name and make and model. Both elds
can be named anything you like. The names will be used to identify the printer later.
3. Click Next once you are happy with the settings
4. To complete setting up your network printer, please read Appendix A of the User Manual

YML15WN ADSL2+/3G Wireless N300 4-Port Modem Router
www.netcomm.com.au 17
NetComm Gateway Series - ADSL2+/3G Wireless N300 4-Port Modem Router
Passwords
1. On this page you can change the passwords for the different levels of users
2. The default password for all users is the same as the corresponding username
3. Once you have completed setting the passwords click Finish
4. You will be taken back to the home page where you can view your connection status
Establishing a Wireless Connection
You can connect multiple wireless devices, including laptops, desktops and PDA’s to your device by following these two basic steps.
1. Using your wireless device, scan the wireless networks in your area and select the network called NetComm Wireless, then click
connect.
Note: If you changed the SSID in the wireless quick setup, then your network name will be different
2. Enter the following default security key: a1b2c3d4e5
Note: To ensure wireless security, we recommend that you change the default settings through the web Interface.
If you changed the wireless password in the wireless quick setup, then your security key will be different
Troubleshooting
Cannot establish a wireless connection
• Make sure the wireless switch on your laptop is in the on position
• Ensure your device and wireless adapter are using the same wireless security settings
• Make sure you are trying to connect to the correct SSID with the correct
security key
Cannot establish an ADSL connection
• Ensure you have entered the correct username and password as supplied by your ISP. If you cannot nd them please contact
your ISP to ensure you have the correct details.
Cannot establish a 3G Connection
• Ensure you are using a compatible 3G USB Modem
Note: See NetComm Website for a list of compatible modems - www.netcomm.com.au
• Ensure you have entered the correct 3G Prole (ISP name and pre/post paid) and that the APN is the same as supplied by your
3G ISP
Cannot access the Web UI
• If you have changed your username/password and forgotten them you will need to reset your router to the factory default settings
and use the default settings admin/admin
How to reset your router to the factory default settings
• With a paperclip, sharp pencil or similar object press the reset button on the back panel of the device and hold for approximately
10 seconds.

Web User Interface

YML15WN ADSL2+/3G Wireless N300 4-Port Modem Router
www.netcomm.com.au 19
NetComm Gateway Series - ADSL2+/3G Wireless N300 4-Port Modem Router
Web User Interface
What can you do from here?
By logging into the web user interface, you are able to congure your 3G15Wn with a wide array of basic and advanced settings. From
setting wireless security, to backing up your routers settings, uploading new rmware and setting parental controls, the web user interface
is a handy tool for personalizing your device to maximize its potential. See below, in the rest of this user manual for a more advanced
description on all elements of the web user interface
Logging into the user interface
To login to the web interface, follow the steps below:
NOTE: The default settings can be found in Default Settings, listed earlier in this manual.
1: Open a web browser and enter the default IP address for the Router in the web address eld. In this case http://192.168.1.1
NOTE: For local administration (i.e. LAN access), the PC running the browser must be attached to the Ethernet, and not necessarily to the device. For remote access, use the
WAN IP address shown on the WUI Homepage screen and login with remote username and password.
2: A dialog box will appear, as illustrated below. Enter the default username and password, as dened in the section Default Settings.
Click OK to continue.
Username: admin
Password: admin
NOTE: The login password can be changed later (see Access Control > Passwords)
3: After successfully logging in for the rst time, you will reach this following “Quick Setup” page.

Basic
/