Page is loading ...

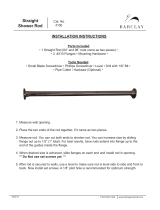
INSTALLATION INSTRUCTIONS
P 847•244•1234 www.barclayproducts.com
4/20/09
1. Before beginning any work be sure to shut off the water supply.
2. Apply teflon tape to ends of both the hot and cold supply nipples.
Place valve body through holes in tub. Thread the large locknuts
onto the other ends of the nipples and secure the shower set to the tub.
3. Assemble shower head to gooseneck riser pipe.
4. Assemble riser pipe to the riser coupling assembly on the spout by
tightening the coupling nut. After hand tightening, fasten securely by
using a wrench.
5. Secure wall support bracket to the wall using the wood screws provided.
6. Turn on water supply.
NOTE: Please seek professional help if you have copper plumbing in your home.
Cleaning Instructions
Wipe this whole set off with warm water and a soft cloth. DO NOT use soaps, cleansers, or brass cleaners as
they will disintegrate the protective lacquer coating and leave the brass exposed causing it to tarnish.
Parts Included
● Tub Spout #191-S ● Gooseneck Riser Pipe #199-R ●
● Wall Support Bracket w/ Screws #4195-WS ● Shower Head 1003 ●
Code Rectangular
Shower Unit
Tools Needed
• Screwdriver • Level • 1/4” Drill Bit • Wrench • Wood Screws • Set Screw •
Cat. No.
4191
Pg. 1

Code Rectangular
Shower Unit
Cat. No.
4191
4/20/09
P 847•244•1234 www.barclayproducts.com
Parts Included:
• 2 Corner pieces • 1 Back bar (no inserts) • 1 Front bar with grey inserts •
• 2 #331 D-Rod loops • 2 #300 Flanges • 8 Wall screws • 2 Set screws •
• #336 Double Eye Loop •
1. Attach bent corner rods to straight rods by sliding them onto the gray inserts in the straight rods.
2. The large straight rod fits into the #331 D-Rod loops.
3. The looped portion of the #331 fits over the D-Rod corner pieces as shown.
4. The flanges attach to the wall (measure for proper distance).
5. The D-Rod assembly fits into flanges and is secured with set screws.
***** To attach faucet assembly: use #336 Double eye loop *****
6. The #336 double eye loop must be put on the desired side of the D-Rod before
back straight rod is attached.
7. The riser for the faucet assembly will fit through the other opening in the #336.
INSTALLATION INSTRUCTIONS
Pg. 2
Tools Needed
• Pencil • Drill • Measuring Tape •
/