Page is loading ...

For Clawfoot Tub
includes Rectangular Shower Rod
New Add On Shower
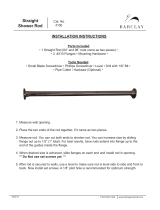
Cut from the smooth end .
Cut from the smooth end .
Note: Ceiling support rod and Support rod may be cut
off as required for proper length
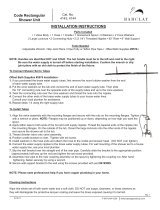
1.Turn off water supply and remove existing faucet .
2.Apply a bead of Silicone Sealant or plumber’s putty to
the back of the new faucet (1) and place it into position
Attach locknuts (2) to the thread shanks , Do not overtighten
nuts as this may damage your tub .
3.Reconnect existing supply nosecone pieces into faucet
shanks , Tighten coupling nuts securely .
4.Thread riser coupling (4) onto one end of the lower riser tube
(3) and tighten , thread opposite end of the lower riser tube(3)
into faucet riser connector nut (5) and tighten .No thread
sealing tape required .
5.Put together shower frame assembly :
a)Slide the Ceiling support loop (6) onto one end of half
tube (7) .
b)Connect the two half tube (7) by use the tube connecting
piece (16) , squeeze the tube connecting slightly and
insert 1-1/2" inch into one end of the half tube (7), use
the same process and connect the second half tube (7),
the two half tubes should be meet , tighten with the wood
screws provided .
c)Slide the other two ends of the half tube (7) into Rod Holder
assembly (10) Tighten the two setscrew provided .
6.Thread the Ceiling support Rod (15) into the Ceiling support
Flange (14) ,and measure the installation length of the Ceiling
Support Rod (15) ,Cut the Ceiling Support Rod (15) to be
proper length , insert the Ceiling Support Rod (15)into the
Ceiling Support Loop (6) , secure with the provided set
screw.
7.Thread the Wally Bracket Rod (13) into the Ceiling support
Flange (14) ,and measure the installation length of the Wall
Bracket Rod (13) ,Cut the Wall Bracket Rod (13) to be
proper length , insert the Wall Bracket Rod (15)into the
Rod Holder assembly (10) , secure with the provided set
screw.
8.Thread the bushing out off the Upper Riser (11) ,apply
thread sealing tape to face bushing and attach the
shower head (12) and tighten.
9.Slip the Upper Riser (11) into the Rod Holder assembly (10)
and thread Upper Riser assembly to Lower Riser using riser
coupling (4) , No thread sealing tape required .
10.Move the complete shower frame assembly along the Upper
Riser (11) until Ceiling Support Flange (14) reaches the ceiling
and Wall .
11.Fasten Support Flanges (14) to the ceiling and wall use the
anchor wood screws provided with the flanges.
Note: When fastening flanges to drywall (plastic board) or hollow
wall , use plastic anchors provided ,install plastic anchors
into the wall before inserting the screws. If installation
requires that the holes be re-drilled with a masonry type
drill bit and that Toggle Bolt Style Anchors (not supplied)
are used.
12.Tighten all the screws on the loop and shower rod holder.
Tighten all Jam nuts (17) on the threaded rods.
13.Turn on water and check for leaks at all connectors.
Item no.:11123

Item no.:11127
9
10
1.Turn off water supply .
2.Remove existing bath faucet and riser by unthreading faucet
locknuts and supply coupling nuts from back of tub.
3. Apply a bead of Silicone Sealant or plumber’s putty to the back
of the new faucet (1) and place it into position ,Attach locknuts
(2) to the thread shanks , Do not overtighten nuts as this may
damage your tub .
4.Reconnect existing supply into faucet shanks.
Tighten coupling nuts (not shown) securely.
5.Thread riser coupling (3) onto one end of the lower riser tube
(4) and tighten , thread opposite end of the lower riser tube(3)
into faucet riser connector nut (5) and tighten .No thread
sealing tape required .
6.Slip the Upper Riser (7) into the Riser loop (8) and thread Upper
Riser assembly to Lower Riser using riser coupling (3) , No thread
sealing tape required .
7.Thread the Wall Bracket Rod (9) into the Flange (10) ,and
measure the installation length of the Wall Bracket Rod (9) ,
Cut the Wall Bracket Rod (9) to be proper length , insert the
Wall Bracket Rod (9)into the riser loop (8) , secure with
the provided set screw.
8.Thread the bushing out off the Upper Riser (7) ,apply
thread sealing tape to face bushing and attach the
shower head (6) and tighten.
9.Move up the Wall Bracket Rod (9) to desired height.
10.Fasten Wall Bracket Flange to wall using the two wood
screws supplied with the flange.
Note: When fastening flanges to drywall (plastic board) or
hollow wall , use plastic anchors provided ,install
plastic anchors into the wall before inserting the screws.
If installation requires that the holes be re-drilled with a
masonry type drill bit and that Toggle Bolt Style Anchors
(not supplied) are used.
11.Turn on water and check for leaks at all connections.
Note: Support rod may be cut off as required for proper length
Cut from the smooth end .
9

6
1
2
3
5
4
Item no.:11120
Spout Type
1.Turn off water supply and remove existing tub spout .
2.Install new diverter Spout (1) on to threaded threaded stub out .
3.Thread riser Coupling (3) onto one end of the Lower Riser tube
(2) and tighten , thread opposite end of the Lower Riser tube(2)
into Spout Riser connector nut (5) and tighten .No thread
sealing tape required .
4.Slip the Upper Riser (4) into the Riser bracket (6) and thread Upper
Riser assembly to Lower Riser using riser coupling (3) , No thread
sealing tape required .
5.Thread the bushing out off the Upper Riser (4) ,apply thread sealing
tape to face bushing and attach the shower head (7) and tighten.
6.Move up the Riser bracket (6) to desired height.
7.Fasten Riser bracket (6) to wall using the two wood screws supplied
with the Riser bracket.
Note: When fastening flanges to drywall (plastic board) or hollow wall ,
use plastic anchors provided ,install plastic anchors into the wall
before inserting the screws.If installation requires that the holes
be re-drilled with a masonry type drill bit and that Toggle Bolt Style
Anchors (not supplied) are used.
8.Turn on water and check for leaks at all connections.
/