Page is loading ...

Pegatha Aluminum Railing
Level Rail Installaon Instrucons 2015 V1.0
Step #1 – Aluminum Post Installaon
Determine locaon of all posts prior to installing deck
boards.
Add blocking where necessary to support proper post
installaon.
Use the composite shims included with your posts to
make sure your posts are plumb.
Secure posts by rst pre-drilling and then using 2-1/2”
lag bolts with washers to fasten through the decking and
into the framing structure/blocking to hold the posts in
place.
Cut or break o the shims.
Step #2 – Measure & Cut Aluminum Rails
Lay your boom rail on the deck centered between two posts.
Mark a line where the post is on both sides of the rail.
Measure back 5/8” from the rst line and mark a cut line on both
ends.
Lay the top rail beside the boom rail lining up the baluster connect-
ors.
Using the cut line from your boom rail mark a cut line on your top
rail as well.
Use a miter saw and cut the lines you have marked.
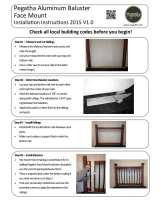
Components Included:
Top Level Rail w/ baluster connectors (1)
Bottom Level Rail w/ baluster connectors (1)
Top Level Rail Mounting Brackets w/ caps (2)
Bottom Level Rail Mounting Brackets w/ caps (2)
*Multi-Angle Brackets are available but must be
ordered separate and in packs of two.
Rail Support(s) (1-6’ or 2-8’)
Rail Support Baluster(s) (1-6’ or 2-8’)
Balusters (15-6’ or 21-8’)
#8X3/4” Pan Head Self Drilling Screws (13-6’ or 14-8’)
*Post Kits are sold separately
Check all local building codes before you begin!

Step #4 – Aach Railing to Posts
BEFORE aaching railing to posts be sure to put the Post
Base Covers on if they are of a one piece design! Two
piece designs can be put on aer the railing is installed.
Remove the clamps and ip the railing over.
Peel back the plasc protecve cover from the top rail 3”
to 4” on both ends.
Slide the top and boom brackets onto the assembled
railing.
Place two spacer blocks beneath where the railing will sit
between the posts. Make them 2”-3” in height depending
on the desired rail height and local building code require-
ments.
Place the center Rail Support in place and set your rail on
top of the spacer blocks.
Use the supplied screws and fasten your brackets to the
posts locking your rail secon into place. Do not forget the
screw that aaches from the boom up on the top brack-
ets and the screw that aaches through the side of the
boom brackets.
Adjust the Rail Support Baluster(s) to brace the railing and
use the supplied screw to hold it in place.
Remove the protecve lm from the top of the top railing.
If you have two piece Post Base Covers now install those
covering the base of the posts and use the supplied
screws.
To nish the installaon place the post caps on top of the
Posts, using construcon adhesive if necessary to hold
them in place.
Step #3 – Railing Assembly
Lay down a protecve blanket or cardboard and place the
top rail upside down on top of it.
We suggest clamping the top rail to the deck or a work
bench to keep it stable.
Install the balusters on each of the baluster connectors
making sure they are ght against the rail. Use a rubber
mallet if needed to tap them in place.
Install the boom rail making sure all of the balusters line
up. Use a rubber mallet to tap the rail onto the balusters.
Screw the extra connector to the center of the boom
rail and aach the Rail Support Baluster(s).
/