Page is loading ...

1
VNR 100 Media Drive Replacement Kit • Setup Guide
The Extron VNR 100 Media Drive Replacement Kit is an optional accessory for the VNR 100 recorder. It offers
a convenient way to archive materials and also allows the recorder to be moved between secure areas without
compromising condential data.
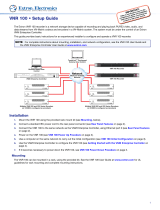
There are four drive bays on the front panel of the VNR 100. From left to right, they are numbered 0 - 3. The media
drive is labelled number1.
b a
Media Drive (drive #1)
Replacing an Existing Drive
1. If necessary, switch the recorder off by pressing and holding down the power switch (
a
) until the LEDs (
b
) ash
red and then go out.
ATTENTION: Never remove or insert the drive
while the unit is powered on.
2. Unplug the recorder.
3. Press the red catch. The lever arm is released (see the
gure to the right).
4. Swing the lever arm out until it is perpendicular to the
front of the drive caddy and use the arm to pull the
caddy out of the drive bay (see the gure to the right).
5. Remove the drive. There are no screws to be removed or
cable connections to be undone.
6. Insert the new drive into the drive bay.
7. Push the caddy into the recorder.
8. Swing the lever arm back until it clicks into place behind
the catch.
9. Reconnect the power to the VNR 100 and power the unit
on by pressing the power switch.
Conguring the New Drive
Initial conguration is through the browser of a computer connected to the same
network as the VNR 100.
1. In the browser address bar, enter the IP address of the recorder followed by a
colon and the port number (for example 192.168.254.254:8080). The login
page opens (see the gure to the right).
2. Enter the Username and Password.
NOTE: By default, the Username and Password are both config.

2
68-2259-50 Rev. A
05 13
Extron Headquarters
+1.800.633.9876 (Inside USA/Canada Only)
Extron USA - West Extron USA - East
+1.714.491.1500 +1.919.850.1000
+1.714.491.1517 FAX +1.919.850.1001 FAX
Extron Europe
+800.3987.6673
(Inside Europe Only)
+31.33.453.4040
+31.33.453.4050 FAX
Extron Asia
+65.6383.4400
+65.6383.4664 FAX
Extron Japan
+81.3.3511.7655
+81.3.3511.7656 FAX
Extron China
+86.21.3760.1568
+86.21.3760.1566 FAX
Extron Middle East
+971.4.299.1800
+971.4.299.1880 FAX
Extron Korea
+82.2.3444.1571
+82.2.3444.1575 FAX
Extron India
1800.3070.3777
Inside India Only
+91.80.3055.3777
+91.80.3055.3737 FAX
© 2013 Extron Electronics All rights reserved. www.extron.com
VNR 100 Media Drive Replacement Kit • Setup Guide (Continued)
3. Click Login. The VNR 100 Recorder Settings page opens (see the gure
to the right).
Once mounted, the capacity of the new drive will be shown under Disk
free space. This takes a few seconds.
4. If you are inserting a new drive, click Format.
ATTENTION: When inserting a drive that contains previously
recorded content, do not use the Format option as this will remove
all data.
5. When the formatting is complete, the message formatted to ext3 will
appear next to the Format button.
6. Click Apply Changes.
7. Logout of the cong screen.
Monitoring Free and Used Disk Space
To monitor the amount of free disk space and the percentage of disk space
used, see the Data Disk information on the VNR 100 web page (see the gure above).
Directory and File Structure
Use the Enterprise Controller website to view the directory and le structure of the VNR 100 media disk.
1. Enter the IP address of the Enterprise
Controller in the address bar of your browser.
2. At the login screen, enter the username and
password.
3. If necessary, click on the Devices tab of the
Enterprise Controller web page.
4. Select the VNR 100 of interest from the list of
devices.
5. Click Recorder in the Action buttons at the bottom of the screen. A popup window opens showing the home
directory for the recorder.
6. Click on the directory icon to show the les contained in the directory.
Network settings [eth0]
Recorder settings
User settings
Data disk
IP Address
Subnet Mask
Gateway
Serial
Controller IP
Controller port
MTU
New password
Confirm New password
192.168.254.254
255.255.0.0
192.168.254.253
192.168.254.254
5432
1500
1111999
mounted to /home/matrix_rec/Recording_Files
Disk free space: 19GB->98% used
formated to ext3
status:
Umount
Format
Apply Changes
Cancel Changes
Logout
VNMatrix recorder settings
/