Teleco Hub User manual

Type
User manual

Teleco Hub, your gateway to a smarter RV experience. With Teleco Hub, you can effortlessly control and monitor your RV's features from anywhere using your smartphone. From awnings and lights to water tank levels and door locks, Teleco Hub puts your RV at your fingertips. Enjoy the convenience of remote control and real-time notifications, ensuring your travels are comfortable and secure.

Teleco Hub, your gateway to a smarter RV experience. With Teleco Hub, you can effortlessly control and monitor your RV's features from anywhere using your smartphone. From awnings and lights to water tank levels and door locks, Teleco Hub puts your RV at your fingertips. Enjoy the convenience of remote control and real-time notifications, ensuring your travels are comfortable and secure.

TELECO HUB
INSTALLATION GUIDE AND USER MANUAL
GB
2
Teleco Warranty
Teleco guarantees its products against faulty materials and/or workmanship.
The TELECO warranty is limited to expense-free replacement or repair of
all those parts TELECO deems faulty. The warranty is applied for a 2-YEAR
period starting from the date of product purchase; nevertheless, it shall only
be deemed valid if the customer can produce a written document stating the
date of purchase (invoice or receipt).
The TELECO warranty does not cover:
a. Damage caused by improper installation and/or use and/or
maintenance
b. Damageresultingfromproductmodicationsthathavenotbeen
authorised by Teleco
c. Damage resulting from the use of spare parts that are not Teleco
originals
d. Damage resulting from repairs carried out by personnel who have not
been authorised by Teleco
e. Normal wear of parts
f. Spare part shipping between the customer and the service centre
g. Damage that may occur during transport:
transport-associated risks are always considered to be the customer’s
responsibility
Information
Congratulations on choosing Teleco HUB, the ideal interface with which to
remote-control your camper or caravan accessories via a smartphone using
a simple APP. This handbook has been drawn up to provide information on
thetechnicalspecicationsandhowtoinstall,useandmaintainyourTeleco
HUB:
For additional information, please contact your local dealer or:
TELECO s.p.a.
Via E. Majorana 49
48022 LUGO (RA), Italy
Web site: www.telecogroup.com
After-sales service: 899.899.856
TELECO s.p.a. declines all responsibility for any errors contained in this
manual. All information contained herein is up to date at the time of printing
and in line with the above-mentioned revisions. TELECO s.p.a. reserves
the right to make any changes made necessary by the development of its
products.
3
Contents
List of supplied accessories ....................................................................................................4
Technical characteristics .......................................................................................................... 4
Indicators and control parts .....................................................................................................5
Installation ..................................................................................................................................6
Positioning .............................................................................................................................. 6
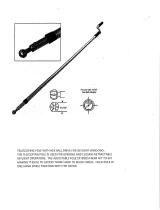
GSM external antenna (optional) ...........................................................................................6
Connecting to the vehicle battery ............................................................................................7
Connection of auxiliary inputs and outputs (optional) .............................................................. 8
Connection of system-ready Teleco/Telair products (optional) ................................................9
Rapid HUB and smartphone conguration ............................................................................. 11
RapidcongurationoftheBluetoothproximityconnection .....................................................11
RapidcongurationoftheremoteconnectionviaGSM(SMS) ............................................... 12
HUB and Smartphone detailed conguration ......................................................................... 15
Bluetooth Connection ..............................................................................................................15
Pairing a smartphone for Bluetooth connection ..................................................................15
Deleting the list of smartphones paired for Bluetooth connection .......................................16
GSM connection ...................................................................................................................... 17
Inserting and removing the Micro-SIM card .......................................................................17
ConguringGSMconnection .............................................................................................18
ConguringthenumbersenabledforHUBcontrolviaGSM(SMS)....................................20
Auxiliary controls .....................................................................................................................23
ConguringtheInputs .........................................................................................................24
ConguringtheOutputs ......................................................................................................25
AlarmsandNotications .......................................................................................................... 26
ConguringtheAlarms ........................................................................................................ 26
CongurationofthetelephonenumberstowhichSMSalarmmessagesaretobesent .... 27
Tracking ................................................................................................................................... 30
Troubleshooting ........................................................................................................................31
Recycling: with a view to reducing
disposal of waste electrical and electronic
equipment as much as possible, do not
throw out this end of life appliance together
with other unsorted municipal waste, but
make use of a recycling centre.
4
List of supplied
accessories
The Teleco HUB package contains the following accessories:
1 Teleco HUB control unit (hereinafter referred to as the HUB)
2 Power supply cable
3 Auxiliary inputs lead
4 Auxiliary outputs lead
5 Installation and use manual
Technical
characteristics
• Power supply: 12 Volt (10-15 V DC)
• Max consumption: 300 mA
• SIM Card connector: Micro-SIM card
• Bluetooth-connectible phones: 4
Auxiliary outputs: 2 clean 10A 250V AC / 30 V DC contacts
• Inputs: 2 digital channels (internal voltage 12 Volt)
• Dimensions: 147x97x35
• Weight: 200g
5
Indicators and
control parts
FIG 1
1 Key
Starts and ends the pairing procedure needed to link the HUB to a mobile device (smartphone, tablet etc.)
using Bluetooth technology
2 Red LED (POWER)
Flashes during HUB start up, on when the HUB is ready to work
3 Green LED (GSM)
On when GSM connection is possible (SMS ok, tracking ok)
Flashes when the GSM connection is partial (SMS ok, no tracking)
4 Blue LED (BLUETOOTH)
Flashesbrieyevery3secondswhentheHUBisabletoconnectviaBluetoothwithoneofthepaired
smartphones; on when a smartphone is connected
Duringthepairingprocedure:asheseverysecondwhentheHUBisreadytopair,ashesrapidlywhen
the paired smartphone list is full.
5 GSM EXT/INT
Commutator to select the internal GSM (INT) or external (EXT) antenna
6 GSM
Connector for GSM external antenna (optional, not included in the order)
7 SIM CARD
Slot for insertion of GSM micro-SIM (optional, not included in the order)
7
4
3
2
1
6
5
6
Installation
Positioning
To identify the HUB position that gives the best GSM and Bluetooth
reception proceed as follows:
1. Connect the HUB to the vehicle battery and carry out a Bluetooth
pairingwithasmartphone(see«RapidcongurationoftheBluetooth
proximity connection»)
2. Check the GSM reception quality of the HUB by selecting «SMS» from
the TelecoHUB App Menu and checking that GSM signal quality in the
chosen installation position is good.
3. Check Bluetooth reception quality by moving around inside the vehicle
with your smartphone and checking there are no interruptions in Blueto-
oth connection with the HUB
Make sure the Micro-SIM slot remains accessible.
GSM external antenna (optional)
TheinternalantennaoftheHUBisusuallysufcienttoensuregood
reception.
Should an external antenna be required, please contact your authorised
Teleco partner/dealer as choosing the wrong antenna may worsen signal
reception.
Should you decide to use an external GSM antenna proceed as follows:
1. Lift the plastic lid that protects the GSM connector (Fig. 1)
2. Connect the antenna to the GSM connector
3. Shift the GSM INT/EXT commutator to the “EXT” external position
4. Check GSM reception by using the TelecoHUB App
7
Connecting to the vehicle battery
1) Connect the BLACK wire of the power supply cable to the NEGATIVE
POLE of the vehicle 12 Volt battery, and the RED wire to the POSITIVE
POLE + (be careful not to invert the + and - poles) using 2 cables of a
cross section of 1 mm2. Protect the positive pole with a 3 A fuse near
the battery terminal.
2) Connect the GREEN wire of the power supply cable to the consensus
of the vehicle ignition console (in many cases such consensus is loca-
ted on Pin 15 in the main terminal board) so that whenever the engine
is started this cable receives a positive + 12 V DC voltage.
If this connection is not made the HUB will not be able to send you an
alarm when the vehicle engine is started.
• Warning
The 3-way power connector
(P) must be inserted in the
POWER V DC socket.
Inserting this connector
in any other socket will
irreparably damage the
board and render the
warranty null and void
Black
Red
3A fuse
Green
8
Connection of auxiliary inputs and outputs (optional)
The HUB places 2 inputs and 2 outputs at the user’s disposal to control
camper equipment/devices.
For example, the inputs could be used to monitor the water and waste water
tanks (Tank full? Tank empty?), or to check if the door and the skylight/
ventilation port are open or closed.
The outputs could be used to switch the lights on and off or to command
unlocking of the camper.
Inputs: 2 digital channels (internal voltage 12 Volt)
1) Connect the IN1 wires of the Auxiliary Input Lead to the
rstinputyouwishtocontrol.
2) Connect the IN2 wires of the Auxiliary Input Lead to the
ends of the second input you wish to control.
Outputs: 2 10A 250 V AC / 30 V DC relays
Common (COM.), Normally Closed (N.C.) and Normally
Open (N.O) contacts are available for every output
1) Use the Auxiliary Output Lead to carry out
connections on the basis of the equipment to be
controlled.
Example:
Magnetic contact for
doors and windows
Example:
Water tank level
indicator
Example: Door lock
Example: Light
Note: IN1- and IN 2- are internally connected to the negative pole of the control center power supply.
9
Connection of system-ready Teleco/Telair products (optional)
The HUB allows you to control - with a smartphone - satellite antennas, air
conditioners and power generators that are ready for use with the Teleco
HUB.
Installation without control panel
Using a HUB-Bus cable (not included in this order) connect the “SAT ANTENNA” connector of the
HUB to the “PANEL” connector of the control unit.
Installation with control panel
Connect a HUB-Splitter (not included in this order) to the “SAT ANTENNA” connector of the HUB.
Connect the two HUB-Splitter outputs to the “PANEL” connector of the control unit and to its
wall-mounted control unit.
Compatible satellite antenna models:
All FlatSat BT, TeleSat BT, Elegance BT and Komfort BT systems (year of sale from 2019 onwards).
10
Compatible models: SILENT 5400H-7400H-8400H and DUALCLIMA 8400H-12400H
Connection with the HUB occurs via the ICL interface
Power generator:
Using a HUB-Bus cable (Teleco code...: not included in this order)
connect the “GENERATOR” connector of the HUB to the RJ11
connector at the rear of the panel of compatible generators
Compatible models: TIG3000B, TIG3000G, TIG3000D
Air conditioner:
Using a HUB-Bus cable (not included in this order) connect the “CLIMA”
connector of the HUB to the “Teleco HUB” connector of the ICL Clima
interface
ICL
Note: All the products connected to the HUB must have the same earth reference.
11
Rapid HUB and
smartphone
conguration
ToconguretheHUBandyoursmartphonerapidlyfollowtheinstructions
contained in the next two paragraphs.
For further details go to the chapter on “HUB and Smartphone detailed
conguration”.
Press and release:
The BLUE LED
startsashing
4. Remain near the HUB and start the TelecoHUB App on the smartphone;
if requested, press the “Pair” key (if the App is already on, scroll the
screen down to force reconnection)
Rapid conguration of
the Bluetooth proximity
connection
1. Install the TelecoHUB App on your smartphone
2. Activate Bluetooth on the smartphone
3. Press the HUB pairing key (Fig. 1) and release it: the blue LED starts
ashing(1secondonand1secondoff)
Now the smartphone is connected via Bluetooth to the HUB and can
control it from nearby. On subsequent activations of the TelecoHUB App the
smartphone will automatically connect to the HUB.
Repeatthecongurationwithallthesmartphonesthatwillbeusedtocontrol
the HUB via Bluetooth (maximum 4).
12
4. Gotothe“HUBSimconguration”sectionandkeyinthetelephone
numberoftheMicro-SIMcardinstalledintheHUBandconrmby
pressing “Send”
Rapid conguration of
the remote connection via
GSM (SMS)
1. If you have not already done so, insert a Micro-SIM card (with its own
phonenumberandsufcientcredit)intheslotshowninFig.1and
power the HUB
2. Remain close to the HUB and open the TelecoHUB App on the smar-
tphone enabled for nearby control (if the App is already open, scroll
the screen down to force reconnection, see previous paragraph): the
smartphone automatically connects to the HUB via Bluetooth
3. Press Menu
and select the «SMS» item
13
5. Scroll down and select “Modify” in the “Authorised phones list” section
6. Identify a free slot and click on it
7. Key in the number of the smartphone to be enabled for remote control
andconrmbypressing“Save”
14
8. Repeat steps 6 and 7 to enter all the phone numbers to be enabled for
remote control (maximum 10 telephone numbers)
9. Press “Back” to exit the list
10. Press Menu
and select the «Close Menu» item
The HUB is ready to be controlled via GSM (SMS) by smartphones whose
numbers have been entered on the “Authorised phones list”
(points 6, 7 and 8).
15
HUB and Smartphone
detailed conguration
The HUB has been developed to allow proximity (nearby) and remote
control of your Camper or Caravan using mobile devices such as
smartphones, tablets etc. Works via Bluetooth in the immediate vicinity
(about 10 metres) and automatically goes to GSM (SMS) operation
overgreaterdistances.Youcanndthefree“TelecoHUB”appinthe
Apple AppStore on the Google PlayStore. It can be installed on all the
smartphones that will be used to control the HUB.
Pairing a smartphone for Bluetooth connection
To pair a smartphone press the HUB pairing key (Fig. 1) and release it: the
blueLEDstartsashing(1secondonand1secondoff).
Press and release:
The BLUE LED
startsashing
Bluetooth Connection To ensure your privacy the HUB only communicates via Bluetooth with
paired smartphones.
Paired smartphones connect to the HUB automatically when the TelecoHUB
App is opened.
To force a connection attempt scroll the main App window downwards.
Should connection fail to occur, check that the smartphone Bluetooth
function is on: if necessary activate it as per the instructions for the
smartphone.
It is possible to connect one smartphone at a time. So if the blue LED is
on(steady,notashing)toindicatethataconnectionwithasmartphoneis
already established, no other connection, pairing or deletion tasks may be
performed until the current connection has been terminated.
16
Start the TelecoHUB App on the smartphone; if requested, press the “Pair”
key (if the App is already on, scroll the screen down to force reconnection).
Once pairing has been completed, the smartphone connects to the HUB
and «Bluetooth pairing» mode is automatically terminated.
Up to 4 smartphones can be paired; they can connect to the HUB one at a
time.
Ifyoutrytopairanewsmartphonewhenthelistisfull,theblueLEDashes
rapidly for about 3 seconds, then the HUB returns to standby ready to
connect with one of the paired smartphones.
Note: on the smartphone the HUB will be displayed with the name
“TelecoHUB (XXXX)”, where XXXX is the 4-letter code on the label on the
back of your HUB.
Deleting the list of smartphones paired for Bluetooth connection
To delete the list of smartphones press the HUB pairing key and keep it
presseduntiltheblueLEDstopsashingandremainson.
Press and keep
pressed:
The BLUE LED
startsashing
LED on (steady,
notashing)
Release when
the BLUE LED is
on (steady, not
ashing)
17
Note
on deletion of Apple
iOS smartphones:
the Apple iOS operating system requires that deletion be effected on both
the HUB and on the smartphone, otherwise it will not be possible to repeat
its pairing. To delete the pairing on the smartphone go to the iOS “Bluetooth
settings” and remove “TelecoHUB (XXXX)” from the “MY DEVICES” list
(press , and then “disassociate this device”).
Consult, if necessary, the smartphone instructions.
This procedure does not regard Android smartphones: their pairing can be
repeated immediately.
Make sure you insert the card
in the special guide with the
contacts facing downwards.
To remove the Micro-SIM card
press it again.
Note: the HUB can also be used
without a Micro-SIM; this limits
usage to Bluetooth connection
in the immediate vicinity (range
about 10 metres).
GSM connection For GSM communication a Micro-SIM card with its own phone number and
sufcientcreditisneeded.TheMicro-SIMcardisnotincluded.
Equipment is controlled via SMS (text) messaging.
Warning: the TelecoHUB App automatically creates the messages with
the commands to be sent (e.g. “Close Antenna Sat (50030)”): to ensure
communication is completed successfully, send the message without
modifying recipient or message text.
Inserting and removing the Micro-SIM card
InserttheMicro-SIMcardinthe«SIMCARD»slotasillustratedinthegure
below until it clicks into place.
18
Conguring GSM connection
TocongureGSMcommunicationuseasmartphonethathasbeen
Bluetooth paired with the HUB:
1. Remain close to the HUB and open the TelecoHUB App on the
smartphone (if the App is already open, scroll the screen down to force
reconnection): the smartphone automatically connects to the HUB via
Bluetooth
2. Press Menu
and select the «SMS» item on the
TelecoHUB App.
3. Gotothe“HUBSimconguration”sectionandenterthetelephone
numberoftheMicro-SIMcardinstalledintheHUBandconrmby
pressing “Send”
Where requested by the App, enter the PIN of the Micro-SIM installed in
the HUB. If a PIN is entered incorrectly 3 times, the Micro-SIM is locked. To
unlock the Micro-SIM card remove it from the HUB and unlock it in a mobile
device using the PUK code. To receive help in unlocking the card, contact
your mobile phone service provider.
The tracking service requires that the Micro-SIM installed in the HUB be
enabledfordatatrafc.WhererequestedbytheprovideroftheMicro-SIM
installedintheHUB,enterthedatafordatatrafcconguration:APN,
Username and Password.
19
Toreceivehelpinconguringthecard’sdatatrafcfunction,contactyour
mobile phone service provider.
If the Micro-SIM card is replaced, modify the telephone number in the
TelecoHUB App «SMS» menu accordingly.
No signal OK Poor
Quality
OK Normal
Quality
OK Good
Quality
OK Excellent
Quality
NO SIM
Sim Card
not inserted
Sim Card
locked
SMS not
available
OK
SMS
NO SIM
Sim Card not
inserted
Sim Card
locked
Tracking
not available
OK
Tracking
The “GSM HUB Signal” section of the App «SMS» menu provides
information on GSM connection status and signal quality.
20
3. Scroll down and select “Modify” in the “Authorised phones list” section
Conguring the numbers enabled for HUB control via GSM (SMS)
To ensure your privacy the HUB only accepts commands via GSM (SMS)
from numbers contained in a list of 10 enabled telephone numbers.
To add a phone number to the list use a smartphone that has been
Bluetooth paired with the HUB:
1. Remain close to the HUB and open the TelecoHUB App on the
smartphone (if the App is already open, scroll the screen down to force
reconnection): the smartphone automatically connects to the HUB via
Bluetooth
2. Press Menu
and select the «SMS» item
  • Page 1 1
  • Page 2 2
  • Page 3 3
  • Page 4 4
  • Page 5 5
  • Page 6 6
  • Page 7 7
  • Page 8 8
  • Page 9 9
  • Page 10 10
  • Page 11 11
  • Page 12 12
  • Page 13 13
  • Page 14 14
  • Page 15 15
  • Page 16 16
  • Page 17 17
  • Page 18 18
  • Page 19 19
  • Page 20 20
  • Page 21 21
  • Page 22 22
  • Page 23 23
  • Page 24 24
  • Page 25 25
  • Page 26 26
  • Page 27 27
  • Page 28 28
  • Page 29 29
  • Page 30 30
  • Page 31 31
  • Page 32 32
  • Page 33 33
  • Page 34 34
  • Page 35 35
  • Page 36 36

Teleco Hub User manual

Type
User manual

Teleco Hub, your gateway to a smarter RV experience. With Teleco Hub, you can effortlessly control and monitor your RV's features from anywhere using your smartphone. From awnings and lights to water tank levels and door locks, Teleco Hub puts your RV at your fingertips. Enjoy the convenience of remote control and real-time notifications, ensuring your travels are comfortable and secure.

Ask a question and I''ll find the answer in the document

Finding information in a document is now easier with AI