Page is loading ...

D-Light Box
8” Portable Digital Photo Album
User’s Guide

i
Note
Digital Foci, Inc. reserves the right to make improvements and/or changes to
the products and programs described in this User’s Guide at any time without
notice.
Please read the entire User’s Guide before operating the device.
Digital Foci, Inc. assumes no responsibility for errors or omissions in this User’s
Guide. Nor does Digital Foci, Inc. make any commitment to update the infor-
mation contained herein.
Trademarks
D-Light Box, PhotoMemo, and Digital Foci are trademarks of Digital Foci, Inc.
All names and products mentioned within this document are registered
trademarks of their respective companies.
© 2013 Digital Foci, Inc. All rights reserved. This publication is intended for
sole use by the owner of the associated device. Neither this publication nor
any part of this publication may be printed and distributed, electronically dis-
tributed, reproduced, translated, or reduced to any other electronic medium
or machine readable form without the prior written permission of Digital Foci,
Inc.
Digital Foci, Inc., 3111 E. Via Mondo, E. Rancho Dominguez, CA 90221 USA
Recycling
Digital Foci is committed to designing and manufacturing products with a
sense of environmental awareness that minimizes the overall environmental
impact of our products. Our product designs minimize material usage and
waste, encourage longer product lifecycles, and utilize recyclable compo-
nents and material wherever possible. We comply with global and local
guidelines and restrictions on hazardous substances usage.
For assistance with disposal and recycling of any Digital Foci product, please
email us at [email protected] or call (310) 763-9100. More information
about our policies on recycling and environmental stewardship can be found
at the Company page of our website at www.digitalfoci.com.

ii
iii
Warranty Policy
As the original owner of this product, you receive these warranties from Digi-
tal Foci. Your D-Light Box (hereafter referred to as “Device”) will be free from
defects in material and workmanship and will perform in substantial compli-
ance with your user documentation accompanying the Device for 1 year from
the purchase date providing proper use of the Device. Your warranty rights
will be honored so long as you read and follow your user documentation for
all aspects of operating the Device. Any unauthorized or improper use of the
Device may cause your warranty to become void.
If there is a problem or defect with your Device, please contact Digital Foci,
Inc.
Disclaimer
This limited warranty is the only warranty Digital Foci, Inc. makes for the
Device. To the extent allowed by Law, no other warranty applies, whether
expressed, implied, or statutory, including any warranty of merchantability,
of tness for a particular purpose, or of non-infringement. This warranty does
not cover accidental damage, wear and tear, or consequential or incidental
loss. Under no conditions is Digital Foci, Inc. liable for loss of or damage to, a
computer; nor loss of, or damage to, programs, records, or data; nor any con-
sequential or incidental damages, even if Digital Foci, Inc. has been informed
of their possibility.
Additional Rights
Some states or countries do not allow exclusion or limitation of incidental
or consequential damages, or limitations on the length of an implied war-
ranty. Under these circumstances, the above limitations or exclusions may
not apply. This warranty includes specic legal rights, and other rights may be
available from state to state or country to country.
Safety and Regulatory Compliance
This device and its accessories have been tested to comply with relevant
safety and regulatory standards including, but not limited to, FCC Part 15
Class B (15.107, 15.109), CE for EMC/ITE (EN55022, EN55024), CE for EMC/AV
(EN55013, EN55020), C-Tick (AS/NZS CISPR 22), and VCCI.
Caring for Your D-Light Box
To keep D-Light Box in good condition and working properly, follow
these basic guidelines:
• When cleaning D-Light Box, do not use abrasive cloths or harsh
chemicals.
• Do not drop, jar, bump, shock or expose D-Light Box to severe
vibration.
• Do not handle or shake D-Light Box while data is being
transferred.
• Do not operate or store D-Light Box in dusty environments.
• Do not leave D-Light Box under direct sunlight, in a parked car, or
in other situations where the temperature may be above 140°F
(60°C).
• To prevent risk of short circuit and damage, do not expose D-Light
Box to liquids, precipitation or moisture.
• To avoid bodily injury or damage to internal components, do not
take apart D-Light Box.
• Never force the USB cable if it does not plug in smoothly. Instead,
examine the head of the cable to make sure that the plug
orientation is correct.
• Never force insertion of the memory card or USB ash drive if it
does not insert smoothly. Instead, examine to see if the memory
card or USB ash drive is facing the correct direction and the slot is
correct.
• Do not attach or remove memory cards, ash drive, or the USB
cable while D-Light Box is accessing data.
• Only use soft cloth or lens brush to clean the screen. Do not use
solvents or alcohol to clean the screen.
• Use only power adapters and cords provided by the manufacturer.
• For best battery life, make sure to periodically recharge your
D-Light Box to prevent the battery from becoming completely
depleted.

iv
v
6. Using the Kickstand for Easy Viewing 29
7. Connecting D-Light Box to Audio/Video Devices 32
7.1. Viewing Photos and Videos on TV or Projector 32
7.2. Playing Music through Stereo System 33
8. Tips and Techniques 34
8.1. Organizing Your Files to Play in a Specied Order 34
8.2. Organizing your Photos by Folders/Events 35
8.3. Displaying a Microsoft PowerPoint Presentation 36
9. Frequently Asked Questions & Troubleshooting 37
10. Troubleshooting 41
11. Appendix – LCD Display Pixel Policy 44
12. Appendix – Technical Specications 46
13. Regulatory Compliance 47
Table of Contents
1. Welcome! 1
1.1. D-Light Box Features 1
1.2. Package Contents 2
1.3. Latest Firmware 2
2. Getting Started 3
2.1. D-Light Box Overview 3
2.2. Device Layout 5
2.3. Powering D-Light Box 6
2.4. Setting Up D-Light Box 9
2.5. Resetting D-Light Box 14
3. Copying Photos, Videos, and Music from Computer to
D-Light Box 15
3.1. Connecting D-Light Box to Your Computer 15
3.2. Copying Photos, Videos, and Music Files to D-Light Box
from Computer 16
3.3. Playing Music with Slideshow 17
4. Accessing Memory Devices on D-Light Box 19
4.1. Connecting Memory Cards or USB Flash Drive 19
4.2. Home Screen (Device Select) on D-Light Box 20
4.3. Viewing Photos and Videos on the Memory Card or USB
Flash Drive 21
5. Enjoying Photos and Videos on D-Light Box 22
5.1. Browsing Folders 22
5.2. Viewing Photos in Thumbnail View 24
5.3. Viewing Photos Full Screen 25
5.4. Playing Automatic Photo Slideshow 26
5.5. Viewing Videos on D-Light Box 27

1
Welcome!
1. Welcome!
Congratulations on purchasing your D-Light Box – 8” Portable
Digital Photo Album.
1.1. D-Light Box Features
• 8” digital LCD with 800 x 600 resolution
• Large 4 GB internal memory holds thousands of digital
photos
• Built-in memory card slots provide native support for:
SD/HC card, microSD, and MS/MS Pro/MS Duo.
• Supports USB ash drives
• USB 2.0 connection for transferring photos between
your computer and device
• Organize your photos by unique collections for easy
search and playback
• Browse index of selected album in Photo Thumbnail
View
• Run automatic Full-Screen Slideshow with adjustable
time intervals and transition eects
• Scroll photos manually with zoom and pan functions
• Use a dedicated set of music les to play with any slide-
show through MusicBox slideshow feature
• Supported video formats – MPEG-4 SP
• Runs on rechargeable Lithium battery with an average
play time of 6 hours
• Comes with soft leatherette album case that protects
D-Light Box and makes an attractive presentation

Welcome!
2
3
Getting Started
1.2. Package Contents
• D-Light Box
• Padded leatherette album case with snap-in cradle
• AC power adapter
• USB cable for computer connection
• Quick Start Guide
1.3. Latest Firmware
New versions of the D-Light Box rmware are periodically
released with new features and format support to enhance your
user experience.
Check the Digital Foci website (http://www.digitalfoci.
com/support) for the latest available rmware updates and
instructions.
2. Getting Started
2.1. D-Light Box Overview
There are 2 ways to view photos and videos on D-Light Box:
• Copy photos and videos from your computer to the D-Light
Box Internal Memory. You can also copy any music les you
want to play as the background music.
• View photos and videos directly from an inserted memory
card (SD, SDHC, MS, MS PRO, MS Duo) or an USB ash drive.

Getting Started
4
5
Getting Started
On D-Light Box, you have the following viewing options:
• Folder/Thumbnail View:
o Navigate through folders
o View thumbnail images of all the photos and videos in
selected photo album
• Full Screen View:
o View images full screen
o Manually scroll through images in the selected photo
album
o Zoom and pan images
o Play video les
• Automatic photo slideshow:
o Play slideshow of photos and videos
o Select time intervals and transition eects
o Play background music with photo slideshow (either
Album-specic theme music or dedicated set of music
les using MusicBox feature)
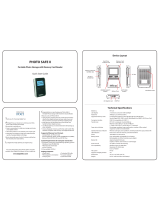
2.2. Device Layout
Front View
Bottom View (with device facing up)
Memory Card Slot View (with slot door open)

Getting Started
6
7
Getting Started
2.3. Powering D-Light Box
2.3.1. Charging D-Light Box Battery
D-Light Box has an average battery life of over 6 hours on a full
charge. With lower brightness setting it can run up to 9 hours.
You can charge the battery either by the included AC power
adapter or by USB power from your computer. For best battery
performance, please charge the battery for 6 hours before
using it for the rst time.
The battery indicator on the bottom left corner of the screen
shows the current battery life of D-Light Box. Charge the
device when the battery icon turns red and is close to empty.
Also, make sure to periodically recharge your D-Light Box to
prevent the battery from becoming completely depleted.
Charging D-Light Box by AC adapter
Follow these instructions to charge the D-Light Box battery by
AC adapter:
1. Plug the AC power adapter into a wall outlet.
2. Plug in the AC adapter to the Power Adapter Jack located at
the bottom center of D-Light Box.
3. The battery LED will turn red to indicate that the battery is
charging.
4. With the device turned o, the battery will become fully
charged in under 5 hours. The Red LED will turn o when
the battery is fully recharged.
Charging D-Light Box by USB Port
You can also charge the D-Light Box battery through the USB
port by connecting it to a computer or an USB charger. USB
power charges at a slower rate than the AC power adapter.
When charging through the USB port, you can turn o the
D-Light Box for faster charging.
1. Connect D-Light Box to your computer with the USB 5-pin
mini-B cable.
2. The battery LED will turn RED to indicate that the battery is
charging.
3. With the device turned o, it takes under 6 hours to fully
recharge an empty battery by USB.
Note: Most computers must be turned on for the USB port to
supply power. Check the documentation for your computer to
see if the USB port can provide power while the computer is
o.
2.3.2. Power Indicator LED
The power indicator LED shows the power status.
Green: D-Light Box is turned on and using battery power.
Red: D-Light Box is turned o and the battery is charging.
When the battery is fully charged, the LED will turn OFF.
Orange: D-Light Box is turned on and charging.

Getting Started
8
9
Getting Started
2.4. Setting Up D-Light Box
From the Home Screen, scroll to the Settings and press ENTER to
access the Setup Options.
Main Setup Screen:
The following screen shows the main Setup categories:
At the Main Setup Screen, press UP/DOWN to move the cursor
and browse the Setup Options. Press ENTER to select the
option.
Press ESC to return to Home Screen.
2.3.3. Powering On/O D-Light Box
To turn on D-Light Box, press the Power Button. The Power LED
will turn green and the Digital Foci screen will appear while
D-Light Box powers on and initializes.
To turn o D-Light Box, press and hold the Power Button for 3
seconds. D-Light Box will shut down in about 2 seconds and
the LED will turn o.
2.3.4. Battery Saving Features
D-Light Box has two power saving features to conserve battery
power.
1. Screen Saver: If no button has been pressed and there is
no activity for 10 minutes (default setting), D-Light Box will
turn o the LCD screen. Pressing any button will turn the
screen back on.
2. Auto-shutdown: If no button has been pressed and there is
no activity for 15 minutes (default setting), D-Light Box will
automatically shut down.
You can adjust the Screen Saver and Auto-shutdown settings
to best match your needs by accessing the Setup Options.

Getting Started
10
11
Getting Started
Setup - Level 2:
At Setup - Level 2, you will see the Setup categories on the left
side of the screen, and the available values of each category
on the right.
Press UP/DOWN to select dierent categories and press ENTER
to change the corresponding value. The corresponding value
to the right will turn yellow to indicate that you can change its
value.
Press UP/DOWN to change the value. Press ENTER to save the
change. The text will be changed back to white. Press ESC to
cancel.
Press ESC to return to the previous Setup Level.
2.4.1. Setup Option – Device
From the Main Setup Screen, highlight Device and press ENTER
to enter Device options.
The available Device options are:
• Auto-shutdown: Adjust the amount of idle time allowed
before D-Light Box automatically shuts down to conserve
battery life. Choose a value between 1 minute and 30
minutes and o.
• Screen Saver: Adjust the device idle time allowed before
the screen turns o to conserve battery life. You can set the
timer to a value between 1 minute and 30 minutes and o.
• Screen Brightness: Adjust the brightness of the LCD
screen. Choose a value between 1 and 8 (with 8 being the
brightest).
2.4.2. Setup Option – Slideshow Settings
From the Main Setup Screen, highlight Slideshow Settings and
press ENTER to enter Slideshow Settings options.
The available Slideshow Settings options are:
• Transition Eect: Select the transition eect for slideshow.
Available options include: Corner Slide, Slide, Zoom Move,
Zoom Blend, Cube Sides, Flip, Four Corners, Wavy, Page
Turn, Storm, Collect, Landslides, Vertical Blinds, Grid Rotate,
and Eects O.
• Slideshow Mode: Select slideshow mode among Photo
Only, Video Only, or Both. Both means that photos and
videos will be included in the same slideshow.
• Background Audio: Options include MusicBox, Local, and
O.
o MusicBox: Play music les saved in the MusicBox folder
on the Internal Memory of D-Light Box.
o Local: Play music les saved in the current folder.
o O: Turn o background music during slideshow.
• Slideshow Play Mode: Select among Random, Once, and
Repeat.
o Random: Play photos in random order.
o Once: Play photos in listed order and stop after playing
last photo.
o Repeat: Play photos in listed order in a repeating loop.

Getting Started
12
13
Getting Started
2.4.3. Setup Option – Photo Settings
From the Main Setup Screen, highlight Photo Settings and
press ENTER to enter Photo Settings option.
The available Photo Settings option is:
• Photo Display Mode: Select among Original, Fit, and Fill.
o Original: Device will automatically resize the photo
for best display without changing the aspect ratio. In
the case that the resolution of the photo is less than
800x600 (the screen resolution of D-Light Box), D-Light
Box will display the photo in its original size.
o Fit: In the case that the resolution of the photo is less
than 800x600 (the screen resolution of D-Light Box),
D-Light Box will automatically enlarge the photo until
it matches the rst X or Y axis while preserving aspect
ratio.
o Fill: Device will resize the photo to ll the screen. Photo
might be distorted.
Note: Most digital cameras will capture photos in a 4:3
aspect ratio. The aspect ratio determines the width and
height of the photo. The screen on the D-Light Box is 4:3
and will display 4:3 photos completely on the full screen.
Other aspect ratios will show in a letterbox under Original
or Fit settings.
2.4.4. Setup Option – Video Settings
From the Main Setup Screen, highlight Video Settings and
press ENTER to enter Video Settings options.
The available Video Settings options are:
• Video Display Mode: Select between Original and Fit.
o Original Resolution: D-Light Box will display the video
(supported videos are MPEG-4 Simple Prole videos up
to 640x480 resolution) in its original size, which means
that it will be smaller than the screen size.
o Fit: D-Light Box will automatically enlarge the video
until it matches the rst X or Y axis while preserving
aspect ratio.
• Video Play Mode: Select among Once, Repeat Current, and
Repeat All.
o Once: Play videos in listed order and stop after playing
last video.
o Repeat Current: Play selected video in a repeating
loop.
o Repeat All: Play video les in listed order in a repeating
loop.

Getting Started
14
15
Copying Photos, Videos, and Music from Computer to D-Light Box
2.4.5. Viewing Technical Information
From the Main Setup Screen, highlight System Info and press
ENTER to enter view technical information.
• Firmware Version: Firmware Version is displayed.
• Internal Memory Capacity: The Total Capacity of the D-Light
Box are displayed.
• Contact/Tech Support Info: Contact information for Digital
Foci Tech Support is displayed.
2.5. Resetting D-Light Box
In the case that D-Light Box encounters an erroneous operation
and freezes, you can reset it by pressing the Reset Button. This
button is located on the sidewall to the left of the audio/video
jacks on the bottom of the D-Light Box when you are looking at
it from the back. Press the Reset Button to rest the device.
This will reset the operating system. You can power on D-Light
Box and return to normal operations. Your photos on the
Internal Memory will not be aected.
3. Copying Photos, Videos, and Music from
Computer to D-Light Box
Copy photos and videos from your computer to the D-Light Box
Internal Memory. You can also copy any music les you want to
play as the background music.
3.1. Connecting D-Light Box to Your Computer
1. Connect D-Light Box to your computer using the included
Standard USB cable. The USB port of D-Light Box is located
at the bottom of the device. Note that D-Light Box needs to
be powered on rst.
2. The USB Connection LED Indicator located next to the
USB port of D-Light Box will light up green to indicate
that it is connected to the computer. While D-Light Box is
connected to the computer, it will not be accessible using
the buttons on the device until you disconnect it from the
computer.
3. Once D-Light Box is connected, your computer will
automatically recognize the device. In Windows, D-Light
Box will show up as a removable disk with the default label
“DLB-8”. If a memory card is inserted in D-Light Box, it will
also show up on your computer as a ‘Removable Disk’. In
Mac, D-Light Box will show up as an “DLB-8” icon on the
Desktop or Finder. Icons for memory cards will also appear
if a memory card is inserted.
Note: The D-Light Box Internal Memory and memory card icon
labels may vary and can be renamed.

Copying Photos, Videos, and Music from Computer to D-Light Box
16
17
Copying Photos, Videos, and Music from Computer to D-Light Box
3.2. Copying Photos, Videos, and Music Files to D-Light Box
from Computer
To play photos and videos on D-Light Box, copy those photo and
video les from your computer to D-Light Box Internal Memory.
Organize photos and videos into dierent folders as how you
would like them to display on D-Light Box. The same folder
structure will be kept.
1. Connect D-Light Box to your computer and double click
on the “DLB-8” icon under My Computer in Windows or the
“DLB-8” icon on the Desktop in Mac to open up the DLB-8
window.
2. In Windows, double click My Computer to open a new
window. Browse to the location where you want to copy
the photos, videos, or music from. In Mac, open a new
nder window by clicking on the icon in the Dock. Browse
to the location where you want to copy the photos, videos,
or music from.
3. Use the copy and paste function or simply click-and-drag
the les you want to copy from your computer to D-Light
Box.
4. A progress bar will pop up on the screen. When the copying
process is complete, the photo, video, and music les will
be successfully transferred to D-Light Box.
3.3. Playing Music with Slideshow
On D-Light Box, you can have specic music les play along with
your photo slideshow. You can choose to either play the music
les you saved in the MusicBox folder on the Internal Memory, or
play the music les you saved in the same photo album you wish
to view.
3.3.1. MusicBox Feature
There is a default folder named “MusicBox” on the Internal
Memory of your D-Light Box. Music les stored at this
location can be played as the background music for any photo
slideshow. This feature will work the same for photos stored on
the D-Light Box Internal Memory or on an inserted memory
card or USB ash drive.
Copying music les to the MusicBox folder:
1. Connect D-Light Box to your computer and access the
Internal Memory shown as the “DLB-8” drive as described in
the previous section.
2. Double click on the “MusicBox” folder in the “DLB-8” drive to
open up the MusicBox folder.
Note: If the MusicBox folder does not exist, rst create a new
folder named MusicBox at the root location of DLB-8.
3. In Windows, double click My Computer to open a new
window. In Mac, open a new nder window by clicking
on the icon in the Dock. Browse to the location where you
want to copy the music les from.

Copying Photos, Videos, and Music from Computer to D-Light Box
18
19
Accessing Memory Devices on D-Light Box
4. Use the copy and paste function or simply click-and-drag
the music les you want copy from your computer to the
MusicBox folder so that they can be played along with your
slideshow.
Playing music les in MusicBox folder with your slideshow:
1. Access the Setup Options under Settings from the Home
Screen.
2. Select Slideshow Settings.
3. Set Background Audio to MusicBox.
With this option, music les stored in the MusicBox folder will
play in the background with any photo slideshow.
3.3.2. Album-specic Theme Music
You can include specic theme music with individual photo
albums by copying the music les into their respective folders.
When playing a photo slideshow, you can choose to play the
music les included in the same folder as the photos of that
slideshow.
Playing album-specic theme music with your slideshow:
1. Access the Setup Options under Settings from the Home
Screen.
2. Select Slideshow Settings.
3. Set Background Audio to Local.
With this option, music les stored in the same folder as your
photos will play in the background with your slideshow.
4. Accessing Memory Devices on D-Light Box
You can view photos and videos directly from an inserted
memory card (SD, SDHC, MS, MS PRO, MS Duo) or a connected
USB ash drive.
4.1. Connecting Memory Cards or USB Flash Drive
To access the memory card slots and USB port for USB ash
drive, open the card slot cover on the right side of D-Light Box.
Insert your memory card in the designated memory card slot
with the label side facing towards you as shown below.
• For MS, MS PRO, and MS Duo, use the upper card slot
• For SD and SDHC, use the top compartment in the lower
card slot
• For microSD, use the bottom compartment in the lower
card slot
• For USB ash drive, use the USB slot
Note: The USB ash drive may take a few seconds to
connect.

Accessing Memory Devices on D-Light Box
20
21
Accessing Memory Devices on D-Light Box
4.3. Viewing Photos and Videos on the Memory Card or
USB Flash Drive
You can view photos and videos directly from an inserted
memory card or connected USB ash drive.
Once a memory card or USB ash drive is inserted, D-Light Box
will automatically recognize the device and make it available
from the Home Screen.
To view the content, highlight the icon representing the memory
card or USB ash drive you would like to view, and press ENTER.
The supported photos and videos on the selected memory card
or USB ash drive will be displayed.
If you are in the Thumbnail View when the card or USB ash
drive is inserted, D-Light Box will navigate to the Thumbnail
View of the inserted card or USB ash drive.
The next section will explain about how to browse through
folders, view photos full screen, and playing automatic photo
slideshows.
Note: Only one memory card can be inserted at a time. Do
not insert two memory cards the same time.
Warning: Do not force the memory card in the slot if it
does not slide in smoothly. Instead, remove the card, check
the card orientation and slot, and try again.
Once a memory card or USB ash drive is inserted, D-Light Box
will automatically recognize the device and make it available
from the Home Screen.
If you are in the Thumbnail View when the card or USB ash
drive is inserted, D-Light Box will navigate to the Thumbnail
View of the inserted card or USB ash drive.
4.2. Home Screen (Device Select) on D-Light Box
From the Home Screen, press LEFT/RIGHT to move among the
available memory devices and Settings. The memory devices
include your D-Light Box Internal Memory and any inserted
memory card or USB ash drive. Press ENTER to select the
desired memory device or Settings.
MENU options for available memory devices:
Press MENU with cursor highlighting the desired memory
device to access the following options:
• Info: Display capacity information
• Format: Format memory device
Caution: Formatting will delete all data on the memory
device. When formatting the D-Light Box Internal Memory, an
empty MusicBox folder will also be created.

Enjoying Photos and Videos on D-Light Box
22
23
Enjoying Photos and Videos on D-Light Box
You will then see the Folder View, which displays the contents of
that selected memory device in its folder structure.
The following screen shows the Folder View:
With the desired folder highlighted, press ENTER to navigate
into the folder. The name of the folder being highlighted will be
displayed at the bottom of the screen.
If the photo that you want to see is located inside a folder and
not yet visible, move the cursor to the desired folder and press
ENTER to open and view the contents of that folder.
• Press + / – to show bigger/smaller thumbnails.
• Press LEFT / RIGHT / UP / DOWN to move cursor.
• With the desired folder highlighted, press ENTER to
navigate into the folder.
• Press ESC to go back one folder level.
5. Enjoying Photos and Videos on D-Light Box
D-Light Box supports Baseline JPEG image le format. JPEG
images taken directly from your digital camera are typical in this
format. Unsupported image les will not be shown.
Note: D-Light Box does not support Progressive JPEGs. Make
sure you save your images in Baseline JPEG format if you use an
image editing software to edit your images.
You may use an imaging software such as Photoshop to check
this:
1. When saving images in Photoshop: Click Save As, and Click
OK.
2. You will open the JPEG Options Dialogue Box. Next, choose
Baseline (“Standard”) from the Format Options sections and
click OK.
5.1. Browsing Folders
From the Home Screen, select the memory source you would
like to view by highlighting that memory device and press
ENTER. The memory device could be your D-Light Box Internal
Memory, or an inserted memory card or USB ash drive.

Enjoying Photos and Videos on D-Light Box
24
25
Enjoying Photos and Videos on D-Light Box
5.3. Viewing Photos Full Screen
From the Thumbnail View, highlight the desired photo and press
ENTER. The highlighted photo will be shown in Full Screen View.
5.3.1. Scrolling Through Photos Manually
With the photo displayed full screen:
• Press RIGHT / LEFT to manually scroll to the next / previous
photo.
• Press ESC to return to Thumbnail View.
5.3.2. Zooming Photos
With the photo displayed full screen, you can zoom in and out
on the photos by pressing + / –. While zooming, you can use
the directional buttons to pan to a specic part of the photo.
Press ESC to cancel the zoom and return to normal view.
The following screen shows the Zoom View.
5.2. Viewing Photos in Thumbnail View
Keep navigating into the folder until you see the Thumbnail
View of your photos in that selected folder.
In the Thumbnail View, all supported photos and videos will
be shown as thumbnails. The dierent layout options available
include thumbnail grids of: 5x4, 6x4, 7x5, 8x6, and 10x7.
From the Thumbnail View, you can enter manual photo viewing
mode by pressing ENTER on a photo or video, or start an
automatic photo slideshow by accessing the Menu option.
The following screens show examples of the Thumbnail Views.
• Press + / – to change layout to bigger/smaller thumbnails.
• Press LEFT / RIGHT / UP / DOWN to move cursor.
• With the desired photo or video highlighted, press ENTER
to view the photo in full screen or start playing the video.
• Press MENU to access the following Menu option:
o Play Slideshow
• Press ESC to go back one folder level.

Enjoying Photos and Videos on D-Light Box
26
27
Enjoying Photos and Videos on D-Light Box
5.4. Playing Automatic Photo Slideshow
On D-Light Box, you can play automatic photo slideshows
with adjustable time intervals and transition eects. One great
feature of D-Light Box is that you can also play videos with the
photos in the same slideshow.
5.4.1. Playing Photo Slideshow
You can start an automatic photo slideshow of a selected
folder from the Thumbnail View.
1. On D-Light Box, navigate to the folder that contains the
photos you wish to play.
2. With that folder highlighted, press ENTER so that you see
the Thumbnail View of your photos in that selected folder.
3. With a photo highlighted, press MENU and select Play
Slideshow to start the photo slideshow.
All the available photos in that folder will be playing in an
automatic slideshow.
As the photo slideshow is playing, you can do the following:
• Press RIGHT / LEFT scroll to the next / previous photo.
• Press ENTER to pause and resume the slideshow.
• Press + / – to adjust volume up / down. To turn o music,
press the – button until the volume is turned to Mute.
• Press ESC to return to Thumbnail View.
• Press UP / DOWN to change the slideshow interval between
photo transitions.
o The Slideshow Interval Menu will pop up.
o Next, press LEFT/RIGHT to adjust the slideshow interval
(from 5 seconds up to 24 hours).
o Press ENTER to conrm the selection.
5.4.2. Slideshow Options
Dierent slideshow playing options (transition eects,
background audio, repeat/random playback settings, photo
only/video only/photo and video slideshow) can be selected in
Slideshow Settings under Setup Options.
Access the Setup Options under Settings from the Home
Screen (see Section 2.4 Setting Up D-Light Box).
5.5. Viewing Videos on D-Light Box
D-Light Box supports MPEG-4 Simple Prole video format with
maximum resolution at 640 x 480.
Note: D-Light Box does not support high-denition video les
and any les with resolution higher than 640x480.
You may use a video conversion program to convert your video
to a format that is supported on the D-Light Box. We suggest
the following video format:
• Output Container: AVI
• Output Video Codec: MPEG-4
• Output Audio Codec: MP3 or AAC
• Video max bitrate: 1440
• Audio: max sampling frequency: 44100
• Audio: max bitrate: 128

Enjoying Photos and Videos on D-Light Box
28
29
Using the Kickstand for Easy Viewing
5.5.1. Playing Videos
Each video le will be shown with a video icon in Thumbnail
View. To view a video le, browse to the video and press
ENTER.
As the video is playing, you can do the following:
• Press ENTER to pause and resume the video.
• Press UP / DOWN to start fast forwarding / rewinding the
video.
o Press ENTER to pause the fast forwarding / rewinding.
o Press ENTER again to resume playing.
• Press + / – to adjust volume up / down.
• Press RIGHT / LEFT to go to the next / previous video.
• Press ESC to return to Thumbnail View.
6. Using the Kickstand for Easy Viewing
The built-in kickstand of D-Light Box allows you to set up D-Light
Box as a tabletop display for easy photo and video viewing.
First, remove D-Light Box from the leatherette album case:
1. Using both hands, place your index nger along each side
of the device and your thumb at the top of the 2 tabs at the
bottom of the Album Case cradle.
2. Slowly apply downward (towards you) pressure on the 2
tabs while using your index ngers to lift the device up and
out of the cradle.
3. Continue to rotate the device up and out of the cradle until
the two tabs at the top of the cradle are clear of the device
and the device can be take out completely.

30
31
Using the Kickstand for Easy Viewing
Using the Kickstand for Easy Viewing
Next, turn the D-Light Box upside-down. You will now be able to
access the built-in kickstand.
Extend the built-in kickstand by pivoting it away from the device
until you hear a click. Place the D-Light Box on a at surface and
make sure it is stable.
Now you can enjoy your photos and videos like a photo frame or
tabletop display.
To replace device into Album Case:
1. Hold the device by the edge of the bottom two corners by
pinching it between your thumb and index ngers with your
thumb on the top surface of the device.
2. Place the top edge of the device against top contour of the
cradle while positioning it so that the two tabs at the top t
into their respective slots on the device.
3. Rotate the device downward into the cradle and press along
the bottom edge of the device rmly until the two tabs at the
bottom snap closed to capture the device.
/