Page is loading ...

Photo Book
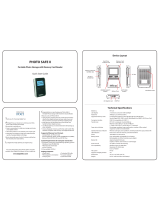
8” Portable Digital Photo Album
User’s Guide

Digital Foci, Inc. reserves the right to make improvements and/or changes to the
products and programs described in this User’s Guide at any time without notice.
Please read the entire User’s Guide before operating the device.
Digital Foci, Inc. assumes no responsibility for errors or omissions in this User’s
Guide. Nor does Digital Foci, Inc. make any commitment to update the information
contained herein.
Trademarks
Photo Book and Digital Foci are trademarks of Digital Foci, Inc. All names and products
mentioned within this document are registered trademarks of their respective companies.
©2009 Digital Foci, Inc. All rights reserved. This publication is intended for sole use by the
owner of the associated device. Neither this publication nor any part of this publication may
be printed and distributed, electronically distributed, reproduced, translated, or reduced to
any other electronic medium or machine readable form without the prior written permission of
Digital Foci, Inc.
Digital Foci, Inc., 3111 Via Mondo, E. Rancho Dominguez, CA 90221 USA

Limited Warranty
As the original purchaser of this product, you receive these warranties from Digital
Foci, Inc.
Your Photo Book (hereafter referred to as “Device”) will be free from defects in
material and workmanship and will perform in substantial compliance with your user
documentation accompanying Device for one year from the purchase date providing
proper use of Device.
Your warranty rights will be honored so long as you read and follow your user
documentation for all aspects of operating Device. Any unauthorized or improper
use of Device may cause your warranty to become void.
If there is a problem or defect with your Device, please contact Digital Foci, Inc.
Disclaimer
This limited warranty is the only warranty Digital Foci, Inc. makes for Device. To the
extent allowed by Law, no other warranty applies, whether expressed, implied, or
statutory, including any warranty of merchantability, of fitness for a particular
purpose, or of non-infringement. This warranty does not cover accidental damage,
wear and tear, or consequential or incidental loss. Under no conditions is Digital
Foci, Inc. liable for loss of or damage to, a computer; nor loss of, or damage to,
programs, records, or data; nor any consequential or incidental damages, even if
Digital Foci, Inc. has been informed of their possibility.
Additional Rights
Some states or countries do not allow exclusion or limitation of incidental or
consequential damages, or limitations on the length of an implied warranty, so the
above limitations or exclusions may not apply to you. This warranty gives you
specific legal rights, and you may also have other rights which vary from state to
state or country to country.

Caring for Photo Book
To keep Photo Book in good condition and working properly, follow these
basic guidelines:
• Do not drop, jar, bump, shock or expose Photo Book to severe
vibration.
• Do not operate or store Photo Book in dusty environments.
• Do not leave Photo Book under direct sunlight, in a parked car, or in
other situations where the temperature may be above 140°F (60°C).
• To prevent risk of heat buildup, place Photo Book in a well ventilated
location.
• To prevent risk of short circuit and damage, do not expose Photo Book
to liquids, precipitation, or moisture.
• To avoid bodily injury or damage to internal components, do not take
apart Photo Book.
• Never force insertion of the memory card if it does not insert smoothly.
Instead, examine to see if the memory card orientation and slot is
correct.
• Only use soft cloth or lens brush to clean the screen. Do not use
solvents or alcohol to clean the screen.
• Use only power adapters and cords provided by the manufacturer.
• For best battery life, make sure to periodically recharge your Photo
Book to prevent the battery from becoming completely depleted.

Photo Book (PBK-080)
User’s Guide
Page iv
Table of Contents
1.
Welcome! ....................................................................................................... 1
1.1. Photo Book Features ................................................................................................ 1
1.2. Package Contents ..................................................................................................... 2
1.3. Latest Firmware ....................................................................................................... 2
2. Getting Started .............................................................................................. 3
2.1. Photo Book Overview .............................................................................................. 3
2.2. Device Layout ........................................................................................................... 5
2.3. Powering Photo Book .............................................................................................. 6
2.4. Setting Up Photo Book ............................................................................................ 8
2.5. Copying Files from Computer to Photo Book Internal Memory ...................... 11
2.6. Accessing Memory Card and USB Flash Drive on Photo Book ........................ 12
3. Enjoying Photos and Videos on Photo Book ............................................ 16
3.1. Browsing Albums in Photo Album View .............................................................. 16
3.2. Viewing Photos in Photo Thumbnail View .......................................................... 17
3.3. Viewing Photos in Full Screen Mode .................................................................... 18
3.4. Playing Automatic Photo Slideshow ..................................................................... 20
3.5. Playing Music on Photo Book ............................................................................... 20
3.6. Viewing Videos on Photo Book ............................................................................. 21
3.7. Deleting Photos or Albums .................................................................................... 21
4. Frequently Asked Questions & Troubleshooting ...................................... 23
5. Digital Foci LCD Display Pixel Policy ...................................................... 26
6. Appendix – Technical Specifications ......................................................... 27
7. Regulatory Compliance .............................................................................. 29

Photo Book (PBK-080)
User’s Guide
Page 1
Version 1.1-R0
1. Welcome!
Congratulations on purchasing Photo Book – 8” Portable Digital Photo Album.
1.1. Photo Book Features
• 8” digital LCD with 800 x 600 resolution
• Large 4 GB internal memory holds thousands of digital photos
• Built-in memory card slots provide native support for: CF, SD/HC card, MMC,
MS/MS Pro, and xD-Picture Card (Supports mini-SD, RS-MMC, MS Duo with
adapter.)
• USB host capability - supports USB flash drives
• Copy albums directly from memory cards for USB flash drives to internal
memory without needing a computer
• USB 2.0 connection for transferring photos between your computer and device
• Displays each photo album with folder name and thumbnail of the first photo
• Run automatic Full-Screen Slideshow or Photo Book Slideshows with
adjustable time intervals
• Scroll photos manually with zoom, pan, and rotate functions
• Supported image formats – JPG, BMP, TIFF, GIF, RAW* image files from a wide
selection of DSLR cameras
(* See Section 6 Appendix – Technical Specifications for details.)
• Automatic photo orientation based on EXIF data: Photos will be automatically
rotated to the correct orientation based on the EXIF data captured by the
camera.
• Supported audio formats – MP3, AAC, WMA – music will play in the
background during photo slideshow
• Supported video formats – MJPEG, MPEG-1, MPEG-4 SP
• Built-in 1 channel, 1.4W speaker
• Runs on rechargeable Lithium-polymer battery with 2.5 hours of battery life
• Comes with soft leather-like case that protects Photo Book and makes an
attractive presentation

Photo Book (PBK-080)
User’s Guide
Page 2
Version 1.1-R0
1.2. Package Contents
• Photo Book with soft leather-like case
• AC power adapter
• Standard USB cable (USB to computer)
• USB OTG cable (to USB flash drive)
• Quick Start Guide
1.3. Latest Firmware
New versions of the Photo Book firmware are periodically released with new
features and format support to enhance your user experience.
Check the Digital Foci website (http://www.digitalfoci.com/support
) for the latest
available firmware updates and instructions.

Photo Book (PBK-080)
User’s Guide
Page 3
Version 1.1-R0
2. Getting Started
2.1. Photo Book Overview
There are 3 ways to view photos and videos on Photo Book:
• Copy photos and videos from your computer to the Photo Book Internal
Memory. You can also copy any music files you want to play as the
background music.
• View photos and videos directly from an inserted memory card (CF, SD,
SDHC, MMC, MS, MS PRO, xD) or a connected USB flash drive.
• Copy photos and videos directly from an inserted memory card (CF, SD,
SDHC, MMC, MS, MS PRO, xD) or a connected USB flash drive onto the
Photo Book Internal Memory.
On Photo Book, you have the following viewing options:
• Photo Album View: Browse all photo albums with folder name and preview
image
• Photo Thumbnail View: Browse thumbnail images of all the photos and
videos in selected photo album
• Full Screen View:
o View images full screen
o Manually scroll through images in the selected photo album
o Zoom, pan, and rotate images
o Play video files
• Automatic photo slideshow:
o Play Photo Book slideshow
o Play Full-screen slideshow

Photo Book (PBK-080)
User’s Guide
Page 4
Version 1.1-R0

Photo Book (PBK-080)
User’s Guide
Page 5
Version 1.1-R0
2.2. Device Layout

Photo Book (PBK-080)
User’s Guide
Page 6
Version 1.1-R0
2.3. Powering Photo Book
2.3.1. Charging Photo Book Battery
Photo Book has a battery life of approximately 2.5 hours on a full charge. You
can charge the battery either by the included AC power adapter or by USB power
from your computer.
For best battery performance, please charge the battery for 8 hours
before using
it for the first time.
When Photo Book has about 10% battery life remaining, it will start displaying a
Battery Low icon on its screen. You should charge the device when the low
battery warning appears.
Also, make sure to periodically recharge your Photo Book to prevent the battery
from becoming completely depleted.
Charging Photo Book by AC adapter
Follow these instructions to charge the Photo Book battery by AC adapter:
1. Plug the AC power adapter into a wall outlet.
2. Plug in the AC adapter to the Power Adapter Jack located on the bottom left
of Photo Book.
3. The battery LED will appear RED to indicate that the battery is charging.
4. With the device turned off, it takes under 3 hours to fully recharge an empty
battery. The Red LED will turn off when the battery is fully recharged.
Charging Photo Book by USB Port
Follow these instructions to charge the Photo Book battery by USB power on
your computer:
1. Connect Photo Book to your computer with the USB 5-pin mini-B cable.
2. The battery LED will appear RED to indicate that the battery is charging.
3. With the device turned off, it takes under 6 hours to fully recharge an empty
battery by USB.
2.3.2. Powering On/Off Photo Book
To turn on Photo Book, press the Power Button. The Power LED will turn green
and the Digital Foci screen will appear while Photo Book initializes and powers
on.
To turn off Photo Book, press the Power Button. Photo Book will shut down in
about 2 seconds and the LED will turn off.

Photo Book (PBK-080)
User’s Guide
Page 7
Version 1.1-R0
2.3.3. Battery Saving Features
Photo Book has two power saving features to conserve battery power.
1. Dimming backlight: The LDC backlight will dim when the device is
performing a copy task from memory card or flash drive to Internal Memory.
2. Auto-off Timer: You can set the Auto-off Timer so that if no button has been
pressed and there is no activity for a certain amount of time, Photo Book will
automatically turn off. This Auto Off feature will be temporarily disabled when
the device is connected to the computer by USB. You can adjust the Auto-off
Timer (None, 5, 10, 15, .. up to 55 minutes) to best match your needs by
accessing the Setup option. Refer to Section 2.4.6 Setup Option – Auto
Shutdown Timer for detailed instructions.

Photo Book (PBK-080)
User’s Guide
Page 8
Version 1.1-R0
2.4. Setting Up Photo Book
From the Home Screen, press MENU to display the Menu Options.
Next, select Setup Icon
to access the Setup screen.
2.4.1. Setup Options
The following screen shows the main Setup screen.
Follow these instructions to select Setup option and to change the settings:
1. Press LEFT / RIGHT / UP / DOWN to move the cursor to browse the Setup
options.
2. Press OK to access the selected Setup option. The page on the right will be
highlighted.
3. Press LEFT / RIGHT / UP / DOWN to change the value. When you have
selected the desired value, press OK to confirm your setting.
4. To exit Setup menu, press the ESC button.
2.4.2. Setup Option – Theme Style
1. Select Theme Style Icon
to change the background theme of the Photo
Book.
2. Press UP / DOWN to change the background theme.
3. When you finish setting the desired background, press OK to confirm your
setting.

Photo Book (PBK-080)
User’s Guide
Page 9
Version 1.1-R0
2.4.3. Setup Option – Screen Brightness
1. Select Brightness Icon
to adjust the brightness of the LCD screen. .
2. Press LEFT / RIGHT to adjust the value between 0 and 10. The brightness of
the screen will be adjusted real-time.
3. When you finish setting the desired brightness, press OK to confirm your
setting.
2.4.4. Setup Option – Language
1. Select Language Icon
to select among 10 different display languages
for the user interface. The available options are: English, Traditional Chinese,
Simplified Chinese, Japanese, Korean, Spanish, German, French, Italian, and
Russian.
2. Press LEFT / RIGHT / UP / DOWN to select the desired language.
3. When you finish setting the desired language, press OK to confirm your
setting.
2.4.5. Setup Option – Date Time
1. Select Date Time Icon
to set date and time.
2. With the Year field highlighted, press LEFT / RIGHT to change the year.
When the correct year is selected, press OK to move to the Month field.
3. Continue to set the Month, Date, Time Zone, Hour, Minute, and Second of
local time. Use LEFT / RIGHT to change the value. Press OK to move to the
next field.

Photo Book (PBK-080)
User’s Guide
Page 10
Version 1.1-R0
2.4.6. Setup Option – Auto Shutdown Timer
1. Select Auto Shutdown Timer Icon
to adjust the amount of idle time
allowed before Photo Book automatically shuts down to conserve battery life.
2. You can set the timer to a value between 5 minutes and 55 minutes. You can
also select Off to disable this feature.
3. Press LEFT / RIGHT / UP / DOWN to adjust the value.
4. When you finish setting the desired time, press OK to confirm your setting.
Note
: This Auto Off feature will be temporarily disabled when the device is
connected to the computer by USB.
2.4.7. Setup Option – Status
1. Select Status Icon
to view technical information of the device, including:
Total size of Internal Memory, Free space of Internal Memory, Hardware
Version, Firmware Version, and Battery Status.

Photo Book (PBK-080)
User’s Guide
Page 11
Version 1.1-R0
2.5. Copying Files from Computer to Photo Book Internal Memory
2.5.1. Connecting Photo Book to Your Computer
1. Open the bottom door on the right side of Photo Book to access the USB port
of Photo Book.
2. Connect Photo Book to your computer using the included USB mini-B cable.
3. Photo Book will display a “Computer Connect” image on its screen to indicate
that it is connected to your computer.
4. Once connected, your computer will automatically recognize Photo Book.
Photo Book will show up as a removable drive with the default label
“PhotoBook”.
5. If a memory card is inserted in Photo Book, it will also show up on your
computer as a ‘Removable Drive’. You can transfer files among an inserted
memory card or USB flash drive, your computer, and the Photo Book Internal
Memory.
Note
: The Photo Book Internal Memory and memory card icon labels may vary
and can be renamed.
2.5.2. Copying Photos, Videos, and Music Files to Photo Book from Computer
There are 2 default folders on Photo Book: PHOTO and MUSIC.
• PHOTO:
Copy your photos and video files into the PHOTO folder.
Each folder and sub-folder inside the default PHOTO folder with support
photos and videos will be displayed as a separate album. In other words, if
a folder has folders inside it, each unique folder (regardless of the directly
structure level) will be listed as a separate album.
Note
: Photos and videos not located in the PHOTO folder will not display on
Photo Book.
• MUSIC:
Copy any music files you would like to play into the MUSIC folder. All the
music files in this folder will play in the background on Photo Book in
random order.
Note
: Music files not located in the MUSIC folder will not play on Photo
Book.

Photo Book (PBK-080)
User’s Guide
Page 12
Version 1.1-R0
2.6. Accessing Memory Card and USB Flash Drive on Photo Book
2.6.1. Connecting Memory Cards or USB Flash Drive
To access the memory card slots and USB port, open the card slot cover on the
right side of Photo Book.
Insert your memory card in the designated memory card slot with the label side
facing towards you as shown below.
• For Compact Flash card, use the upper card slot
• For SD, SDHC, MMC, MS, MS PRO, or xD, use the lower card slot.
Warning
: Do not force the memory card in the slot if it does not slide in smoothly.
Instead, remove the card, check the card orientation and slot, and try again.
To connect a USB flash drive, do the following:
1. Connect your USB flash drive to the female end of the included USB OTG
cable.
2. Connect the mini end of the USB OTG cable into the USB port.
Once a memory card is inserted or a USB flash drive is connected, Photo Book
will automatically recognize the device. The Menu options will pop up on the
upper left corner of the screen.
At this point, you can select the connected card or USB flash drive to view its
content on Photo Book or copy the content to Photo Book.

Photo Book (PBK-080)
User’s Guide
Page 13
Version 1.1-R0
2.6.2. Viewing Photos and Videos on the Memory Card or USB Flash Drive
1. After a card is inserted or a USB flash drive is connected, the Menu options
with the available card or flash drive icons will pop up automatically. Or, you
can press MENU to bring up the Menu options.
CF card
SD/SDHC/MMC,MS/MS PRO, xD card
USB flash drive
2. Highlight the icon representing the memory card or USB flash drive you would
like to view, and press OK.
3. On the bottom right corner of the screen, a card/device indicator will appear to
indicate the memory card or USB flash drive that is currently being accessed.
4. All available photo albums on the selected memory card or USB flash drive
will be displayed. Each folder and sub-folder with supported photos and
videos will be displayed as a separate album.
Go to Section 3 Enjoying Photos and Videos on Photo Book to learn about how
to browse through albums, view photos full screen, and playing automatic photo
slideshows.
2.6.3. Copying Photos and Videos on the Memory Card or USB Flash Drive to
Photo Book
On Photo Book, you can also copy photos and videos directly from a memory
card or USB flash drive to Photo Book Internal Memory.
1. Insert your memory card or connect USB flash drive to Photo Book.
2. Highlight the icon representing the memory card or USB flash drive you would
like to copy, and press OK.
3. Photo Book will display the photo albums available on the selected device.
4. Press MENU to bring up the Menu options.
5. Select Copy Icon
.
6. A confirmation window will pop up, showing (1) the location on the Photo
Book that the files will be copied to, and (2) free space on the Photo Book
Internal Memory. Select Yes
and press OK to start the copy.
7. All supported photos and videos on the entire memory card or USB flash drive
will be copied to the Photo Book Internal Memory.

Photo Book (PBK-080)
User’s Guide
Page 14
Version 1.1-R0
8. During the copy process, the screen will display the following information:
Note
: The LCD backlight will dim during the copy process to save battery power.
9. Upon copy completion, you will see the Backup Summary screen which
shows the total number of files copied, copy speed, total size of files copied,
and free space on the Photo Book Internal Memory.
10. From the Backup Summary screen, you can select one of the following:
• Compare
: Select Compare to verify that each file on the card matches
each file copied to Photo Book. This ensures that there are no copy errors
during the copy process.
• View
: Select View to go to main Photo Album view to view all available
photo albums on the Photo Book Internal Memory.
• Close
: Select Close to close the option screen.
11. Only supported photos and videos are copied to Photo Book. On the Photo
Book Internal Memory, the copied files will be located in the default PHOTO
folder.
• All supported photos and video files will be copied into this folder with their
original folder structure.
The folder name created will indicate the type of memory card or USB
flash drive, followed by sequential numbers starting from ‘0000’ (followed
by ‘0001’, ‘0002’,… that shows the order in which the folders were
created.
The type of memory card or USB drive are represented as follows:
CF = Compact Flash SD = Secure Digital
MMC = MultiMedia Card xD = xD-Picture Card
MS = Memory Stick MSPRO = MS PRO
DEV001 = USB Flash Drive

Photo Book (PBK-080)
User’s Guide
Page 15
Version 1.1-R0
• On the main Photo Album view on Photo Book, each folder or sub-folder
will be displayed as a separate album and be displayed with its original
folder name. If the photos are in the root directory of the memory card or
USB flash drive, Photo Book will display those files in a separate album,
and the folder name shown will be the folder name created for the copy
(for example, SD-00001).
/