
Operating Instructions <Setup Instructions>
Center Module
Model No.
WX-CC411
WX-CC412
English Français
WX-CC411_PGQP1742ZA_SI_.indb 1 2014/01/17 18:11:09

2
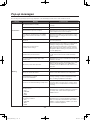
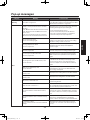
Contents
Before use ......................................................................... 3
Preface ........................................................................... 3
Features ......................................................................... 3
System diagram ............................................................. 3
Operation ....................................................................... 4
Concerning the Operating Instructions .......................... 5
Trademarks and registered trademarks ......................... 5
Abbreviations ................................................................. 5
Screen operations ............................................................ 6
Basic screen operations ................................................. 6
Entering the settings ...................................................... 6
Inputting characters ....................................................... 7
Inputting the date and time ............................................ 7
Adjusting the volume level .............................................. 7
Displaying the Settings screen ....................................... 8
Settings screen display .................................................. 8
Setting the Center Module ............................................... 9
Installation settings [Installation Settings] ...................... 9
Setting the date and time ............................................... 9
Setting the current date and time ................................... 9
Setting the daylight saving time ................................... 10
Changing the password ............................................... 11
Setting the network address ........................................ 11
Setting the help contact ............................................... 12
Setting the screen and touch panel ............................. 13
Setting the All-In-One Headset or
Belt Pack [Headset] ...................................................... 14
Setting the Wireless Repeater [Wireless Repeater] ..... 17
Store settings [Store Settings]
....................................... 19
Setting the nighttime volume ........................................ 19
Setting the store hours ................................................. 20
Setting the tandem lane (WX-CC412 only) ................... 22
Setting each lane [Lane] ................................................ 24
Setting the volume of input sound ................................ 24
Setting the volume of output sound .............................. 24
Setting the AUX SP ...................................................... 25
Setting the DSP ........................................................... 26
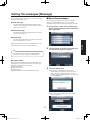
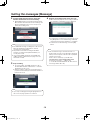
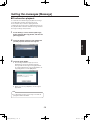
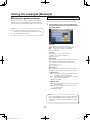
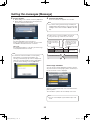
Setting the messages [Message] .................................. 27
Recording messages ................................................... 27
Confirmation playback .................................................. 29
Setting the greeter message ........................................ 30
Setting the reminder message ..................................... 33
Setting the alert message ............................................ 35
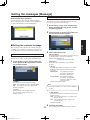
Setting the security alert [Security Alert] ..................... 36
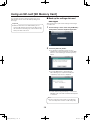
Using an SD card [SD Memory Card] ........................... 38
Back up the settings data and messages .................... 38
Restoring the backup data ........................................... 39
Formatting an SD card ................................................. 40
Maintenance [Maintenance] ........................................... 41
Displaying the software version ................................... 41
Data initialization .......................................................... 41
Pop-up messages ........................................................... 42
Troubleshooting .............................................................. 44
ENGLISH VERSION
WX-CC411_PGQP1742ZA_SI_.indb 2 2014/01/17 18:11:09

3
English
Before use
Preface
The WX-CC411 and WX-CC412 are Center Modules for the wireless intercom systems that are used in drive-thru outlets.
Features
The WX-CC411 is designed for single lane operation of drive-thru outlets; the WX-CC412 is designed for dual lane operation.
A system compliant with the 1.9 GHz band DECT
*
standard is used so the voices of the store personnel and customers are
heard clearly and distinctly even in open areas, and interference is minimal, resulting in stable communication.
* Digital Enhanced Cordless Telecommunications
A high degree of vocal clarity is ensured by a powerful echo canceller and digital noise reduction (Digital Noise Reduction).
The cabinet supports wall-mounting for easy installation.
The total number of All-In-One Headsets and Belt Packs that can be registered is 32. Up to four operators can communicate
at the same time per lane using All-In-One Headsets and Belt Packs.
This unit has a 7-Type LCD display with a touch panel, and is easy to operate.
This unit can be connected to an IP network using Ethernet to enable remote control operations to be performed.
Using an SD card, it is possible to back up and restore the settings, and save messages unique to the outlet.
The system contains a scheduler to enable the greeter message to be changed at designated times and reminder messages
to be played back automatically.
Up to four Network Cameras made by Panasonic can be registered, and their images can be monitored on this unit’s LCD
display.
Alert signals that have been received can be sent to the All-In-One Headsets or Belt Packs, signals can be output to external
devices, and alert emails can be sent to external destinations.
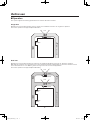
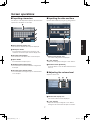
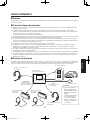
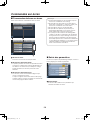
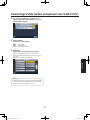
System diagram
By connecting the Center Module and All-In-One Headsets or Belt Packs wirelessly, it is possible to communicate between the
All-In-One Headsets or Belt Packs or between the All-In-One Headsets or Belt Packs and the customers at the order post.
All-In-One Headset
WX-CH450
Belt Pack
WX-CT420
Center Module
WX-CC411/WX-CC412
All-In-One Headset
WX-CH450
Vehicle detector
Order post
Microphone
Speaker
TALK
(Communications with
customers)
PAGE
(Communications with
other store personnel)
Belt Pack
WX-CT420
Connect the vehicle
detector to terminals
CNT1 and COM of vehicle
detector input [VDET].
If the vehicle detector is
connected to terminal
CNT2, it will not work,
since this terminal is for
expansion (unused).
Note
WX-CC411_PGQP1742ZA_SI_.indb 3 2014/01/17 18:11:09

4
Before use
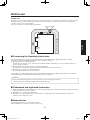
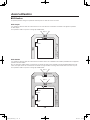
Operation
This system supports the following operations that are suited to drive-thru customers.
Single lane
Operations in an environment in which only one order post is installed are referred to as “single lane” operations.
These lane operations are supported by the WX-CC411.
ORDER POST
WINDOW
DRIVE-THRU LANE
Hello
Dual lane
Operations in an environment in which the order posts are installed in parallel are referred to as “dual lane” operations.
With dual lane operations, the vehicle detectors for lane A and lane B operate independently of each other, and when each of
these vehicle detectors is set to ON, the greeter message for the lane concerned is played back.
These lane operations are supported by the WX-CC412.
ORDER POST
WINDOW
LANE A
DRIVE-THRU LANE
WINDOW
LANE B
ORDER POST
LANE A
LANE B
Hello
Hello
WX-CC411_PGQP1742ZA_SI_.indb 4 2014/01/17 18:11:09

5
English
Before use
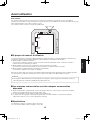
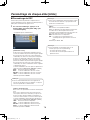
Tandem lane
Operations in an environment in which the order posts are installed in series are referred to as “tandem lane” operations. When
the vehicle detector for lane A is OFF and the vehicle detector for lane B is set to ON, a tandem lane message urging the
customer to move to lane A is played back.
These lane operations are supported by the WX-CC412.
Concerning the Operating Instructions
The Operating Instructions consist of the Operating Instructions <Installation Guide>, Operating Instructions <Setup
Instructions> (PDF file) and Operating Instructions <Browser Guide> (PDF file).
Operating Instructions <Installation Guide>:
These instructions describe how to connect the Center Module with the required devices, how to install them and how to
perform settings (excerpted).
Operating Instructions <Setup Instructions> (this manual: PDF file):
These instructions describe the settings that must be performed before this unit can be used.
Operating Instructions <Browser Guide> (PDF file):
These instructions explain access from the browser.
To read PDF files, you will need Adobe
®
Reader
®
which is available from Adobe Systems. When Adobe
®
Reader
®
is not installed on
the PC, download the latest Adobe
®
Reader
®
from the Adobe web site and install it.
Download the “Operating Instructions <Browser Guide>” from the home page given below.
http://www.panasonic.com/business/POS-drive-through/manuals.asp
Important
Trademarks and registered trademarks
Adobe, Acrobat Reader, and Adobe Reader are either registered trademarks or trademarks of Adobe Systems Incorporated
in the United States and/or other countries.
SD, SDHC Logo is a trademark of SD-3C, LLC.
Other names of companies and products contained in these operating instructions may be trademarks or registered
trademarks of their respective owners.
Abbreviations
The following abbreviations are used in this document.
SDHC and SD memory cards are referred to as “SD cards”.
ORDER POSTORDER POST
DRIVE-THRU LANE
WINDOW
LANE A
WINDOW
LANE B
LANE BLANE A
Pull forward
WX-CC411_PGQP1742ZA_SI_.indb 5 2014/01/17 18:11:10

6
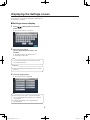
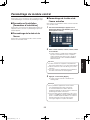
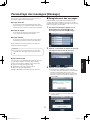
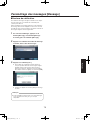
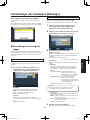
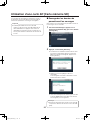
Screen operations
Basic screen operations
This section describes basic screen operations.
21
3
1
Return button
This button is used to return to the previous screen.
2
Item selector buttons
Operation moves to the screen corresponding to the
button that has been touched. On the setting screen, one
of the buttons is selected (indicated in orange).
The buttons have different names, depending on the
situation.
3
Page selector buttons
These buttons are used to select the page when the
screen extends over a multiple number of pages.
When the ▼ button is touched, the next page screen
is displayed, and when the ▲ button is touched, the
previous page screen is displayed.
The LCD display is easily scratched, so always
perform the operations involving this display using
one finger.
Do not use a ballpoint pen or other hard-tipped or
sharp object, including fingernails, to perform touch
panel operations.
Do not press on the LCD display with too much force.
Do not use any of the LCD protective films available
on the market. (The touch panel may not operate
properly.)
The inside of the LCD display may become cloudy
or condensation (droplets of water) may form and
the display may not operate properly when the
temperature changes suddenly, such as immediately
after air-conditioning or heating has been turned on. If
this occurs, leave this unit for about one to two hours
before attempting to use it again.
Notice
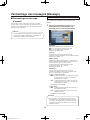
Entering the settings
On a screen with multiple setting items, touch the [Set]
button to confirm a setting.
1
1
Set button
This button confirms all multiple settings displayed on the
screen together.
WX-CC411_PGQP1742ZA_SI_.indb 6 2014/01/17 18:11:11

7
English
Screen operations
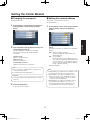
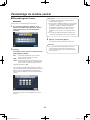
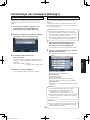
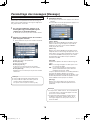
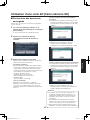
Inputting characters
Use the keys on the keyboard to input the characters when
a password or an address is to be input.
1
2
4
3
5
6
1
Input character display area
The characters that have been input are displayed.
2
Backspace button
Touch this button to delete the last character of the
characters shown in the input character display area.
3
Character input buttons
The character on the button that is touched is input.
4
Space button
Touch this button to input a space.
5
Set/Enter button [Enter/Login]
Touch this button to enter the character string that has
been input.
6
Character type selector button
Touch this button to change the type of characters that
are to be input.
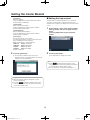
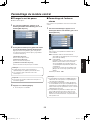
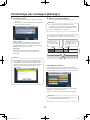
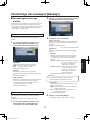
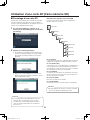
Inputting the date and time
Input the date and time by using the [+] and [-] buttons.
2 31
1
Setting value display area
The current setting values are displayed.
2
+ and – buttons
Adjust the settings by touching the + and – buttons.
3
Set/Enter button [Set/Enter]
Touch this button to enter the date and time that has
been set.
Adjusting the volume level
Adjust the volume level.
2 1 2
1
Volume level display area
The current volume levels are displayed.
2
+ and – buttons
Adjust the levels by touching the + and – buttons.
Changes in the volume level take place in real time.
WX-CC411_PGQP1742ZA_SI_.indb 7 2014/01/17 18:11:12

8
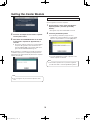
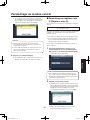
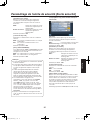
Displaying the Settings screen
The Settings screen for the Center Module is displayed after
the password is confirmed.
Settings screen display
1 Touch (setting button) on the touch
panel.
The password input screen appears.
2 Input the set password.
(Up to 8 alphanumeric characters and
symbols)
The input characters are displayed as “
*
”.
Default password: 12345
If you forget the password, consult the store where
you purchased this unit.
Note
Change the password at regular intervals for security
purposes.
Important
3 Touch the [Login] button.
The Settings screen is displayed.
Each setting screen returns to the password input
screen automatically after 2 minutes if no operations
are performed.
To display the Settings screen again, input the
password again.
Note
WX-CC411_PGQP1742ZA_SI_.indb 8 2014/01/17 18:11:13

9
English
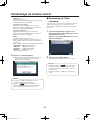
Setting the Center Module
This function is used to select an item to set from the
Settings screen and perform the required settings.
Installation settings
[Installation Settings]
This function is used to perform the basic settings for this
unit. Be sure to perform these settings after installing this
unit.
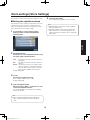
Setting the date and time
This function is used to set the date, time, and daylight
saving time for the Center Module.
Setting the current date and
time
This function is used to set the current date and time for the
Center Module.
1 On the Settings screen, touch the [Installation
Settings] button, and then the [Date & Time]
button.
2 Input the current year, month, date, hour, and
minute.
The date and time display on the LCD display is
updated. For the inputting method, refer to “
Inputting
the date and time” (p.7)
. You can input the date and
time from 2013/1/1/00:00 to 2035/12/31/23:59.
The date and time on this unit is set with the following
order: month / day / year hour:minute
The time is displayed as a 24-hour clock.
The date and time on the LCD display are also
displayed according to the above rules.
Important
3 Touch the [Set] button.
The current date and time displayed on the LCD
display are updated.
If you set daylight saving time while setting the date
and time, a warning screen is displayed. Before
setting daylight saving time, complete the date and
time setting.
After the date and time are set, if you turn the
power OFF and then ON after 1/1/2036, they will
be initialized to 1/1/2000. On and after 2036/1/1,
schedule functions such as the greeter message and
reminder message do not operate.
Note
WX-CC411_PGQP1742ZA_SI_.indb 9 2014/01/17 18:11:13

10
Setting the Center Module
Setting the daylight saving time
This function is used to set the daylight saving time.
1 On the Settings screen, touch the [Installation
Settings] button, [Date & Time] button, and
then the [Daylight Saving Time] button.
2 [Setup]
Set Daylight Saving Time using the [ON], [OFF],
or [AUTO] buttons.
ON: Set the time to daylight saving time. (Advance
the current time by 1 hour)
OFF: Cancel daylight saving time.
AUTO: Daylight saving time is set based on the set
date and time to start and end (Month, week,
day of the week, time).
Default setting: OFF
If AUTO is selected, you must set the date and time to
start and end Daylight Saving Time. Touch the [Edit]
button to set the date and time to start and end Daylight
Saving Time.
Input the month, day, and hour to start/end Daylight
Saving Time, and then touch the [Enter] button.
“
*
” appears in the time display during Daylight Saving
Time.
Specify [DAY] as the ○th ∆day of the week. If [Last] is
set, the 4th specified day of the week becomes the
subject day, unless there is a 5th specified day of the
week in the month.
You cannot set the same date as the date to start and
end daylight saving time.
Note
3 Touch the [Set] button.
The daylight saving time setting is updated.
After daylight saving time is set, all schedule-related
functions (reminder messages, Store Hours, etc.)
operate based on daylight saving time.
Note
WX-CC411_PGQP1742ZA_SI_.indb 10 2014/01/17 18:11:14

11
English
Setting the Center Module
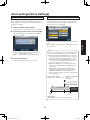
Changing the password
Change the password.
1 On the Settings screen, touch the [Installation
Settings] button, and then the [Password]
button.
2 Input the [Old Password], [New Password], and
[Confirm New Password].
Touch the [Edit] button, and then input the [Old
Password], [New Password], and [Confirm New
Password].
[Old Password]
Input the current password.
[New Password]
Input the new password.
[Confirm New Password]
Input the new password for confirmation.
You can input up to 8 alphanumeric characters and
symbols as the password.
The input characters are displayed as “
*
”.
Note
Change the password at regular intervals for security
purposes.
Important
3 Touch the [Set] button.
The password is changed.
Setting the network address
This function is used to set the network for
the Center Module.
1 On the Settings screen, touch the [Installation
Settings] button, and then the [Network]
button.
[DHCP]
This function is used to set whether to use the DHCP
function.
OFF: Set the IP address manually.
Input the [IP Address], [Subnet Mask], and
[Default Gateway].
ON: Use the DHCP.
Set the IP address using the DHCP function. If
no IP address is obtained from the DHCP server,
a new IP address is set automatically (Auto IP).
You do not need to input [IP Address], [Subnet
Mask], or [Default Gateway].
Default setting: OFF
When DHCP is set to OFF, set the IP address so that
it will not be the same as that of another device.
When DHCP is set to ON, set the DHCP server so
that devices that do not use the DHCP function do
not have the same IP address. For server settings,
contact the network administrator.
When DHCP is set to ON, if an IP address cannot
be obtained from the DHCP server, search for
an unused IP address between 169.254.1.0 and
169.254.254.255, and set it as the IP address.
Note
WX-CC411_PGQP1742ZA_SI_.indb 11 2014/01/17 18:11:15

12
Setting the Center Module
[IP Address]
Set the IP address.
Touch the [Edit] button, and then input the IP address.
Default setting: 192.168.0.50
[Subnet Mask]
Set the subnet mask address.
Touch the [Edit] button, and then input the address.
Default setting: 255.255.255.0
[Default Gateway]
Set the default gateway address.
Touch the [Edit] button, and then input the address.
Default setting: 192.168.0.1
[Line Speed]
Specify the baud rate of the network.
Touch the [Select] button, and then select a baud rate.
Select a baud rate from the following.
Auto: The baud rate is set automatically.
100M-Full: 100Mbps Full duplex
100M-Half: 100Mbps Half duplex
10M-Full: 10Mbps Full duplex
10M-Half: 10Mbps Half duplex
Default setting: Auto
2 Touch the [Set] button.
The following confirmation pop-up screen is
displayed. To enter the change made to the network
settings, touch the [YES] button.
When the network setting is changed, the system
restarts automatically.
Touch the (Setting Information button) on the
touch panel, and then touch the [System Info] button
to check the network status.
Note
Setting the help contact
“Help Contact” is a function that allows you to check the
emergency contact number on the Help Contact screen.
Input the phone number to be displayed on the Help Contact
screen.
1 On the Settings screen, touch the [Installation
Settings] button, and then the [Help Contact]
button.
Touch the [Edit] button to input the phone
number.
2 Touch the [Set] button.
The Help Contact settings are entered.
Touch
(Setting Information button) on the
touch panel, and then touch the [Help Contact] button
to check the phone number that you input.
You can input up to 18 numerals and symbols (“-”).
Note
WX-CC411_PGQP1742ZA_SI_.indb 12 2014/01/17 18:11:16

13
English
Setting the Center Module
Setting the screen and touch
panel
This function is used to set items related to the LCD display
and touch panel.
1 On the Settings screen, touch the [Installation
Settings] button, and then the [Screen & Touch
Panel] button.
[Touch Panel Adjustment]
Adjust the position of the touch panel. Touch the
[Execute] button, and the “Touch Panel Adjustment”
screen is displayed.
If you touch any point other than the “+” marks,
position adjustment restarts from the beginning.
Note
If you touch five “+” marks, the following confirmation
pop-up screen is displayed. To enter the position
adjustment result, touch the [YES] button. To return
without entering the position adjustment result, touch
the [NO] button.
[Language]
Select the language to be displayed on the
LCD display. Touch the [Select] button, and
then select a display language. Select a
language from the following.
English: Texts are displayed on the LCD display in
English.
Français: Texts are displayed on the LCD display in
French.
Default setting: English
WX-CC411_PGQP1742ZA_SI_.indb 13 2014/01/17 18:11:17

14
Setting the Center Module
Setting the All-In-One Headset
or Belt Pack [Headset]
The Headset is a general term for All-In-One Headset or
Belt Pack. The following are the procedures for performing
related settings.
How to register an ID
To talk or page using an All-In-One Headset or Belt Pack,
its ID must be registered.
For ID registration, set the Center Module to ID
registration mode, and proceed with the registration by
operating the All-In-One Headset or Belt Pack concerned.
The ID registration procedure is described below, based on
an example involving the operation of an All-In-One Headset
or Belt Pack.
1 On the Settings screen, touch the [Headsets]
button, and then the [ID Registration] button.
The ID registration screen appears.
The registered All-In-One Headset or Belt Pack numbers
are displayed in the [Registered Headsets] area. When ID
registration is completed successfully, the ID of the newly
registered All-In-One Headset or Belt Pack is added.
Note
2 Touch the [Start] button.
The following confirmation pop-up screen is
displayed. You cannot perform other operations
during ID registration. To continue ID registration,
touch the [YES] button. To stop ID registration, touch
the [NO] button.
Touch the [YES] button to start ID registration mode.
The number of the All-In-One Headset or Belt Pack that has
been registered is displayed.
3 Press the [POWER] button while holding down
the [T1] button and [T2] button of the All-In-
One Headset or Belt Pack.
The All-In-One Headset or Belt Pack starts up in ID
registration mode. The “Registration Mode” voice
prompt will be heard from the earphone, and the
power indicator will blink orange.
In ID registration mode, the buttons and indicators
have different functions from those at normal startup.
WX-CC411_PGQP1742ZA_SI_.indb 14 2014/01/17 18:11:18

15
English
Setting the Center Module
4 Press the [T1] button on the All-In-One
Headset or Belt Pack.
The All-In-One Headset or Belt Pack searches for a
Center Module that is in ID registration mode. The
“Connecting center module A” voice prompt will be
heard from the earphone, and the lane indicator will
blink orange.
In the case of the WX-CC412, after lane A registration,
the “Connecting center module B” voice prompt will be
heard, and the lane indicator will blink green.
When ID registration has been completed
successfully, the “Registration complete” voice
prompt will be heard from the earphone, and then a
voice prompt for the number of the registered All-In-
One Headset or Belt Pack will be heard. The power
indicator and the lane indicator now stop blinking,
and light up.
After registrating all of the headset IDs, touch the [Stop]
button on the ID registration screen.
ID registration mode for the Center Module is exited. The
power indicator of the All-In-One Headset or Belt Pack
changes from orange to green.
When registering the IDs of a multiple number of
All-In-One Headsets or Belt Packs, register the ID
of each unit in sequence. If an attempt is made to
register the IDs of multiple units at the same time, the
IDs may not be registered correctly.
During the ID registration process, do not turn off
the power of the All-In-One Headsets or Belt Packs
or remove their batteries. Otherwise, their IDs may
not be registered correctly. If the registration is not
proceeding smoothly, touch the [Stop] button on the
Center Module, exit ID registration mode, and then try
again.
When ID registration fails, a “BUU-UU-UU” warning
sounds in the All-In-One Headset or Belt Pack
concerned, and then the “Failed” voice prompt is
heard. If an ID registration has failed, the ID of the
All-In-One Headset or Belt Pack will not be registered
in the Center Module, and the power indicator of the
All-In-One Headset or Belt Pack concerned will blink
in red.
The IDs of up to 32 All-In-One Headsets or Belt Packs
can be registered in one Center Module. If an attempt
is made to register IDs for more than 32 units, the IDs
of the headsets not used for the longest time will be
automatically deleted, and then the IDs of the new
units will be registered.
It is not possible to register the ID of a wireless
repeater while ID registration mode of the All-In-One
Headsets or Belt Packs is active.
Important
WX-CC411_PGQP1742ZA_SI_.indb 15 2014/01/17 18:11:18

16
Setting the Center Module
How to delete an ID
This function is used to cancel the ID registration of All-In-
One Headsets or Belt Packs.
1 Turn off the All-In-One Headset or Belt Pack to
be deleted.
2 On the Settings screen, touch the [Headsets]
button, and then the [ID Deletion] button.
All of the All-In-One Headsets or Belt Packs with
registered IDs are displayed in a list.
* If there is no All-In-One Headset or Belt Pack with
registered IDs, this screen is not displayed.
3 On the ID Deletion screen, touch the [Deletion]
button of the All-In-One Headset or Belt Pack
to be deleted.
The following confirmation pop-up screen is
displayed. To delete, touch the [YES] button. To
cancel deletion, touch the [NO] button.
You can check your Headset number by turning it on
and listening to the voice prompt. When an All-In-One
Headset or Belt Pack is turned on, the following voice
prompts will be heard: “Hello”, “Headset xx” (xx is the
ID number registered in the Center Module), “Lane x”
(x is the connected lane).
Note
How to register groups
Register a group of All-In-One Headsets or Belt Packs.
If you select a group as the broadcast destination for alert
messages or reminder messages, you can broadcast to
multiple All-In-One Headsets or Belt Packs simultaneously.
1 On the Settings screen, touch the [Headsets]
button, and then the [Group] button.
You can set from Group 1 to Group 6.
Note
2 Touch the button of the group to be set.
All of the All-In-One Headsets or Belt Packs with
registered IDs are displayed in a list.
* If there is no All-In-One Headset or Belt Pack with
registered IDs, this screen is not displayed.
3 Select the All-In-One Headsets or Belt Packs
that will be registered in a group.
Set the All-In-One Headsets or Belt Packs to be
registered in a group to [ON].
Set the All-In-One Headsets or Belt Packs to be
deleted from a group to [OFF].
When deleting all All-In-One Headsets or Belt Packs
from a group, touch the [Clear] button.
Default setting: All OFF
If you touch the [Clear] button, the following
confirmation pop-up screen is displayed. To delete
from the group, touch the [YES] button. To cancel
deletion, touch the [NO] button.
WX-CC411_PGQP1742ZA_SI_.indb 16 2014/01/17 18:11:19

17
English
Setting the Center Module
You can register up to 32 All-In-One Headsets or Belt
Packs in a group.
You can register an All-In-One Headset or Belt Pack
in multiple groups.
Note
4 Touch the [Set] button.
Registration of the All-In-One Headsets or Belt Packs
is entered.
Setting the Wireless Repeater
[Wireless Repeater]
This function is used to register or delete wireless repeaters.
How to register an ID
Register wireless repeaters. You can extend the wireless
communication distance by using wireless repeaters.
To use a wireless repeater, its ID must be registered.
For ID registration, set the Center Module to wireless
repeater ID registration mode, and register the ID by
operating the repeater.
The ID registration procedure for the wireless repeater is
described below.
1 On the Settings screen, touch the [Wireless
Repeater] button, ([Lane A/B] button,)* and
then the [ID Registration] button.
* This appears only when the WX-CC412 is used.
If the wireless repeater has been registered, you
will not be able to touch the [ID Registration] button.
Cancel registration of the wireless repeater, and then
perform ID registration again.
Note
2 Touch the [Start] button.
The following confirmation pop-up screen is
displayed. You cannot perform other operations
during ID registration. To continue ID registration,
touch the [YES] button. To stop ID registration, touch
the [NO] button.
Touch the [YES] button to start Wireless repeater ID
registration mode.
WX-CC411_PGQP1742ZA_SI_.indb 17 2014/01/17 18:11:20

18
Setting the Center Module
3 Insert the AC adapter for the wireless repeater
into the power outlet.
4 Hold down the PROGRAM button on the back
of the wireless repeater for approximately 3
seconds.
The wireless repeater searches for a Center Module
in repeater ID registration mode. At this time, the
operation STATUS LED on the repeater lights up in
green and the RSSI/ID LED blinks green.
When registration is completed successfully, the following
confirmation pop-up screen is displayed and repeater ID
registration mode ends automatically. The wireless repeater
restarts automatically.
You can register only one wireless repeater to each
lane.
Note
How to delete an ID
Cancel registration of wireless repeaters.
1 On the Settings screen, touch the [Wireless
Repeater] button (, and then [Lane A/B]
button)*.
* This appears only when the WX-CC412 is used.
2 Touch the [ID Deletion] button.
The following confirmation pop-up screen is
displayed. To continue ID deletion, touch the [YES]
button. To stop ID deletion, touch the [NO] button.
Touch the [YES] button, and the registration of the
wireless repeater is canceled.
If the wireless repeater has not yet been registered,
you will not be able to touch the [ID Deletion] button.
Note
WX-CC411_PGQP1742ZA_SI_.indb 18 2014/01/17 18:11:21

19
English
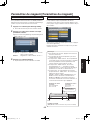
Store settings [Store Settings]
This function is used to perform operation settings for stores.
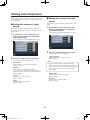
Setting the nighttime volume
This function is used to reduce the volume level of the voice
output from the order post speaker. Use this function to
reduce the volume level of the voice output from the order
post to decrease the noise volume at night.
1 On the Settings screen, touch the [Store
Settings] button, and then the [Nighttime
Volume] button.
2 [Nighttime Volume]
Set whether to use the Nighttime Volume using
the [OFF], [ON], or [AUTO] buttons.
OFF: The volume level of the order post speaker is
unchanged.
ON: The volume level of the order post speaker is
reduced.
AUTO: The volume level of the voice output from the
order post speaker is reduced automatically
every day, based on the set time to start and
time to end the nighttime volume function.
Default setting: OFF
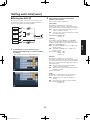
3 [Level]
Set the voice suppression level.
Set to -20 dB to 0 dB (in steps of 2 dB).
Default setting: 0 dB
4 [Start Time][Ending Time]
When you select “AUTO”, set the times to start
and end the Nighttime Volume.
Touch the [Edit] button for the [Start Time] or [Ending
Time] to set the time.
When setting the Nighttime Volume spanning two
days, set the time to finish earlier than the time to
start.
Note
5 Touch the [Set] button.
The setting for the nighttime volume is entered.
When WX-CC412 is used, this setting is applied to
both lane A and lane B.
When the nighttime volume setting is enabled, the
ASLC function does not operate regardless of its
setting. For details on the ASLC, refer to “Setting the
DSP” (p.26).
Note
WX-CC411_PGQP1742ZA_SI_.indb 19 2014/01/17 18:11:22

20
Store settings [Store Settings]
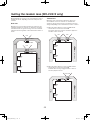
Setting the store hours
This function is used to set the business hours for the store.
With this function, you can play back the closing greeter
message for customers who visit the store outside of
business hours.
1 On the Settings screen, touch the [Store
Settings] button, and then the [Store Hours]
button.
2 [Store Hours]
Set whether to use the Store Hours using the
[OFF], [AUTO], [Closed], or [Holiday] buttons.
OFF: When the vehicle detector is ON, the greeter
message set in the scheduler is played back.
AUTO: When the vehicle detector is ON within
business hours, the greeter message set in
the scheduler is played back. If it is outside
business hours, the closing greeter message
is played back.
Closed: When the vehicle detector is ON, the closing
greeter message is always played back. Use
this function if the lane is closed, etc.
Holiday:
When the vehicle detector is ON, the holiday
greeter message is always played back. Use
this function when playing a special greeter
message on Christmas, Halloween, etc.
Default setting: OFF
When setting the Store Hours to AUTO, set the business
hours in advance. Set in [Weekly Setting]. For details,
refer to “
Setting business hours” (p.21)
.
Note
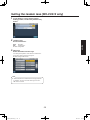
3 Set the closing greeter message or holiday
greeter message.
Touch the [Select] button for the [Closed Message]/
[Holiday Message] and select a message from the
greeter message list.
Default setting: OFF
You can select from the prerecorded greeter
messages.
For recording operation, refer to
“
Recording
messages” (p.27).
Note
4 Touch the [Set] button.
The setting for the Store Hours is entered.
WX-CC411_PGQP1742ZA_SI_.indb 20 2014/01/17 18:11:22
Page is loading ...
Page is loading ...
Page is loading ...
Page is loading ...
Page is loading ...
Page is loading ...
Page is loading ...
Page is loading ...
Page is loading ...
Page is loading ...
Page is loading ...
Page is loading ...
Page is loading ...
Page is loading ...
Page is loading ...
Page is loading ...
Page is loading ...
Page is loading ...
Page is loading ...
Page is loading ...
Page is loading ...
Page is loading ...
Page is loading ...
Page is loading ...
Page is loading ...
Page is loading ...
Page is loading ...
Page is loading ...
Page is loading ...
Page is loading ...
Page is loading ...
Page is loading ...
Page is loading ...
Page is loading ...
Page is loading ...
Page is loading ...
Page is loading ...
Page is loading ...
Page is loading ...
Page is loading ...
Page is loading ...
Page is loading ...
Page is loading ...
Page is loading ...
Page is loading ...
Page is loading ...
Page is loading ...
Page is loading ...
Page is loading ...
Page is loading ...
Page is loading ...
Page is loading ...
Page is loading ...
Page is loading ...
Page is loading ...
Page is loading ...
Page is loading ...
Page is loading ...
Page is loading ...
Page is loading ...
Page is loading ...
Page is loading ...
Page is loading ...
Page is loading ...
Page is loading ...
Page is loading ...
Page is loading ...
Page is loading ...
Page is loading ...
Page is loading ...
-
 1
1
-
 2
2
-
 3
3
-
 4
4
-
 5
5
-
 6
6
-
 7
7
-
 8
8
-
 9
9
-
 10
10
-
 11
11
-
 12
12
-
 13
13
-
 14
14
-
 15
15
-
 16
16
-
 17
17
-
 18
18
-
 19
19
-
 20
20
-
 21
21
-
 22
22
-
 23
23
-
 24
24
-
 25
25
-
 26
26
-
 27
27
-
 28
28
-
 29
29
-
 30
30
-
 31
31
-
 32
32
-
 33
33
-
 34
34
-
 35
35
-
 36
36
-
 37
37
-
 38
38
-
 39
39
-
 40
40
-
 41
41
-
 42
42
-
 43
43
-
 44
44
-
 45
45
-
 46
46
-
 47
47
-
 48
48
-
 49
49
-
 50
50
-
 51
51
-
 52
52
-
 53
53
-
 54
54
-
 55
55
-
 56
56
-
 57
57
-
 58
58
-
 59
59
-
 60
60
-
 61
61
-
 62
62
-
 63
63
-
 64
64
-
 65
65
-
 66
66
-
 67
67
-
 68
68
-
 69
69
-
 70
70
-
 71
71
-
 72
72
-
 73
73
-
 74
74
-
 75
75
-
 76
76
-
 77
77
-
 78
78
-
 79
79
-
 80
80
-
 81
81
-
 82
82
-
 83
83
-
 84
84
-
 85
85
-
 86
86
-
 87
87
-
 88
88
-
 89
89
-
 90
90


Ask a question and I''ll find the answer in the document
Finding information in a document is now easier with AI
in other languages
- français: Panasonic Attune II
Related papers
-
Panasonic WX-CC412 User manual
-
-
-
-
-
-
-
-
-
Other documents
-
3M XT-1 Quick Reference Manual
-
-
-
Arris Touchstone WR2100 Quick Installation Manual
-
 Wentworth Technology SpeedTHRU Operating instructions
-
HME EOS HD Operation Instructions Manual
-
Lexibook JC800FEI1 Owner's manual
-
-
 Algo 5002 User manual
-
Mazda 2015 3 Sports Owner's manual

