Page is loading ...

Battery Holder
Screw
L U TR ON
Overview
Pico wireless controls are for use with Lutron® RF systems. The controls are
programmed by the installer as shown in these instructions or the system
Setup Guide.
Important Notes
Codes: Install in accordance with all local and national electrical codes.
Environment: Ambient operating temperature: 32 °F to 140 °F
(0 °C to 60 °C), 0 to 90% humidity, non-condensing. Indoor use only.
Wallplates: Use only Lutron wallplates with this device. The mechanical
design of the Pico wireless control is NOT compatible with non-Lutron
wallplates. Claro
® and Satin Colors® wallplates are strongly recommended
for best color match and clean aesthetic appearance. Do not paint
controls, buttons, or wallplates. Wallplates are sold separately.
Cleaning: To clean, wipe with a clean damp cloth. DO NOT use any
chemical cleaning solutions.
Battery: The Pico wireless control uses one (1) CR 2032 battery (included).
Keep battery out of reach of children. DO NOT use rechargeable batteries.
Using improper batteries could damage the Pico wireless control. DO NOT
dispose of the battery in normal household waste. Please recycle battery,
take to a battery disposal facility, or contact your local waste disposal
provider regarding local restrictions on the disposal or recycling of batteries.
For California residents only: The batteries in these devices contain
perchlorate material - special handling may apply. For more information
visit: www.dtsc.ca.gov/hazardouswaste/perchlorate
RF Device Placement: RF dimmers, switches, keypads, controls and
shades/draperies must be located within 30 ft (9 m) of an RF signal
repeater. For systems without an RF signal repeater, all RF dimmers,
switches, keypads, controls and shades/draperies must be located within
30 ft (9 m) of each other. Remote dimmers and switches hardwired to RF
dimmers and switches are not required to be within a specific range.
Mounting: For optimal performance, DO NOT mount the Pico Wireless
control to a metal surface.
Contents:
Installation
The Pico wireless control can be used as a handheld remote, table top
control or wall mount control. See the corresponding section below
based on the type of installation desired.
Handheld remote: Slide the Blank Backplate into the back of the Pico
wireless control.
Tabletop control: Slide the Pico wireless control onto the Tabletop
Pedestal (sold separately). Pedestal model numbers are:
QSA-PED1 (holds 1 Pico control) and QSA-PED2 (holds 2 Pico controls).
Wall mount control: See the Wall Mount Template sheet included with
the Pico wireless control for various wall mount applications.
Simple Setup
To program a system which contains a Main Repeater refer to the system
Setup Guide. Follow the instructions below to program a system which does
NOT contain a Main Repeater.
After all devices have been installed, the Pico wireless control must be
programmed to control a set of dimmers, switches and shades/draperies.
Programming a system which does NOT contain a Main Repeater consists of
two steps:
1. Assigning dimmers, switches, keypads and shades/draperies to a Pico
wireless control
2. Saving the desired light levels and shade/drapery positions
Assigning devices to a Pico wireless control
1. Enter assign mode – press and hold the top and bottom buttons of
the Pico wireless control until the LED begins to flash (approximately 6
seconds).
Note: The Pico control will automatically exit assign mode after 10 minutes.
2. Assign devices to the Pico wireless control
a. Dimmers/switches – press and hold the tapswitch on the device until the
load flashes 3 times (approximately 6 seconds). The LEDs on assigned
dimmers and switches will continue to flash while the Pico control is in
assign mode.
b. Shades/draperies – press any button on the drive and the LED will flash.
3. Assign keypad columns – press and hold the bottom button of the
keypad column to be assigned until the LEDs begin to flash (approximately
6 seconds).
4. When all devices have been assigned, exit assign mode by holding the top
and bottom buttons of the Pico wireless control until the LED stops flashing
(approximately 3 seconds).
5. Confirm programming by individually pressing every button on the Pico
wireless control. Assigned devices respond to the button press by going to
the default level for that button. During normal operation, when a button is
pressed, the LED next to the top button will flash for 1-2 seconds and turn
off to conserve battery power.
Saving light levels and shade/drapery positions
You can customize the levels or positions of the devices assigned to a Pico
wireless control by using the steps below. The Pico control containing the
button to be customized must have already been programmed according to
Assigning devices to a Pico wireless control, above.
1. Press the button you wish to customize. The lights and shades/draperies
will move to the default level(s) and/or position(s) for this button. Wait until
the lights and shades/draperies stop dimming and moving.
2. Adjust each dimmer, switch and shade/drapery assigned to that column
as follows:
a. Dimmers - use the tapswitch to toggle the lights on or off. Use the raise
or lower button on the right side of the dimmer to make adjustments to
the desired light levels.
b. Switches - use the tapswitch to toggle the lights on or off.
c. Shades/draperies - use the clockwise or counter-clockwise buttons on
the shade/drapery to adjust the position.
3. Making dimmers, switches and shades/draperies ‘unaffected’
(optional) – to make assigned devices not respond to a button press, you
may make the devices ‘unaffected’. During normal operation when you
press a button on a control, a device that is ‘unaffected’ will ignore that
button press. The light level or shade/drapery position will not change. To
make devices ‘unaffected’, follow the corresponding step below based on
the type of device to be made ‘unaffected’.
a. Dimmer – if the dimmer is on, turn it off using the tapswitch. After the
dimmer is completely off, hold the lower rocker until the three middle
LEDs turn on (approximately 6 seconds), signifying that the next save will
be ignored. **
b. Switch – if the switch is on, turn it off using the tapswitch. Pull the
FASS
™
switch out. Press and hold the tapswitch. While still holding the
tapswitch, push the FASS switch in. Continue holding the tapswitch until
the LED flashes, signifying that the next save will be ignored. **
c. Shade/Drapery – if the shade/drapery is open, close it using either the
clockwise or counter-clockwise button. Release the button. After the
shade/drapery is closed, press and hold the same button used to close
the shade/drapery until the green LED blinks (approximately 10 seconds),
signifying that the next save will be ignored. **
4. Press and hold the selected Pico wireless control button until the
LED flashes (approximately 6 seconds) to save the current levels or the
‘unaffected’ status. The LED will blink rapidly for 1-2 seconds to confirm
that the save was successful.
** After a device becomes ‘unaffected’, you have 10 minutes to complete the
save for all dimmers, switches and shades/draperies.
Note: To change the ‘unaffected’ status of a dimmer, switch or shade/
drapery, follow the steps in Saving light levels and shade/drapery
positions above.
(1) Pico wireless control
(1) Blank
backplate
(1) Wall mount plate
(4) Mounting screws
(4) Screw anchors
(1) Wall mount template
L-PED1
LU T RON
QSR4P-3R
QSR8P-3R
QSRKP-3R
QSRMP-3R
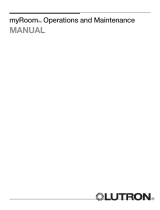
Battery Replacement
WARNING: Burn hazard. To avoid the risk of fire, explosion
or burns, DO NOT recharge, disassemble, crush, puncture
or incinerate the battery. DO NOT heat the battery above
212 °F (100 °C).
L-PED2
Lutron Elec tron ics Co., Inc.
7200 Suter Road Coopersburg, PA 18036-1299
Made and print ed in the U.S.A. 06/10 P/N 045-304 Rev. B
Technical Assistance:
U.S.A. / Canada: 1.800.523.9466
Mexico: +1.888.235.2910
Installation Instructions
Please Read Before Installing
1. Remove the battery holder screw and slide the battery holder out of
the back of the Pico wireless control.
2. Remove existing battery and replace with a new CR 2032 battery,
positive (+) side down. Slide battery holder back into the Pico wireless
control until it snaps into place and insert the battery holder screw.
Do not overtighten screw.
Battery Holder
Screw
Other Countries: +1.610.282.3800
24 hours a day, 7 days a week.
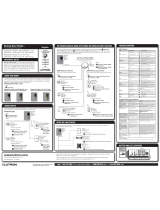
Tap Top Button
Shades Or Draperies:
Go to Open limit
(–3R & –2R only)
Grafik Eye
® QS Wireless
In Scene Control Mode:
Activates Scene 1
(–3R & –2R & –2)
Grak Eye QS Wireless
In Zone Control Mode:
All assigned Zones
brighten to 100%
(–3R & –2R & –2)
All other lighting devices:
Brighten to 100%
(–3R & –2R & –2)
Tap Round Button:
(–3R only)
Shades Or Draperies:
Go to favorite preset
Grak Eye QS Wireless
In Scene Control Mode:
Activates Scene 16
Grak Eye QS Wireless
In Zone Control Mode:
All assigned Zones
go to the preset level
All other lighting devices:
Go to favorite preset
Tap Bottom Button:
Shades Or Draperies:
Move to Close limit
(–3R & –2R only)
Grak Eye QS Wireless
In Scene Control Mode:
Fade to off
(–3R & –2R & –2)
Grak Eye QS Wireless
In Zone Control Mode:
Fade to off
(–3R & –2R & –2)
All other lighting devices:
Fade to off
(–3R & –2R & –2)
Press Raise Button:
(–3R & –2R only)
Shades Or Draperies:
Move towards open limit
Grak Eye QS Wireless
In Scene Control Mode:
Brightens all zones
Grak Eye QS Wireless
In Zone Control Mode:
Brightens all assigned zones
All other dimming devices:
Brighten light level
Switching devices:
Turn on
Press Lower Button:
(–3R & –2R only)
Shades Or Draperies:
Moves towards close limit
Grak Eye QS Wireless
In Scene Control Mode:
Dims all zones
Grak Eye QS Wireless
In Zone Control Mode:
Dims all assigned zones
All other dimming devices:
Brighten light level
Switching devices:
No function available
Pico Wireless Control Operation
1
The Pico wireless control can be used as a handheld remote, wall mount
control or tabletop control. The Pico can simply be converted to a wall
mount control by removing the back plate and attaching the control to
the wall mount adapter plate that has been mounted to the wall. The Pico
wireless control can also be converted to a tabletop control by attaching it
to the optional tabletop pedestal.
Lutron, Claro, Satin Colors, GRAFIK Eye, Pico and the sunburst logo are registered trademarks and FASS is a trademark of Lutron Electronics Co., Inc.
©2010 Lutron Electronics Co., Inc.
2
3
4
LUTR
ON
QSRKP-2R
QSRMP-2R
QSRKP-2
QSRMP-2
English
Pico® wireless control
QSR4P-3R, QSR8P-3R, QSRKP-3R,
QSRMP-3R, QSRKP-2R, QSRMP-2R,
QSRKP-2, QSRMP-2
3 V
10 mA
Pico® wireless
control

Troubleshooting Guide (for simple setup)
Symptom Probable Cause and Action
LED on a Pico wireless
control doesn’t light up
when buttons on it are
pressed.
Dead, low, or no battery in
Pico wireless control.
•
Install new battery.
Battery is installed incorrectly (reversed polarity).
•
Install battery as indicated in the Battery
Replacement section.
A specific dimmer, switch
or shade/drapery not
controlled when a button
is pressed on a Pico
wireless control.
The dimmer, switch or shade/drapery is not assigned to
the Pico control.
•
Follow the steps in Assigning devices to a
Pico
wireless control.
The device is ‘unaffected’ for that button.
•
Follow the steps in Saving light levels and shade/
drapery positions to change the ‘unaffected’ status
of the device.
The lamp(s) controlled by the dimmer/switch is (are)
burned out.
•
Replace the lamp(s).
Either there is no power to the device or the FASS
™
switch is pulled out on a dimmer/switch.
•
Ensure that the device is powered and push the
FASS switch in.
Devices are out of range.
•
Check to make sure all Pico controls, keypads,
dimmers, switches and shades/draperies are within
30 ft (9 m) of each other.
Dimmer, switch or shade/
drapery does not go
to the desired level or
position when a button
on the Pico wireless
control is pressed.
The button was not programmed correctly.
•
Follow the steps in Saving light levels and
shade/drapery positions to program the button.
The device is ‘unaffected’ for that button.
•
Follow the steps in Saving light levels and
shade/drapery positions to change the ‘unaffected’
status of the device.
The button pressed is the bottom button.
•
The bottom button cannot be saved or modified.
Devices are out of range.
•
Check to make sure all Pico controls, keypads,
dimmers, switches and shades/draperies are within
30 ft (9 m) of each other.
Note: Refer to the system Setup Guide for additional troubleshooting suggestions.
Assigning a GRAFIK Eye® Wireless Unit to the
Pico
® Wireless Control
5
Set the wireless mode on the GRAFIK Eye unit
to “Setup Mode”. Refer to the instructions that
came with the GRAFIK Eye unit.
Place the Pico wireless control into
Programming Mode by pressing and holding the
Top button and Bottom button for 3 seconds.
The GRAFIK Eye unit should display a screen
saying: “Pico: change type?”
Press OK on the GRAFIK Eye unit, select the
“Scene” type, then press OK.
Now hold the Top Scene button on the GRAFIK
Eye unit for 3 seconds. The scene LEDs should
start flashing and all zones should go to
maximum intensity.
Exit Programming Mode on the Pico wireless
control by pressing and Top button and Bottom
button for 3 seconds.
5.1
Scene Control
5.1.1
5.1.2
5.1.3
5.1.4
5.1.5
5.1.6
Zone Control
5.2
Set the wireless mode on the GRAFIK Eye unit
to “Setup Mode”. Refer to the instructions that
came with the GRAFIK Eye unit.
Place the Pico wireless control into Programming
Mode by pressing and holding the Top button
and Bottom button for 3 seconds.
The GRAFIK Eye unit should display a screen
saying: “Pico: change type?”
Press OK on the GRAFIK Eye unit, select the
“Zone” type, then press OK
Set a zone to a desired preset level, using the
Raise and Lower buttons on the GRAFIK Eye
unit. Then press and hold both the Raise and
Lower button until the Zone LEDs begin to flash.
Repeat step 5.2.5 for each zone that will be
controlled by the Pico wireless control.
Exit Programming Mode on the Pico wireless
control by pressing and holding the Top button
and Bottom button for 3 seconds.
5.2.1
5.2.2
5.2.3
5.2.4
5.2.5
5.2.6
5.2.7
6
Storing a Favorite Preset (not applicable to
GRAFIK Eye QS)
The round button on the Pico wireless control allows the user to
recall a favorite preset of all the devices assigned to that control.
Position the shade(s), drapery(ies) or light level
to the desired setting using the Raise or
Lower button on the Pico wireless control.
6.1
Press and hold the round button on the
Pico wireless control for 5 seconds. The
green LED on the control will flash rapidly
for 5 seconds, turn off for 5 seconds, flash
rapidly and turn off indicating the preset has
been stored.
6.2
FCC Information (For model number QSR4P-3R)
Note:
This equipment has been tested and found to comply with the limits for a Class B digital
device, pursuant to part 15 of the FCC rules. These limits are designed to provide reasonable
protection against harmful interference in a residential installation. This equipment generates,
uses and can radiate radio frequency energy and, if not installed and used in accordance with
the instructions, may cause harmful interference to radio and television reception, which can
be determined by turning the equipment off and on. The user is encouraged to try to correct
the interference by one or more of the following measures:
· Reorient or relocate the receiving antenna.
· Increase the separation between the equipment and receiver.
· Connect the equipment into an outlet on a circuit different from that
to which the receiver is connected.
· Consult the dealer or an experienced radio/TV technician for help.
Note:
Changes or modifications not expressly approved by Lutron
Electronics Co. could void the user’s authority to operate this equipment.
* This device complies with Part 15 of the FCC Rules.
Operation is subject to the following two conditions:
(1) This device may not cause harmful interference and
(2) This device must accept any interference received, including interference
that may cause undesired operation.
This Class B digital apparatus complies with Canadian ICES-003.
Lutron Electronics Co., Inc.
One Year Limited Warranty
For a period of one year from the date of purchase, and sub-
ject to the exclusions and restrictions described below, Lutron
warrants each new unit to be free from manufacturing defects.
Lutron will, at its option, either repair the defective unit or issue
a credit equal to the purchase price of the defective unit to the
Customer against the purchase price of comparable replace-
ment part purchased from Lutron. Replacements for the unit
provided by Lutron or, at its sole discretion, an approved
vendor may be new, used, repaired, reconditioned, and/or
made by a different manufacturer.
If the unit is commissioned by Lutron or a Lutron approved
third party as part of a Lutron commissioned lighting control
system, the term of this warranty will be extended, and any
credits against the cost of replacement parts will be prorated,
in accordance with the warranty issued with the commissioned
system, except that the term of the unit's warranty term will be
measured from the date of its commissioning.
EXCLUSIONS AND RESTRICTIONS
This Warranty does not cover, and Lutron and its suppliers are
not responsible for:
1. Damage, malfunction or inoperability diagnosed by Lutron or
a Lutron approved third party as caused by normal wear and
tear, abuse, misuse, incorrect installation, neglect, accident,
interference or environmental factors, such as (a) use of
incorrect line voltages, fuses or circuit breakers; (b) failure to
install, maintain and operate the unit pursuant to the operating
instructions provided by Lutron and the applicable provisions
of the National Electrical Code and of the Safety Standards of
Underwriter's Laboratories; (c) use of incompatible devices or
accessories; (d) improper or insufficient ventilation; (e)
unauthorized repairs or adjustments; (f) vandalism; or (g) an act
of God, such as fire, lightning, flooding, tornado, earthquake,
hurricane or other problems beyond Lutron's control.
2. On-site labor costs to diagnose issues with, and to remove,
repair, replace, adjust, reinstall and/or reprogram the unit or
any of its components.
3.Equipment and parts external to the unit, including those
sold or supplied by Lutron (which may be covered by a
separate warranty).
4. The cost of repairing or replacing other property that is dam-
aged when the unit does not work properly, even if the damage
was caused by the unit.
EXCEPT AS EXPRESSLY PROVIDED IN THIS WAR-
RANTY, THERE ARE NO EXPRESS OR IMPLIED
WARRANTIES OF ANY TYPE, INCLUDING ANY IMPLIED
WARRANTIES OF FITNESS FOR A PARTICULAR
PURPOSE OR MERCHANTABILITY. LUTRON DOES NOT
WARRANT THAT THE UNIT WILL OPERATE WITHOUT
INTERRUPTION OR BE ERROR FREE.
NO LUTRON AGENT, EMPLOYEE OR REPRESENTA-
TIVE HAS ANY AUTHORITY TO BIND LUTRON TO ANY
AFFIRMATION, REPRESENTATION OR WARRANTY
CONCERNING THE UNIT. UNLESS AN AFFIRMA-
TION, REPRESENTATION OR WARRANTY MADE BY
AN AGENT, EMPLOYEE OR REPRESENTATIVE IS
SPECIFICALLY INCLUDED HEREIN, OR IN STANDARD
PRINTED MATERIALS PROVIDED BY LUTRON, IT DOES
NOT FORM A PART OF THE BASIS OF ANY BARGAIN
BETWEEN LUTRON AND CUSTOMER AND WILL
NOT IN ANY WAY BE ENFORCEABLE BY CUSTOMER.
IN NO EVENT WILL LUTRON OR ANY OTHER PARTY
BE LIABLE FOR EXEMPLARY, CONSEQUENTIAL,
INCIDENTAL OR SPECIAL DAMAGES (INCLUDING, BUT
NOT LIMITED TO, DAMAGES FOR LOSS OF PROFITS,
CONFIDENTIAL OR OTHER INFORMATION, OR PRI-
VACY; BUSINESS INTERRUPTION; PERSONAL INJURY;
FAILURE TO MEET ANY DUTY, INCLUDING OF GOOD
FAITH OR OF REASONABLE CARE; NEGLIGENCE, OR
ANY OTHER PECUNIARY OR OTHER LOSS WHATSO-
EVER), NOR FOR ANY REPAIR WORK UNDERTAKEN
WITHOUT LUTRON'S WRITTEN CONSENT ARISING OUT
OF OR IN ANY WAY RELATED TO THE INSTALLATION,
DEINSTALLATION, USE OF OR INABILITY TO USE THE
UNIT OR OTHERWISE UNDER OR IN CONNECTION
WITH ANY PROVISION OF THIS WARRANTY, OR ANY
AGREEMENT INCORPORATING THIS WARRANTY, EVEN
IN THE EVENT OF THE FAULT, TORT (INCLUDING
NEGLIGENCE), STRICT LIABILITY, BREACH OF CON-
TRACT OR BREACH OF WARRANTY OF LUTRON OR
ANY SUPPLIER, AND EVEN IF LUTRON OR ANY OTHER
PARTY WAS ADVISED OF THE POSSIBILITY OF SUCH
DAMAGES.
NOTWITHSTANDING ANY DAMAGES THAT CUSTOMER
MIGHT INCUR FOR ANY REASON WHATSOEVER
(INCLUDING, WITHOUT LIMITATION, ALL DIRECT
DAMAGES AND ALL DAMAGES LISTED ABOVE), THE
ENTIRE LIABILITY OF LUTRON AND OF ALL OTHER
PARTIES UNDER THIS WARRANTY ON ANY CLAIM FOR
DAMAGES ARISING OUT OF OR IN CONNECTION WITH
THE MANUFACTURE, SALE, INSTALLATION, DELIVERY,
USE, REPAIR, OR REPLACEMENT OF THE UNIT, OR
ANY AGREEMENT INCORPORATING THIS WAR-
RANTY, AND CUSTOMER'S SOLE REMEDY FOR THE
FOREGOING,WILL BE LIMITED TO THE AMOUNT PAID
TO LUTRON BY CUSTOMER FOR THE UNIT. THE FORE-
GOING LIMITATIONS, EXCLUSIONS AND DISCLAIMERS
WILL APPLY TO THE MAXIMUM EXTENT ALLOWED BY
APPLICABLE LAW, EVEN IF ANY REMEDY FAILS ITS
ESSENTIAL PURPOSE.
TO MAKE A WARRANTY CLAIM
To make a warranty claim, promptly notify Lutron within the
warranty period described above by calling the Lutron Techni-
cal Support Center at (800) 523-9466. Lutron, in its sole dis-
cretion, will determine what action, if any, is required under this
warranty. To better enable Lutron to address a warranty claim,
have the unit's serial and model numbers available when mak-
ing the call. If Lutron, in its sole discretion, determines that an
on-site visit or other remedial action is necessary, Lutron may
send a Lutron Services Co. representative or coordinate the
dispatch of a representative from a Lutron approved vendor to
Customer's site, and/or coordinate a warranty service call
between Customer and a Lutron approved vendor.
This warranty gives you specific legal rights, and you may
also have other rights which vary from state to state. Some
states do not allow limitations on how long an implied warranty
lasts, so the above limitation may not apply to you. Some
states do not allow the exclusion or limitation of incidental or
consequential damages, so the above limitation or exclusion
may not apply to you.
© 2010 Lutron Electronics Co., Inc.
Contact Information
Internet: www.lutron.com
E-mail: [email protected]
WORLD HEADQUARTERS
USA
Lutron Electronics Co., Inc.
7200 Suter Road, Coopersburg, PA
18036-1299
TEL +1.610.282.3800
FAX +1.610.282.1243
Toll-Free 1.888.LUTRON1
Technical Support 1.800.523.9466
North and South America
Technical Hotlines
USA, Canada, Caribbean: 1.800.523.9466
Mexico: +1.888.235.2910
Central/South America: +1.610.282.6701
EUROPEAN HEADQUARTERS
United Kingdom
Lutron EA Ltd.
6 Sovereign Close, London,
E1W 3JF United Kingdom
TEL +44.(0)20.7702.0657
FAX +44.(0)20.7480.6899
FREEPHONE (UK) 0800.282.107
Technical support +44.(0)20.7680.4481
ASIAN HEADQUARTERS
Singapore
Lutron GL Ltd.
15 Hoe Chiang Road,
#07-03 Euro Asia Centre, Singapore 089316
TEL +65.6220.4666
FAX +65.6220.4333
Asia Technical Hotlines
Northern China: 10.800.712.1536
Southern China: 10.800.120.1536
Hong Kong: 800.901.849
Indonesia: 001.803.011.3994
Japan: +81.3.5575.8411
Macau: 0800.401
Singapore: 800.120.4491
Taiwan: 00.801.137.737
Thailand: 001.800.120.665853
Other countries: +65.6220.4666
Warranty
CE Information (For model numbers QSR8P-3R, QSRKP-3R,
QSRMP-3R, QSRKP-2R, QSRMP-2R, QSRKP-2 and QSRMP-2)
Lutron Electronics hereby declares that the model numbers listed above are in
compliance with the essential requirements and other relevant provisions of
Directive 1999/5/EC. A copy of the DoC can be obtained by writing to:
Lutron Electronics Co., Inc. 7200 Suter Road, Coopersburg, PA 18036 U.S.A.
Lutron Elec tron ics Co., Inc.
7200 Suter Road Coopersburg, PA 18036-1299
Made and print ed in the U.S.A. 06/10 P/N 045-304 Rev. B
Lutron, Claro, Satin Colors, GRAFIK Eye, Pico, the sunburst logo are registered trademarks and FASS is a trademarks of Lutron Electronics Co., Inc.
©2010 Lutron Electronics Co., Inc.
Returning Pico wireless controls to Factory Settings
Note: Returning a Pico wireless control to its Factory Settings will remove
it from the system and erase all programming.
Step 1: Triple tap and hold either the Top or Bottom button on a Pico wireless control.
DO NOT release the button after the third tap.
Step 2: Keep the button pressed on the third tap until the LED next to the top button
turns on solid (approximately 3 seconds).
Step 3: Immediately release the button and triple tap it again. The LED next to the top
button will flash quickly. When the LED stops flashing, the control has been
returned to Factory Settings.
Complies with
IDA standards
DA 103083
IDA Compliance Information (For model numbers QSRMP-3R,
QSRMP-2R and QSRMP-2)
TRA
REGISTERED
NO:
ER0037292/10
DEALER NO:
0016561/08
TRA Compliance Information (For model numbers QSR8P-3R,
QSRKP-3R, QSRKP-2R and QSRKP-2)
/