Page is loading ...

INSTRUCTION MANUAL (en)

Welcome
This manual is designed to be a reference tool for the installation and operation of your system;
you can find information about the DVR features and functions, as well as, a detailed explanation
of the menu trees.
Before installation and operation please read the following safeguards and warnings carefully!
Important Safeguards and Warnings
Do not place heavy objects on the DVR.
Do not let any liquids spill onto or into the DVR.
Please ensure fans and vent openings are not blocked and that the unit is placed in an area with
adequate air circulation.
Do not try to disassemble or replace components other than the installation of the hard disk
drive.
Environment
Please place and use the DVR in an area that can maintain a temperature range of 0°C to 40°C
(32°F to 104°F).
Avoid placing the DVR in direct sunlight and keep away from any heat source.
Do not install the DVR in a damp environment.
Do not use the DVR in a smoky or dusty environment.
Please ensure that the DVR is placed on a level and stable workplace.
Please install it in a well ventilated area and please keep all vents clean and clear.
Use only the AC adapter included with your DVR and within the voltage ratings noted on the
adapter.

Directory
1 Production Introduction ............................................................................................................................ 1
1.1 Product overview ........................................................................................................................... 1
1.2 Main functions ............................................................................................................................... 1
2 Open-package check and cable connections .......................................................................................... 2
2.1 DVR package contents .................................................................................................................. 2
2.2 Hard disk installation ..................................................................................................................... 2
2.3 Front panel..................................................................................................................................... 3
2.4 Rear panel ..................................................................................................................................... 4
2.5 Port Connection Overview ............................................................................................................. 4
2.6 Audio and video input and output connections ............................................................................. 5
2.6.1 Video input connections ...................................................................................................... 5
2.6.2 Video output connections and options ................................................................................ 5
2.6.3 Audio signal input ................................................................................................................ 5
2.6.4 Audio signal output .............................................................................................................. 5
2.8 Speed dome connections .............................................................................................................. 6
3 Basic operation ........................................................................................................................................ 7
3.1 Preview .......................................................................................................................................... 7
3.2 System Login ................................................................................................................................. 8
3.3 Desktop shortcut menu ................................................................................................................. 8
3.3.1 Main menu ........................................................................................................................... 9
3.3.2 Record Mode ..................................................................................................................... 10
3.3.3 Search/Playback ............................................................................................................... 10
3.3.4 PTZ control ........................................................................................................................ 14
3.3.5 Tour setup .......................................................................................................................... 20
3.5.6 Audio Adjust ....................................................................................................................... 21
3.3.7 Logout................................................................................................................................ 21
3.3.8 Window switch
................................................................................................................... 22
4 Mai
n menu ............................................................................................................................................. 23
4.1 Main menu navigation ................................................................................................................. 23
4.2 Search/Playback .......................................................................................................................... 24
4.3 Record ......................................................................................................................................... 24
4.3.1 Record ............................................................................................................................... 24
4.3.2 Record Conf ...................................................................................................................... 25
4.3.3 Region Cover .................................................................................................................... 26
4.4 HDD Manage ............................................................................................................................... 27
4.5 System setup ............................................................................................................................... 28
4.5.1 Language .......................................................................................................................... 28
4.5.2 Date/Time .......................................................................................................................... 29
4.5.3 Account .............................................................................................................................. 30
4.5.4 GUI Display ....................................................................................................................... 34
4.5.5 Video ................................................................................................................................. 35
4.6 Advanced ..................................................................................................................................... 36
4.6.1 Alarm Set ........................................................................................................................... 36
4.6.1.1 Mail .......................................................................................................................... 37

4.6.1.2 Video Blind .............................................................................................................. 38
4.6.1.3 Alarm Management ................................................................................................. 39
4.6.2 Version............................................................................................................................... 39
4.6.3 Motion Detect .................................................................................................................... 40
4.6.5 Auto Maintain ..................................................................................................................... 42
4.6.6 PTZ Configure ................................................................................................................... 45
4.6.7 Network ............................................................................................................................. 46
5 FAQ and maintenance ........................................................................................................................... 51
5.1 FAQ .............................................................................................................................................. 51
5.2 Maintenance ................................................................................................................................ 55
Appendix 1. Remote control operation ..................................................................................................... 57
Appendix 2. Mouse operation ................................................................................................................... 58
Appendix 3.Hard disk capability calculation ............................................................................................. 59
Appendix 4. Technical Specifications ........................................................................................................ 60

- 1 -
1 Production Introduction
1.1 Product overview
This series DVR is designed especially for security purposes which makes it an outstanding digital
surveillance product. It introduces an embedded LINUX operating system which is more stable. It
introduces the standard H.264mp video compressed format and G.711A audio compressed format
which ensures the highest quality image, low error coding ratio, and single frame playing. It utilizes
TCP/IP network technology which achieves the strongest network communication and
telecommunication ability.
This DVR can be used individually or online as part of your safety surveillance network and with the
included professional network video surveillance software, it can help you to maintain a strong
communication and telecommunication network.
1.2 Main functions
Real-time surveillance
Analog interface and VGA interface (VGA interface is equipped selectively)
Surveillance function through monitor or display
Data Storage
User selected motion activated hard drive “sleep” and “wake” functions to extend storage capacity and
extend life-span.
Special storage format which insures data safety.
Compression
Real-time compression by individual hard drive which insures the audio and video signal synchronization
and stability.
Backup
Through SATA and USB interface and also through Internet download.
Playback
Individual real-time video recording, as well as, search, playback, network surveillance, recording check,
and downloading.

- 2 -
Multi-playback mode.
Internet operating
Internet surveillance in the real time
PTZ control
Recording check and real-time playback
Communication interface
RS485 interface for PTZ control
Standard Ethernet network interface with RJ45 jack
intelligent operations
USB Mouse and backup/copy/paste functions
2 Open-package check and cable connections
2.1 DVR package contents
Please verify that there is not visible damage to the DVR and then verify the following:
• 4 channel H.264 DVR
• AC Power Supply
• Remote Control (requires 2 AAA batteries – not included)
• USB Optical Mouse
• (4) Screws to Mount HDD
• Installation CD
• User Manual
• Quick Guide
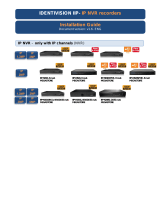
2.2 Hard disk installation
Install SATA hard disk drives before completing the initial software setup. (The below images are just
used to show how to install hard disk. The DVR in the photos is not the DVR in the package.)

- 3 -
1. Remove case screws 2. Remove cover. 3. Install SATA hard drive
4.Connect SATA data cables 5. Install SATA power cables 6. Replace cover
7. Replace screws
2.3 Front panel
(1) IR remote receiver (2) Power indicator light (3) Previous file/1 (4) HDD indicator light
(5) Next file /2 (6) PTZ /8 (7) Slow play /3 (8) HDD Info/9
(9) Fast play/4 (10) Backward pause/5 (11) Record /0 (12) Play Pause /6
(13) Function switch (14) Search video/7 (15) USB (16) ESC
(17)Left (18) Up (19)Down (20) Menu/Enter (21) Right

- 4 -
2.4 Rear panel
(1) Video input (2) BNC output (3) audio output (4) audio input (5) Power supply
(6) USB/Mouse* (7) Network (8) VGA output (9) RS485
*NOTE* if the rear USB mouse port is used then the front USB port becomes non-functional.
2.5 Port Connection Overview
Picture 2.1 Connection Diagram

- 5 -
2.6 Audio and video input and output connections
2.6.1 Video input connections
The video input ports utilize a BNC connector plug with an input signal of NTSC BNC (1.0V
P-P
, 75Ω).
The video lines should be firmly connected to avoid signal interference and possible oxidation at the
connection.
2.6.2 Video output connections and options
The video output is divided into NTSC BNC (1.0V
P-P
, 75Ω) and VGA (selective configuration).
Please note the following regarding the display used for monitoring:
1. Do not leave the display on for long periods of time.
2. Stay away from any electromagnetic interference.
2.6.3 Audio signal input
Audio port is a BNC connector.
The audio signal line should be firmly connected to avoid signal interference and possible oxidation
at the connection.
2.6.4 Audio signal output
Normally the output parameter of DVR audio signal is greater than 200mv 1KΩ (BNC) which can be
connected to low impedance earphones, speakers, or other audio output equipments through a
power amplifier. If the speakers and microphone cannot be isolated, feedback often occurs. The
following are some suggestions to help correct this issue:
1. Use a higher quality microphone.
2. Adjust the speaker volume to be under the threshold that produces the feedback.
3. Use materials that will absorb the sound and reduce reflection of the sound.
4. Adjust the layout of the speaker and microphone.
2.7.
PTZ connections
1. PTZ decoder connections
1. The grounding of a PTZ decoder and DVR must be shared otherwise the common-mode voltage

- 6 -
could result in PTZ control failure - shielded twisted pair cable is recommended.
2. Avoid high voltage connections and use surge protectors.
3. When connecting use 120Ω resistance, paralleled, to ensure the signal quality.
4. The 485 AB lines of DVR cannot be connected with other 485 output equipment that is paralleled.
5. The voltage between the AB lines of the decoder must be less than 5V.
2. Front equipment grounding note
Incorrect grounding can result in damage to the unit.
3. PTZ input type unlimited
Parameter meaning
485T+/A,485T-/B 485communication interface which is connected with the
recording control equipments such as the decoder
2.8 Speed dome connections
1. Connect the 485 lines of the speed dome with the DVR 485 interface.
2. Connect the video line to the DVR video input.
3. Power on the speed dome.

- 7 -
3 Ba
sic operation
Note: Any buttons that are displayed in gray indicates it is not supported.
3.1 Preview
Picture3.1 4 Channel Preview
You can right click your mouse to switch between the windows.
The system date, time, channel name, surveillance video, and the alarm status are shown in each
window.
1
Rec
ording status 3
Audi
o
2
Mot
ion detect 4
Vi
deo loss
Table 3.1 Preview icon

- 8 -
3.2 System Login
When the DVR boots up, the user must login and then the system will provide the corresponding
functions with that particular user’s authority level. There are three user settings: admin, guest and
default and these settings initially have no password assigned. Admin is the administrator level
while guest and default’s permissions are “preview” and “video playback” only. User admin and
guest’s password can be revised, while their permissions cannot be revised; user default is the
default login user whose permission can be revised but not its password.
Picture 3.2 System Login
Password protection: If the password is entered incorrectly three times, the alarm will start. If
the password is entered incorrectly five times, the account will be locked.
(After 30 minutes or if the unit is rebooted, the account will be unlocked and you can try to
enter the password again).
For your system security, please modify your password after first login.
3.3 Desktop shortcut menu
In preview mode you can right click your mouse to get a desktop shortcut menu. The menu includes:
main menu, record mode, Search, PTZ control, Start Tour, Volume regulate, Logout, view is
for 1/4/8/9/16 channel screens.

-
9 -
Pi
cture 3.3 Shortcut Menu
3.3.1 Main menu
When you login, the system main menu is shown as below.
Picture3.4 Main Menu

- 10 -
3.3.2 Record Mode
Please check current channel status: “○” means it is not in recording status, “●” means it is in
recording status.
You can use the desktop shortcut menu or click [main menu]> [recording function]> [recording
set] to enter the recording control interface.
Picture 3.5 Record Mode
【Schedule】Record according to the configuration.
【Manual】Click the “All” button and all channels will record no matter which state the individual
channel is set to. Clicking the individual channels will allow only those particular channels
to record.
【Stop】Click the “Stop” button and all channels will stop recording no matter which state the
individual channels are set. Clicking the individual channels will stop the recording of that particular
channel.
3.3.3 Search/Playback
There are two methods for you to play the video files on the hard drive(s).
1. In the desktop shortcut menu - Main menu -> Search.
Note: The hard drive that saves the video files must be set as read-write or read-only state. (3.5.1)

- 11 -
Picture 3.6 vide
o playback
1. Listed files 2. File information 3. File searching
4. File backup 5. Operation hint 6. Playback control
【Listed files】Look up the listed files that are contained within that search criteria.
【File information】Look up the found file information.
【File searching】Search the file according to the searching parameter.
Picture 3.7 file searching
1
3
2
4
56

- 12 -
File type: Set the searching file type.
HDD type: Set the searching HDD type.
Channel: Set the searching channel.
Start Time: Set the searching start time scan.
End Time: Set the searching end time scan.
【File backup】Backup the chosen file. Click the button and operate as directed.
Note: The storage drive must be installed before the file can be backed-up. If the backup is
terminated any files already backed-up can be played-back individually.
Picture 3.8 detect storage device
Detect: Detect the storage device connected to the DVR such as hard drive or USB drive.
Erasure: Choose the file to delete and click erase to delete the file.
Stop: Stop the backup.
Backup: Click backup button and a dialog box will open. You can choose the backup file
according to the type, channel and time.

- 13 -
Picture 3.9 recording backup
Remove:Clear file information.
Add:Show file information meeting the set file attributes.
Start/Pause:Click the play button to start the backup and click the pause button to stop the
backup.
Cancel:During backup you can exit the page layout to carry out other functions.
【Playback control】Refer to the following sheet for more information.
Button Function Button Function
/
Play/pause
Backward
Stop
Slow play
Fast play
Previous frame
Next frame
Previous file
Next file
Circulation
Full screen
Table 3.2 Playback control key
Note: Frame by frame playback is only performed in the pause playback state.

- 14 -
*Hint* You can display the function by placing the cursor on that area.
Special functions:
Accurate playback:Input time (h/m/s) in the time column and then click the play button. The
system will perform an accurate playback according to the search time entered.
Local zoom:When the system is in a single-window full-screen playback mode, you can drag your
mouse onto the screen to select a section and then left click the mouse to activate the
local zoom. You can right click the mouse to exit.
3.3.4 PTZ control
Operation functions include: PTZ direction control, step, zoom, focus, iris, and setup operation,
patrol between spots, trail patrol, boundary scan, assistant switch, light switch, level rotation and so
on.
Note1. Decoder A (B) line connects with DVR A (B) line.
2. Click [main menu] > [system configuration] > [PTZ setup] to set the PTZ parameters.
3. The PTZ functions are decided by the PTZ protocols.
Picture 3.10 PTZ setup
【Speed】Set the PTZ rotation range. Default range: 1 ~ 8.
【Zoom】Click
/ button to adjust the zoom multiple of the camera.
【Focus】Click
/ button to adjust the focus of the camera .

- 15 -
【Iris】Click / button to adjust the iris of the camera.
【Direction control】Control the PTZ rotation. 8 direction controls are supported (4 directions in Front
panel are supported)
【High speed PTZ】Full-screen show channel image. Left click your mouse and you can control the
PTZ rotate orientation. Left click your mouse and then rotate the mouse to
adjust the multiple zoom options of your camera.
【Set】Enter the function operation menu.
【Page switch】Switch between different pages.
Special functions:
1. Preset
Set a location for the preset, call the preset point, and the PTZ will turn to the preset position.
1)To set the Preset option:
Step1: As shown in Picture 3.10, click any of the Direction buttons and the PTZ will turn to that
position, click the Set button to enter that position as shown in Picture 3.11.
Step 2: click the Preset button, and then enter the preset points in the input blanks.
Step 3: click the Set button and the PTZ Control window will open, shown in Picture 3.10, and this
completes the setup of preset points and preset positions.
To clear Preset:Input preset points, click Remove button to remove the preset.
Picture 3.11 Preset Settings
Preset button
Preset point input blank

- 16 -
2)Preset Point Calls
Click the Page Switch button to enter the PTZ control interface as shown in Picture 3.12. In the
input blank, enter the preset points and then click the Preset button and the PTZ will turn to the
corresponding preset point.
Picture 3.12 PTZ Control
2. Touring between Points
1)Touring between Point Settings
Tour lines are connected by multiple preset points, to set the preset points:
Step1: as shown In Picture 3.10, the Directional keys will turn the PTZ to any desired location,
and then click the Set button to enter that location (Picture 3.13),
Step 2: click the Tour button, enter that value into the Tour Line and Preset Points blanks,then
click “Add Preset Points” button to complete the settings (you can also add and delete
Tour lines which have been previously set up)
Step 3: repeat steps1 and step 2, until all of the preset designated Tour points have been
entered.
Remove Preset:Input preset value in the blank, click Remove Preset button to remove the
preset points.
Remove Tour Line:Input the number of the Tour line, click Del Tour button to remove the Tour
line setting.
Value input blank
/