Page is loading ...

Before using this model, please read this manual carefully!
Permitted in:
EU, CH
40 MHz Ref. 00 5796
Permitted in:
D, A, E, GB, GR, I, NL, CH, B, Fl
35 MHz Ref. 00 5795
30.11.05
Dop.
1
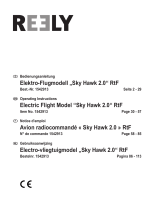
ca. 1010 mm
ca. 750 mm
ca. 15,8 qdm
ca. 610 g
9,6 Volt 600mAh
3/4-Kanal
Decathlon 480
Easy to build
Easy to fly
Bellanca
Inh. Erich Natterer
Am Lauerbühl 5
D-88317 Aichstetten
Fax 07565/9412-23
Service-Hotline:
0180/5913123
www.jamaratoys.de
Important Notice - Please read carefully!
Attention!
This radio controlled model is not a toy!
Not suitable for children under 14 years.
- There are small parts contained, which might be swallowed (keep away from small children)
- This model is constructed for best performance, all manipulations on ist structure are forbidden and lead to an immediate
loss of warranty
- Keep packing and all other parts including manual at hand
-Never use this model on wet grounds, the electric parts could be damaged
Q.S.
4 Channel
GB

3 2
Information
Conformity-explanation
The company Jamara model technology declares that the model
“ARA” conforms to the guidelines of the FTEG 1999/5/EG .
This model “ARA” comprises Transmitter + receiver!
The model conforms to the guidelines of the R & TTE
If you have any questions to the conformitiy please contact our service centre:
Jamara Modelltechnik; Am Lauerbühl 5, D-88317 Aichstetten; Fax: +49 (0)
7565/9412-23; [email protected].
Communication regulations:
40 MHz: Restrictions for radio controlled equipment with 40 Mhz
changeable crystal .
The radio systems is equiped with changeable crystals wich are considered as
hamonized in the states of the european community (device class1)
Devidces of class 1 are allowed to be used with out restriction of any kind within the
european community.
A change of the crystals is only allowed under consideration of the accredited class 1
frequencies. Otherwise the products must be considered as device class 2 and needs
to be announced.
35 MHz: Restrictions for radio controlled equipment with 35 Mhz
changeable crystal .
If you have any questions about the right choice of the channel, or for further questions
please consult our service or your local shop. Further information can be found in the
JAMARA main katalog 04/05 in the “Euro-Frequenz-Tabelle” on page 102.
We'd like to point out that the responsibility for the device lies in the hands of
the user, please consider the laws of your country.
Frequency of device class 1: 40 Mhz (40.665,40.675, 40.685, 40.695) . If you have
any questions about the right choice of the channel, or for further questions please
consult our service or your local shop. Further information can be found in the
JAMARA main katalog 04/05 in the “Euro-Frequenz-Tabelle” on page 102.
Scope of delivery and parts-list
1) Fuselage
Ref.Nr. 165157
2) Cowl
Ref.Nr. 165160
3) Main-wing
Ref.Nr. 165156
4) Elevator/Rudder
Ref.Nr. 165159
5) Propeller
Ref.Nr. 165163
6) Rod-Sett
Ref.Nr. 165165
7) Landing-gear
Ref.Nr. 165158
8)Tailgear
Ref.Nr. 165161
9) Rods
Ref.Nr. 165162
10) Battery-pack
Ref.Nr. 165166
10)Motor
Ref.Nr. 165167
11) Controller
Ref.Nr. 165164
Please notice!
After flight:
Important: After a hard landing you should alwas check your plane carefully, wether it has any damage. Sraighten all parts, which aren't settled correctly and, if needed replace
loose or damaged parts. Never repair defekt propellers, please replace them with the included air screws.
Storing the plane:
Keep your plane in the original box and in a safe place, to avoid damage. Always take out the flight accu and the batteries, to avoid damage caused by running out parts
Important: After a hard landing you should alwas check your plane carefully, wether it has any damage. Sraighten all parts, which aren't settled correctly and, if needed replace
loose or damaged parts. Never repair defekt propellers, please replace them with the included air screws.
Recommended for flight
Charger for the
connection to a 230 V
socket. In box content.
One Flight rechargeable battery-pack is
included in box content.
To make more than one flight at a time, we
suggest to buy several more battery-packs.
(Best. Nr. 165166).
Radio control:
(1) Radio control
(in box content)
(2) Batteries (Mignon)
(not included in box content)
Charger and batteries:
Required Tools:
(Not in box content included) Hobby knife
Screwdriver
As charger for 230V socket and 12V- connection
(car battery), we recommend the X-Peak 5 Ref. No.
15 1900, which includes an automatic charging stop, as
soon as the accu is fullcharged.
(Not included in box content)
Where and how to fly
Choose an open space, far away from houses,
power lines, trees and water, streets and airports.
Beginners should choose a calm day with no wind.
Completely pull out the antenna. Use the vane attached
to the antenna to check the wind force and direktion.
If the vane drifts in an angle of >30° you shouldn't fly.
Wind force OK Wind force too strong,
do not fly.
Special airstreams
Air currents may
occur behind
buildings, while drop
winds may occure
at steep slopes.
Avoid to fly in these
areas, because they
are dangerous.
Avoid the use of same frequencies!
Before starting your model make sure that there
are no other RC-models around you. A second
plane with the same frequency can cause
interferences what may lead into the loss of
control over your or the other plane. If you fly
with two or more models always check frequencies
before the start! If you have two models with the
same frequencies always stay at least 1km away
from the other plane.If you're not sure of the used
frequencies always keep this distance for savety
reasons!
Disposal information:
Please care for a environmental correct and legal way of disposing
the batteries and/or accus. Please, only throw away empty accus into the collect-
boxes in your local shops or commune. (Normally discharge the flying)accus, when
the model stops
21
3
44
10
7
8
5
This RTF-model can
easily be converted
into an aileron-model!
(conversion-kit included in this
package!)
Accessories:
(not included in this package!)
(for aileron-model)
Servo XT-MicroBlue
Ref. Nr. 07 4210
Conversion-kit for
aileron-plane!
(included in this kit!)
6
9

4
5
2. Charging the flight accu
Recharge the flight accu at a socket with the in the box included
recharging gear. Because you don't known how much capacity is
left in the accu, you should check the temperature every 20
minutes, to avoid an overcharging. The recharging of an
empty accu takes about 3 hours. Make sure, that you don't
overcharge the accu, and let warm accus cool out befor
you recharge them.
The accu is fully recharged, when it gets warm (max. 45°C). Disconnect the accu from the recharging gear
and let it cool out completely, before you mount it in the model. As charging gear for 230V socket and 12V
connection (car battery) we suggest the X-Peak 5 Ordering No. 15 1900, which has an automatic charging
stop, when the accu is fullcharged.
Battery care
To conserve the performance of the battery, it should be completely discharged and recharged after every
10 flights.To do so, turn on the transmitter and keep the motors running, until they stop from alone. Recharge
the battery after it has cooled out. During the recharging, take care that the battery doesn't get to hot. If the battery
gets warm (~45°), disconnect it from the charger, it is completely charged now.
The flight time with constantly running motors is about 7 minutes. As soon as the motor stops from itself
(only proportional controlled models), land the model, to prevent a low level discharging of the batteries. Get
several more battery-packs to make longer flights, as long as your using one to fly, you can recharge the other.
1. Power for the transmitter
The transmitter should use 8AA Mignon Alkali-batteries or
Ni-Mh-Akkus. Take care that you are always using full batteries
and accus for flight. Open the cover and put 8 Mignon-Cells or
accus into the transmitter.When starting up the transmitter,
red and green lights have to glow.
If the lights are not glowing or if the are glowing weak, do not
start the model under all circumstances, because it could get
out of control.
Also check the indication during the flight, if the green lamp
glows weaker, or stops glowing, land the model as soon as
possible.
Change Batteries, or recharge them with a common recharging
gear.
Power supply
3. Power supply for the receiver, servos and the motor:
The power supply for the RC-components is through the BEC-support of the
flight battery. To secure a save power supply, the RC-components are
connected to the ESC or the motor switch, what secures a save landing
even if the battery is almost empty.
IMPORTANT!
1. First turn on the loaded transmitter.
Be sure that the motor switch is turned off.
2. Now the flight battery can be connected.
3. After the flight, first disconnect the flight battery.
Insert the flight battery through
the plane's battery-window.
!
Assembly
Attachment of the wing linkage:
Connect the rudder-linkage with the rudder-horn
as shown in the picture. Bend the linkage that the
rudder is even with the wing. Rookies should use
soft or medium sensitivity.
Mount the main-wing by using the elastic
bands. Mount 2 bands crossed and 2 bands
parallel. (Like shown in the picture)
Use a small amount of glue and fix the
tail-gear with a small stripe of
adhessive tape.
Mount the wing-mounts like shown in
the picture.
After the glue is completely dry, check
the position of the tail-gear.
Mount the rudder and wing into the
slots in the fuselage using a small
amount of glue.
You can adjust the tail-gear’s position
by bending the rod’s sleeve.
Remove the protective film from the
adhessive tape
Stick together the tail-gear and
elevator-wing
Ad a small amount of glue
Mount the spinner with the included
screws
Mount the propeller as shown in the
picture
Mount the landing gear while slightly
pressing together the gear rods
falsch
Ruler
Rudder Wing
Rod
Rudderhorn
Ruderhorn Sensibilität
Soft sensitivity
medium sensitivity
high sensitivity
Fläche Rumpf
Warning
If the batteries are charged with
improper terminals, the batteries
may leak. Do not mix different
batteries. Always use same kind
and fresh new batteries.
close the battery-window

6
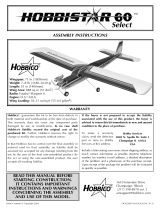
Antenna
Changable frequency
Power switch
Trim
Trim
OK NO NO
Not fly Check battery
CH 4
3 channels functions
throttle (up / down)
4 channels functions
rudder (left / right)
throttle (up / down)
For 3 channel version:
Rudder can be set on the left stick through changing
the plug on the reciever into place 4 .
For 4 channel version:
Aileron can be changed with rudder.
(By changing the plugs on the receiver
from place 1 to place 4 and viseversa)
Left controlstick Right controlstick
Both lights should be ON when the switch is in the on position
which denotes proper battery installation, otherwise please
check if batteries were installed upside-down or you may need
to replace with them fresh Batteries.
Standard
(see pic.)
CH1-3 Standard functions
CH4 free for 4. Outlet (aileron-version),
please puts in after demand,
Attention!
Please make an rudder moving direction check
CH 2
CH 1
CH 2
CH 1
CH 3
CH 3
CH 4
Attention!
Before you the transmitter switching ON,
you bring the left throttelstick in OFF position.
(Screen-system)
The propeller cannot run. Motor = AusMotor = Aus
Indicating light
Instruction Manual for QS 4 Radio-System
7
Start
Batterien einlegen:
Battery installation:
Accessories:
8x AA sized batteries required
You can also use 8xAA sized rechargable batteries
(not included)
Warning
If the batteries are
loaded with improper
terminals, the batteries
may leak. Do not mix
different batteries.
Always use the same
kind of fresh new
batteries.
Battery cover
Press and push
Transmitter
3 channel
Transmitter CH1= Receiver place 1
Transmitter Ch2= Receiver place 2
Transmitter CH3= Receiver place 3
Transmitter CH4= Receiver place 4
Receiver, servos, speedcontroler and accu connecting
CH1=1
CH2=2
CH3=3
CH4=4
Speedcontroler
Accu
motor connecting wire
Receiver
CH1 CH2 CH3 CH4 elevator servo
rudder servo aileron servo
Elevator Servo
Rudder servo
(not included)
4 channel
tuning-set
to airplane
with aileron
Plug connection
Servo reverse
for all 4 funktions
3 and 4 channels functions
Elevator (up / down)
4 channels function
aileron (left / right)
3 channels function
rudder

6
Antenna
Changable frequency
Power switch
Trim
Trim
OK NO NO
Not fly Check battery
CH 4
3 channels functions
throttle (up / down)
4 channels functions
rudder (left / right)
throttle (up / down)
For 3 channel version:
Rudder can be set on the left stick through changing
the plug on the reciever into place 4 .
For 4 channel version:
Aileron can be changed with rudder.
(By changing the plugs on the receiver
from place 1 to place 4 and viseversa)
Left controlstick Right controlstick
Both lights should be ON when the switch is in the on position
which denotes proper battery installation, otherwise please
check if batteries were installed upside-down or you may need
to replace with them fresh Batteries.
Standard
(see pic.)
CH1-3 Standard functions
CH4 free for 4. Outlet (aileron-version),
please puts in after demand,
Attention!
Please make an rudder moving direction check
CH 2
CH 1
CH 2
CH 1
CH 3
CH 3
CH 4
Attention!
Before you the transmitter switching ON,
you bring the left throttelstick in OFF position.
(Screen-system)
The propeller cannot run. Motor = AusMotor = Aus
Indicating light
Instruction Manual for QS 4 Radio-System
7
Start
Batterien einlegen:
Battery installation:
Accessories:
8x AA sized batteries required
You can also use 8xAA sized rechargable batteries
(not included)
Warning
If the batteries are
loaded with improper
terminals, the batteries
may leak. Do not mix
different batteries.
Always use the same
kind of fresh new
batteries.
Battery cover
Press and push
Transmitter
3 channel
Transmitter CH1= Receiver place 1
Transmitter Ch2= Receiver place 2
Transmitter CH3= Receiver place 3
Transmitter CH4= Receiver place 4
Receiver, servos, speedcontroler and accu connecting
CH1=1
CH2=2
CH3=3
CH4=4
Speedcontroler
Accu
motor connecting wire
Receiver
CH1 CH2 CH3 CH4 elevator servo
rudder servo aileron servo
Elevator Servo
Rudder servo
(not included)
4 channel
tuning-set
to airplane
with aileron
Plug connection
Servo reverse
for all 4 funktions
3 and 4 channels functions
Elevator (up / down)
4 channels function
aileron (left / right)
3 channels function
rudder

8
Irrtum und technische Änderungen vorbehalten
Copyright JAMARA-Modelltechnik 2005
Kopie und Nachdruck, auch auszugsweise,
nur mit Genehmigung von JAMARA.
Start by hand
During the flight:
The flight direction is controlled by rudder and aileron. The model will be positioned in direction by moving over the
mainwing. When you fly to narrow turns, the model begins to sink slightly. You can control this by giving a little more
elevator.
Rise and sink is controlled by the elevator. Note that your model may tilt if the rising angle becomes to high due to the
loss of torque. If that happens put the controll sticks to neutral position. Due to its contruction, the plane will stabilize
itself. Especially when you fly near the ground take care that you fly allways fast enough.
Trim:
If your model flies corners without steering use the trim function of the
rudder and aileron to make sure that the plane flies straight on. If the
model rises or sinks without steering use the trim function of the elevator
to control that.
Maybe it's necessary to change the center of gravity
(as mentioned below!)
How to land:
As soon as the plane won't rise anymore with running Motor or the Motor
is stalled by the electronic speed control or power switch, you should
begin the landing. Keep the plane on a height of approx. 30m and pass
the pilot with the wind in the back of the plane. At approx. 20m height
turn the aircraft 180° and fly against the wind. Right before
ground-contact slightly pull the elevator to flatten your landing-angle.
Adjust the center of gravity
With the motor stalled and the elevator in neutral position the airplane
should glide with a slight sinking. If it's flying up and down all the time,
the center of gravity is to far back. Position the battery a little more to
the front. If it's sinking to fast the center of gravity is to far in the front.
Position the battery a little more to the back. Always use small steps
and save the battery from moving by placing foam dices around the battery
Flight instructions
Take off:
Check winddirection and windspeed by using a frequency flag.
Please don't start with strong winds. You may perhaps loose control of your plane!
You can launch the plane in two different ways: By hand or from the ground on a hard surface.
Always start against the wind! Set the throttle control stick to off position. Push the red start button on the
fuselage to allow the motor to turn. Set the speed control to full throttle and throw the airplane against the wind.
When starting from the ground move the airplane down a straight line by using the rudder. When the plane has
reached enough speed slightly pull the elevator.
No matter what kind of launching method you prefer keep care that the speed is high enough!
Always be very careful when flying your airplane.
/