Page is loading ...

20070091 REV 3 08/17
ELB / ELB-HA
INSTALLATION INSTRUCTIONS
800.533.3948 • www.barronltg.com
1
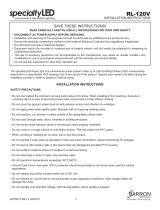
1. Secure anchor bolt to template plate.
2. Install anchor bolts in concrete. Pass electrical wires
through center hole in anchor bolt template.
3. Remove Dome Assembly from bollard tube
by removing (4) tamper resistant screws.
Tamper
Resistant
Screws
Dome
Assembly
LED
Driver
Bollard
Tube
2 Pin Terminal
Blocks
Fig. 1
Fig. 2
3.54
3.54
45°
5.00 BOLT CIRCLE
6.00
1.18
.375-16 THREAD
1.00 HOOK
Fig. 3
3 Pin Terminal
Blocks
4. High Abuse option (HA) proceed to step 4a.
for all other option, skip step 4 and 7.
IMPORTANT SAFEGUARDS
READ AND FOLLOW ALL SAFETY INSTRUCTIONS.
When using electrical equipment, basic safety precautions should always be followed including the following:
• DISCONNECT AC POWER SUPPLY BEFORE SERVICING.
• Installation and servicing of this equipment should be performed by qualified service personnel only.
• Ensure the electricity connections conform to the National Electrical Code and local regulations if applicable.
• Do not mount near gas or electrical heaters.
• Equipment should be mounted in locations and at heights where it will not readily be subjected to tampering by
unauthorized personnel.
• The use of accessory equipment not recommended by the manufacturer may cause an unsafe condition. Any
modification or use of non-original components will void the warranty and product liability.
• Do not use this equipment for other than intended use.
SAVE THESE INSTRUCTIONS!

800.533.3948 • www.barronltg.com
2
20070091 REV 3 08/17
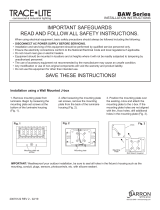
4a. Remove Bollard Tube from the Base Plate by removing (4) tamper resistant
screws. (Fig. 4)
5. Remove Center Column from Base Plate by removing (4) screws. (Fig. 5)
6. Secure and level Base Plate to anchor bolt template, installing washer,
lock nut and nut.
7. Reinstall Center Column to Base Plate, then align Bollard Tube (Fig. 6)
to Center Column retightening (4) screws.
8. Run electrical wires 3ft. minimum through center column before attaching to base.
9. Make electrical connections. Cap all unused leads to prevent shorting. This
fixture auto adjusts for voltages between 120 – 277VAC. (See Detail A)
a. Connect the line fixture lead to the black supply lead.
b. Connect the common fixture lead to the white supply lead.
c. Connect the ground lead from the service to the green grounding lead.
10. Install Dome Assembly to Bollard Tube, retightening (4) tamper resistant
screws. (Fig. 3)
TROUBLE SHOOTING
ELB-HA does not turn “ON”.
1. Check incoming voltage to LED driver. Must be at least a minimum of 120VAC and no greater than 277VAC.
2. Are all the LEDs on the light engine “OFF”? If so, LED driver may be defective. Using a voltmeter, check to see if
voltage is present at the output of power supply. If low or no voltage, then replace power supply.
3. If any individual LEDs are “OFF” the LED light engine is defective. Please have the serial number off the light engine
available when you contact technical support.
Bollard
Tube
Base
Plate
Base
Plate
Center
Column
Fig. 4
Fig. 5
Bollard
Tube
Support
Column Fins
Fig. 6
Detail A
Tamper
Resistant
Screws
ELB / ELB-HA
INSTALLATION INSTRUCTIONS
GRN
WHT
BLK
SURGE
PROTECTOR
GRN
GND
WHT
NEUTRAL
BLK
LINE
LINE
NEUTRAL
WHT
BLK
W3-PIN
CONNECT TO POWER
MTG
BRKT
W2-PIN
CONNECT TO 0 -10V
DIMMING CONTROL
+ DIM
- DIM
+ OUT
- OUT
LED DRIVER
RED
BLU
PURP
GRY
GND
LED
LIGHT
ENGINE
RED
BLU
W3-PIN
W3-PIN
W2-PIN
/