Page is loading ...

1 2
3 4
5 6
Installation Guide
Low Voltage
LED Puck Light Kit
Model #
IN-0103-3-XX-XX
ATTACH YOUR RECEIPT HERE
Purchase Date __________________
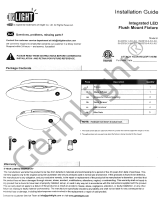
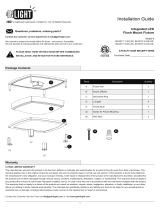
Package Contents
Hardware Contents
Warranty
A 3
B 3
C 1
D 1
Puck lights with a lead wire
Back Plate
Connection box
Power Cord with transformers
E Dimmer control unit 1
Piece Description Quantity
A
AA
B
C
D
Mounting
Screws
Qty: 8
BB
Qty: 9
Cord
Mounting
Clip
E
Contact the customer service department at [email protected]
We commit to respond to emails within 24 hours - and sooner, if possible!
We are devoted to solving problems and offering the best service to our customers.
Questions, problems, missing parts?
PLEASE READ THESE INSTRUCTIONS BEFORE COMMENCING
INSTALLATION AND RETAIN FOR FUTURE REFERENCE.
is registered trademarks of Inlight Co. Ltd. All Rights Reserved.
5-YEAR LIMITED WARRANTY
Contact the Customer Service Team at [email protected] or visit www.getinlight.com
The manufacturer warrants this product to be free from defects in materials and workmanship for a period of Five (5) years from date of purchase. This
warranty applies only to the original consumer purchaser and only to products used in normal use and service. If this products is found to be defective,
the manufacturer's only obligation, and your exclusive remedy, is the repair or replacement of the product at he manufacturer's discretion, provided that
the product has not been damaged through misuse, abuse, accident, modifications, alterations, neglect, or mishandling. This warranty shall not apply to
any product that is found to have been improperly installed, set-up, or used in any way not in accordance with the instructions supplied with the product.
This warranty shall not apply to a failure of the product as a result an accident, misuse, abuse, negligence, alteration, or faulty installation, or any other
failure not relating to faulty material workmanship. The manufacturer specifically disclaims any liability and shall not be liable for any consequential or
incidental loss or damage, including labor/expense costs involved in the replacement or repair of said product.

1 2
3 4
5 6
Safety Information
Pre-Installation
ESTIMATED ASSEMBLY TIME: 20 minutes.
HELPFUL TOOLS:
Philips
Screwdriver
WARNING AND CAUTIONS
***CONSULT A LOCAL LICENSED ELECTRICIAN OR ELECTRICAL CONTRACTOR IF YOU ARE NOT SURE ABOUT THE INSTALLATION.***
Drill
WARNING To reduce the risk of FIRE, ELECTRIC SHOCK, OR INJURY TO PERSONS:
-For INDOOR USE ONLY.
-Do NOT touch LEDs. Do NOT remove the protective LED lens. Do NOT look directly at lighted LEDs for any length of time.
-Do NOT touch, operate, or install fixture while in contact with water. Not intended for illumination of aquariums. Do NOT mount over sinks or stoves.
-Not intended for recessed installation in ceilings or soffits. Do NOT mount the light to cabinets having a material thickness less than 1/4 in.
-The low voltage portable cabinet light may be installed inside or under a kitchen cabinet or other built-in furniture when the low voltage Class 2 power
supply is located OUTSIDE the cabinet and is not concealed and when the line voltage power supply cord is not concealed or run through openings in
the cabinet, walls, ceilings or floors. This requirement does not apply to the wiring between the cabinet light and the power unit.
-Do NOT attempt to install while plugged in.
-Use only insulated staples or plastic ties to secure cords, route and secure cords so that they will NOT be pinched or damaged when the cabinet is
pushed to the wall.
-To reduce the risk of fire, do not install in a compartment smaller than 12 inches by 12 inches by 12 inches.
CAUTIONS
-Read and understand all instructions and illustrations completely before proceeding with assembly and installation of this fixture.
-All parts must be used as indicated in these instructions. Do not substitute any parts, leave parts out, or use any parts that are worn out or broken.
Failure to obey this instruction could invalidate the UL listing, C.S.A. certification, and/or ETL listing of this fixture.
-This fixture is intended for installation in accordance with the National Electric Code (NEC) and all local code specifications.
-Use ONLY the supplied LED driver to power fixture.
-LEDs can be damaged by electro static discharge (ESD) shock. Before installation, discharge yourself by touching a grounded bare metal surface to
remove this hazard. To avoid damage, do not remove the clear lens over the LED module.
-DO NOT USE THIS FIXTU H A DIMMING CIRCUIT. If dimmer controls are present, remove them and replace them with regular electrical
switches. If a three-way din present, replace it with a regular three-way switch. If unfamiliar with electrical installations, it is recommended a
qualified electrician do the installation.
-The light sources are non-changeable light emitting diodes (LED). Do not disassemble this product.
-Included led driver accommodates a maximum of 6 wattage only. Beware not to exceed the wattage of the LED driver, this is displayed on the driver.
PLANNING INSTALLATION
Compare all parts with the parts listed in the hardware included and pack contents sections. If any part appears missing or damaged, do not install and
use this light. Contact customer service.

1 2
3 4
5 6
Prepare for installation Locate the desired positions for all units
- - Locate the desired positions where the LED puck lights (A) and
connection box (C) are to be mounted.
- Measure and mark the corresponding placement on the
mounting surface for all units. Make sure everything is
properly spaced before drilling screw holes into the cabinets.
Install the back plate Install the LED puck lights
- Install the back plate (B) to the bottom side of the cabinet by
inserting two mounting screws (AA) into the mounting holes
on the bottom of each back plate (B). (Fig 1.)
- Snap the LED puck light (A) onto back plate (B), it is held in
place by magnet.
-
Repeat steps 1 to 3 to install the remailing two LED puck
lights (A).
Connect the dimmer control unit and
power cord
Install the connection box and dimmer
control unit
- Insert the plug from the power cord (D) into the jack of
the dimmer control unit (E).
- Attach the connection box (C) to the bottom of the cabient
using two mounting screws (AA).
- Attach the dimmer control unit to the bottom of the cabient
using two cord mounting clips (BB).
Installation (Section A) - Surface Mounting (Wires under a shelf or cabinet)
1 2
Note:
Ensure the connection box (C) is within 6 ft. of an electrical outlet
and the puck lights (A) are located within 6 ft. of the connection
box (C).
5 6
3 4
Place the wall switch to the "OFF" position. (Fig.1.)
Place either the main (Master) switch to the "OFF" position,
cutting off power to your entire home OR turn off the individual
switch that provides power to where the fixture will be installed.
(Fig.2.)
Carefully unpack the fixture. Lay out all parts on a clean surface.
Note:
Ensure that the screw’s heads are level with back plate. (Fig 2.)
Puck Light Connection Box Outlet
6ft. Max
6ft. Max
Back Plate
B
A
C
AA
Mounting
Screws
Plug of
Power Cord
Jack of Dimmer
Control Unit
D
E
Connection Box
C
Dimmer Control Unit
E
AA
Mounting
Cord
Mounting
Clip
BB
Fig.1
Wall Switch
Fig.2
Breaker Panel
-
-
Fig. 1
Fig. 2
Back Plate
B
LED Puck Light
A

Lighitng & Spacing
2
1
3
1 2
3
4
5 6
Connect the cords Secure the cords
- Connect the wires from 3 of the LED puck lights (A) to the
holes marked as "output" in the connection box (C).
- Excess puck light cords and power cord can be secured using
the cord mounting clips (BB)
- Connect the wire from the dimmer control unit (E) to the
hole marked as "intput" in the connection box (C).
Connect the plug to an electrical outlet
- Insert the power plug (D) into an electrical outlet and install
is now complete.
ation
Prepare for installation Install the trim rings
- Locate positions where LED puck lights are to be mounted by
following step 2 in Section A - Surface Mounting (Wires
under a shelf or cabinet)
- Install the back plate (B) as described in step 3 of Section A -
Surface Mounting (Wires under a shelf or cabinet)
- Thread the cord from the LED puck light (A) through the hole,
Snap the LED puck light (A) on to black plate (B), it is held in
place by magnet.
- Use the enclosed template to drill 1/2" hole to pass the
LED puck light cord through the shelf.
- Repeat steps 1 to 2 to install the remaining LED puck lights.
9
Note:
Proceed with caution when attaching the cord clips
to the cabinet, make sure the metal nail does not
pierce through the cord.
Hole Size
Ø1/2"
(Ø13 MM)
Installation (Section A) - Surface Mounting (Wires under a shelf or cabinet)
7 8
Installation (Section B) - Surface Mounting (Wires on top of a shelf or cabinet)
1 2
Wires from the
LED Puck Lights
Wires from the
Dimmer Control
Unit
E
A
Cord
Mounting
Clip
BB
Back Plate
LED Puck Light
A
B
Front View
Hole

Lighitng & Spacing
1 2
3 4
5 6
Dimming Control
Press the on/off button to switch on the light and use the dim/bright button to adjust the brightness of the puck lights.
Troubleshooting
2. Faulty Switch.
3. Faulty wire connection.
2. Replace switch.
3. Check wiring.
4. Damaged or defect LED driver. 4. Replace the LED driver
Fixture doesn't light.
Problem Possible Cause
1. Power is off. 1. Check if power supply is on.
Corrective Action
Fuse blows or circuit breaker trips when light is turned on.
1. Overloaded circuit
2. Short circuit.
Discontinue use and call customer service.
Bright Button
Dim Button
On & Off Button
Dimmer Control Unit
E
Connect the LED puck lights and connection box
Installation (Section B) - Surface Mounting (Wires on top of a shelf or cabinet)
3
- Install the connection box and dimmer control unit as described in
step 5 to 6 of Section A - Surface Mounting (Wires under a shelf or
cabinet).
- Connect and secure the cords, then connect the plug to the
electrical outlet as described in steps 7 to 9 of Section A - Surface
Mounting (Wires under a shelf or cabinet)

1 2
3 4
5
6
Maintenance
These lights use light emitting diodes (LEDs) to provide light. LEDs do not have a filament to burn out like a traditional light bulb. LEDs gradually emit
less light over their lifetime, but will typically last 50,000 hours in a residential environment.
Periodically clean the fixture and diffuser using a mild, non-abrasive cleaner and soft cloth. When cleaning the fixture, make sure the power is turned off.
Do not spray cleaner directly onto any part of the fixture or LEDs.
Installation within a cabinet require 12V Class 2 transformers (included). Class 2 transformers are by definition “Power limited” (5 amps maximum) and
“Inherently Protected” (fused). Primary wires to the transformer enclosure must follow normal NEC Chapter 3 wiring techniques. Non-enclosed secondary
wiring and splices are not restricted in concealed spaces.
V. 2019
Questions, problems, missing parts? Before returning to the store,
contact Inlight Customer Service
Retain this manual for future use.
is a trademark of Inlight Co. Ltd.
/