Page is loading ...

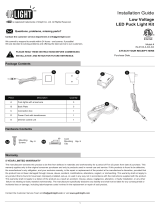
Package Contents
Piece Description Quantity
A Puck light housing with a lead wire and tail wire 2
B Puck light housing with a lead wire 1
C Trim ring (preassembled to LED puck lights A&B) 3
D Linking Cord 1
E Power Cord 1
Mounting
Screws
Qty.6
Phillips
Screwdriver
Drill
WARNING
Warranty
A
AA
B
C
D
E
1
Installation Guide
Model #
IN-0107-3-XX-XX
ATTACH YOUR RECEIPT HERE
Purchase Date __________________
Contact the customer service department at [email protected]
We commit to respond to emails within 24 hours - and sooner, if possible!
We are devoted to solving problems and offering the best service to our customers.
Questions, problems, missing parts?
PLEASE READ THESE INSTRUCTIONS BEFORE COMMENCING
INSTALLATION AND RETAIN FOR FUTURE REFERENCE.
is registered trademarks of Inlight Co. Ltd. All Rights Reserved.
Swivel Design
LED Puck Light Kit
These products may represent a possible shock or fire hazard if improperly installed or attached in any way. Products should be installed in accordance with
these instructions, current electrical codes and/or current National Electric Code (NEC). To reduce shock of fire, electric shock or injury to persons, use only
insulated staples or plastic ties to scure cords, route and secure cords so that they will not be pinched or damaged when the cabinet is pushed to the wall,
position the portable cabinet light with respect to the cabinet so the lamp replacement marking are able to read during relamping. Not intended for installation in
ceilings or soffits. The National Electrical Code (NEC) does not permit cords to be concealed where damage to insulation may go unnoticed. To prevent fire
danger, do not run cord behind walls, ceilings, soffits or cabinets where it may be inaccessable for examination, cords should be examined periodically and
immediatly replaced when any dammage is noted. To reduce the risk of fire, do not install in a compartment smaller than 6" X 6" X 6".
Inlight offers a warranty of 5 years for the LED puck lights from the date of purchase that cover repair or replacement of defective parts of the housing, optics,
and electronics. To contact Inlight customer service send an e-mail to [email protected]. For more information on technical specifications and additional
assessories visit our website: www.getinlight.com
Hardware Contents Tools required

1 2
- -
Note:
Do not fully tighten the screws into the trim ring as the cords
from the LED puck housing will need to be pulled through the
hotches on the trim ring before securing.
3 4
-
-
5
Connect adjacent lead and tail wires
Quick Connect
Lighitng & Spacing
2
Separate the trim ring (C) by pushing the back of the LED
puck housing (B).
Installation (Section A) - Surface Mounting (Wires under a shelf or cabinet)
Preparing for installation
Install the trim ring (C) to the bottom side of the cabinet by
inserting two mounting screws (AA) into the mounting holes
on the bottom of each trim ring (C).
Installing the trim rings
Note:
1) Make sure the LED puck housings are installed in the
same direction so that they will be connected with ease.
2) Measure the distance of every LED puck housing before
installation.
Tighten the screws (AA) and push the LED puck housing (B)
into the trim ring (C) while pulling the cord tight.
Take the cord from the LED puck housing (B) and feed the
cord through the outlet hole of the trim ring (C). Do not pull the
cord tight just yet, as you need to leave space to screw in the
trim ring (C).
- Repeat steps 1 to 3 to install the remailing two LED
puck housing (A).
Installing the first LED puck light Installing the remaining two LED assemblies
Connecting the LED puck lights
- Connect the LED puck lights with each other. Connect the power cord (E) to the fixtures.

1 2
-
-
3
1 2
-
-
-
-
Connect adjacent lead and tail wires
Lighitng & Spacing
Quick Connect
3
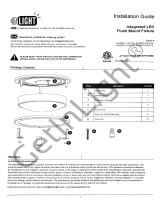
Installation (Section C) - Recessed Mounting
Hole Cut Size
MIN. Ø2-5/16" (Ø59 MM)
Ø2-3/8" (Ø60 MM)
MAX. Ø2-7/16" (Ø62 MM)
Note: Ensure that you measure the distance of
every LED puck housing before drilling the
installation holes. The minimum distance between
every LED housing must be at least 6 inch.
Locate positions where LED pucks are to be mounted.
Separate the trim ring (C) by pushing on the back of the LED
puck housing(B).
Use the enclosed template to drill a 2-3/8" hole.
Thread the wires from the LED puck housing (B) through the
hole and insert the fixture into the hole. Repeat steps 1 and
2 for the remaining two LED puck housing (A).
Preparing for installation Installing the LED puck lights
Hole Size
Ø1/2" (Ø16 MM)
Installation (Section B) - Surface Mounting (Wires on top of a shelf)
Preparing for installation
Use the enclosed template to drill 1/2" hole to pass the
connector through the shelf.
Locate positions where LED pucks are to be mounted.
Thread the wire from the LED puck housing through the hole
and compress the springs and push the LED puck housing (B)
in the trim ring (C).
Repeat step 1 if necessary, you need 1 hole for puck light with
a lead wire, and 2 holes for pucklight with a lead wire and a tail
wire.
Installing the trim rings
Connecting the LED puck lights
- Repeat steps 1 and 2 to install the remailing two LED pucks (A).
- Connect the LED puck lights with each other. Connect the power cord (E) to the fixtures.

3
1 2
-
-
Quick Connect
Lighitng & Spacing
4
IN-0107-1: Bulk Puck, White, 2700K
IN-0107-1-BZ: Bulk Puck, Bronze, 2700K
IN-0107-1-SN: Bulk Puck, Brushed Nickel, 2700K
IN-0107-1-40: Bulk Puck, White, 4000K
IN-0107-1-BZ-40: Bulk Puck, Bronze, 4000K
IN-0107-1-SN-40: Bulk Puck, Brushed Nickel, 4000K
Connect adjacent lead and tail wires
Installation (Section C) - Recessed Mounting
Connecting the LED puck lights
Connect the LED puck housing with each other. Connect the power cord (D) to the fixtures.
Installation (Section D) - Hardwired with Junction box (sold separately)
Turn power OFF from the electrical panel before starting
installation.
Follow the directions for installing a junction box (IN-0501-3),
installation instruction is included in the package of junction box.
- Follow the directions above to mount the puck lights.
- Connect the linking cord to the junction box.
Installing the junction box (sold separately) Installing the LED puck lights
JC2-12-WH: 12" Extendsion Cord, White
JC2-24-WH: 24" Extendsion Cord, White
JC2-32-WH: 32" Extendsion Cord, White
JC2-60-WH: 60" Extendsion Cord, White
JC2-12-BK: 12" Extendsion Cord, Black
JC2-24-BK: 24" Extendsion Cord, Black
JC2-32-BK: 32" Extendsion Cord, Black
JC2-60-BK: 60" Extendsion Cord, Black
IN-0501-3: Junction Box, White
IN-0501- -BZ: Junction Box, Bronze
Bulk Puck
Additional puck for 3 puck light kit, bulk pucks
include 6" lead wire and 6" tail wire, power cord is
not included in this item.
Junction box (3-15/16" X 2-5/16" X 15/16")
Used to power LED puck lights using linking
cord. Includes ON/OFF switch.
Linking Cord Bulk Puck
Extendsion cord to connect between two 120V
LED pucks.
Compatible accessories (sold separately)
V. 2019
/