Page is loading ...

INS #
iLumin TC1 Timeclock
User Guide
Contents
Connecting the TC1 to the iLumin Plus Network..................................................................................................... 2
TC1 Navigation Overview......................................................................................................................................... 3
Programming Operations Settings........................................................................................................................... 4
Programming the Initial Operation Settings...................................................................................................... 4
Step 1: Set the Time.................................................................................................................................. 5
Step 2: Set the Date.................................................................................................................................. 5
Step 3: Set the Day of Week..................................................................................................................... 5
Additional Operations Setting Review............................................................................................................... 5
Astronomical Clock Review........................................................................................................................ 5
Daylight Savings Time Review.................................................................................................................... 6
Firmware Version Review........................................................................................................................... 7
Programming, Modifying, or Reviewing Events...................................................................................................... 7
Programming, Modifying, or Reviewing an Event that Occurs at a Specific Time.......................................... 8
Programming, Modifying, or Reviewing an Event that Uses the Astronomical Clock...................................... 9
Programming the Event Action (Command)...................................................................................................... 10
Programming a Select Scene Event........................................................................................................... 10
Programming a No Action Event................................................................................................................ 11
Programming a Set Zone (Channel) to Level Event.................................................................................... 11
Programming an Event to Issue a Sequence Command........................................................................... 12
Programming or Modifying Scene Light Levels...................................................................................................... 13
Issuing a Manual Scene Command......................................................................................................................... 14

2
TC-1 Timeclock User Guide
www.eaton.com/lightingsystems
Welcome and Introduction
If time clock functionality is required, it is typical to have a single, active time clock device in the iLumin Plus network. The
TC1 provides the astronomical time clock functionality and has the added capability of basic scene programming and manual
scene command.
Optional iLumin Plus software may be used to program TC1 functions. The software provides advanced functionality that
may not be available for editing from the TC1 onboard interface. If it has been purchased, use the iLumin Plus software to
administer all TC1 programming changes.
This user guide is intended for the facility manager or user that is maintaining basic time clock programming using the
onboard TC1 interface. The TC1 interface allows the facility manager to:
• Configure the operational settings for the time clock including, the time, date, and day of week.
• Review and update previously configured astronomical clock coordinates, and if not previously programmed, initiate annual
daylight savings time dates.
• Program up to 255 time clock events to issue scenes to pre-defined areas, to issue specific zones to a desired light level,
or to start, stop or pause pre-defined sequences.*
• Program or update scene light levels for pre-defined areas.*
• Manually issue scene commands or zone level commands to the iLumin Plus system.*
*Areas, zones, and sequences must be configured before they will respond to the TC1 commands. This manual assumes that this configuration has been
previously completed.
Connecting the TC1 to the iLumin Plus Network
The TC1 must be mounted and connected into the iLumin Plus network before programming.
The TC1 surface mounts using the provided wall bracket. It connects directly to the iLumin Plus Network for communications
and power. The lighting network is a daisy-chain that requires one in and one out connection made to the same wiring
terminal on the TC1. Use Eaton LCCP or LCCNP wire for the lighting network (alternate: Belden 1502, 1502P).
The lighting network requires installation of a terminating jumper or resistor at the two ends of the network. In the TC1, the
terminating device is a resistor that is shipped pre-connected to the wiring terminals. If the TC1 is not an end device, remove
the resistor.

3
TC-1 Timeclock User Guide
www.eaton.com/lightingsystems
TC1 Navigation Overview
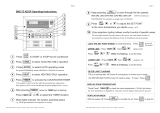
The TC1 onboard keypad is used to input the necessary information. Main functions are accessed from the main time clock
display using the number keys 1 through 4.

4
TC-1 Timeclock User Guide
www.eaton.com/lightingsystems
From the main time clock display, press the number for the desired function and then follow the on-screen prompts. The ‘ent’
key is typically used to save and advance the screen while the ‘esc’ key may be used to exit the screen without saving. The
‘A’ and ‘B’ keys may be used to scroll through options or to select specific options within screens. If no entry is made for 30
seconds, the display will return to the main time clock display without saving the current entry.
Programming Operations Settings
The main operation settings are accessed from the main screen using menus 1 and 4. Typically, these items are set up
during the initial site programming and should not need adjustment.
Warning: If the iLumin Plus software has been used to set astronomical and daylight savings time, some parameters are
only available from the software. Use caution when using the onboard display to avoid inadvertently overwriting these
settings.
Programming the Initial Operation Settings
Before programming events, make sure that the clock is on the correct time, date and day of week.
Step 1: Set the Time
Time is entered in 24-hour clock, military time, Hour:Minute:Second (HH:MM:SS) format to distinguish morning from
evening. For example, 2:00 in the afternoon would appear as 14:00:00.
To adjust the time clock time:
Screen Instructions Keypad
1.
From the main display, press ‘1’.
2.
In the time and date screen, press ‘1’.
3.
Enter the current time followed by the ‘ent’ key.
Time

5
TC-1 Timeclock User Guide
www.eaton.com/lightingsystems
Step 2: Set the Date
The date is entered in Day:Month:Year format (DD:MM:YY). For example, February 16, 2019 would be entered as 16:02:19.
To adjust the time clock date:
Screen Instructions Keypad
1.
From the main display, press ‘1’.
2.
In the time and date screen, press ‘2’.
3.
Enter the current date in DD:MM:YY format
followed by the ‘ent’ key.
Date
Step 3: Set the Day of Week
Enter the current day of week so that events run on the properly defined days.
To adjust the time clock day of week:
Screen Instructions Keypad
1.
From the main display, press ‘1’.
2.
In the time and date screen, press ‘3’.
3.
Enter the number corresponding to the current
day of week (0=Sun, 1=Mon, 2=Tues, 3=Weds,
4=Thurs, 5=Fri, 6=Sat).
Once the day is selected, press the ‘ent’ key
to save.
0-6 for day
Additional Operations Setting Review
Astronomical clock settings, daylight savings time dates and firmware version may be reviewed through the onboard display.
Astronomical Clock Review
If astronomical clock parameters are adjusted from the onboard display, some parameters available only from iLumin Plus
software may be lost. Unless absolutely necessary, avoid using the TC1 screen to change pre-configured astronomical clock
coordinates. The TC1 display may be helpful to review the current dusk and dawn times.
To review the astronomical clock:
Screen Instructions Keypad
1.
From the main display, press ‘4’.

6
TC-1 Timeclock User Guide
www.eaton.com/lightingsystems
2.
In the coordinates/DST screen, press ‘1’.
3.
Review the latitude displayed. If the coordinate is not correct, use the number
keys to correct the entry. Press the ‘A’ key to change between North and South.
Press the ‘ent’ key to advance the screen.
4.
Review the longitude displayed. If the coordinate is not correct, use the number
keys to correct the entry. Press the ‘A’ key to change between East and West.
Press the ‘ent’ key to advance the screen.
5.
Review the offset from Greenwich Mean Time (GMT). If the offset is not correct,
use the number keys to correct the entry. Press the ‘A’ key to change between
plus (+) and minus (-). Press the ‘ent’ key to advance the screen.
6.
Review today’s calculated dawn time for the entered coordinates. Press the ‘ent’
key to advance the screen.
7.
Review today’s calculated dusk time for the entered coordinates. The screen will
exit automatically after displaying the dusk time, or press the ‘esc’ key to exit
manually.
Daylight Savings Time Review
Some daylight savings time (DST) settings are only available from the iLumin Plus software. If the software has been used
previously to program the TC1, the TC1 online display may not be able to display or allow changes to the DST settings.
If the DST has been set for manual adjustment from the iLumin Plus software, the dates may be reviewed and changed
through the onboard TC1 display. Dates that are manually entered will require annual adjustment as the DST dates vary
each year.
If manually entering DST dates, the date is entered in Day:Month format (DD:MM). For example, March 10th would be
entered as 10:03.
Screen Instructions Keypad
1.
From the main display, press ‘4’.
2.
In the coordinates/DST screen, press ‘2’.
3.
In the DST menu screen, press the ‘ent’ key.
4.
Review the DST start date displayed.
*
If DST has been set to manual mode via
software, enter the date that DST starts for the current year. Press the ‘ent’ key
to advance the screen.
5.
Review the DST end date displayed.
*
If DST has been set to ‘manual’ mode via
software, enter the date that DST ends for the current year. Press the ‘ent’ key
to advance the screen.
*Date displayed may not be correct if DST has been programmed using iLumin Plus software.

7
TC-1 Timeclock User Guide
www.eaton.com/lightingsystems
Firmware Version Review
Viewing the firmware version is helpful if pursuing help with the TC1 time clock. To review the current firmware:
Screen Instructions Keypad
1.
From the main display, press ‘*’.
2.
The screen will display the current firmware
version. Press ‘esc’ to return to the main time
clock display.
Programming, Modifying, or Reviewing Events
Up to 255 events may be programmed in the TC1. An event can issue a scene select command, a zone level command, or
command a pre-programmed sequence. An event can occur daily, on specified days of the week, or on a specific date. The
time that the event occurs may be defined for a specific time or may use the astronomical clock’s dusk and dawn time.
To modify an existing event, locate the programmed event number to adjust the desired settings. To review an event’s
settings, once the event is selected, use the ‘ent’ key to advance through the programming screens without adjusting the
displayed parameters.
Before performing the steps outlined in this section, it is helpful to know:
• The area numbers that have been programmed in the system and how they relate the rooms in the facility
• The scene numbers that have been used in each area and what effect the scenes have on the light levels
• If sequences have been previously programmed into the time clock using the iLumin Plus software, the sequence
numbers that have been used, any important action line numbers, and the function that the sequence performs
• If events have already been programmed, the programmed event numbers and functions
Important navigation and entry tips:
• To review an event without making changes, use the same screens as used in programming but do not change the
displayed settings.
• Any time entries should be entered in 24-hour clock, military time, Hour:Minute:Second (HH:MM:SS) format to distinguish
morning from evening. For example, 2:00 in the afternoon would appear as 14:00:00.
• Any date entries should be entered in Day:Month:Year format (DD:MM:YY). For example, February 16, 2019 would be
entered as 16:02:19.
• To assist with identification, an event that occurs at a specific time will have the letter ‘T’ in front of the event number.
• An event that is using the astronomical clock dusk/dawn times will have the letter ‘A’ in front of the event number.
• It is possible to temporarily disable an event, and re-enable it manually through the time clock screen.

8
TC-1 Timeclock User Guide
www.eaton.com/lightingsystems
Programming, Modifying, or Reviewing an Event that Occurs at a Specific Time
To program, modify or review an event that issues a command at a specific time, follow the steps below.
Screen Instructions Keypad
1.
From the main display, press ‘3’.
2.
In the events screen, press ‘1’.
3.
In the edit events screen, press the ‘A’ or ‘B’ key to scroll through the events.
Once the desired event number is displayed, press the ‘ent’ key to advance the
screen.
or
4.
To have the event occur at a specific time, press the ‘A’ key.
5.
Enter the desired time in 24-hour clock, military time (HH:MM:SS). Press the
‘ent’ key to advance the screen.
Time
6.
If the event will run only on a specific date, or will start on a date in the future,
enter the desired date (DD:MM:YY). If the event is an ongoing event not specific
to a date, enter today’s date (DD:MM:YY). Press the ‘ent’ key to advance the
screen.
Date
7.
If the event will run only on the date specified, press ‘1’ to select YES for
running on the exact date and skip to step 10. If the event is an ongoing event,
press ‘0’ for NO. Press the ‘ent’ key to advance the screen.
or
8.
If the event is an everyday event, select ‘1’ to have the event run every day of
the week and skip to step 10. Otherwise, select ‘2’ to specify the days of the
week that the event will run. Press the ‘ent’ key to advance the screen.
or
9.
If the event will run on specific days of the week, select the active days. Press
‘1’ for Y(yes) or ‘0’ for N(no) under each day, using the ‘A’ key to advance to the
next day or the ‘B’ key to backtrack. Press the ‘ent’ key to advance the screen.
or
or
10.
Select to enable or disable the event. An event must be enabled to execute
the command. An event can be disabled to prevent it from running until it is re-
enabled. Press ‘1’ to enable the event. Press ‘0’ to disable the event. Press the
‘ent’ key to advance the screen.
or
11.
Program the desired action. For information on action programming, see “Pro-
gramming the Event Action (Command)” on page 10.

9
TC-1 Timeclock User Guide
www.eaton.com/lightingsystems
Programming, Modifying, or Reviewing an Event that Uses the Astronomical Clock
The astronomical clock uses latitude and longitude coordinates to calculate the dusk and dawn times for each day. To review
the what time the astronomical clock calculated dusk and dawn times will occur for the current day, refer to “Astronomical
Clock Review” on page 5.
In order for the time clock to process astronomical clock events properly, it is necessary to reset the time clock daily. This
command can only be programmed from the iLumin Plus software. If this command has been previously implemented,
proceed with the programming or modification as described below.
To program, modify or review an event, follow the steps below.
Screen Instructions Keypad
1.
From the main display, press ‘3’.
2.
In the events screen, press ‘1’.
3.
In the edit events screen, press the ‘A’ or ‘B’ key to scroll through the events.
Once the desired event number is displayed, press the ‘ent’ key to advance the
screen.
Note: If modifying or reviewing an existing astronomical clock event, the event
number will have the letter ‘A’ before it.
or
4.
To have the event occur using the astronomical clock, press the ‘B’ key.
5.
If the event is being newly setup as an astronomical clock event, select to have
the event occur at dawn, ‘A’, or at dusk, ‘B’.
Note: If modifying or reviewing an existing astronomical event, this screen will
not be displayed.
or
6.
If setting up a new astronomical clock event, add or subtract time from the
calculated dusk or dawn time by using ‘A’ to indicate to subtract time, or ‘B’ to
add time. To use the exact dawn or dusk time without adding an offset, select
either ‘A’ or ‘B’ to advance to the next screen.
Note: if modifying or reviewing an existing astronomical event, this screen will
not be displayed.
or
7.
Type in the amount of time to offset the calculated astronomical value, using
the number keypad to enter the desired number of hours and minutes. To use
the exact calculated dawn or dusk time without an offset, leave all entries at 0.
Press the ‘ent’ key to advance the screen.
Enter hours & minutes
8.
If the event will run only on a specific date, or will start on a date in the future,
enter the desired date (DD:MM:YY). If the event is an ongoing event not specific
to a date, enter today’s date (DD:MM:YY). Press the ‘ent’ key to advance the
screen.
Date

10
TC-1 Timeclock User Guide
www.eaton.com/lightingsystems
9.
If the event will run only on the date specified, press ‘1’ to select YES for
running on the exact date and skip to step 12. If the event is an ongoing event,
press ‘0’ for NO. Press the ‘ent’ key to advance the screen.
or
10.
If the event is an everyday event, select ‘1’ to have the event run every day of
the week and skip to step 12. Otherwise, select ‘2’ to specify the days of the
week that the event will run. Press the ‘ent’ key to advance the screen.
or
11.
If the event will run on specific days of the week, select the active days. Press
‘1’ for Y(yes) or ‘0’ for N(no) under each day, using the ‘A’ key to advance to the
next day or the ‘B’ key to backtrack. Press the ‘ent’ key to advance the screen.
or
or
12.
Select to enable or disable the event. An event must be enabled to execute
the command. An event can be disabled to prevent it from running until it is re-
enabled. Press ‘1’ to enable the event. Press ‘0’ to disable the event. Press the
‘ent’ key to advance the screen.
or
13.
Program the desired action. For information on action programming, see “Pro-
gramming the Event Action (Command)” on page 10.
Programming the Event Action (Command)
Events may be programmed to issue the following commands:
• Select scene
• No action
• Set zone (channel) to level
• Sequence start, stop and pause commands
Programming a Select Scene Event
Select scene is the most commonly used event action. Caution should be used during select scene event programming to
ensure proper operation. Be aware of the following items:
• If the area number is left at 0, all programmed areas will respond to the command.
• If the scene number is left at 0, all lighting in the area will turn off.
To program a scene select action:
Screen Instructions Keypad
1. Program the event parameters for a specific time or to use the astronomical
clock as instructed in the previous sections.
2.
When the action change screen is displayed, if the action displayed under the
action change screen does not display the desired command, press ‘1’ for Y(yes)
to change the action type, or press ‘0’ for N(no) to leave the action as displayed.
Press the ‘ent’ key to advance the screen.
or

11
TC-1 Timeclock User Guide
www.eaton.com/lightingsystems
3.
Press the ‘A’ or ‘B’ key to scroll through the actions until ‘Select Scene’ is
displayed. Press the ‘ent’ key to advance the screen.
or
4.
Use the number keys to enter the area number that should be issued the com-
mand (areas 0 through 255 supported). Press ‘ent’ to advance to the scene entry
field.
Use the number keys to enter the desired scene (scenes 0 through 128 sup-
ported). Press ‘ent’ to advance the screen.
Enter area & scene
5.
Next select the period of time it should take to transition to the light levels of
the selected scene. Use the ‘A’ key to increase the fade time or the ‘B’ key to
decrease the fade time. (range 0 milliseconds through 60 minutes supported).
Press ‘ent’ to save the event and return to the main time clock display.
or
Programming a No Action Event
Setting the event action to ‘No Action’ will prevent the event from running until an action type other than no action is set.
This has a similar effect to using the event disable function. To have an event execute, ensure that the action type is set to
the desired command.
Programming a Set Zone (Channel) to Level Event
Setting the event action to ‘Set Zone (channel) to Level’ will cause a specific lighting zone in an area to go to the level
defined when the event occurs. In order to use this command, it will be necessary to know what area numbers and zone
numbers have been programmed. Be aware of the following items:
• If the area number is left at 0, all programmed areas will respond to the command.
• If the zone number is left at 0, all zones within the specified area will respond to the command.
To program a ‘Set Zone (channel) to Level’ command:
Screen Instructions Keypad
1. Program the event parameters for a specific time or to use the astronomical
clock as instructed in the previous sections.
2.
When the action change screen is displayed, if the action displayed under the
action change screen does not display the ‘Set Chan Level’ action, press ‘1’ for
Y(yes) to change the action type, or press ‘0’ for N(no) to leave the action as
displayed. Press the ‘ent’ key to advance the screen.
or
3.
Press the ‘A’ or ‘B’ key to scroll through the actions until ‘Set Chan Level’ is
displayed. Press the ‘ent’ key to advance the screen.
or

12
TC-1 Timeclock User Guide
www.eaton.com/lightingsystems
4.
Use the number keys to enter the area number that should be issued the
command (areas 0 through 255 supported). Press ‘ent’ to advance to the zone
(channel) entry field.
Use the number keys to enter the desired zone (channel) (zones 0 through 65535
supported). Press ‘ent’ to advance the screen.
Enter area & zone
5.
Use the number keys to enter the desired light level (areas 0% through 100%
supported). Press ‘ent’ to advance to the fade time screen.
Enter light level
6.
Next select the period of time it should take to transition to the defined light
level. Use the ‘A’ key to increase the fade time or the ‘B’ key to decrease the
fade time. (range 0 milliseconds through 60 minutes supported). Press ‘ent’ to
save the event and return to the main time clock display.
or
Programming an Event to Issue a Sequence Command
Sequences may be programmed into the time clock to allow for multiple or specialized actions to be triggered by a single
event. Sequences are only programmable by using iLumin Plus software. Once a sequence has been programmed, it is
possible to use the time clock keypad to program an event to start, stop, or pause this pre-defined sequence. This will
require knowledge of the sequence numbers that are used and a clear understanding of the sequence’s actions and purpose.
An event sequence command may start the sequence, stop the sequence, or pause the sequence. To program a sequence
action:
Screen Instructions Keypad
1. Program the event parameters for a specific time or to use the astronomical
clock as instructed in the previous sections.
2.
When the action change screen is displayed, if the action displayed under the
action change screen does not display the desired sequence action, press ‘1’
for Y(yes) to change the action type, or press ‘0’ for N(no) to leave the action as
displayed. Press the ‘ent’ key to advance the screen.
or
3.
Press the ‘A’ or ‘B’ key to scroll through the actions until the desired sequence
command is displayed. Sequence commands include, ‘Start Sequence’, ‘Stop
Sequence’, or ‘Pause Sequence’. Press the ‘ent’ key to advance the screen.
or
4.
All sequence commands will request the sequence number be entered. Use
the number keys to enter the desired sequence number (sequences 1 through 8
supported).
For a ‘Start Sequence’ action, press ‘ent’ to advance to the ‘1st Action’ entry
field and enter the line number of the sequence that should be commanded with
this event (action lines 1 through 29 supported). Pause and stop sequence com-
mands will not display this option.
Press ‘ent’ to save the event and return to the main time clock display.
Enter sequence number &
action line

13
TC-1 Timeclock User Guide
www.eaton.com/lightingsystems
Programming or Modifying Scene Light Levels
Any scene in the iLumin Plus system may be programmed or modified using the time clock onboard keypad and display. All
changes to light levels occur in real-time and will change the light levels as modifications are made. If this is not desirable,
wait until the space is unoccupied before making changes. If saving the change to the current scene, issue the desired scene
prior to modifying light levels.
Before performing the steps outlined in this section, it is helpful to know:
• The area numbers that have been programmed for each room being controlled in the facility
• The scene numbers that have been used in each area
• The light levels that are issued with each scene number (If uncertain of the light levels issued, perform the steps outlined
in the section “Issuing a Manual Scene Command” on page 14 for each scene in the area).
To program or modify scene levels, perform the following steps:
Screen Instructions Keypad
1.
From the main display, press ‘2’.
2.
In the scenes screen, press ‘2’.
3.
In the edit scene screen, press the ‘ent’ key to advance the screen.
4.
Use the number keys to enter the area number (areas 0 through 255 supported).
Press ‘ent’ to advance to the channel entry field.
Use the number keys to enter the starting zone (channel) for adjustment (zones 0
through 65535 supported). Press ‘ent’ to advance the screen.
Enter area & zone
5.
Increase or decrease the zone’s light level to the desired light level. Press the ‘A’
key to increase the zone light level by 5% with each press. Press the ‘B’ key to
decrease the zone light level by 5% with each press.
Once the zone is at the desired level, use the number keys to enter the next
zone (channel) to adjust and repeat the light level adjustment steps. Repeat
until all zones have been adjusted to the desired levels.
Press ‘ent’ to advance the screen.
or
Enter next zone number &
repeat
6.
Select to save the levels to the current scene ‘1’ (yes) or select to manually
enter the scene number the levels should be saved to ‘0’ (no).
or
7.
If ‘0’ was selected in the last step, use the number keys to enter the scene
number to save the adjusted levels to (scenes 1 through 128 supported). Press
the ‘ent’ key to advance the screen.
Enter scene number
8.
The scene will be saved. Press the ‘esc’ key to return to the main time clock
display.

Eaton
1121 Highway 74 South
Peachtree City, GA 30269
www.Eaton.com/lightingsystems
For service or technical assistance:
1-800-553-3879
Canada Sales
5925 McLaughlin Road
Mississauga, Ontario L5R 1B8
P: 905-501-3000
F: 905-501-3172
© 2019 Eaton
All Rights Reserved
Printed in USA
Publication No. IB503042EN
July 2019
Eaton is a registered trademark.
All trademarks are property
of their respective owners.
Procuct availability, specifications, and
compliances are subject to change
without notice.
Issuing a Manual Scene Command
The TC1 time clock’s onboard keypad and display can be used to manually issue a scene to the iLumin Plus system.
Warning: Use extreme caution when sending commands to the system from the TC1 keypad. It is possible to issue a
command to all areas in the facility by commanding area 0. If area 0 is erroneously entered for a scene 0 (off) command, all
lighting in the iLumin Plus system will turn off.
Before performing the steps outlined in this section, it is helpful to know:
• The area numbers that have been programmed for each room being controlled in the facility
• The scene numbers that have been used in each area
To issue a manual scene command, follow the steps below.
Screen Instructions Keypad
1.
From the main display, press ‘2’.
2.
In the scenes screen, press ‘1’.
3.
In the scene select screen, leave the ‘Seg’ field at the default 000 setting
(it is typically not necessary to designate a segment unless dealing with an
extremely large system). Press the ‘ent’ key to advance to the area field.
Use the number keys to enter the area number that should receive the command
(areas 0 through 255 supported). Press ‘ent’ to advance the screen.
Enter segment 000 & area
number
4.
Use the number keys to enter the desired scene number (scenes 0 (off) through
128 supported). Press ‘ent’ to advance to the ‘Fa’ fade entry field.
Use the number keys to enter the fade value number corresponding to the
desired fade time per the chart below:
Fade
Value
Fade
Time
Fade
Value
Fade
Time
Fade
Value
Fade
Time
0 0 140 10 sec 204 15 min
25 0.5 sec 160 30 sec 219 30 min
50 1 sec 190 1 min 234 45 min
70 3 sec 194 5 min 249 60 min
90 5 sec 199 10 min
Press ‘ent’ to advance the screen.
Enter scene & fade value
5.
The scene command will be sent. Press the ‘esc’ key to return to the main time
clock display.
/