Page is loading ...

CSERIES
OPERATING INSTRUCTIONS
FOR ACTRON AIR C SERIES CONTROL SYSTEM
CONGRATULATIONS: on your purchase of an Actron Air air conditioning system.
This unit has been meticulously designed to achieve maximum energy effi ciency. It
is manufactured from the highest quality materials has passed numerous “in house”
and “external” inspection procedures, ensuring years of satisfactory operation.
This “easy to read” Operating Instruction Manual is supplied to increase
your understanding of the system. It will show “step by step” instructions on:
How to operate the system most effectively.• How to save on energy costs.• How to maintain your system.•
Please read this booklet carefully
ACTRON ENGINEERING PTY LTD

SAFETY AND OPERATION PRECAUTION
YOUR ACTRONAIR SYSTEM IS A STATE OF THE ART PRODUCT with its Microprocessor
Control it automatically fi lters, circulates and conditions by cooling or heating the indoor air to
give you complete year-round climate control.
INSIDE THIS MANUAL You will fi nd instructions for C-Series 7-Day Programmable controller
(C7).
SUMMER OPERATION is when your system is operating on COOLING CYCLE, the room
air is circulated through the fi lter and indoor unit where heat, excess moisture and dust are
removed. The clean, cool air is then returned to your room. Dust and other airborne particles
are trapped in the fi lter, and condensed moisture is drained away. The indoor heat is transferred
by interconnecting refrigeration pipes to the outdoor unit, which then exhaust this heat to the
outdoor atmosphere.
WINTER OPERATION is just the reverse use of the system to obtain heat into our rooms.
During the HEATING CYCLE the outdoor unit extracts heat from the outside air and then
transferred by the same interconnecting pipes to the indoor unit where the circulated air is
heated and returned to your rooms. Again, the room air is fi ltered reducing dust and other
particles. During heating cycle you may notice water running from the outdoor unit. This is
due to moisture from air condensing on the outside coil surface. Thus us normal during winter
operation.
ACCESS PANELS AND GUARDS: NEVER remove any access panels
or guards as this could cause injury from electric shock and burns from
extremely hot components. Never allow any bodily parts such as fi ngers
or objects to protrude through the fan guards or any other opening as
they could cause personal injury and damage the air conditioner.
RETURN AIR FILTER: The air conditioner must never be operated without a return air fi lter as
this will allow a build up of dust etc on the Indoor Coil. This is very diffi cult to clean and causes
the system to operate ineffi ciently or even fail.
CRANKCASE HEATER PRECAUTION: The main power ( Outside switch board ) to the system
must be kept ON at all times to prevent damage to the outdoor compressor unit. Should the
main power be disconnected or interrupted for 6 hours or longer, then no attempt should be
made to start the system for 2 hours after the power has been restored to outdoor unit. This
allows the compressor to warm up, and remove any liquid refrigerant that may cause damage.
Copyright ©2011
All rights reserve. No part or contents of this book maybe reproduced or transmitted in any
form or by any means without the written permission of Actron Engineering Pty. Ltd.
!
1
GENERAL INFORMATION

CONTENTS
General information................................Page 1
Safety and operation precautions............Page 1
System information.................................Page 2
Advance features....................................Page 3
Wall controller functions.........................Page 4
Circulation operation............................. Page 6
Cooling operation..................................Page 7
Heating operation..................................Page 8
Auto operation.......................................Page 9
Display button......................................Page 10
Off timer function..................................Page 11
On timer function...................................Page 12
After hours operation............................Page 13
Enabling and disabling after hours.........Page 14
Timeclock operation..............................Page 15
Setting the time and day..........................Page 16
Activating and deactivating 7-Day
time clock ..............................................Page 17
Basic Operation
7-Day Programmable Model
SYSTEM INFORMATION
Programming the events......................Page 18
Cancelling an individual event..............Page 19
Repeating a days event and times
times....................................................Page 20
Zone controller functions.....................Page 21
Temperature set point range
limit......................................................Page 22
Temperature setback...........................Page 23
Tips for cold winter/hot summer..........Page 24
Operating tips for extreme weather
(Winter)...............................................Page 25
Operating tips for extreme weather
(Summer)............................................Page 26
Energy conservation tips.....................Page 27
Maintenance........................................Page 28
Trouble shooting..................................Page 29
Resetting wall control..........................Page 30
Memo...................................................Page 30
Additional Features
Additional Features
Air Conditioner
Model No.
Serial No.
The air conditioner model and serial number is situated on the access panel of the
outdoor unit bottom left corner.
Wall Controller
Model No.
The wall controller model number is situated inside the wall controller fl ip lid.
Installer
Company Name
Phone Number
Technicians Name
2

ADVANCE FEATURES
1Auto-Restart After Power Failure
Should a power failure occur whilst the air conditioner is running, the wall
controller will restart the air conditioner in the same mode when the power is
restored.
27 - Day Programmable
A fully programmable 7-Day TIMECLOCK feature allows you to set the air conditioner
to turn on and off at different times for each day of the week. Each day can have two
programmed events. Each event has an on and off time ( See 7-Day Programmable
Operation section, page 15).
3One Touch after Hours Time Function
To start air conditioning system for a preset time outside of normal operating hours
press ON / OFF button. To turn off air conditioning system before the completion of
preset run time, press ON / OFF button again.
4Integrated Zoning ( Optional )
A zone control option is available to control up to 4 zone areas. The integrated zon-
ing system has a unique feature, where it can select which remote temperature sen-
sor to use depending on which zones are selected. One example is on a two-storey
house with only the downstairs zone on. The zone control will select the downstair
sensor to control the temprature, thus ensuring the perfect comfort in the area oc-
cupied. (See zone controller functions, page 21).
5Auto Defrost Function ( Heating Mode )
At certain outdoor conditions (low temperature) there may be a build up frost on
the outdoor heat exchanger. This gradual build up frost reduces the
performance of the air conditioner. the microprocessor detects this frost build up
and will automatically activate the defrost mode.
The defrost mode is displayed on the wall controller by fl ashing the heat light
every second.
6Setback Operation
Temperature setback is useful in unoccupied times or during the night to maintain a
maximum or minimum room temperature. Setback changes the operating set points
to provide cooling and heating if the temperature rises or falls to these minimum and
maximum setback settings. (See temperature setback, page 23).
7Hot Start Function ( Heating Mode )
When the air conditioner starts in heating mode, the indoor fan is delayed for a
short period of time, this allows the heat exchanger to warm up before the air
fl ow starts, thus preventing cold drafts. The hot start feature also activates itself
when the system fi nishes defrosting.
8Filter Clean Light
The microprocessor monitors the accumulated run time of the air conditioner
and after a preset number of hours has passed, the “Filter” light will fl ash,
indicating it’s time to check if fi lter needs cleaning. (See Maintenance section,
page 28)
9Self Diagnosis
In the unlikely event that a fault develops with the air conditioner the
microprocessor will diagnose the fault (where possible) and display a fault code
on the wall controller. (See trouble shooting, page 29)
3

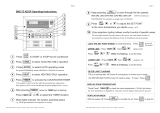
1Temperature setting button
Lowers room temperature.
2Temperature setting button
Raises room temperature.
3Fan control button
Changes fan speed and select
continuous or non-continuos fan
operation.
4Continuos indicator
Is illuminated when fan is set to
continuos mode.
5High fan speed indicator.
6Digital display
Display setpoint, room temp, timer
hours
7Low speed fan indicator
8Auto indicator
This light indicates the system will
automatically select heating or cooling
operation.
WALL CONTROLLER FUNCTIONS
4
9Heat indicator
10 Cool indicator
11 Run indicator
Run light is illuminated when the
outdoor machine is running.
12 ON indicator
13 OFF indicator
14 ON / OFF button
15 Room temperature indicator
Flashes when digital display is showing
room temperature.
16 Timer operation button
Activates timer.
17 Timeclock program up arrow setting
button
18 Timeclock program down arrow
setting button
1
2
3
4
5
6
78
9
10
11
12 13
14
15
16
17
18

5
19 Zone three button
20 Zone one button
21 Exit button
For quick exit from any program menu.
22 Time clock program button
For setting the clock / entering the
7-day time clock menu.
23 Operation mode button
Selects cooling, heating & auto modes.
24 Day indicator
Display the day of the week when
the time is shown and which day is
selected for programming.
25 AM / PM indicator
26 Program and event menu
27 Timer indicator
28 Filter indicator
(See maintenance section, page 28).
29 After hours indicator light
30 Display button
Toggles between displaying set temp.,
time and room temp.
31 Repeat indicator
For repeating the previous day settings
to current day.
32 Cancel / Restore button
33 Zone two button
34 Zone four button
24
21
20
19
22
25 26 27 28
30
32
33
34
WALL CONTROLLER FUNCTIONS
23
29
31

6
Circulation Operation
1Make sure the system is off.
2Press the FAN CONTROL button.
3 Adjust the FAN SPEED by pressing the FAN CONTROL
button.
The fan speed can be set to:
Low (LOW is illuminated)• High (HIGH is illuminated)•
4 Press ON/OFF button again.
The system will retain your last setting until next operation.
OFF

7
Cooling Operation
1Press ON/OFF button
2Press the AUTO
HEAT COOL button until “COOL” is illuminated.
3Set the desired temperature by pressing either the UP or
DOWN arrow key.
Maximum temperature setting 28• oC.
Minimum temperature setting 16• oC.
For a WARMER room temperature, press the UP arrow key.• For a COOLER room temperature, press the DOWN arrow key.•
4Adjust the desired fan speed by pressing the FAN
CONTROL button.
When your air conditioner is turned ON the indoor fan can run continuously
and is indicated by the CONT. light. This is generally preferred during the
cooling mode to ensure maximum air circulation. However, during the
heating mode this can create the effect of cool drafts. It then would be
preferable to have the indoor fan, cycle On and Off automatically with the
Outdoor Unit. This is selected by pressing the FAN button until the CONT. light
is Off.
5 Press ON/OFF button again.
The system will retain your last setting until next operation.
OFF

8
Heating Operation
OFF
1Press ON/OFF button
2Press the AUTO
HEAT COOL button until “HEAT” is illuminated.
3Set the desired temperature by pressing either the UP or
DOWN arrow key.
Maximum temperature setting 28• oC.
Minimum temperature setting 16• oC.
For a WARMER room temperature, press the UP arrow key.• For a COOLER room temperature, press the DOWN arrow key.•
4Adjust the desired fan speed by pressing the FAN
CONTROL button.
When your air conditioner is turned ON the indoor fan can run continuously
and is indicated by the CONT. light. This is generally preferred during the
cooling mode to ensure maximum air circulation. However, during the
heating mode this can create the effect of cool drafts. It then would be
preferable to have the indoor fan, cycle On and Off automatically with the
Outdoor Unit. This is selected by pressing the FAN button until
the CONT. light is Off.
5Press ON/OFF button again.
The system will retain your last setting until next operation.

Auto Operation
OFF
Automatically changes between heating and cooling
1Press ON/OFF button
2Press the AUTO
HEAT COOL button until “AUTO” is illuminated.
3Set the desired temperature by pressing either the UP or
DOWN arrow key.
Maximum temperature setting 18• oC.
Minimum temperature setting 16• oC.
For a WARMER room temperature, press the UP arrow key.• For a COOLER room temperature, press the DOWN arrow key.•
4Adjust the desired fan speed by pressing
the FAN CONTROL button.
When your air conditioner is turned ON the indoor fan can run continuously
and is indicated by the CONT. light. This is generally preferred during the
cooling mode to ensure maximum air circulation. However, during the
heating mode this can create the effect of cool drafts. It then would be
preferable to have the indoor fan, cycle On and Off automatically with the
Outdoor Unit. This is selected by pressing the FAN button until
the CONT. light is Off.
5Press ON/OFF button again.
The system will retain your last setting until next operation.
9

Display Button
Shows different setting details on the screen display.
1 Repeatedly pressing the display button toggles through
the following:
Temperature Set Point displayed
Indicated by SET and oC lights being illuminated.
Time displayed
Time and Day displayed.
Room temperature displayed
Indicated by ROOM and oC lights being illuminated.
10

Timer Operation
1 Press the DISPLAY button until the Time or Set Temp is
displayed.
2 Ensure that air conditioner is ON
Make sure the system is running and the operating conditions are those
desired.
3 Press the timer button
TIMER and OFF indicators will fl ash• Display shows the selected off time.•
4 Set the desired OFF time by pressing either the UP or
DOWN arrow buttons.
The UP/DOWN arrow buttons must be pressed while TIME and OFF are • fl ashing.
The timer can be set from 15 mins. to 24 hours duration (in 15-mins. period)•
5 Once the desired OFF time has been selected, press the
TIMECLOCK PROGRAM button to enable the Timer
The timer indicator now illuminated. If not, repeat the process again but
make sure you press timeclock program while the timer light is still fl ashing to
confi rm.
6 Press ON/OFF button again.
OFF timer is cancelled and the air conditioner stays ON.
7To change the Off timer, follow step 3 to 5.
Cancelling OFF Timer
Changing the OFF Timer duration
OFF Timer
Function
11
Notice
When the air conditioner is started by • the timer function, it will only start in Auto
mode.
Timer Operation cannot turn ON Fan only • mode.
Timer function does not work• when
after hours is enabled. See page 14 for
disabling after hours.

Timer Operation
ON Timer
Function
12
Notice
When the air conditioner is started by • the timer function, it will only start in Auto
mode.
Timer Operation cannot turn ON Fan only • mode.
Timer function does not work• when
after hours is enabled. See page 14 for
disabling after hours.
1Ensure the air conditioner is off.
2 Press the timer button
TIMER and OFF indicators will fl ash• Display shows the selected off time.•
3 Set the desired ON time by pressing either the UP or
DOWN arrow buttons.
The UP/DOWN arrow buttons must be pressed while TIME and ON are • fl ashing.
The timer can be set from 15 mins. to 24 hours duration (in 15-mins. period)•
4 Once the desired ON time has been selected, press the
TIMECLOCK PROGRAM button to enable the Timer
The timer indicator now illuminated. If not, repeat the process again but make
sure you press timeclock program button while timer light is fl ashing.
5 Press ON/OFF button again.
Timer is cancelled and the air conditioner stays ON.
6To change the Off timer, follow step 2 to 4.
Cancelling ON Timer
Changing the ON Timer duration

After Hours Operation
13
TIMECLOCK has to be enabled for After Hours Run Timer to operate.• Setting up of After Hour Timer is done via the Operating Functions Menu, see next • page.
If after Hours Run Timer overlaps into TIMECLOCK start time, the system will start, • but AH light will be OFF.
1 To start the air conditioner for a preset time outside of
normal operating hours press the ON/OFF button.
AH and TIMER light will be illuminated.
2 Press the ON/OFF button again to turn OFF air conditioner
before the completion of After Hours Run Timer duration
AH and TIMER light will turn off.
Notice

Enabling and Disabling After Hours
via Operation functions Menu
14
1Ensure air conditioner is turned off.
2 Press and hold EXIT button. Press TIMECLOCK /
PROGRAM button and release them altogether
Function 1 is displayed Auto Heat Cool fl ashing.
3 Press TIMECLOCK / PROGRAM button repeatedly until
the AH Timer is illuminated.
ON or OFF will be fl ashing.
4 Make your selection by pressing the UP or DOWN
TIMECLOCK PROGRAM arrow buttons.
5 Once you have made your selection press TIMECLOCK/
PROGRAM button
This make the after hours function available to use.
The AH hours duration is the next function if you
have correctly enabled the After Hours Function.
6Set duration time using the UP and DOWN arrows.
7 Once you have set duration press EXIT button to exit
menu.
AH Duration

Timeclock Operation
The 7-Day TIMECLOCK feature allows you to set the air conditioner to turn ON and • OFF at different times for each day of the week.
Each day can have two programmed events.• Each event has an ON and OFF time. Each event has an ON and OFF time.• TIMECLOCK PROGRAM set up can only be done with air conditioner switched OFF.•
MON TUE WED THU FRI SAT SUN
EVENT
1
ON
TIME 6:00am 6:00am 6:00am 6:00am 6:00am 7:00am 8:00am
OFF
TIME 10:00am 10:00am 10:00am 10:00am 10:00am 9:00am 12:00pm
EVENT
2
ON
TIME 4:00pm 4:00pm 4:00pm 4:00pm 1:00pm -:-- -:--
OFF
TIME 10:00pm 10:00pm 10:00pm 10:00pm 11:00pm -:-- -:--
Example of typical TIMECLOCK set up
Notice
15

Ensure the air conditioning system is turned off and displaying time of day.
1Press the TIMECLOCK PROGRAM button 3 times
“SET” will be illuminated and the “HOUR” will start fl ashing on the display.
2 Adjust the “hours” by using the TIMECLOCK PROGRAM
UP/DOWN arrow buttons.
3 Press the “TIMECLOCK PROGRAM” button.
SET will be illuminated and the “Minutes” will be fl ashing on the display.
4 Adjust the “minute” by using the TIMECLOCK PROGRAM
UP/DOWN arrow buttons.
5 Press the “TIMECLOCK PROGRAM” button.
SET will be illuminated and the selected Day will be fl ashing
6 Set the “Day” using the TIMECLOCK PROGRAM UP/
DOWN arrows.
7Press the TIMECLOCK PROGRAM button
8 Press the EXIT button.
The time and Day have been set.
During a power failure, the clock retains the time and day via the backup battery
inside the wall control.
Battery Backup
16
Setting the Time and Day
Notice

De-activating
7-Day Programmable Operation
Activating and
De-activating the
7-Day Timeclock
1 Press the TIMECLOCK PROGRAM button twice.
SET and TIMECLOCK will illuminate and OFF indicator will fl ash.
2 Press the TIMECLOCK PROGRAM button UP/DOWN arrow
until ON is fl ashing.
3Press EXIT button
TIMECLOCK should now be illuminated.
1Press the TIMECLOCK PROGRAM button twice.
SET and TIMECLOCK will illuminate and OFF indicator will fl ash.
2Press the TIMECLOCK PROGRAM UP/DOWN arrows until
OFF is fl ashing.
3Press the EXIT button.
TIMECLOCK should now be off.
.
Ensure the air conditioning system is turned off and displaying time of day.
Notice
17
Activating

1 Press the TIMECLOCK PROGRAM button repeatedly until
EVENT, 1, ON and MON are illuminated
You are now setting Monday, Event 1 ON time. The display shows the ON time.
2 Use the TIMECLOCK UP/DOWN arrow buttons to adjust
time.
3 Press the TIMECLOCK PROGRAM button to move to the
EVENT 1 OFF time.
The display shows the OFF time.
4 Repeat step 2 above to set the EVENT 1 OFF time.
5 Press the TIMECLOCK PROGRAM button to move to next
event.
The event time is entered once the TIMECLOCK PROGRAM button has been
pressed. If the EXIT button is pressed before moving to the next event, the time
programmed will not be entered.
6 Repeat steps 2 to 5 above to program all the events
required.
1 Event ON times can be set up to 11:45PM of the current
day.
2 Event ON times can be set up to 9:00AM the following day.
Re-Activate an Event
Programming the Events
18
If you program Event 1 past midnight, then Event 2 will be automatically cancelled.
Notice
Ensure the air conditioning system
is turned off and displaying time of
day.
Notice

Re-activating Cancelled Events
1 Press the TIMECLOCK PROGRAM button repeatedly until
the ON time for the event to be cancelled is displayed.
2 Press the CANCEL/RESTORE button.
-:-- will be displayed indicating the event is cancelled.
3Repeat the above steps to cancel any desired event.
4 Refer to the 7-Day TIMECLOCK operation for
programming sequence. See Page
See page 17.
1 Press the TIMECLOCK PROGRAM button repeatedly until
the cancelled event is displayed.
-:-- will be displayed indicating the event is canceled.
2Press the CANCEL/RESTORE button.
3 Repeat the above steps to restore any previously
cancelled event.
Cancelling Individual Events
19
Ensure the air conditioning system is turned off and displaying time of day.
Notice
/