Page is loading ...

Digital Telephone System
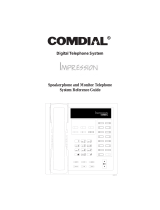
LCD Speakerphone
System Reference Guide
R
1
2
4
7
0
8
9
5
6
3
#
ABC
GHI
PRS
OPER
TUV
WXY
JKL
MNO
DEF
SPKR
HOLD
TAP
ITCM
T/C
MUTE
unisyn05.cdr

This user guide is applicable for the Impression
LCD speakerphone model 2022S-
**
Rev. A and
later using the following software cartridges on a
digital telephone system:
I0408 Rev. 18A and Later
I0816 Rev. 18A and Later
I1632 Rev. 18A and Later
S0408 Rev. 18A and Later
S0816 Rev. 18A and Later
S1632 Rev. 18A and Later
Attention
Comdial
®
makes every effort to design the features in our
communications systems to be fully interactive. Under cer-
tain conditions, some features may be incompatible with
each other and will not work simultaneously. Comdial as-
sumes no responsibility for problems caused by incompatible
features.
The possible combinations of accessories and features are far
too numerous for us to document in this manual. Further-
more, Comdial Corporation cannot guarantee that features
will operate as described in this publication when they are
combined with other features.

Contents
1 IntroducingTheLCDSpeakerphone...........1
1.1 Using This Guide ...................................................... 1
1.2 Knowing Your Telephone’s Features......................... 2
1.3 UsingYour Speakerphone........................................ 4
1.4 Understanding What The Lights Mean..................... 6
1.5 Understanding The LCD Abbreviations .................. 8
1.6 Understanding What the Rings Mean....................... 9
2 ProgrammingTheAttendantFeatures.........11
2.1 Using Chapter Two.................................................. 11
2.2 Creating The LCD Response Messages.................. 12
2.3 Naming The System Telephones............................ 16
2.4 Setting The Music On Hold Feature....................... 20
2.5 Setting The Night Transfer Of Ringing Mode........ 24
2.6 Setting The Night Transfer Button......................... 24
2.7 Setting The System Clock....................................... 22
2.8 Printing The Station Message Detail Accounting
(SMDA) Records.................................................... 23
2.9 Storing The System Speed Dial Numbers .............. 24
2.10 Reporting System Alarms ...................................... 27
2.11 Transferring Calls To The Voice Mail System....... 37
2.12 Transferring Calls To A Secondary
Attendant Telephone ............................................... 27
2.13 Using Digital Voice Announce................................ 28
2.14 Understanding Direct Inward Station Dialing........ 32
3 AnsweringCalls ...........................35
3.1 Answering Outside Calls ........................................ 35
3.2 Answering Intercom Calls...................................... 35
3.3 Responding To A Subdued Off-Hook
VoiceAnnouncement............................................... 36
3.5 Using Caller ID ....................................................... 37
3.4 Using Call Pick-Up................................................. 37
3.7 Using Station Monitoring ....................................... 38
3.6 Using Night Transfer............................................... 38
Contents
Contents–iii

4 MakingCalls..............................57
4.1 Calling Outside The System .................................. 39
4.2 Calling Intercom Numbers..................................... 40
4.3 Calling A Busy Station (Executive Override)......... 41
4.4 Camping At Another Telephone
And Waiting For An Automatic Callback............... 42
4.5 Camping At Another Telephone
And Waiting For An Answer (Call Waiting)........... 42
4.6 Making An Automatic Dialing Call (Autodial)...... 43
4.7 Making A Speed Dial Call ..................................... 44
4.8 Making An Automatic Redial Call (Auto-Redial).. 45
4.9 Redialing The Last Number Dialed........................ 46
4.10 Redialing A Saved Number.................................... 46
4.11 Selecting A Line Group........................................... 47
4.12 Showing The Cost Or Time Of A Call.................... 47
4.13 Waiting For A Line (Queuing)................................ 48
4.14 Voice Announcing To A Busy Station
(Subdued Off-Hook Voice Announcement)........... 49
4.15 Using Dial By Name............................................... 50
5 HoldingCalls..............................51
5.1 Holding A Call ........................................................ 51
5.2 Using Exclusive Hold.............................................. 51
5.3 Using The Hold Recall Feature.............................. 52
5.4 Using Call Park...................................................... 5.4
5.5 Using Directed Hold .............................................. 53
6 TransferringAndConferencing Calls........ 55
6.1 Transferring Calls.................................................... 55
6.2 Using Screened Transfer......................................... 56
6.3 Using Unscreened Transfer..................................... 57
6.4 Conferencing Telephones Together......................... 58
6.5 Making An Unsupervised Conference Call............ 59
Contents
iv–Contents

7 UsingTheOtherTelephoneFeatures..........61
7.1 Adjusting The Display Contrast.............................. 61
7.2 Blocking Voice Announce Calls............................. 61
7.3 Controlling Background Music............................... 63
7.4 Choosing Between Pluse And Tone Dialing........... 63
7.5 Choosing Your Personal Ring Tones....................... 64
7.6 Displaying The Functions Of Your
Station’s Buttons (Button Query) ........................... 64
7.7 Entering An Account Code .................................... 65
7.8 Forwarding Your Calls............................................ 66
7.9 Listening To A Call Over
The Speaker (Group Listening) .............................. 67
7.10 Making A Call Non-Private .................................... 67
7.11 Monitoring A Conversation Between
Two Telephones (Service Observing)..................... 68
7.12 Muting Your Telephone.......................................... 69
7.13 Operating Your LCD Speakerphone As A
Department Station ................................................. 70
7.14 Relocating Your Telephone ..................................... 71
7.15 Sending A Paging Announcement ......................... 72
7.16 Setting The Volume Control................................... 74
7.17 Setting A Do Not Disturb Condition....................... 76
7.18 Using Toll Restriction Override.............................. 77
7.19 Using The Optional Tracker Pager System............ 78
7.20 Using The Data Interface Unit................................ 80
Contents
Contents – v

8 UsingNon-VerbalMessaging................ 83
8.1 Turning On A Message Waiting Light.................... 83
8.2 Sending LCD Messages.......................................... 84
8.3 Leaving A Station-To-Station Message .................. 85
8.4 Sending An Assist Button Message........................ 85
9 ProgrammingYourTelephone................87
9.1 Programming For Automatic Dialing ..................... 87
9.2 Storing Autodial And Speed Dial Numbers............ 90
9.3 Storing DSS Numbers............................................. 91
9.4 Storing The Feature Buttons................................... 92
9.5 Storing The Special Purpose Feature Buttons....... 94
10 TroubleshootingYourTelephone............ 97
10.1 Using Your Quick Reference Guide........................ 98
Glossary................................... G–1
Index .....................................I–1
Contents
vi – Contents

Introducing The LCD
Speakerphone
1.1 Using This Guide
Chapter One provides you with a general overview of your new
speakerphone and its functions. Each of the other nine chapters in this
guide is clear and easy to follow.
The Chapters are numbered as follows:
Chapter One: Introducing The LCD Speakerphone
Chapter Two: Programming The Attendant Features
Chapter Three: Answering Calls
Chapter Four: Making Calls
Chapter Five: Holding Calls
Chapter Six: Transferring and Conferencing Calls
Chapter Seven: Using The Other Telephone Features
Chapter Eight: Sending And Receiving Non-Verbal Messages
Chapter Nine: Programming Your Telephone
Chapter Ten: Troubleshooting Your Telephone
For your convenience, a quick reference guide, a glossary, and an
alphabetical index are included in the back of this user’s guide.
1
Introducing The LCD Speakerphone
Impression LCD Speakerphone – 1

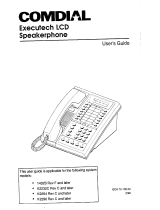
1.2 KnowingYourTelephone’sFunctions
The Impression model 2022S-✳✳ LCD speakerphone provides many
versatile features for your use. Refer to the following list for the
features and their functions.
• Alphanumeric Display
(Liquid Crystal Display—LCD)
– Displays time, day, and date
– Keeps you apprised of the status of your telephone
– Provides programming prompts
• Hold Button
– Places a line on hold
– Stores pauses in number sequences during programming
• Interactive Buttons
– Provide quick and easy access to system features
– Provide straightforward button programming without dialing
codes (the interactive buttons themselves, however, are not
programmable)
• Intercom Button (ITCM)
– Selects an intercom line
– Initiates many of the telephone’s features
• Message Waiting Light (located beside the Hold button)
– Indicates that a message awaits pick up
• Microphone Opening
– Allows handsfree operation of speakerphone (speak clearly
toward microphone opening)
• Mute Button
– Allows you to respond to a SOHVA call
– Keeps the person on the line from hearing your conversation
• Programmable Buttons
– Allow you to store numbers for automatic dialing functions
– Allow you to store telephone extension numbers for Direct
Station Selection (DSS)
– Indicate which lines are either in use or on hold
Introducing The LCD Speakerphone
2 – Impression LCD Speakerphone

• Speaker
– Sounds distant party’s voice
– Sounds ringing and call progress tones
• Speaker Button (SPKR)
– Disconnects a call when you are on a handsfree call
– Ends or cancels programming
– Activates group listen feature
• TAP Button (will be preprogrammed for only
one of the following functions)
– Recalls dial tone, or
– Activates host system features
• Transfer/Conference Button (T/C)
– Transfers calls
– Sets up conference calls
• Volume Control (Rocker Switch Control)
– Regulates the volume of the ringer, the speaker, the handset,
the headset, and of the group listen feature
unisyn08.cdr
LCD Display
Interactive Buttons
Speaker
Mute Button
T/C Button
SPKR Button
Message
Waiting Light
Hold Button
TAP Button
ITCM Button
Programmable
Buttons
Volume Control
Microphone Opening
1
2
4
7
0
8
9
5
6
3
#
ABC
GHI
PRS
OPER
TUV
WXY
JKL
MNO
DEF
SPKR
HOLD
TAP
ITCM
T/C
MUTE
Introducing The LCD Speakerphone
Impression LCD Speakerphone – 3

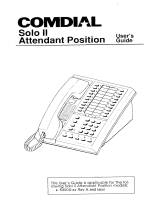
1.3 Using Your Speakerphone
Your Impression speakerphone is handsfree allowing you to dial a call
or answer a call-announce while on hook. Your speakerphone gives you
the freedom to speak to the distant party without ever lifting the
handset. After you make the initial contact, you can carry on a
telephone conversation and still be free to do other things.
During the course of a conversation, you can always switch from the
speakerphone to the handset for privacy. To do this, just lift the handset
and talk. To return to speakerphone use, press the SPKR button and
hang up the handset.
• To manually place a call using your speakerphone,
– press the line button or the ITCM button,
– dial the number,
– when party answers, talk.
To autodial using your speakerphone, just press the
programmed button and talk when your party answers.
• To answer a call with your speakerphone,
– press the line button with flashing red or orange light,
– speak toward the telephone to answer the call.
• To end a call with your speakerphone,
– press SPKR.
Understanding Speakerphone Operation
Your speakerphone is activated by the sound of your voice; therefore,
the operation of a speakerphone is slightly different from the use of a
standard telephone handset. Consider all of the following guidelines
before you use your speakerphone.
Introducing The LCD Speakerphone
4 – Impression LCD Speakerphone

• Locating Your Speakerphone
– Place your speakerphone at least eight inches away from your
desk edge (the desktop helps to reverberate your voice into the
microphone).
– Do not place your speakerphone in a high-traffic area.
Background noise from voices and machines can inhibit the
speakerphone’s performance.
– Do not place anything directly beside or beneath your
speakerphone; objects in the speakerphone’s path may inhibit
the microphone’s operation.
• Using Your Speakerphone
– Speak directly into the microphone (don’t shout, but speak in a
loud and clear voice for best results).
– Remain within a three-foot radius while speaking (the
microphone may pick up your voice from a greater distance,
but within three feet provides optimal results).
– Make sure you and your distant party don’t speak at the same
time (because the voice-activated microphone overrides the
speaker, both parties speaking simultaneously may garble the
transmission).
unisyn07.cdr
Speaker
SPKR Button
Handset
ITCM Button
Volume Control
Microphone Opening
1
2
4
7
0
8
9
5
6
3
#
ABC
GHI
PRS
OPER
TUV
WXY
JKL
MNO
DEF
SPKR
HOLD
TAP
ITCM
T/C
MUTE
Introducing The LCD Speakerphone
Impression LCD Speakerphone – 5

1.4 Understanding What the Lights Mean
The lights on your telephone indicate the status of lines, features, and
intercom.
• Next to a Direct Station Select (DSS)/
Busy Lamp Field (BLF) button:
– Steady red = station is in use, or in Do Not Disturb.
– Flashing red = station is receiving a call or station is
calling you.
– Fluttering red = station-to-station messaging has been set.
• Next to a line button:
– Steady green = line is in use at your station.
– Steady red = line is in use at another station.
– Flashing red = a call is coming in on this line.
– Flashing orange = your line is ringing and will be answered
when you take the telephone off hook.
– Winking green = line is on hold at your station.
– Winking red = line is on hold at another station.
– Fluttering green = line has recalled from hold at your station.
– Fluttering red = line has recalled from hold at another station.
• Next to a fixed or programmable feature button:
– Steady red = the feature is on.
– Steady off = the feature is off.
• Next to the ITCM button:
– Steady red with a quick flash = you are using your intercom.
– Flutteringred=autoredialisinuse,orsystemisinnight
mode (station 10).
– Winking red = an LCD message is set on your telephone for
others to receive when calling.
– Flashing red = another station is calling you.
• Next to the HOLD button:
– Flashing red = message awaits pick up.
– Fluttering red = automatic station relocation has been set.
Introducing The LCD Speakerphone
6 – Impression LCD Speakerphone

• Next to the SPKR button:
– On steady (with telephone on hook and busy)
= speakerphone mode active.
– On steady (with telephone on hook and idle)
= background music turned on.
– On steady (with telephone off hook and busy)
= group listen is active.
• Next to the MUTE button:
– On steady = called party cannot hear your conversation.
Mute Light
Speaker Light
Message
Waiting Light
Hold Light
Intercom Light
unisyn12.cdr
Line Lights,
DSS/BLF Lights
(one for each button)
1
2
4
7
0
8
9
5
6
3
#
ABC
GHI
PRS
OPER
TUV
WXY
JKL
MNO
DEF
SPKR
HOLD
TAP
ITCM
T/C
MUTE
Interactive Buttons
Introducing The LCD Speakerphone
Impression LCD Speakerphone – 7

1.5 Understanding The LCD Abbreviations
The following chart identifies the abbreviations that appear above your
interactive buttons on the LCD screen.
LCD Screen Feature
ADIAL Automatic Dial
ALL All
ANS Answer
ARDL Automatic Redial
BKSP Back Space
BLOCK Block
CAMP Camp
CFWD Call Forward
CLBK Call Back
CLEAR Clear
CWAIT Call Waiting
DARK Dark (Contrast)
DIAL Dial
DISP Display (Contrast)
DND Do Not Disturb
DSS Direct Station Select
EXIT Exit
EXT External
FEAT Feature
FWD Forward
G (followed by last number) Group
HOLD Hold
HVHLD Have Hold
INT Internal
L (followed by last number) Line
Last No Saved Last Number Saved
LIGHT Light (Contrast)
MUSIC Background Music
MSG Message
NEXT Next Display
Introducing The LCD Speakerphone
8 – Impression LCD Speakerphone

LCD Screen Feature
OVER Override
P (followed by last number) Port
PERS Personal
PREV Previous Display
RECALL Recall
RECON Reconnect
RING Ring Tone
S (followed by last number) Station
SAVE Save Number
SDIAL Speed Dial
SEND Send Transfer
SET Set
SOHVA Subdued Off Hook
Voice Announce
TIMER Timer
TKMSG Take Message
VAB Voice Announce Block
1.6 Understanding What the Rings Mean
Two short rings = intercom call.
Single longer ring = outside call.
One short ring burst = voice announce.
Three short ring bursts = ring back from a held call, callback from a
queued call.
You can vary the ringing tone of your telephone, choosing from one of
six different rings. This way, you can identify your ring even though
you may not be close to your telephone.
Additionally, so you won’t be disturbed when you’re busy on a call and
another call rings at your station, the ring volume is subdued
automatically.
Introducing The LCD Speakerphone
Impression LCD Speakerphone – 9

This page remains blank intentionally.
10 – Impression LCD Speakerphone

ProgrammingThe
Attendant Features
2.1 Using ChapterTwo
The main system operator, or attendant, should be familiar with all of
the information contained in this system user’s manual. The manual is
user-friendly and designed with both the attendant and the station
user’s needs in mind.
All of the chapters will prove useful to you, but if you are the system
attendant, you should closely study Chapter Two, Programming the
Attendant Features, before you begin operating the system.
Within Chapter Two you will find helpful information on programming
all of the special features on your telephone that are unique to attendant
station operation.
NOTE: If possible, read all of this manual before you attempt to
operate your telephone system.
2
Programming The Attendant Features
Impression LCD Speakerphone – 11

2.2 Creating The LCD Response Messages
When you are busy or are away from your desk, you can set a message
at your telephone that will be received by any LCD speakerphone
within your system. Your system provides two default messages:
Backat...and Call.... In addition, you can add eight customized
messages, or you can create up to ten messages if you choose not to use
the two default messages.
NOTE: If you intend to create a response message to a voice announce,
remember that this is also a message, and that it uses one of
your message locations.
• To store the LCD messages, proceed as follows:
— write your messages on the chart on page 15 (each message
can have up to 16 characters),
— use the letter code table (on page 14) to assign a number to
each letter,
— write these numbers on the chart line beside the
message letters,
— press ITCM,
—dial✳#05,
— dial a message location number (0–9),
— dial # to clear current message,
— compose your messages by dialing the two-digit codes that
relate to the letters,
—dial✳to save message,
— dial next location number, # to clear it, two-digit codes for the
message, and ✳ to save,
— repeat previous step until all messages are stored,
— press SPKR to end.
Programming The Attendant Features
12 – Impression LCD Speakerphone

Example: Create a message that will read as TAKE MESSAGE and
program it into message location number 3.
— press ITCM,dial✳
#05,
—dial 3
#,
—dial 81, 21, 52, 32 12 61, 32, 73, 73, 21, 41, 32
TAKE space MESSAGE
—dial ✳,and press SPKR to end.
— When you are finished creating and programming messages,
fill in the list on page 15 of this guide. Make a list of the
stored messages and their location numbers, and give each
station user a copy.
Programming The Attendant Features
Impression LCD Speakerphone – 13

Letter Code Table
Character Code Character Code Character Code
A21a24SPACE12
B22b25;17
C23c26/18
D31d34“19
E32e35.27
F33f36,28
G41g44:29
H42h45101
I 43i46202
J51j54303
K52k55404
L53l56505
M61m64606
N62n65707
O63o66808
P71p74909
Q11q14000
R72r75 +
S73s76 ^
T81t84 ^
U82u85 ^
V83v86 ^
W91w94 ^
X92x95 ^
Y93y96 ^
Z13z16 ^
Programming The Attendant Features
14 – Impression LCD Speakerphone
/