Page is loading ...

User Guide
Original Instructions
ProJet™ 6000
3D Professional Printer

3D Systems, Inc.
CONTENTS
INTRODUCTION ......................................................................................4
About this Manual .................................................................................... 5
Service Contact ...................................................................................5
Copyright ........................................................................................... 5
FCC Notice.......................................................................................... 5
Limitations of Warranty and Liability ...................................................................... 5
SAFETY ............................................................................................6
Customer Safety Program . . . . . . . . . . . . . . . . . . . . . . . . . . . . . . . . . . . . . . . . . . . . . . . . . . . . . . . . . . . . . . . . . . . . . . . . . . . . . . 6
Levels of User ....................................................................................... 6
Operators ........................................................................................6
Certied Service Personnel ..........................................................................6
Safety Design Features in the ProJet™ 6000 ............................................................... 6
Safety Symbols and Denitions .......................................................................... 7
Safety Hazards and General Guidelines ................................................................... 8
Follow these general safety guidelines regarding .........................................................8
Training and Instructions ............................................................................8
Material Handling ..................................................................................8
Machine Handling .................................................................................8
Laser Safety ......................................................................................8
Alarms and Warnings ...............................................................................8
Environmental Safety Issues . . . . . . . . . . . . . . . . . . . . . . . . . . . . . . . . . . . . . . . . . . . . . . . . . . . . . . . . . . . . . . . . . . . . . . . . . . . . 9
Safety Interlocks...................................................................................... 9
Interlocks ........................................................................................9
Laser Safety........................................................................................ 10
Print Material Handling and Safety....................................................................... 10
Print Material Characteristics ........................................................................10
Print Material Disposal .............................................................................10
Print Material Spill Containment. . . . . . . . . . . . . . . . . . . . . . . . . . . . . . . . . . . . . . . . . . . . . . . . . . . . . . . . . . . . . . . . . . . . . . 10
Shelf Life .......................................................................................11
In-Service Life ...................................................................................11
Contamination ...................................................................................11
Polymerization ...................................................................................11
Electrical Safety ......................................................................................11
Emergency Shut Down Using the E-Stop ................................................................. 12
First Aid and Protective Equipment ...................................................................... 12
First Aid and Protective Equipment ...................................................................12
Skin Contact. . . . . . . . . . . . . . . . . . . . . . . . . . . . . . . . . . . . . . . . . . . . . . . . . . . . . . . . . . . . . . . . . . . . . . . . . . . . . . . . . . . . . 12
Eye Contact .....................................................................................12
Contact Lenses ..................................................................................12
Fume Inhalation ..................................................................................13
Safety Notice ....................................................................................... 13
Label Installation Diagram . . . . . . . . . . . . . . . . . . . . . . . . . . . . . . . . . . . . . . . . . . . . . . . . . . . . . . . . . . . . . . . . . . . . . . . . . . . . . 14
OVERVIEW .........................................................................................17
ProJet™ 6000 Components............................................................................ 17
Upper Build Chamber................................................................................. 18
Elevator and Print Applicator Mechanism ................................................................. 19
Detail A .........................................................................................20
Lower Build Chamber................................................................................. 21
Material Cart........................................................................................ 22
Material Cart with Bottle Holder Extended ..............................................................23
Front Panel Indicators ................................................................................ 24
Blue LED - Laser .................................................................................24
Green LED - Control ..............................................................................24
Amber LED - System ..............................................................................24
USER INTERFACE ...................................................................................25
Opening Screen and Login ............................................................................ 25
Status............................................................................................. 27
Settings ........................................................................................... 28
1
2
3
4
2

3D Systems, Inc.
Printer............................................................................................. 29
Global Print Defaults ..............................................................................29
Scale Factors ....................................................................................30
Network ........................................................................................31
Display Settings ..................................................................................31
User Settings . . . . . . . . . . . . . . . . . . . . . . . . . . . . . . . . . . . . . . . . . . . . . . . . . . . . . . . . . . . . . . . . . . . . . . . . . . . . . . . . . . . . . . . 32
Heater Settings ..................................................................................34
Drawing Settings .................................................................................35
Advanced .......................................................................................... 36
Printer .........................................................................................36
Elevator-Leveler ..................................................................................37
Print Applicator ...................................................................................38
Printhead .......................................................................................39
Prints ..........................................................................................41
Alerts ............................................................................................. 44
Logout ............................................................................................ 45
OPERATION ........................................................................................47
Install Print Tray and Material Cart....................................................................... 47
Install Elevator Forks and Print Platform .................................................................. 50
Power Up and Login.................................................................................. 53
Fill Material Cart and Print Tray with Material .............................................................. 56
Level Print Platform .................................................................................. 57
Install the ProJet™ 6000 in 3D Manage .................................................................. 60
Submit a Print Job ................................................................................... 61
Start a Print Job ..................................................................................... 63
Print Job Complete - Move Platform to Ofoad Position ...................................................... 64
Move Print Platform to Ofoad Position using Elevator Controls .............................................65
REMOTE OPERATION ................................................................................66
POST PROCESSING .................................................................................70
EC DECLARATION OF CONFORMITY ...................................................................71
5
6
7
8
3

3D Systems, Inc.
INTRODUCTION
Thank you for purchasing the ProJet™ 6000 3D Printer. We pride ourselves in our ability to offer customers three dimensional modeling
solutions.
The 3D Systems team is condent your system will provide many years of service.
1
4

3D Systems, Inc.
ABOUT THIS MANUAL
This manual provides users with an understanding of features, system requirements, and operating procedures needed to create
nished parts using the ProJet 6000.
Should additional questions arise, contact 3D Systems:
Service Contact
Hotline
Every workday: 8:00 - 17:00 EST/EDT
1.800.793.3669
E-Mail [email protected]
Service Address
U.S.A.
3D Systems Inc.
333 Three D Systems Circle
Rock Hill, SC 29730
Service Address
Japan
3D Systems, Japan K.K.
4-6-8 Tsurumaki
Setagaya-Ku, Tokyo 154-0016
Service Address
Europe
3D Systems Europe Ltd.
Mark House, Mark Road
Hemel Hempstead
Herts HP2 7UA
United Kingdom
COPYRIGHT
© 2011 by 3D Systems, Inc. All rights reserved. This document is subject to change without notice as 3D Systems may (but shall
not be obligated to) make improvements to this document from time to time. This document is copyrighted and contains proprietary
information that is the property of 3D Systems, Inc. The ProJet™ 6000 customer does not have the right to copy, reproduce, or translate
this document in any way without the prior written consent of 3D Systems, Inc. No copies of the document may be sold or given to any
person or other entity. ProJet is a trademark and 3D Systems, the 3D logo and VisiJet are registered trademarks of 3D Systems, Inc.
FCC NOTICE
This equipment has been tested and found to comply with the limits for a class “A” digital device, pursuant to Part 15 of the FCC
Rules. These limits are designed to provide reasonable protection against harmful interference when the equipment is operated in
a commercial environment. This equipment generates, uses, and can radiate radio frequency energy and, if not installed and used
in accordance with the instruction manual, may cause harmful interference to radio communications. Operation of this equipment
in a residential area is likely to cause harmful interference in which case the user will be required to correct the interference at their
expense. Changes or modications not expressly approved by 3D Systems could void your authority to operate this equipment.
LIMITATIONS OF WARRANTY AND LIABILITY
This information is provided by 3D Systems for the convenience of its customers. It is believed to be reliable, but NO
REPRESENTATIONS, GUARANTEES, OR WARRANTIES OF ANY KIND ARE MADE AS TO ITS ACCURACY, FITNESS FOR A
PARTICULAR USE, OR THE RESULTS TO BE OBTAINED THEREFROM. The information is based in whole or in large part on
laboratory work and does not necessarily indicate performance in all conditions. Notwithstanding any information provided by 3D
Systems or its afliates, the customer remains fully responsible for determining which federal, state, or local laws or regulations, or
industry practices are relevant to activities in which it engages, as well as assuring that those laws, regulations, or standards are
complied with under actual operating conditions, and 3D Systems undertakes no responsibility in these areas.
IN NO EVENT WILL 3D SYSTEMS BE RESPONSIBLE FOR DAMAGES OF ANY NATURE, INCLUDING SPECIAL OR
CONSEQUENTIAL DAMAGES, RESULTING FROM THE USE OF OR RELIANCE UPON THIS INFORMATION. THE CUSTOMER
ASSUMES ALL RISK RESULTING FROM THE USE OF THIS INFORMATION. Customer use of the materials that follow is an
acknowledgment of its agreement to the foregoing. Any customer not wishing to be bound should return this material to 3D Systems.
Nothing contained herein is to be considered as permission, recommendation, nor as an inducement to practice any patented invention
without permission of the patent owner.
5

3D Systems, Inc.
SAFETY
You must be properly trained before operating the ProJet™ 6000. Also, anyone assisting you must be properly trained.
After you are trained, always follow the safety guidelines and procedures in this section before operating the ProJet™ 6000.
CUSTOMER SAFETY PROGRAM
Before using the ProJet™ 6000, customers must have a safety program in place. The safety program should do the following:
• Label and point out hazardous equipment, materials, and procedures.
• Explain what to do in an emergency situation.
• Provide information about the hazards of equipment and materials in the form of Material Safety Data Sheets (MSDS). The
MSDSs are provided with all materials supplied by 3D Systems.
The information in this chapter supplements the customer’s existing safety program. It points out safety considerations that specically
concern the ProJet™ 6000.
LEVELS OF USER
WARNING: Do not attempt to perform any procedures described in this manual unless you have been specically
trained to do so.
There are two levels of users of the ProJet™ 6000, based on the amount and type of training the user has received. The two levels of
users (operators and certied service personnel), are described below.
Operators
Operators are trained to operate the system and perform all the necessary tasks to build a part.
Certied Service Personnel
Certied service personnel are those who have completed the 3D Systems service training package and are certied to perform service
tasks. Certication may occur at various levels, and certied service personnel should only perform tasks they are authorized and
certied to complete.
SAFETY DESIGN FEATURES IN THE ProJet™ 6000
The following design features are provided to reduce potentially hazardous operating conditions:
WARNING: If any of the following safety features fail, your actions may be all that will prevent potentially hazardous
operating conditions.
• Safety interlocks at the ProJet™ 6000 process chamber door and limited access to cabinets are intended to prevent accidental
exposure of the user to the laser beam, thermal hazards, pinch points, or to electrical shock.
• The design of the beam delivery system is intended to prevent the laser from being aimed outside the area of the process chamber.
• Limited access to service areas prevents accidental exposure to electrical shock hazards or pinch points.
• The viewing window to the process chamber prevents operator exposure to laser emission while observing operation.
• If the ProJet™ 6000 detects certain unsafe conditions during operation, it is designed to shut down immediately.
2
6

3D Systems, Inc.
SAFETY SYMBOLS AND DEFINITIONS
CAUTION: Indicates the possibility of damage to the equipment.
WARNING: Indicates the possibility of injury or death to personnel.
ELECTRIC SHOCK HAZARD: High voltage electricity is accessible in the vicinity of this sign or behind the access
panel. High voltage can cause severe burns or death. Access panels are for service only and should be opened only
by certied service personnel.
LASER RADIATION HAZARD: Invisible laser radiation is accessible in the vicinity of this sign or behind the access
panel. Direct and scattered radiation can cause severe burns and blindness. Access panels are for service only and
should be opened only by certied service personnel.
IRRITANT: Indicates that skin or eye irritation could result while exposed to a chemical composition.
Ultraviolet radiation inside. Exposure may cause eye damage. Do not operate without covers. Wear UV eye protection.
HOT SURFACE: There are surfaces in the vicinity that may be hot and could cause severe burns or re.
NOTE: Indicates an important point.
7

3D Systems, Inc.
SAFETY HAZARDS AND GENERAL GUIDELINES
The ProJet™ 6000 was designed with safety in mind. However, as with all equipment, improper use and malfunctions could cause
injury.
This section provides general guidelines for operating the ProJet™ 6000.
Follow these general safety guidelines regarding
• Training and Instructions
• Material Handling
• Machine Handling
• Laser Safety
• Alarms and Warnings
Training and Instructions
• Do not operate the ProJet™ 6000 before receiving proper training.
• Read and follow all operating instructions.
• Follow all safety rules in this section and heed all hazard warnings in this guide.
Operators are trained to operate the system and perform all the necessary tasks to build a part.
Material Handling
• Do not use any material without rst reviewing its MSDS.
• To prevent injury and equipment damage, be sure to follow all handling guidelines in 2.09 Print Material Handling and Safety.
Machine Handling
• When operating the ProJet™ 6000, always keep the following points in mind:
• Do not try to open any panel or door while a machine is running.
• Do not operate the ProJet™ 6000 before receiving proper training.
• Always follow the procedures in this manual.
• Conform to all the safety rules described in this section and in other sections of this manual.
• Use common sense in dealing with the heated, inert environment of the process chamber.
• Do not allow operators to attempt to access or adjust the laser system in any way.
Laser Safety
• Post warning signs during open laser beam operations. Only Certied Service Personnel are permitted to perform open laser beam
operations.
• Do not enter any area displaying posted warning signs during open beam operations without proper eye protection.
WARNING: Open laser beam operation should occur only during service procedures performed by certied service
personnel.
Alarms and Warnings
• If you hear an alarm, or if you see an error, alarm, or warning message on the ProJet™ 6000 display or on the front panel indica-
tors, clear the alarm, error, or warning message before resuming operation.
• Displayed error, alarm, or warning messages can result from unsafe practices, such as opening an enclosure door or panel when
equipment is powered up and running.
8

3D Systems, Inc.
ENVIRONMENTAL SAFETY ISSUES
The following are environmental issues concerning the ProJet™ 6000:
• Controlling waste heat is not required for normal operation of the ProJet™ 6000.
• When you dispose of materials, refer to the MSDS for that material and follow any applicable local regulations.
• All waste products, (spilled print material, cleaning liquids, etc.) must be disposed of in accordance with all applicable local regula-
tions.
SAFETY INTERLOCKS
Interlocks
Safety interlock devices on the ProJet™ 6000 equipment help prevent accidental laser exposure, electrical shock and crush injuries.
ProJet™ 6000 equipment will not operate unless all safety interlocks are satised.
WARNING: Never disable or override any safety interlock device on the ProJet™ 6000. Operating equipment without
all safety interlocks enabled can cause injury. If you suspect a safety interlock device is not working, do not operate
the ProJet™ 6000. Disconnect power from the equipment and contact 3D Systems Customer Support for assistance.
9

3D Systems, Inc.
LASER SAFETY
The ProJet™ 6000 is designated as a Class I Laser Device by the U.S. Center for Devices and Radiological Health (CDRH). Class I
devices are not considered harmful and require no special safety precautions. Under normal operation conditions, the laser beam is
completely conned. The viewing window blocks the UV laser radiation from exposure outside of the build area.
LASER RADIATION HAZARD: Operating the equipment or performing procedures other than those specied within
this guide may result in exposure to hazardous, invisible laser radiation.
LASER RADIATION HAZARD: Never stare directly into a laser beam, nor into any beam reection, whether diffused or
from a mirror-like surface.
LASER RADIATION HAZARD: During normal operation, and with all panels installed, the ProJet™ 6000 is classied as
a Class I laser device. If any of the interlocks are defeated, the ProJet™ 6000 becomes a Class IV device. Eye damage
can occur by looking directly into the beam or by viewing any type of beam reection.
PRINT MATERIAL HANDLING AND SAFETY
IRRITANT: Always wear chemical-resistant gloves, goggles and protective clothing when handling print material.
Avoid skin contact. Avoid breathing print material fumes.
• Always wear approved goggles, nitrile gloves and protective clothing when working near print materials or with partially cured parts.
• Wearing contact lenses when working with print materials is not recommended.
• Always wear chemical-resistant gloves whenever handling print materials or partially cured parts. Recommended gloves are 100%
Nitrile. Do NOT wear latex gloves.
• Always work in a well ventilated area when using print materials. Avoid breathing vapors.
• Always wash skin thoroughly with a non-abrasive soap and COLD water after working with print materials. DO NOT USE HOT
WATER OR SOLVENTS to wash hands, as it will result in absorption through the skin.
• Use extreme care when handling solvents used to remove excess print material from uncured parts. These solvents (e.g., dena-
tured alcohol, isopropyl alcohol) are very ammable.
• Keep all print materials away from heat, sparks and ame. Print material containers may rupture when exposed to extreme heat.
WARNING: Use National Fire Protection Association Class B extinguishers such as carbon dioxide, dry chemical, or
foam.
Print Material Characteristics
The photopolymers used in the print materials may be hazardous if handled improperly. Repeated skin contact with print materials
may cause sensitization. Consult the manufacturer’s Material Safety Data Sheet (MSDS) for information on specic print materials. For
further information on this and related topics, consult the 3D Systems - Materials website.
CAUTION: Never mix different print materials.
Print Material Disposal
Do not dump used print material down any drains. Dispose of print material according to the guidelines given in the MSDS included with
the print material and all applicable regulations,(local, state, and federal).
Print Material Spill Containment
Your company has the responsibility to dene what constitutes a major spill. Personnel who are involved in cleaning up major spills of
print material should wear NIOSH/MSHA approved respirators designed for use with organic chemical vapors. In addition, each person
should wear protective goggles, rubber boots, and 100% nitrile gloves to minimize exposure to print material, which can cause eye,
skin, and respiratory irritation, as well as possible skin allergies and respiratory reactions.
10

3D Systems, Inc.
WARNING: Untrained personnel should be evacuated from the area.
WARNING: Print materials are ammable. Care should be taken during print material containment and cleanup
operations.
A supply of dikes and control booms should be stocked so they are available to contain the affected area in the event of a major print
material spill. The spilled print material should then be absorbed on inert absorbent material and placed into drums for transfer to an
approved waste disposal site. After cleaning up the spill, individuals should wash thoroughly with soap and cold water. All clothing
should be washed before reuse. Avoid exposure to sunlight until skin and clothing have been cleaned of print material. Refer to the
MSDS before using any chemicals. Repeated or prolonged skin contact may cause sensitization. Vapor may be harmful.
Shelf Life
VisiJet SL & Accura materials are certied for use for at least 12 months from their date of manufacture. Most materials are certied
for 18 months from their manufacture dates. The recertication dates are marked on the material cartridge labels. In general, resins
are usable for several months after their recertication dates provided that the materials have been properly stored, handled and not
exposed to excess heat. However, use of very old or material past its recertication date may shorten your In-Service material life. It is
advisable to check the viscosity of any material past its recertication date prior to use.
In-Service Life
In-Service Life of the VisiJet SL materials is dened as the useful life of the material after having been poured into the ProJet 6000 print
tray. The In-Service Life of the Projet 6000 material greatly varies depending on material type, usage and environmental conditions. The
more volume built, the more the material is refreshed with newer material. This blends older material with newer material and extends
the In-Service Live of the materials. If the material is exposed to temperatures outside of the normal operating limits, is exposed to UV
light, is exposed to particulates or vapors in the air such as dust or fumes, or if contaminates are introduced such as partially cured
platforms being placed back into the print tray, this will shorten the material In-Service life. The type of patterns and builds performed
also affect the in-service life of the material. With all this taken into consideration, we would expect the in-Service life of the material to
be at least two years but can be much longer with proper care and maintenance. The material retains its usefulness until a buildup of
viscosity or a change in reactivity prevents further processing in the ProJet™ 6000.
Contamination
Care should be taken when cleaning windows, panels, and other parts of the ProJet™ 6000. Cleaning products which contain ammonia
should not be used because they can cause contamination of the material. Instead use a small amount of isopropyl alcohol on a paper
towel to clean up spills. Accidental contamination of resins may change the material’s performance characteristics to such an extent that
acceptable parts can no longer be reliably created.
Polymerization
Signs of polymerization of stored resin include container bulging, leaking, and the emission of heat, or an unusual odor from the
container. If you notice this, do not use the material and dispose of it properly.
ELECTRICAL SAFETY
To prevent electrical shock, the ProJet™ 6000 will not operate unless all external panels are installed and all electrical safety interlock
circuits are closed. The ProJet™ 6000 was designed to minimize operator exposure to electrical hazards during normal operations. All
exposed electrical circuits are contained within limited-access cabinets. This is to separate the operator from service and maintenance
areas.
WARNING: Hazardous voltage exists inside the enclosures of the ProJet™ 6000. Injury or death from electrical shock
can result if you remove external panels or try to defeat safety interlocks. Panels should only be removed and safety
interlocks should only be defeated by certied service personnel.
11

3D Systems, Inc.
EMERGENCY SHUT DOWN USING THE E-STOP
ALERT: In the event of an emergency, immediately press the Emergency Stop switch (E-Stop).
The emergency stop switch is pressed any time the operator experiences or suspects a machine malfunction. Pressing the E-Stop
disables the laser and all motors. Pressing the E-Stop does not switch off all power to the machine.
To restart the system after an emergency shut down, rotate the E-Stop switch clockwise to reset it.
FIRST AID AND PROTECTIVE EQUIPMENT
First Aid and Protective Equipment
The following paragraphs provide general rst aid procedures and recommendations for protective equipment to minimize the risks from
print material exposure. If professional medical attention is necessary, take the Material Safety Data Sheet (MSDS) for the exact print
material involved to the attending physician.
Skin Contact
Wear 100% nitrile gloves and lab coats to avoid skin contact. Should print material come in contact with skin, wash thoroughly with
soap and cold water and immediately remove contaminated clothing and shoes. If skin is irritated, get medical attention. Dry-clean
contaminated clothing. Discard contaminated shoes and leather products.
Eye Contact
Safety goggles should be worn to prevent accidental splashes into the eyes. If print material comes in contact with the eye, ush
immediately with large amounts of water for 15 minutes, avoid sunlight, uorescent light, and other ultraviolet light, and obtain immediate
medical attention. Eye wash facilities and a rst aid kit should be readily available and close to the print material.
Contact Lenses
If print material splashes into the eye when contact lenses are worn, ush the eye with water immediately. Verify that ushing has
removed the contact lens from the eye. Protect eyes from light and obtain immediate medical attention. Discard contact lenses that
come into contact with liquid print material.
12

3D Systems, Inc.
Fume Inhalation
Remove the person to fresh air. Give articial respiration or cardiopulmonary resuscitation (CPR) if required. If breathing is difcult, give
oxygen. Obtain immediate medical attention.
SAFETY NOTICE
CAUTION: Use of controls or adjustments, or performance of procedures other than those contained in the operation,
maintenance or any other manual provided with this machine may result in hazardous radiation exposure.
This laser process machine is certied as a CLASS 1 laser product to the requirements of the US Federal Product Performance
Standard for Laser Products contained in the regulations in 21 CFR Subchapter J except for specic deviations described in FDA Laser
Notice #50.
NOTE: Class 1 laser products are not considered to be hazardous.
This machine incorporates a Class 4 laser and optical system which, by itself, may be hazardous. However, this machine incorporates
a protective housing, laser protective viewing window, and safety interlocks in the machine design such that there is no exposure or
human access to the laser radiation generated by the laser during operation.
All service to the laser process machine, the embedded laser system and optics requiring interlock override shall only be performed
by 3D Systems Corporation service personnel, their authorized agents, or personnel trained by 3D Systems Corporation. The
manufacturer’s user information for the incorporated laser products are supplied with this process machine.
UNDER NO CIRCUMSTANCE shall attempts be made by the user to operate the laser with safety interlocks bypassed or tool
removable access panels that allow access to laser radiation removed. Labels are provided on the products that indicate hazards.
Reproductions of these labels and diagrams showing their location are provided in this manual.
The laser should not be operated if the laser protective window material installed onto the front of the process chamber is damaged
or removed. The window material has a measured minimum optical density (OD) of 5+ @ 355nm. Contact the manufacturer for
replacement information.
13

3D Systems, Inc.
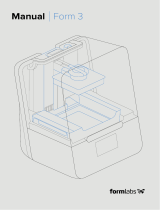
LABEL INSTALLATION DIAGRAM
Item P/N Description Qty Label
1 282530-01 System Label, ProJet™ 6000 1
2 203373-00 Laser Interlocks Defeated Sticker 1
3 203375-00
Laser Warning When Open
Sticker
1
4 283148-00 Laser Warning Sticker (355nm) 1
5 203019-00 Electrical hazard Sticker 1
6 17976-001-01 Electrical Panel Sticker 3
7 19965-001-01 CE declaration label 1
14

3D Systems, Inc.
Item P/N Description Qty Label
8 19984-001-00 Heat Hazard Sticker 3
15

3D Systems, Inc.
16

3D Systems, Inc.
OVERVIEW
The ProJet™ 6000 is a 3-D solid modeler that generates plastic models or prototype parts from computer data. The system builds parts
by processing a three-dimensional CAD le to represent cross sections, or slices. The ProJet™ 6000 creates models by proling each
slice as a layer on the surface of a print material. A laser beam solidies each layer of material. After each layer is proled, the vertical
elevator system lowers the prototype part into the print tray, and immerses the part beneath the surface of the material to a predened
depth. Additional print material is added by a print applicator, which ensures consistent layer thickness. This process is repeated for
each layer until all of the data for the model is processed. The part is then removed from the ProJet™ 6000 for post-processing.
ProJet™ 6000 COMPONENTS
3
Item Function
Emergency Stop Button
The emergency stop button (E-Stop), is pressed any time the operator experiences or suspects a
machine malfunction. Pressing the E-Stop disables the laser and all motors. Pressing the E-Stop
does not switch off all power to the machine.
Graphical User Interface
The graphical user interface (GUI), provides a touch screen which allows operator to perform all
functions needed to operate the machine and build parts.
Status Indicators The three LEDs on the front panel indicate the readiness of the machine and the laser.
Upper Build Chamber Door
Used to access the build chamber. This door can be opened only during certain times, as indicated
by the status indicators.
The door is provided with interlock switches which will disable the machine and switch the laser off if
the door is opened.
Lower Build Chamber Door
Used to access the material cart area. This door can be opened only during certain times, as
indicated by the status indicators.
The door is provided with interlock switches which will disable the machine and switch the laser off if
the door is opened.
Ethernet Ethernet cable connection.
Power On/Off Switch Switch power to the machine On or Off.
Chamber Lights Switch Switches the build chamber lights On or Off.
Internal PC Power On/Off
switch (and Indicator)
This switch is used to reset the PC or power the PC On/Off.
The switch is illuminated to indicate the PC is powered on.
USB Ports Allows the connection of an external mouse and keyboard
17

3D Systems, Inc.
UPPER BUILD CHAMBER
Item Function
Chamber Lights Illuminate the inside of the build chamber.
Upper Chamber Heater Provides a controlled temperature for the build chamber and material.
Vacuum Adjustments Adjust the vacuum delivered to the print applicator.
Elevator Motor Raises and lowers the elevator.
Laser Window Laser is projected through the laser window to the material surface.
18

3D Systems, Inc.
ELEVATOR AND PRINT APPLICATOR MECHANISM
Item Function
Print Applicator Motor Moves the print applicator.
Elevator
The elevator forks and parts platform are attached to the elevator.
The elevator travels in the Z axis.
Material Temperature Sensor Monitors the temperature of material in the print tray.
Print Applicator Arm
Moves front to back across the print tray (not shown).
The print applicator travels in the Y axis.
Material Level Window Provides a visible check of the material within the print applicator blade.
Print Applicator Blade The part of the print applicator that contacts the material in the print tray.
19

3D Systems, Inc.
Detail A
Item Function
Omron Sensor Display Displays the measurements obtained by the omron sensor.
Omron Sensor Detects the level of the material in the print tray. Used for ne adjustment only.
Cosense Sensor Detects the level of material in the print tray. Used for coarse leveling only.
Beam Rest Beam is projected onto the beam rest during the print leveling cycle.
Beam Proler A UV-sensitive detector used for beam calibration and adjustment.
20
/