Page is loading ...

Part No: Rev.
Page:
E.C.O. No:
CUSTOMER SERVICE PHONE: 1-800-426-8562
7021-7112 A
265-725 1 of 8
TABLE OF CONTENTS
Product Safety Instruction ........................................ 1
Suspended and Fixed Pedestals
Converting a Suspended or Fixed Unit to a
Mobile Unit ................................................................. 2
Converting a Suspended or Fixed Unit to a
Stationary Unit ........................................................... 2
Converting a Suspended Unit to a Fixed Unit ......... ... 3
Converting a Fixed Unit to a Freestanding Unit ......... 3
Mobile and Stationary Pedestals
Converting a Mobile Unit to a Stationary Unit ............ 3
Converting a Stationary Unit to a Mobile Unit ............ 3
Taboret Top
Installing a Taboret Top ............................................. 4
Counterweight
Installing a Counterweight .......................................... 6
Lock
Converting a Non-Locking Unit to a Locking Unit ...... 7
PLACES® DRAWER PEDESTAL CONVERSION KIT
Installation Instructions
Tools Required For The Following Conversions
• Phillips Screwdriver
• Slide Removal Tool
PRODUCT SAFETY INSTRUCTIONS
Failure to Follow These Safety Rules Could
Result In Personal Injury
Maximum pedestal loading should comply with
current ANSI/BIFMA specifications. When a
mobile or stationary unit is loaded, bottom drawers
should be loaded first and top drawers last. When
pedestal is unloaded, this order should be
reversed.
Contents and weight should always be evenly
distributed along depth of drawer.
Overloading of drawers could cause premature
failure of pedestal or work surface.
For mobile or stationary units, open only one
drawer at a time. In Desk Credenza applications,
open only one drawer per pedestal at a time.
When re-configuring drawers within a pedestal,
the largest drawer should always be on bottom of
drawer housing. Be sure that drawer slides are
correctly locked in place. Without being properly
engaged, drawer stops may not function and
drawer could come off the drawer housing.
All mobile or stationary units must have a
counterweight.
Do not suspend 30" deep units.
Do not put excessive weight on top of a mobile or
stationary unit.
Mobile or stationary units should not be used as
supports for a work surface.
Haworth recommends unloading contents prior to
moving a pedestal. In addition, all drawers should
be closed and pedestal should be locked. If ped-
estal is non-locking, drawers should be unloaded
and taped shut to prevent accidental opening
during relocation.

Part No: Rev.
Page:
E.C.O. No:
CUSTOMER SERVICE PHONE: 1-800-426-8562
7021-7112 A265-725 2 of 8
SUSPENDED AND FIXED PEDESTALS
Converting a Suspended or Fixed Unit to a
Mobile Unit
A Mobile Conversion Kit is required for this
procedure.
1. Remove drawers from drawer housing. Refer to
the Drawer Pedestal Installation Instructions
(P/N 7021-7050) for removal/installation of drawers.
2. Remove drawer housing from work surface.
3. Lay drawer housing on its back.
4. If converting a fixed unit, remove the support legs
and fixed base skirt.
5. Install counterweight kit. Refer to page 6. Do not
replace drawers in housing until casters are installed.
6. Slide casters into retaining tabs (Fig. 1 and
Fig. a). Attach outside edge of each caster to hous-
ing with two (2) #8-18 x 1/2" pan head screws pro-
vided (Fig. 1 and Fig. 1b).
7. Install taboret top. Refer to page 4.
8. Replace drawers.
Converting a Suspended or Fixed Unit to a
Stationary Unit
A Stationary Conversion Kit is required for this
procedure.
1. Remove drawers from drawer housing. Refer to
the Drawer Pedestal Installation Instructions
(P/N 7021-7050) for removal/installation of drawers.
2. Remove drawer housing from work surface.
3. Lay housing on its back.
4. If converting a fixed unit, remove the support legs
and fixed base skirt.
5. Install counterweight. Refer to page 6. Do not
replace drawers in housing until stationary base is
installed.
6. With front of housing facing upward, align base
skirt with bottom of housing with seam toward back
(against floor). Figure 2.
7. Place Support legs against base and line up
holes. Use #8-18 x 1/2" pan head screws supplied to
attach attach the supports to the base and the
housing (Fig. 2).
8. Install taboret top. Refer to page 4.
.
9. Replace drawers.
FIG. 1
RETAINING
TABS
CASTER
#8-18 X 1/2"
PAN HEAD
SCREW
FIG. 1a
FIG. 1b

Part No: Rev.
Page:
E.C.O. No:
CUSTOMER SERVICE PHONE: 1-800-426-8562
7021-7112 A265-725 3 of 8
Converting a Suspended Unit to a Fixed Unit
A Fixed Base Kit is required for this procedure.
1. Remove drawers from drawer housing. Refer to
the Drawer Pedestal Installation Instructions
(P/N 7021-7050) for removal/installation of drawers.
2. Remove drawer housing from work surface.
3. Lay housing on its back.
4. With front of housing facing upward, align base
skirt with bottom of housing with seam toward back
(against floor). Figure 2.
5. Place support legs against base and line up
holes. Use #8-18 x 1/2" pan head screws supplied
to attach the supports to the base and the housing
(Fig. 2).
Converting a Fixed Unit to a Freestanding Unit
A Freestanding Conversion Kit is required for this
procedure.
1. Remove drawers from drawer housing. Refer to
Drawer Pedestal Installation Instructions
(P/N 7021-7050) for removal/installation of drawers.
2. Remove drawer housing from work surface.
3. Install counterweight. Refer to page 6.
4. Install Taboret Top. Refer to page 4.
5. Replace drawers.
MOBILE AND STATIONARY PEDESTALS
These units are shipped complete and require no
assembly prior to use.
Converting a Mobile Unit to a Stationary Unit
A Stationary Base Kit is required for this procedure.
1. Remove drawers from drawer housing. Refer to
Drawer Pedestal Installation Instructions
(P/N 7021-7050) for removal/installation of drawers.
2. Lay housing on its back.
3. Remove casters from bottom of housing being
careful not to allow counterweight to damage back of
cabinet.
4. With front of housing facing upward, align base
skirt with bottom of housing with seam toward back
(against floor).
5. Place Support legs against base and line up
holes. Use #8-18 x 1/2" pan head screws supplied
to attach the supports to the base and the housing
(Fig. 2).
6. Replace drawers.
Converting a Stationary Unit to a Mobile Unit
A Caster Kit is required for this procedure.
1. Remove drawers from drawer housing. Refer to
Drawer Pedestal Installation Instructions
(P/N 7021-7050) for removal/installation of drawers.
2. Lay housing on its back.
3. Remove base from bottom of housing being
careful not to allow counterweight to damage back of
cabinet.
4. Slide casters into retaining tabs (Fig. 1 and
Fig. 1a). Attach outside edge of each caster to hous-
ing with two (2) #8-18 x 1/2" pan head screws pro-
vided (Fig. 1 and Fig. 1b).
5. Replace drawers.
FIG. 2
#8-18 X 1/2"
PAN HEAD
SCREW
BASE SKIRT
SUPPORT
LEG
SEAM

Part No: Rev.
Page:
E.C.O. No:
CUSTOMER SERVICE PHONE: 1-800-426-8562
7021-7112 A265-725 4 of 8
FIG. 3
REFERENCE
SHELF
PLASTIC
LATCH
DRAWER
HOUSING
FIG. 3a
(underside view)
LOCKED
POSTION UNLOCKED
POSTION
PLASTIC
LATCH
FIG. 3b
(underside view)
FIG. 4
TABORET TOP
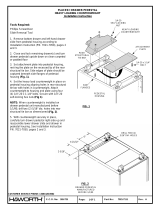
Installing a Taboret Top
1. Always install counterweight first if converting a
suspended or fixed unit to a stationary or mobile
unit.
2. Remove the top drawer to gain access to the
inside of housing.
3. Remove reference shelf (if equipped) from
housing (Figure 3). To remove reference shelf, pull
it part of the way out, reach up underneath and
move the two plastic latches (one on each side) to
the unlocked position as shown in Figures 3a and
3b. Pull reference shelf completely out.
4. Install taboret top attachment brackets with self-
tapping screws supplied with kit (Fig. 4).
TABORET TOP
ATTACHMENT
BRACKET
SELF-TAPPING
SCREW

Part No: Rev.
Page: 5 of 8
E.C.O. No:
CUSTOMER SERVICE PHONE: 1-800-426-8562
7021-7112 A
265-725
5. Set taboret top on pedestal. Align from side to
side and overlap the front of the pedestal (Fig. 5).
Slide the top back so that the attachment brackets
engage with the slots located in the taboret top
cross rail. Adjust the top so that it is flush with the
front of the pedestal.
6. Secure the front of taboret top with two (2) self-
tapping screws supplied (Fig. 6).
7. Replace reference shelf. To secure shelf In
drawer housing, slide it part way into housing and
reach up underneath and move the two plastic
latches (one on each side) to the locked position.
8. Replace top drawer into housing.
FIG. 6
SCREWS
TABORET
TOP
TABORET
TOP
ATTACHMENT
BRACKET
SLIDE
BACK
FIG. 5

Part No: Rev.
Page: 6 of 8
E.C.O. No:
CUSTOMER SERVICE PHONE: 1-800-426-8562
7021-7112 A
265-725
FIG. 7
COUNTER-
WEIGHT
BRACKETS
#8 x 3/8"
SCREWS
COUNTERWEIGHT
COUNTERWEIGHT
COUNTERWEIGHT
Installing a Counterweight
When converting a 21" or 24" high suspended or
fixed unit to a stationary or mobile unit, a counter-
weight is required.
Install counterweight before installing taboret tops,
stationary bases, or casters.
1. Remove all drawers and slides from drawer hous-
ing. Refer to Drawer Pedestal Installation Instructions
(P/N 7021-7050) for removal/installation of drawers.
2. Remove reference shelf (if equipped) from
housing (Figure 3). To remove reference shelf, pull it
part of the way out, reach up underneath and move
the two plastic latches (one on each side) to the
unlocked position as shown in Figures 3a and 3b.
Pull reference shelf completely out.
3. Lay drawer housing on its back.
4. Place counterweight behind tabs on lower hori-
zontal support against back of cabinet. Be careful
not to drop counterweight and damage back of
cabinet.
5. Place counterweight brackets over top of
counterweight. Align hole of bracket with hole in
vertical rail. Use two (2) #8 x 3/8" screws provided to
attach bracket to vertical rail (Fig. 7).
6. Replace reference shelf. To secure shelf In
drawer housing, slide it part way into housing and
reach up underneath and move the two plastic
latches (one on each side) to the locked position.
7. Replace top drawer in housing.
VERTICAL RAIL

Part No: Rev.
Page: 7 of 8
E.C.O. No:
CUSTOMER SERVICE PHONE: 1-800-426-8562
7021-7112 A
265-725
TRIM COVER
SCREWS
FIG.8
LOCK ARM
FIG. 9
FRONT
VERTICAL UNIT
VIEW FROM INSIDE
OF PEDESTAL
LOCK LEVER
ARM
LOCK LEVER
BRACKET
LOCK ARM
FINGER
LOCK
SPRING
FIG. 10
SLOTTED
HOLES
LOCK
Converting a Non-locking Unit to a Locking
Unit
1. Remove suspended or fixed unit from work
surface. Remove taboret tops from mobile and
stationary units. Remove all drawers and refer-
ence shelf (if equipped) from housing. Refer to
Drawer Pedestal Installation Instructions (P/N
7021-7050) for removal/installation of drawers
and reference shelf.
2. Remove slides on the right-hand side (as you
face the pedestal) of the housing. Refer to Drawer
Pedestal Installation Instructions (P/N 7021-7050)
for removal/installation of drawers.
3. Remove trim cover from pedestal by removing
the two (2) screws on the top of housing (Fig. 8).
Retain screws for installing the lock trim cover.
4. Install lock arm by inserting the top and bottom
hooks into the two slotted holes on hidden side of
front vertical support (Fig. 9).
5. Attach lock spring by hooking one end into
hole on lock lever bracket and the other end to
finger on lock arm. Install lock lever arm into lock
lever bracket (Fig. 10).

Part No: Rev.
Page: 8 of 8
E.C.O. No:
CUSTOMER SERVICE PHONE: 1-800-426-8562
7021-7112 A
265-725
6. To position lock cover, grasp lock arm and pull
outward. Slide lock cover arm up and under lock
spring and over top hook on lock arm. Slide into
place (Fig. 11).
7. Install lock shell assembly by engaging pin on
back of lock shell with yoke on lock lever arm (Fig.
12 and Fig. 12a). Attach lock shell assembly to
drawer housing using the screw provided.
8. Position trim cover against the lock shell
assembly at an angle opening towards the right.
Secure trim cover onto housing using the two (2)
screws removed in step 3 (Fig. 13).
9. Looking inside front of lock assembly, notice
position of yoke on the tumbler (Fig. 14a). Remove
key inserted in lock plug and insert control key.
Insert lock plug into lock shell in drawer housing
(Fig. 14). Hold lock plug in place with thumb and
remove control key. When lock plug is in place,
use original key to lock and unlock pedestal. Cycle
lock to make sure lock is operating properly.
10. Replace slides, drawers, and reference shelf.
11. Replace taboret top or follow procedure to
attach suspended or fixed unit from work surface.
LOCK
SHELL ASSY
LOCK ARM
FIG. 11
LOCK COVER
ARM
LOCK COVER
NOTE: SPRING
NOT SHOWN IN
ILLUSTRATION
FOR CLARITY
FIG. 12
LOCK
LEVER ARM
LOCK
SHELL ASSY
PIN
FIG. 12a
CONTROL
KEY
ORIGINAL
KEY
FIG. 14
FIG. 13
TRIM COVER
SCREWS
FIG. 14a
END VIEW OF
LOCK SHELL
YOKE
/