Page is loading ...

Component Checklist
Primary Arm 230mm (x1)
75/100mm VESA
Plate (x1)
Cover
Plate (x1)
Installation Procedure
!
IMPORTANT - Install Telehook Multi as per Installation Instructions.
! Telehook Multi supports Displays from 12” (30cm) to 30” (76cm) weighing up to 18kg (39lbs).
! The Manufacturer accepts no responsibility for incorrect installation.
Bits Box
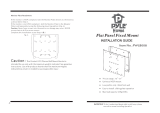
Installation Instructions
TELEHOOK
12/30 Multi
Wall
Bracket (x1)
200mm VESA
Plate (x1)
M8 Nyloc (x1)
M8 Cap Screw (x1)
14 Gauge Coach Screws (x2)
6mm Allen Key (x1)
M8 Square
Neck Bolt (x2)
Push In Clips (x3)
M4 x 10mm
Screws (x6)
Yoke (x1)
B Choose your Mounting Option
M8x 115mm Bolt (x1)
Secondary Arm
200mm (x1)
A Check Components
Check you have received all parts against the Component Checklist and Bit Bag above.
Double Sided
Bush (x1)
Select which mounting option is best suited for your application.
Note that the Telehook 12-30 Multi comes packaged as the Swing Arm by default. (Option 1.)
Steel
Washers (x2)
One Sided
Bush (x4)
Plastic
Washers (x2)
M8 Nyloc’s (x2)
Swing Arm
(x1)
Swing Arm Components
Option 1: Swing Arm
Wall
ISOMETRIC VIEW
Follow Steps; C, D, F & J
Nylon Anchor Plugs (x2)
4mm Allen Key (x1)
M4 x 12mm
Screws (x6)
M4 x 16mm
Screws (x6)
M6 x 12mm
Screws (x6)
C.1.
C.2.
2x14 Gauge
Coach Screws
Wall Bracket
Cover Plate
Wall Bracket
Cover Plate
2x14 Gauge
Coach Screws
2x Nylon
Anchor Plugs
Stud
Wall
Material
Masonry Wall
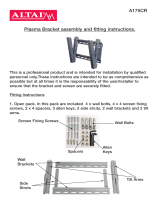
C Installing the Wall Bracket
Option 3: Wall Mount
Wall
Options 1 & 2 (Swing Arm & Articulated Arm)
Follow Steps; G, H, I, & J
C.1 Mounting to a timber stud wall
-
Position Wall Bracket vertically on the wall and mark the 2
mounting holes. (Use a Spirit Level)
-
Drill 2x50mm(2”) holes using a 3mm(3/16”) drill bit.
-
Secure the Wall Bracket using the supplied 14 Gauge Coach
Screws.
-
Attach the Cover Plate as shown in diagram C.1.
C.2 Mounting to a masonry wall
-
Position the Wall Bracket vertically on the wall and mark the 2
mounting holes. (Use a Spirit Level)
- Drill holes using an 8mm masonry drill bit.
- Secure the Wall Bracket using the supplied 14 Gauge Coach
Screws and Nylon Anchor Plugs.
- Attach the Cover Plate as shown in diagram C.2.
Option 2: Articulated Arm
Wall
Follow Steps; C, E, F, & J
NOTE! You must remove the Wall Bracket from the Swing Arm before Installing
Horizontal Correction of Display
Adjust Angle
Loosen
Screw
If the display does
not sit horizontally,
loosen the screw
shown on the
back of the yoke
using the 4mm
Allen Key.
Re-tighten screw
firmly when
display is
positioned
horizontal.
4mm Allen Key

F.2. Tighten the Yoke connection to suit the
weight of your display.
F.1. Attach your Display using the
provided M4 Screws.
4xM4
Screws
6mm Allen Key
75 or 100
F Connect your Display Note: It is recommended that at least two people carry out this operation.
Your Telehook Articulated Arm or Swing Arm is now complete. See Step J for installing Cable Management.
D Swing Arm Assembly
E Articulated Arm Assembly
Assemble the Swing Arm as
Illustrated.
- Select the appropriate VESA
plate (75/100mm or 200mm) to
suit your display.
- Connect VESA Plate as shown
and tighten M8 Cap Screw.
- Adjust Display Tilt when fitted.
(Refer to diagram F.2)
- Install Push-In Clips for cable
management.
Assemble the Articulated Arm
as Illustrated.
- Select the appropriate VESA
plate (75/100mm or 200mm) to
suit your display.
- Connect VESA Plate as shown
and tighten M8 Cap Screw.
- Adjust Display Tilt when fitted.
(Refer to diagram F.2)
- Install Push-In Clips for cable
management.
6mm Allen Key
75/100mm
VESA Plate
M8 Cap Screw
M8 Nyloc (x2)
Push-In
Clips (x3)
M8 Square
Neck Bolt (x2)
Yoke
One Sided
Bush (x4)
200mm
VESA Plate
OR
Primary Arm
6mm Allen Key
75/100mm
VESA Plate
M8 Cap
Screw
M8 Nyloc (x3)
Push-In
Clips (x3)
M8 Square
Neck Bolt (x2)
Yoke
One Sided
Bush (x4)
200mm
VESA Plate
OR
Primary
Arm
M8x115mm
Bolt
Secondary Arm
Steel
Washer (x2)
Plastic
Washer (x2)
D.1.
E.1.
As TFT Manufacturers are constantly releasing new monitor models, Atdec does not accept responsibility if the VESA mounting does not comply with the international standards. Due to continuing product development, the
manufacturer reserves the right to alter specifications without notice. Published: 01.09.05
c
G Attach the VESA Plate to your Display.
Select the appropriate VESA plate (75/100mm or 200mm) to suit your display, and connect as shown.
Your Telehook Multi is now complete and ready to use.
J Installing Cable Management
J1
Ensure Push In Clips have been fitted. Note; They
can be used in either the top or the bottom face
of each Arm and the Cover Plate.
Attach Cables to the Telehook Multi using the Push In
Clips
J2
H Install the Wall Bracket
I Attach your Display Note: It is recommended that at
least two people carry out this operation.
or
M4 Screws (x4)
75 or 100
Install The Mount Bracket Horizontally as shown.(Use Spirit
Level) Use optional stud mounting holes for mounting to a
single stud. Refer to
Step
C
. for further detailed wall fixing
instructions.
2x14 Gauge
Coach Screws
(Choose which
Mounting Holes)
Cover Plate
Wall Bracket
Attach your Display as
shown.
Using an extendable
Socket Wrench, firmly
tighten the connection
to suit the weight of
your display.
M8 Nyloc
M8 Square
Neck Bolt
200mm VESA
Plate
M4 Screws
(x6)
Option 3 (Wall Mount) Note: You will require an extendable socket wrench during installation.
Your Telehook Wall Mount is now complete. See Step J for installing Cable Management.
Push-In Clip
Optional Stud
Mounting holes
For easier installation of larger monitors (23” to 30”), it is recommended that the Swing Arm (Option.1.) be used as
an alternative to the Wall Mount.
G.1.
G.2.
I.1.
H.1.
/