Page is loading ...

MM-3RDX-120
REV00-11222015
1 of 2
Installation Guide
Swivel Beam Clamp
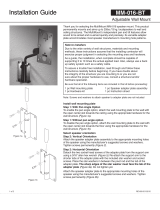
The MultiMount-3RDX-120 provides a wide range of speaker aiming positions
and adapts to standard off-the-shelf schedule 1.5” NPT and NPS threaded
steel pipe. The speaker mount employs two standard mounting hole patterns,
the 3.44” x 6.88” and the 2-3/4” x 5”.
Step 1: A 1.5 NPT or NPS pipe should already been installed from
the ceiling before proceeding to attach the MM-3RDX-120 (Figure 1).
Step 2: Attach MM-3RDX-120 to 1.5 NPT or NPS pipe, then lock
with set screw (Figure 1).
Step 3: Secure speaker to the speaker adapter plate. Pull a sufcient
length of signal wire and safety cable to reach the speaker’s terminal block
and safety cable anchor point. Align the speaker’s four mounting points
with the mount’s matching hole pattern. Use the speaker manufacturer’s
recommended fasteners; tighten fasteners permanently through the mount
and into the speaker cabinet (Figure 2).
Note to installers
Due to the wide variety of wall structures, materials and mounting
methods, these instructions assume that the installing contractor will
exercise proper judgment in selecting the mounting area and hardware.
As a guide, the installation, when complete should be capable of
supporting 5 to 10 times the actual applied load. Also, always use a back
up safety system such as a safety cable.
To assure a trouble free installation, read through and follow these
instructions carefully before beginning. If you have doubts about
the integrity of the structure you are mounting to or you are not
sure about the proper hardware to use, consult a structural and/or
hardware specialist.
Be sure that all of the following items are included in this kit before proceeding:
1 Speaker Adapter Assembly 1 pc Instruction sheet
Note: Screws and washers to attach speaker to adapter plate are not included
1.5 NPT or NPS PIPE
(connected above)
SIGNAL WIRE
AUDIO CABLE/
SAFETY CABLE
Figure 1
1/4-20 SET
SCREW
SPEAKER
ADAPTER
ASSY
Figure 2
SCREW OR
HEX BOLT
MM-3RDX-120
SPEAKER
MOUNT
FLAT WASHER
SPEAKER

MM-3RDX-120
ALWAYS INSTALL SAFETY CABLES
WARNING: Mounting and/or suspension loudspeakers requires experienced
professionals. Improperly installed loudspeakers can result in property
damage, personal injury and/or liability to the installing contractor.
Adaptive Technologies Group
1635 E. Burnett Street | Signal Hill, CA 90755 USA
Ph: 562.424.1100 | Fax: 562.424.3520
www.adapttechgroup.com
REV00-1122015
2 of 2
Installation Guide
Swivel Beam Clamp
Step 4: Setting the Tilt Angle
Loosen the 3/4” side hex bolts of the speaker adapter plate if it’s tightened.
Then aim the speaker at the desired tilt angle. Fully tighten the 3/4” side
hex bolts (one is right hand and the other is a left hand thread). Tighten the
right hand threaded hex bolt clockwise and counter-clockwise for the left
hand threaded hex bolt (Figure 3). Do not release the weight of the speaker
until the side hex bolts have been fully tightened. To re-adjust the tilt angle,
loosen the side bolts, reset the tit angle then fully re-tighten the side bolts.
Do not attempt to change the tilt angle while the side bolts are
tightened down.
Step 5: Setting the Roll Angle
To adjust the roll angle, loosen the 1/2” hex head bolts. Swing the speaker/
lower mount assembly left or right to the desired angle. Then fully tighten
the upper 1/2” hex head bolt rst, then the lower hex head bolt (Figure 4).
Step 6: Connect signal wire to the speaker terminals and secure the safety
cable to the speaker (Figure 5).
Figure 4
Figure 6
LEFT HAND
THREADED BOLT
TO TIGHTEN
RIGHT HAND
THREADED BOLT
TO TIGHTEN
Figure 3
3/4 WRENCH
SPEAKER
WIRE
SAFETY
CABLE
/