Page is loading ...

M1240
Windrower
Unloading and Assembly Instructions (North America)
215033 Revision A
Original Instruction
The harvesting specialists.

M1240 Windrower, featuring Dual Direction
®
and CrossFlex
™
rear suspension
1016391
Published August 2019
© 2019 MacDon Industries, Ltd.
The information in this publication is based on the information available and in effect at the time of printing. MacDon
Industries, Ltd. makes no representation or warranty of any kind, whether expressed or implied, with respect to the
information in this publication. MacDon Industries, Ltd. reserves the right to make changes at any time without notice.

Introduction
This manual contains unloading, assembly, and predelivery information for the MacDon M1240 Windrower, which when
coupled with one of MacDon’s A40DX, R85, R113, R216, D1X Series, or D1XL Series Headers, provides a package designed
to cut and lay a variety of grain, hay, and specialty crops in windrows.
The M1240 Windrower is Dual Direction
®
, meaning that the windrower can be driven in the cab-forward or the
engine-forward mode.
Right and left designations are determined by the operator’s position facing the direction of travel. This manual uses the
terms right cab-forward, left cab-forward, right engine-forward, and left engine-forward when referencing specific
locations on the machine.
The ignition keys were shipped with the shipping documents and are used to lock the cab doors and tool box
compartment.
NOTE:
Keep your MacDon publications up-to-date. The most current version can be downloaded from our website
(www.macdon.com) or from our Dealer-only site (https://portal.macdon.com) (login required).
This document is currently available in English only.
215033 i Revision A

Summary of Changes
The following list provides an account of major changes from the previous version of this document.
Section
Summary of Change
Internal Use Only
Introduction, page i Added R216 Rotary Disc Header to the introduction. Tech Pubs
4.1.9 Starting the Engine, page 46
• Added a note stating the conditions that boot up the
Harvest Performance Tracker.
• Added a step to ensure exhaust is unobstructed.
• Added a note to warm up hydraulic oil before taking GSL
out of park.
Support
4.1.12 Checking Tire Pressures,
page 53
Added R216 Rotary Disc Header to the tire inflation chart. Tech Pubs
4.4 Attaching a Header to an M1
Series Windrower, page 71
Updated images to include new header lock decals throughout
the Attaching Headers section.
ECN 58047
4.4.3 R113 or R216 Rotary Disc
Header, page 88
Added R216 Rotary Disc Header to the title. Tech Pubs
4.5 Adjusting Header Settings on
the Harvest Performance Tracker,
page 99
Changed title. Tech Pubs
4.6 Calibrating the Header
Systems, page 100
Changed title. Tech Pubs
4.7 Calibrating Knife Drive on
Harvest Performance Tracker, page
103
Changed title. Tech Pubs
5.1 Lubricants, Fluids, and System
Capacities, page 107
Updated hydraulic oil specification.
Support
5.5 Definitions, page 119 Added R216 Rotary Disc Header to the definitions list. Tech Pubs
215033 ii Revision A

215033 iii Revision A
Introduction ................................................................................................................................................i
Summary of Changes....................................................................................................................................ii
Chapter 1: Safety .................................................................... .................................................................... 1
1.1 Signal Words ......................................................................................................................................... 1
1.2 General Safety ....................................................................................................................................... 2
1.3 Tire Safety............................................................................................................................................. 4
1.4 Battery Safety ........................................................................................................................................ 5
1.5 Welding Precaution ................................................................................................................................6
1.6 Engine Safety....................................................................................................................................... 10
1.6.1 High-Pressure Rail ........................................................................................................................ 10
1.6.2 Engine Electronics ........................................................................................................................ 10
1.7 Safety Signs ......................................................................................................................................... 12
Chapter 2: Unloading the Windrower ..................................................................................................... 13
2.1 Using One Forklift to Unload Windrower .................................................................................................. 13
Chapter 3: Assembling the Windrower ................................................................................................... 15
3.1 Lowering Steps..................................................................................................................................... 15
3.2 Installing Caster Wheels......................................................................................................................... 17
3.3 Installing Drive Wheels .......................................................................................................................... 19
3.4 Repositioning Right Leg ......................................................................................................................... 21
3.5 Repositioning Casters and Installing Anti-Shimmy Dampeners ...................................................................... 24
3.6 Installing Windshield Access Step ............................................................................................................ 28
3.7 Positioning Mirror Arms......................................................................................................................... 29
3.8 Installing Slow Moving Vehicle Signs ........................................................................................................ 30
3.9 Replacing Speed Identification Symbol Decal – US Only............................................................................... 31
3.10 Installing Rear Ballast Package............................................................................................................... 32
3.11 Lubrication ........................................................................................................................................ 37
3.11.1 Lubrication Procedure ................................................................................................................. 37
3.11.2 Lubrication Points ...................................................................................................................... 37
3.12 Connecting Batteries ........................................................................................................................... 38
Chapter 4: Performing Predelivery Checks.............................................................................................. 41
4.1 Completing Predelivery Checklist............................................................................................................. 41
4.1.1 Recording Serial Numbers ............................................................................................................. 41
4.1.2 Checking Engine Air Intake............................................................................................................. 42
4.1.3 Checking and Adding Engine Oil...................................................................................................... 42
4.1.4 Checking and Adding Hydraulic Oil .................................................................................................. 43
4.1.5 Checking Fuel Separator................................................................................................................ 44
4.1.6 Checking Engine Coolant Level ....................................................................................................... 45
4.1.7 Checking Engine Gearbox Lubricant Level and Adding Lubricant ........................................................... 45
TABLE OF CONTENTS

215033 iv Revision A
4.1.8 Checking Air Conditioning Compressor Belts ..................................................................................... 46
4.1.9 Starting the Engine....................................................................................................................... 46
Engine Start Troubleshooting Tips.................................................................................................. 50
4.1.10 Checking Operating Safety System................................................................................................. 51
4.1.11 Checking and Adding Wheel Drive Lubricant ................................................................................... 52
4.1.12 Checking Tire Pressures ............................................................................................................... 53
4.2 Performing Operational Checks............................................................................................................... 56
4.2.1 Checking Auto Lights .................................................................................................................... 56
4.2.2 Checking Harvest Performance Tracker Display ................................................................................. 57
Navigating the Harvest Performance Tracker ................................................................................... 58
Setting Language and Units of Measurement................................................................................... 59
Setting Time and Date ................................................................................................................. 60
Setting Windrower Tire Size.......................................................................................................... 61
4.2.3 Checking Engine Speed ................................................................................................................. 61
4.2.4 Checking Selective Catalytic Regeneration Conditioning Mode ............................................................. 62
4.2.5 Checking Exterior Lights ................................................................................................................ 63
4.2.6 Checking Horn ............................................................................................................................. 66
4.2.7 Checking Interior Lights................................................................................................................. 67
4.2.8 Checking Climate Controls ............................................................................................................. 67
4.2.9 Checking the Radio and Activating the Bluetooth
®
Feature.................................................................. 68
4.3 Checking Manuals................................................................................................................................. 70
4.4 Attaching a Header to an M1 Series Windrower......................................................................................... 71
4.4.1 A40DX Auger Header .................................................................................................................... 71
Attaching an A40DX Auger Header................................................................................................. 71
Connecting A40DX Auger Hydraulics .............................................................................................. 76
4.4.2 D1X or D1XL Series Draper Header .................................................................................................. 79
Attaching Draper Header Supports ................................................................................................ 79
Attaching a D1X or D1XL Series Draper Header ................................................................................ 79
Connecting D1X or D1XL Series Draper Header Hydraulics ................................................................. 85
4.4.3 R113 or R216 Rotary Disc Header ................................................................................................... 88
Attaching R113 or R216 SP Rotary Disc Header ................................................................................ 88
Connecting R113 or R216 Rotary Disc Header Hydraulics to an M1240 Windrower................................. 94
4.5 Adjusting Header Settings on the Harvest Performance Tracker.................................................................... 99
4.6 Calibrating the Header Systems............................................................................................................. 100
4.7 Calibrating Knife Drive on Harvest Performance Tracker ............................................................................ 103
4.8 Performing Final Steps......................................................................................................................... 105
Chapter 5: Reference ............................................................................................................ .................. 107
5.1 Lubricants, Fluids, and System Capacities................................................................................................ 107
5.2 Fuel Specifications .............................................................................................................................. 109
5.3 Torque Specifications .......................................................................................................................... 110
5.3.1 Metric Bolt Specifications ............................................................................................................ 110
5.3.2 Metric Bolt Specifications Bolting into Cast Aluminum ...................................................................... 112
5.3.3 O-Ring Boss Hydraulic Fittings – Adjustable .................................................................................... 113
5.3.4 O-Ring Boss Hydraulic Fittings – Non-Adjustable.............................................................................. 115
TABLE OF CONTENTS

215033 v Revision A
5.3.5 O-Ring Face Seal Hydraulic Fittings................................................................................................ 116
5.3.6 Tapered Pipe Thread Fittings........................................................................................................ 117
5.4 Conversion Chart................................................................................................................................ 118
5.5 Definitions ........................................................................................................................................ 119
Predelivery Checklist ...................... ...................................................................................... .................. 123
TABLE OF CONTENTS


215033 1 Revision A
Chapter 1: Safety
1.1 Signal Words
Three signal words, DANGER, WARNING, and CAUTION, are used to alert you to hazardous situations. Two signal words,
IMPORTANT and NOTE, identify non-safety related information. Signal words are selected using the following guidelines:
DANGER
Indicates an imminently hazardous situation that, if not avoided, will result in death or serious injury.
WARNING
Indicates a potentially hazardous situation that, if not avoided, could result in death or serious injury. It may also be
used to alert against unsafe practices.
CAUTION
Indicates a potentially hazardous situation that, if not avoided, may result in minor or moderate injury. It may be used
to alert against unsafe practices.
IMPORTANT:
Indicates a situation that, if not avoided, could result in a malfunction or damage to the machine.
NOTE:
Provides additional information or advice.

215033 2 Revision A
1.2 General Safety
1000004
Figure 1.1: Safety Equipment
CAUTION
The following general farm safety precautions should be part of
your operating procedure for all types of machinery.
Protect yourself.
• When assembling, operating, and servicing machinery, wear
all protective clothing and personal safety devices that could
be necessary for the job at hand. Do NOT take chances. You
may need the following:
• Hard hat
• Protective footwear with slip-resistant soles
• Protective glasses or goggles
• Heavy gloves
• Wet weather gear
• Respirator or filter mask
1000005
Figure 1.2: Safety Equipment
• Be aware that exposure to loud noises can cause hearing
impairment or loss. Wear suitable hearing protection devices
such as earmuffs or earplugs to help protect against loud
noises.
1010391
Figure 1.3: Safety Equipment
• Provide a first aid kit in case of emergencies.
• Keep a properly maintained fire extinguisher on the machine.
Be familiar with its proper use.
• Keep young children away from machinery at all times.
• Be aware that accidents often happen when the Operator is
tired or in a hurry. Take time to consider safest way. NEVER
ignore warning signs of fatigue.
SAFETY

215033 3 Revision A
1000007
Figure 1.4: Safety around Equipment
• Wear close-fitting clothing and cover long hair. NEVER wear
dangling items such as scarves or bracelets.
• Keep all shields in place. NEVER alter or remove safety
equipment. Make sure driveline guards can rotate
independently of shaft and can telescope freely.
• Use only service and repair parts made or approved by
equipment manufacturer. Substituted parts may not meet
strength, design, or safety requirements.
1000008
Figure 1.5: Safety around Equipment
• Keep hands, feet, clothing, and hair away from moving parts.
NEVER attempt to clear obstructions or objects from a
machine while the engine is running.
• Do NOT modify the machine. Unauthorized modifications
may impair machine function and/or safety. It may also
shorten the machine’s life.
• To avoid injury or death from unexpected startup of the
machine, ALWAYS stop the engine and remove the key from
the ignition before leaving the operator’s seat for any reason.
1000009
Figure 1.6: Safety around Equipment
• Keep service area clean and dry. Wet and/or oily floors are
slippery. Wet spots can be dangerous when working with
electrical equipment. Be sure all electrical outlets and tools
are properly grounded.
• Keep work area well lit.
• Keep machinery clean. Straw and chaff on a hot engine are
fire hazards. Do NOT allow oil or grease to accumulate on
service platforms, ladders, or controls. Clean machines before
storage.
• NEVER use gasoline, naphtha, or any volatile material for
cleaning purposes. These materials may be toxic and/or
flammable.
• When storing machinery, cover sharp or extending
components to prevent injury from accidental contact.
SAFETY

215033 4 Revision A
1.3 Tire Safety
Service tires safely.
1000020
Figure 1.7: Overinflated Tire
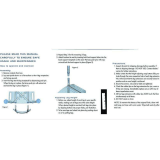
WARNING
• A tire can explode during inflation, which could cause
serious injury or death.
• Follow proper procedures when mounting a tire on a wheel
or rim. Failure to do so can produce an explosion that may
result in serious injury or death.
1000019
Figure 1.8: Safely Inflating Tire
WARNING
• Do NOT remove, install, or repair a tire on a rim unless you
have proper equipment and experience to perform job.
Take the tire and rim to a qualified tire repair shop.
• Make sure the tire is correctly seated before inflating to
operating pressure. If the tire is not correctly positioned on
the rim or is overinflated, the tire bead can loosen on one
side causing air to escape at high speed and with great
force. An air leak of this nature can thrust the tire in any
direction, endangering anyone in area.
• Do NOT stand over tire when inflating. Use a clip-on chuck
and extension hose.
• Do NOT exceed maximum inflation pressure indicated on
tire label.
• Never use force on an inflated or partially inflated tire.
• Make sure all air is removed from the tire before removing the tire from the rim.
• Never weld a wheel rim.
• Replace tires that have defects and replace wheel rims that are cracked, worn, or severely rusted.
SAFETY

215033 5 Revision A
1.4 Battery Safety
1000015
Figure 1.9: Safety around Batteries
WARNING
• Keep all sparks and flames away from batteries; an
explosive gas is given off by electrolyte.
• Ventilate when charging in enclosed space.
1000016
Figure 1.10: Safety around Batteries
WARNING
• Wear safety glasses when working near batteries.
• To avoid an electrolyte loss, do NOT tip batteries more than
45°.
• Battery electrolyte causes severe burns. Avoid contact with
skin, eyes, or clothing.
• Electrolyte splashed into eyes is extremely dangerous.
Should this occur, force eye open, and flood with cool, clean
water for 5 minutes. Call a doctor immediately.
• If electrolyte is spilled or splashed on clothing or body,
neutralize it immediately with a solution of baking soda and
water, then rinse with clear water.
1000017
Figure 1.11: Safety around Batteries
WARNING
• To avoid injury from a spark or short circuit, disconnect the
battery ground cable before servicing any part of the
electrical system.
• Do NOT operate the engine with the alternator or battery
disconnected. With battery cables disconnected and the
engine running, a high voltage can be built up if terminals
touch frame. Anyone touching the frame under these
conditions would be severely shocked.
• When working around storage batteries, remember that all
of the exposed metal parts are live. Never lay a metal object
across the terminals because a spark or short circuit will
result.
• Keep batteries out of reach of children.
SAFETY

215033 6 Revision A
1.5 Welding Precaution
IMPORTANT:
It is very important that correct procedures be followed when welding anything connected to the windrower. If procedures
are not followed, it could result in severe damage to sensitive, expensive electronics. Even if complete failure of a module
doesn’t happen immediately, it is impossible to know what effect high current could have with regard to future
malfunctions or shorter lifespan.
Due to the number of connectors, components to be welded should be removed from the windrower whenever possible
rather than welded in place. When work needs to be completed on a header, disconnect the header completely from the
windrower before welding. These same guidelines apply to plasma cutting, or any other high current electrical operation
performed on the machine.
The following items need to be disconnected:
10176211017621
A
Figure 1.12: Negative Terminals
• Negative battery terminals (A) (two connections)
IMPORTANT:
Always disconnect the battery terminals first, and reconnect
them last.
1017622
A
Figure 1.13: Master Controller
• Master controller (A)
Four connectors: P231, P232, P233, and P234
Location: Behind cab, near header lift/fan manifold
To disconnect the connectors, press the two outer tabs, and
pull the connector away from master controller.
IMPORTANT:
When reconnecting these connectors, double-check that the
connectors are fully seated into the master controller, and
that the two locking tabs on each end of all four connectors
have popped outward. If the tabs are not popped outward,
the connector is not fully seated.
IMPORTANT:
Do NOT power up or operate the windrower until these
connectors are locked into place.
SAFETY

215033 7 Revision A
1017623
A
Figure 1.14: Firewall Extension Module
• Firewall extension module (A)
Two connectors: P235 and P236
Location: Behind cab, near header lift/fan manifold.
To disconnect, use a small 3–6 mm (1/8–1/4 in.) blade
screwdriver to insert into the connector’s locking tab. Gently
pry upward (no more than 6 mm [1/4 in.]) to unlock the
connector tab, and then pull the connector away from the
module.
1017624
A
Figure 1.15: Chassis Extension Module
• Chassis extension module (A)
Two connectors: P247 and P248
Location: Under cab, inside left frame rail
To disconnect, use a small 3–6 mm (1/8–1/4 in.) blade
screwdriver to insert into the connector’s locking tab. Gently
pry upward (no more than 6 mm [1/4 in.]) to unlock the
connector tab, and then pull the connector away from the
module.
1019753
A
B
C
C
Figure 1.16: Engine Control Module
• Engine Control Module (ECM)
Two connectors for Cummins: P100 (A) and J1 Cummins
Proprietary ECM Connector (B)
Location: On engine
To disconnect, pull the rubber boot off the cover, unlock the
latch, and undo the main over-center latch. Remove strain
relief bolts (C) so the connectors can be pulled away from
the ECM.
IMPORTANT:
Be sure to disconnect both connectors. Note connector
locations.
IMPORTANT:
Be sure to reconnect connectors in the proper locations. Do
NOT cross connect.
SAFETY

215033 8 Revision A
1017626
A
Figure 1.17: Cab Connectors
NOTE:
To disconnect the remaining circular Deutsch connectors,
rotate the outer collar counterclockwise.
• Cab connectors (A)
Two round connectors: C1 and C2
Location: Under cab
1017627
A
Figure 1.18: Roof Connectors
• Roof connectors (A)
Four connectors: C10, C12, C13, and C14
Location: Under cab at base of left cab post
1017628
A
Figure 1.19: Chassis Relay Module
• Chassis relay module (A)
Three connectors: P240, P241, and P242
Location: Outside left frame rail near batteries
SAFETY

215033 9 Revision A
1017657
A
Figure 1.20: Engine Harness
• Engine harness (A)
Two round connectors: C30 and C31
Location: Inside left frame rail, at rear of windrower
1017630
A
Figure 1.21: A/C Box Connectors
• Air conditioning (A/C) box connectors (A)
Two connectors: C15 and C16
Location: Rear of A/C box
1017631
A
Figure 1.22: Wheel Motor Connectors
• Wheel motor connectors (A)
Two round connectors: C25 and C26
Location: Under center of frame, just behind front
cross member
IMPORTANT:
To connect circular Deutsch connectors without bending the
pins, align the plug with the receptacle before attempting to
connect.
To align the connectors:
3. Observe the channel cuts and mating channel protrusions on the inner part of the circular walls of the connectors.
4. Face the mating connectors towards each other, and rotate connectors so that channels are aligned.
5. Press connectors together while turning the outer connector clockwise until collar locks.
SAFETY

215033 10 Revision A
1.6 Engine Safety
WARNING
Do NOT use aerosol starting aids such as ether. Such use could result in an explosion and personal injury.
CAUTION
• On initial start-up of a new, serviced, or repaired engine, always be ready to stop the engine to prevent an
overspeed. Do this by shutting off the air and/or fuel supply to the engine.
• Do NOT bypass or disable automatic shutoff circuits. The circuits help prevent personal injury, and prevent engine
damage. For instructions, refer to the technical manual.
• Inspect the engine for potential hazards.
• Before starting the engine, ensure no one is on, underneath, or close to the engine. Ensure that people clear
the area.
• All protective guards and covers must be installed if the engine must be started to perform service procedures.
• To help prevent an accident, work around rotating parts carefully.
• If a warning tag is attached to the engine start switch or controls, do NOT start engine or move controls. Consult
whoever attached the warning tag before starting the engine.
• Start the engine from the operator’s station. Follow the procedure in the Starting Engine section of the operator’s
manual. Following the correct procedure will help prevent major damage to engine components and prevent
personal injury.
• To ensure that the jacket water heater (if equipped) and/or lubricant oil heater (if equipped) is working correctly,
check the water temperature gauge and/or oil temperature gauge during heater operation.
• Engine exhaust contains products of combustion, which can be harmful to your health. Always start and operate the
engine in a well-ventilated area. If the engine is started in an enclosed area, vent exhaust to the outside.
• Engine exhaust gases become very hot during operation and can burn people and common materials. Stay clear of
the rear of machine and avoid exhaust gases when engine is running.
NOTE:
If the engine will be operated in very cold conditions, then an additional cold-starting aid may be required.
1.6.1 High-Pressure Rail
WARNING
• Contact with high-pressure fuel may cause fluid penetration and burn hazards. High-pressure fuel spray may cause a
fire hazard. Failure to follow these instructions may cause personal injury or death.
• Before disconnecting fuel lines or any other components under high-pressure between the fuel pump and high-
pressure common rail fuel system, confirm that the fuel pressure is relieved.
1.6.2 Engine Electronics
WARNING
Tampering with electronic system installation or original equipment manufacturer (OEM) wiring installation is
dangerous and could result in personal injury or death and/or engine damage.
SAFETY

215033 11 Revision A
WARNING
Electrical Shock Hazard. The electronic unit injectors use DC voltage. The engine control module (ECM) sends this
voltage to the electronic unit injectors. Do NOT come in contact with the harness connector for the electronic unit
injectors while engine is operating. Failure to follow this instruction could result in personal injury or death.
This engine has a comprehensive, programmable engine monitoring system. The ECM has the ability to monitor engine
operating conditions. If conditions exceed the allowable range, the ECM will initiate immediate action.
The engine monitoring system can initiate the following actions:
• Warning
• Derate
• Shut down
Abnormalities in the following monitored conditions can limit engine speed and/or engine power:
• Engine coolant temperature
• Engine oil pressure
• Engine speed
• Intake manifold air temperature
• Diesel exhaust fluid (DEF) system performance
• Aftertreatment system performance
SAFETY

215033 12 Revision A
1.7 Safety Signs
1000694
Figure 1.23: Operator’s Manual Decal
• Keep safety signs clean and legible at all times.
• Replace safety signs that are missing or illegible.
• If the original part on which a safety sign was installed is
replaced, be sure the repair part displays the current
safety sign.
SAFETY
/