Page is loading ...

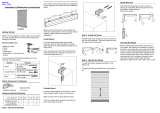
Extension Brackets (optional for Headrail shades)
Optional Extension Brackets are used to project the back of the
shading up to 2 1/2" from the mounting surface. Attach the Standard
Mounting Bracket to the Extension Bracket with the nut and bolt
provided.
Side Mount
(optional for Headrail shades)
Measure from window sill up to desired mounting position on each
side of the window frame. Mark position. Mount Side Mount Brackets
on each side of window frame as shown. Make sure to confirm that
headrail will sit perfectly level. Once Side Mount Brackets are
installed and properly positioned, attach the Standard Mounting
Brackets using the nuts and bolts provided.
Step 2. HANGING THE SHADE
Shades with NO Headrail or Fascia
Once the brackets are secured and level, the fabric roll can be
inserted. Make sure your hands are clean to avoid soiling the fabric.
While facing the inside of the shade, be sure the clutch and roller end
plug are inserted into the roller. Hold the
shade with the bottom of the clutch facing
the floor, and the beaded cord hanging
straight down.
Insert the foot of the control-
side bracket into the slotted
center hole of the clutch. Set
nub of the end plug into the V
of the support bracket.
Rotate the T-hook on the
support bracket to engage
over the nub on the idler and
secure the fabric roll.
Inside Mount - Fascia or NO Headrail
Inside Mount with Headrail
Fully Recessed Inside Mount with Deluxe Headrail
Out
side Mount - Fascia or NO Headrail
Outside Mount - with Headrail
Extension and Sidemount - NO Headrail
The standard roller brackets can be mounted to the side of any
opening utilizing the holes in the side of the bracket.
The optional Extension roller brackets mount in the same manner as
above, but allow an extra 1/2” of projection for the roller.
BASICS
A few simple tools are required:
- Measuring tape
- Carpenters Level
- Power drill or Phillips head Screwdriver
- ¼" Hex head and/or Phillips driver bit
Additional fasteners other than those sent with your shading may be
required depending on the mounting surface. Wallboard and plaster require
the use of anchors such as expansion or toggle bolts. Brick, tile or stone
need special plugs and drill bits. Remember to always pre-drill holes in
wood to avoid splitting.
Step 1. BRACKET INSTALLATION
For shades with headrail, the End brackets
should be located with centerlines 2" in from
each end. Depending on the width of the
shading, necessary additional brackets may
be evenly spaced between the two end
brackets.
For shades with NO headrail, the installation brackets are always
mounted so that the inner surfaces face each other. For Shades with
a fascia, the brackets are mounted with the open end down. It is very
important that the
brackets are
mounted so that
the shade is level
when installed.
1 1/4” Hex
Head
Bracket
Screw
Deluxe
Mounting
Bracket
Wedge for Deluxe
Headrail Bracket
Headrail Extension &
Side mount Bracket
Nut &
Bolt
“U” Shim for
Headrail bracket
Hold Down Bracket
(optional)
Hold Down
Bracket Screw
If the headrail or roller does not sit level, the fabric will not roll up
evenly which could damage the edges of the shading fabric.
Mount roller brackets as necessary, or use shims for headrail
shades if necessary to level brackets.
Low light gap wedges can be used to reduce the
top light gap when the shade is mounted fully
recessed. The wedge is placed between the
mounting surface and the bracket with the tabs
on the wedge facing down and the thick end of
the wedge toward the back of the bracket.
3/4” minimum surface
Shade width # Brackets
Up to 40” 2
>40” - 72” 3
>72” - 84” 4
>84” - 114” 5
Roller Mounting
Brackets for NO Headrail
The roller brackets
can be mounted up
against the window
frame, or back
against the window
casing.
Foot
T-Hook
The roller brackets
can be mounted
back against the
window casing, or
up against the
ceiling.
Control Side
Bracket
End Plug Side
Bracket
Nub
Support Bracket
Ultra Sleek
Mounting
Bracket
3/4” minimum surface
2 1/2”
2 1/2”
2” minimum surface required
Position screw in center of slot
so you can adjust position of
bracket as necessary.
Ultra Sleek Deluxe
Ultra Sleek Deluxe
1” minimum for
shallow mount
2 7/8” minimum for
flush inside mount
Use shims if necessary to ensure that the headrail is mounted level (included).
3/4” minimum for
shallow mount
3 3/4” minimum for
flush inside mount
2”
2”
Brackets for Roller
Shades with Fascia
T-Hook
Control Side
Bracket
End plug Side
Bracket
No Headrail
bracket pictured
Ultra Sleek Deluxe
Fascia
No Headrail
Fascia
No Headrail
Ultra Sleek
Deluxe

Shades WITH Headrail
Step 3. ATTACHING FASCIA PANEL (IF ORDERED)
Attach the fascia by first hooking the
top lip of the fascia panel onto the
bracket as shown.
Swing the bottom of the fascia panel
towards the bracket and gently press
at the bottom of the panel until the
lip on the fascia engages and snaps
lock to the bracket.
Step 4. CHILD SAFETY
The American National Standard for Safety of Corded Window
Covering Products (ANSI) requires the use of a cord tie down (cord
tensioner) on all continuous loop cord systems. The use of such a
device is intended to significantly reduce the occurrence of infant or
small child strangulation injuries or deaths resulting from the looped
pull cords on various window treatment products.
The Cord Tensioner is installed on the Lift Cord before packaging.
The Tensioning device should be mounted in the proper position to
pull the cord taut in order to reduce the possibility of injury.
Follow the instructions included in the Tensioner Bracket Packet.
Step 5. HOLD DOWN INSTALLATION (optional)
Optional Hold Down Brackets
are mounted with the supplied
screws. With the shade at its
proper drop, place the pin of
each Hold Down into the hole in
each End Cap and mark the
screw holes. Make sure the
pins are level and aligned.
Raise the shade, then screw the
Hold Down Bracket into the
mounting surface.
Step 6. SKEW ADJUSTMENT (if necessary)
If the shade does not raise evenly, first make sure the mounting
brackets are mounted level with each other.
If the shade is level, pull the shade all of the
way down. Prepare a strip of masking tape
approximately 5" long. On the side of the
shade opposite of the skewing direction, and as
close to the end of the roller as possible, lift the
fabric toward the back of the shade using your
fingers and slide the tape with the sticky side
facing the roller up as far as possible. The tape
is to be running parallel to the roller.
Roll the shade up and check for skewing. If the shade is still skewing,
add another strip of tape on top of the first one. If the shade is now
skewing to the opposite direction, tear off about 1" of tape from the
last strip installed. The tape is to be torn from the end closest to the
center of the shade.
CLEANING AND CARE
Occasional light vacuuming with a soft bristle attachment or gentle
feather dusting is all that is required to keep Serenade Roller Shades
looking fresh and neat. Most Serenade Shades may also be
ultrasonically cleaned, except those made with Phifer SheerWeave
fabrics.
Phifer SheerWeave fabrics are easy to maintain and only require
occasional vacuuming with a soft brush attachment or washing with
mild soap. Soak a sponge or damp cloth with the soapy solution and
gently wipe or blot the stain from the fabric. To dry, allow the shade
to air dry completely before raising.
If the shading has any wrinkling, lower the shade and leave in the
lowered position for 5 to 7 days. The heat from the sun will smooth
out any light wrinkles.
Installation Instructions
Roller Shades
Roller Shades
152038 Rev. D 08/11/2009
Push the rail back until it is fully engaged.
Un-Install Headrail
To remove the shading, partially lower
the shading and insert a flat head
screwdriver as shown. Twist the
screwdriver until the headrail
disengages from the bracket.
Ultra Sleek
Deluxe
Ultra Sleek
Deluxe
/