Page is loading ...

Day/Night
Cellular Shades
STEP BY STEP INSTALLATION INSTRUCTIONS
Cordless

12
smithandnoble.com
800.248.8888
Table of Contents
Step 1 - Getting Started ..................................3
Overview -
Cellular Cordless Day/Night Shades
.................4
Step 2 - Mounting the Brackets ........................ 5 - 6
Inside Mount ....................................5
Side Mount with Extension Brackets (optional) ......5
Outside Mount ..................................6
Extension Brackets (optional) ...................... 6
Spacer Blocks (optional) ..........................6
Step 3 - Inserting the Headrail ............................7
Step 4 - Hard to Reach Expandable Pole ...................8
Operating the Shade .............................8
Optional - Removing the Shade .............................9
Leveling the Bottom Rail ..........................9
Troubleshooting ...........................................10
Hold Down Brackets (optional) ...............................10
Care & Cleaning ...................................Back Cover
Safety .......................................Back Cover
Warranty .......................................Back Cover
A Smooth Set-Up
We want you to love your new window coverings and that includes
having a smooth installation experience. We recommend saving
reach out to us for help. It’s why we’re here. Call us at 800.248.8888
for more info on installation.
We recommend you hold on to all packaging until your window
coverings are fully installed. Should something go wrong (we
painless as possible.
Customer Service Hours
Monday — Friday: 6am — 6pm PT
Saturday — Sunday: 7am — 4pm PT
smithandnoble.com
Everything
You Need

34
smithandnoble.com 800.248.8888
2½"
2½"
Rail
For shade Standard Rail
widths of:Inside or Outside Mount Inside MountOutside Mount
Up to 40" 2 2 2
>40" to 72" 3 3 4**
>72" to 84" 4 4 5**
>84" to 120" 5* 5 6**
**76pu dna 021>
Large Rail
Use this Number of Brackets:
ALL THE HARDWARE YOU’LL NEED:
a
1
/
16
Locate wooden studs where you’ll want to attach the brackets; if you need to mount your
It’s important when selecting a fastener to make sure it’s designed to support the weight of the
shade. Follow the fastener manufacturer’s instruction from there on out.
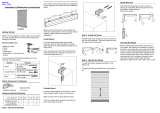
Getting Started
Step 1 — Parts & Tools Overview
Cordless
Headrail
Mounting
Bracket
Spacer
Block
(optional)
Spacer
Block
(optional)
Extension Brackets
(optional)
Middle
Rail
Bottom RailCordless
Handles Hold Down
Bracket
(optional)
MOUNTING BRACKETS
EXTENSION BRACKET
(OPTIONAL)
SCREWS
LEVEL
(NOT INCLUDED)
POWER DRILL
(NOT INCLUDED)
SCREW DRIVER & PENCIL
(NOT INCLUDED)
HOLD DOWN BRACKET
(OPTIONAL)
2½"
2½"
Rail
For shade Standard Rail
widths of:Inside or Outside Mount Inside MountOutside Mount
Up to 40" 2 2 2
>40" to 72" 3 3 4**
>72" to 84" 4 4 5**
>84" to 120" 5* 5 6**
**76pu dna 021>
Large Rail
Use this Number of Brackets:
2½"
2½"
Rail
For shade Standard Rail
widths of:Inside or Outside Mount Inside MountOutside Mount
Up to 40" 2 2 2
>40" to 72" 3 3 4**
>72" to 84" 4 4 5**
>84" to 120" 5* 5 6**
**76pu dna 021>
Large Rail
Use this Number of Brackets:
Mounting
Bracket
2½"
2½"
Rail
For shade Standard Rail
widths of:Inside or Outside Mount Inside MountOutside Mount
Up to 40" 2 2 2
>40" to 72" 3 3 4**
>72" to 84" 4 4 5**
>84" to 120" 5* 5 6**
**76pu dna 021>
Large Rail
Use this Number of Brackets:
SPACER BLOCK
(OPTIONAL)

56
smithandnoble.com 800.248.8888
Nut
Bolt
Extension
Bracket
Mounting
Bracket
BRACKET QTY SHADE WIDTH
2up to 40"
38—72"
48—84"
58—120"
Inside Mount
Hold the shade inside the window
frame so that the front edge of the
shade and the front edge of the
window line up. Don’t forget to keep
it centered (you’ll want the spaces
between the ends of the headrail
brackets should be located 2
1
2
" in from
each end.
top window sill frame. Use the top two
bracket holes.
Outside Mount
so that it’s perfectly centered. Using
headrail hit the window frame or wall.
Notes on accuracy: brackets should be
and not too close to the headrail’s edges
and operating mechanism.
frame or wall above the window using
the provided screws. Use the rear
a minimum surface of 78" high.
(Continue on to STEP 3 - Hanging the
Shade p7)
Side Mount with Extension
Brackets (optional)
Measure from window sill up to desired
mounting position on each side of the
window frame. Mark position.
Mount Extension Brackets on each
perfectly level.
Once the Extension Brackets are
the mounting brackets using the nuts
and bolts provided.
Optional Spacer block will project
bracket 38" from the mounting surface.
Outside Mount with
Spacer Block
(optional)
Optional Extension Brackets are
used to project the back of the shade
up to 2
38
" from the mounting surface.
Attach the Installation Bracket to the
Extension Bracket with the nut and
bolt provided.
Extension Brackets (optional)
Step 2 — Mounting Brackets Step 2 — Mounting Brackets
Extension Bracket
for mounting
Bolt
Nut
Mounting
Bracket
23⁄8"
2"
Mounting
Bracket
Mounting
Bracket
Spacer
Block
Extension
Bracket
Extension
Bracket

78
smithandnoble.com 800.248.8888
Inserting the Headrail
about an inch. This will help keep the fabric
from getting caught between the brackets
and the headrail.
Position the headrail with the front lip (A)
resting on the top hooks of all the brackets.
Make sure that no fabric is pinched between
the brackets and the headrail.
Push the bottom of the headrail firmly
upwards and toward the window until the
groove at the bottom of the headrail snaps
Step 3 — Inserting the Headrail Step 4 — Operating the Shade
Hard to Reach Operation
Expandable Pole
For hard to reach Cordless shades use
expandable pole to raise and lower shades.
slot on the handle and pull gently.
To Raise the shade simply center the poles
end under the bottom rail.
Lower the shade
Raise the shade
Cordless Control
Opening and closing your new shades is
entirely hassle-free.
it’s at your desired height then release.
at your desired height then release.
Headrail
Middle
Rail
Bottom Rail
Cordless
Handles
(B)
(A)
Push up and toward
the window
Mounting
Bracket
Mounting
Bracket
Headrail
Headrail

910
smithandnoble.com
800.248.8888
Level the Bottom Rail
Cellular Shades use a system that allows
easy leveling of the bottom rail. It is
designed to make slight adjustments (Less
than 1") to level the moving rails of your
shade. It is not designed to make length
adjustments.
adjustment screw to raise or lower that side
of the bottom rail. The adjustment screw is
on the underside of the bottom rail.
bottom rail up or down approximately 14".
Over-turning the adjustment screw (more
than 1" of adjustment) can cause the cord
to tangle or wedge inside the rail. The
screw should turn easily - Do Not Force.
Removing the Shade
between the headrail and the bottom
back of the bracket (tab which extends
out slightly from each bracket).
Gently pry the screwdriver to release the
bracket from the headrail. Take care not to
damage the painted finish of the headrail.
headrail to keep it from falling.
Insert screwdriver
here and gently pry
Troubleshooting & Hold Down Bracket
Step 5 - Removing the Shade & Leveling
ADJUSTMENT SCREWS
Problem
1. The shade will not stay down
The fabric may want to spring
up because it was fabricated
primarily in the closed position.
2. T
he pleats billow out when
the shade is raised
.
Solution
cells to relax the pleats. Repeat with another sec-
tion of cells until the fabric is relaxed. Do not tightly
stack the shade for 24 hours.
Pleats may settle and stretch out when left in one
position for extended periods of time.
Raise the shade very slowly to allow the retraction
mechanism to pull up the stretched fabric.
Helpful Tip: Shades that are raised regularly will be
less subject to pleat settling and will remain looking
fresh and new.
Cordless, Cordless with Top Down/Bottom Up and Cordless 2-on-1 Top Down/Bottom Up
Gently stretch the
fabric. Pull evenly
on each side.
Hold Down Bracket (optional)
Optional Hold Down Brackets are mounted
with the supplied screws.
the pin of each Hold Down into the hole in
each End Cap and make sure the pins are
level and aligned.
Mark the screw holes with a pencil.
Bracket into the mounting surface.
Mounting
Bracket
Headrail
Hold Down
Bracket

© 2020 Smith & Noble Home, Inc. All Rights Reserved
Warranty Service
our products come with a limited lifetime warranty. The warranty applies to
or craftsmanship. Shades or blinds must have been properly installed. We
reserve the right to determine if your window covering warrants a repair or a
replacement. In need of warranty service? Call us at 800.248.8888 and we’ll
arrange for a repair or replacement ASAP.
SN112020
risk than to use one of our motorized products.
Child Safety
Care & Cleaning and Safety
Care & Cleaning
Minimal care and cleaning is needed to maintain the beauty of your shades.
To Vacuum: Use brush or dust head attachment.
To Dust:
Safety First. Style Second To None®
Great style should never come at the cost of safety. Every Smith & Noble window treatment
/