Page is loading ...

Manufactured Housing
Anchor Installation
Information
(Updated: 8/25/03)
Provided by
TIE DOWN ENGINEERING
082503,12

INSTALLATION INFORMATION
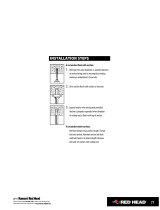
1. 2. 3.
1. Position anchor at a slight back angle (10˚) so that when fully
installed, the anchor head will be inside any skirting or side wall.
2. Install anchor to +/- 2/3 depth, then install stabilizer vertically,
within 3”-4” of anchor shaft, parallel to wall of home.
3. Fully drive anchor, attach strap (see proper strap tensioning),
and pretension strap to pull anchor rod against the stabilizer plate.
Anchor Installation
1. Installation with a power drive machine is always a two person operation.
2. Never wedge drive machine against home or other immovable
object.
3. Always use proper electrical cords & power supply (see drive
machine instructions).
4. Attach anchor head to adapter on drive machine.
5.Place anchor in proper position using power drive to turn
anchor into the ground.
Electric Drive Machine Installation
Manual Anchor Installation
1. Dig holes to a depth of 2/3 of the anchor length. Install anchor
with rod or length of pipe for leverage.
2. Replace earth in hole after anchor/plate is installed at full depth.
Pack dirt with a tamping rod every 6 inches of fill.
3. Testing may be required in loose soil conditions to check that
anchor has proper holding power.
Important:
Anchor must be installed to full depth. Anchor head must
be at ground level or at the top of the stabilizer plate which
is fully installed to ground level.
082503,12
1. Determine anchor/stabilizer
plate location and bracket
location on I-beam to insure a
45˚ or lower strap angle .
2. Drill a 1/2" hole, centered in
the I-beam as shown. Hole must
be a minimum of 4" from any
edge of the I-beam.
3. Connect the two Frame
Brackets (R & L) with a 1/2" Grade 5 bolt and nut.
4. Attach swivel connector and strap to Angle Frame Brackets
with 1/2" Grade 5 bolts and nuts. Tighten all bolts.
1. Determine anchor/stabilizer plate location and bracket loca-
tion on I-beam to insure a 45˚ or lower strap angle.
2. Attach beam clamp with 1/2" Grade 5 bolts and nuts as shown.
3. Connect swivel connector and strap to bolt nearest to anchor
with a 1/2" Grade 5 bolt and nut.
Angle Frame Bracket #59009
Gator Beam Clamp #59011
Stabilization Plates
Class 4B Stabilizer Plate
17-1/2” x 13-1/2”
Galvanized: Part # 59286
12” wide Stabilizer Plate
Black Paint: Part #59292
Quik-Set Stabilizer Plate
Part # 59291
ABS Stabilizer Plate
Part # 59293

INSTALLATION INFORMATION
Proper Strap Tensioning
12-15 inches
Cut
1. Insert slotted bolt into
anchor head, attach loosely.
Pull strap past bolt head and
cut strap so that 12-15 inches
of strap are available to wrap
onto the slotted bolt.
2. Insert the strap end into the
slot in bolt until flush with
opposite side of bolt.
3. Using 15/16" wrench or
socket, turn the bolt, winding
the strap so that a minimum of
four to five complete turns are
made, and the strap is
adequately tensioned.
4. Hold the bolt under tension
while tightening the nut,
drawing the head of the bolt
into the recess. After the bolt is
within the recess, continue to
tighten the nut until securely
fastened.
DOUBLE THICK G-60
GALVANIZED PROTECTION
TIE DOWN ENGINEERING
CERTIFIED TO
ANSI A225.1 ASTM D3953-91
TIE DOWN ENGINEERING
CERTIFIED TO
ANSI A225.1 ASTM D3953-91
DOUBLE THICK G-60
GALVANIZED PROTECTION
Certified Galvanized Strapping*
The HUD Code requires that certified strapping must meet
ASTM specifications, have a minimum (0.30 oz. per square
foot) galvanized coating and must be marked every 5 ft.. Tie
Down strapping is marked every 12 in.
* Available with G60 or G120 galvanized coatings.
Ground Level
"In Line" Installed:
Minimum anchor
length of 48"
In order to prevent lateral movement of manufactured homes
subjected to high wind loads and to comply with HUD’s Wind
Zone I, II, & III requirements, all lateral frame ties must be
attached to a properly stabilized ground anchor. (Two approved
methods illustrated below.)
Anchor Stabilizer
Stabilizer Plate Installation
1. Refer to any and all local, state and federal regulations.
2. Use the Soil Test Probe at the anchor location in order to
match soil class with the anchor/stabilizer.
3. Partially install anchor to allow 14" to 16" remaining above
ground level.
4. Utilizing oversized hammer, vertically install stabilizer plate,
nesting anchor rod in between formed channels on outside
of stabilizer plate (between anchor and frame).
5. Fully install anchor so that head is at the surface of the soil
(1” tolerance, if necessary) and pretension anchor until
touching stabilizer plate.
Tip: TIE DOWN’S SPEED WRENCH cuts time
required to tension strap in half!
T
IE DOWN ENGINEERING
CERTIFIED TO
N
SI A225.1 ASTM D3953-91
2 Seals - 2 Crimps per seal
Strap Attachment
To lengthen strap in the field, a double crimp seal splice is
required. Overlap strap approximately 12 inches and use two
crimp seals evenly spaced, with 2 crimps per seal.
One crimp seal is used when strap is
attached to a sidewall bracket or a strap
connector. If the bracket does not have a
radius edge, a radius clip (short “U” shaped
piece of strap) must be placed between the
strap and contact point to protect the strap
from sharp edges. Verify state requirements
for number of crimp seals required.
082503,12
Strap Splice

INSTALLATION INFORMATION
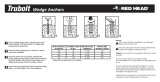
Cross Drive Rock Anchor - MRA
Strap Buckle - MBU
Engineered for installation into solid rock within 1 in. from
bottom of the anchor base. Exact alignment is achieved with
the swivel tensioning head.
• Drill 5/8" diameter hole 5-1/2" deep in center of anchor
location. Insert pilot stud into hole.
• Drill two 3/4" diameter holes, (the length of the rods) into the
rock at 45° angles, using the anchor head as a locating guide.
• Place rod through top and
corresponding bottom web flange
and into 45° hole. Drive rod into
rock. Rod must be driven into rock
at least 80% of it's length to
achieve minimum allowable
pullout resistance. Repeat using
2nd rod.
• Maximum pullout resistance is
developed when ground surface is
solid rock. Maximum distance
from lowest edge of anchor flange
to rock surface is 1 in.
• Thread length of frame
tie strap through strap
buckle as shown.
• Next, thread long end of
strap between frame and
floor of home. Bring strap
through buckle as shown
in diagram and fasten to
anchor head.
• Diagram shows strap in
position around frame and
through buckle. It is
important to remove all
slack from system.
082503,12
45˚
Ground Level
"I" Beam Frame
A Stabilizer Plate must be installed on all frame Ties.
(or alternate method of stabilizing ground anchor.)
Select proper anchor for soil conditions using
the Soil Test Probe, or other approved method
of determining soil classification.
If this angle exceeds 45˚, an additional
frame clamp (hook) must be attached to
the opposite beam as indicated by the dotted line.
Frame Clamp
with Strap
Frame Tie to Anchor
If the angle of the frame tie connection
is greater than 45° (as indicated at left),
an additional frame tie must be attached
to the opposite "I" beam frame member.
X-Plate Anchor
X-Plate for Soil Class 2
2 - 23/32” x 30” rods
included. Part # 59118

INSTALLATION INFORMATION
1. Refer to local, State, and Federal regulations prior to installation in order to assure compliance.
2. Soil Test Probe the anchor location prior to installation in order to match the soil classification with the
proper anchor/stabilizer combination.
3. Install tested and approved Tie Down Engineering anchor products.
Frame Tie with Hook
1. Attach frame hook to top inboard
location of "I" beam.
2. Keeping in line with the hook, wrap
galvanized strap completely around
"I" beam.
3.Thread loose end of strap through
slotted tensioning bolt attached to
tension head of anchor.(Anchor must
be properly installed into the ground
before proceeding with step #4.)
4. Tighten slotted
tensioning bolt a
minimum of 4 to 5
full turns until all
slack in strap is
removed.
Frame Tie with Buckle
1.Install strap by pushing the end
between the inside of the frame "I" beam
and the floor.
2. Position the buckle at upper end of the
"I" beam frame. Wrap the end of the
strap around the "I" beam. Thread the
end of the strap through the slot in the
buckle as shown. Push the end of strap
in-between "I" beam and floor.
3. Pull the strap, making certain the
buckle stays in position. Thread loose
end of strap thru slotted
tensioning bolt attached
to tension head of
anchor. Tighten slotted
tensioning bolt a mini-
mum of 4 to 5 full turns
until all slack in strap is
removed.
082503,12
1. Frame ties attach to the beam with a swivel frame
connector. This method provides the strongest and
safest connection.
2. Attach the swivel frame connector beam hook to
the top of the I-beam from either the front or the back
side. The angled or hook end of the beam hook
should be snug against the inside top I-beam flange.
3. Attach the swivel connector to the underside of the flange and frame hook with a 1/2" grade 5 bolt and nut. This
allows the swivel connector to pivot and lock onto the I-beam.
4. Pull strap past anchor head 12 to 15 inches and cut strap. Insert strap into slotted bolt flush with the opposite
side of the slotted bolt. Tighten slotted tensioning bolt (4 to 5 full turns minimum) until all slack in strap is
removed. (Correct anchor must be installed as per ground anchor manufacturer's installation instructions).
I Beam
Swivel Strap Connector (Best Option)

INSTALLATION INFORMATION
Patio Slab Anchor
Concrete Anchor
Concrete Slab Anchor
This anchor is designed to be inserted through a 3/4" hole
drilled or formed into an existing concrete slab.
• Concrete must be a 2500 PSI minimum
slab with 4" minimum thickness and 6/6 x
10/10 wire mesh or fiber mesh installed.
• Concrete slab must allow 4725 lbs of
vertical tension on anchor without lifting.
This assumes that the concrete weighs
150 lbs per cu. ft.
• Minimum distance from the anchor shaft
to one edge of the slab is 4 in. from one
edge and 2 ft. from any other edge.
• If installed in a 4" slab at minimum dis-
tances from edges, an additional layer of
6/6 x 10/10 mesh is recommended.
The MIJ2 is designed to be installed into a concrete slab at
the time the concrete is being poured.
• Concrete must be a 2500 PSI
minimum slab with 4" minimum
thickness.
• Concrete slab must allow 4725 lbs of
vertical tension on anchor without
lifting. This assumes that the concrete
weighs 150 lbs per cu. ft.
• Minimum distance from the anchor
shaft to one edge of the slab is 4 in.
from one edge.
• If installed in a 4" slab at minimum
distances from edges, an additional layer
of 6/6 or 10/10 mesh is recommended.
• Slab must be 8 in. minimum thickness at location under
any anchor to allow 5 in. embedment of anchor "J" rod.
• After reviewing restrictions listed to the right, drill a
5/8 in x 3 in. hole in the slab where the anchor head is
to be located.
• Place steel expansion sleeve over bolt and place into
the drilled hole.
• Place the washer onto the expansion bolt.
• Thread nut onto expansion bolt and tighten until
maximum expansion of steel expansion sleeve has been
achieved.
• Remove nut and washer and place anchor head over
exposed bolt.
• Place washer and nut onto bolt to attach anchor head,
tighten nut.
• Concrete must be a 2500 PSI minimum slab with 4"
minimum thickness.
• Concrete slab must allow 4725 lbs of vertical tension
on anchor without lifting. This assumes that the
concrete weighs 150 lbs per cu. ft.
• Minimum distance from the anchor shaft to one edge
of the slab is 4 in. from one edge and 6” from any
other edge.
• If installed in a 4" slab at minimum distances from
edges, an additional layer of 6/6 or 10/10 wire mesh or
fiber mesh is recommended.
This anchor is designed to be bolted to an expansion sleeve in an existing concrete slab.
082503,12

1
2
4
b
4
a
3
2
C
L
A
S
S
2
3
4
a
4
b
S
O
I
L
3
4
b
4
a
3
2
C
L
A
S
S
2
3
4
a
4
b
S
O
IL
* Below 175 in. lbs., a professional engineer should be consulted
Ground anchors are designed for different soil classifications: longer models for loose soils, shorter models for harder soils. Prior to
installing any ground anchor model, the soil must be tested (with a Soil Test Probe) in order to match approved ground anchor model
with site soil class.
WARNING: Before ground anchor installation, determine that the anchor locations around home will not be close to any underground
electrical cables, water lines or sewer piping. Failure to determine the location of electrical cables may result in serious personal injury.
Soil Classification Chart
Soil Test Probe
The Soil Test Probe is used to determine the soil conditions below the surface near the anchor's helix. Using the Soil Test Probe will
ensure maximum anchor holding strength by indicating the proper anchor model for each soil condition.
Using the chart provided, a probe reading can be converted to the recommended anchor for every soil condition.
Instructions
1. Place probe tip into ground where you intend to place the anchor. Using a 15/16" hex socket with a ratchet or breaker bar,
rotate the probe in a clockwise direction. (An electric drive machine with an adaptor head may also be used)
2. Drive (rotate) the torque probe into the soil until reaching a depth equal to the length of the anchor being installed.
3. To determine the soil classification:
• Place wrench adaptor onto torque wrench.
• Insert hex portion of wrench adaptor onto the earth probe.
• Support probe shaft with one hand, while rotating probe steadily with the wrench. (Do not exceed 600 in. lbs.)
• Read the torque wrench while rotating probe clockwise.
• Use the soil classification chart to cross reference probe readings. Color codes match those printed on Tie Down's torque probe.
4. If probe reading does not match the anchor for that depth, rotate probe to next anchor depth and check reading. Continue until
reading on probe matches anchor length for depth of reading.
5. To remove probe, use wrench or electric drive machine in reverse (counter clockwise).
5' Earth Probe
Wrench Adaptor
600 in. lbs.
Torque Wrench
NOTE: Each State, County or Municipality may require
a specific anchor from the groups shown for each soil
classification. Check local and State regulations first.
Soil Test Value Soil
Class (in. lbs.) Description
4b
4a
3
2
1
550 +
Very dense and/or cemented
sands, coarse gravel, cobbies,
preloaded silts, clays and coral.
N/A Sound hard rock.
350 to 550 Medium dense coarse sands
sandy gravels very stiff silts
and clays.
275 to 350 Loose to medium dense sands,
firm to stiff clays and silts,
alluvial fill.
175* to 275 Loose sands, firm clays and
silts, alluvial fill.
070203,215

Anchor Chart
4b
4a
3
1
Soil Test Value Recommended TDE Part
Class (in. lbs.) Anchor / Stabilizers Number
N/A
550 lbs +
350 to
550 lbs.
275 to
350 lbs.
175 to
275 lbs.
2
Blue
Yellow
Green
Red
30" X 5/8" rod / 2 - 4" helix 59090
30" X 3/4" rod / 2 - 4" helix 59095 & 59079
All anchors above must use one of the following:
12" Stabilizer Plate 59292
Quik-Set Stabilization Plate 59291
48" X 5/8" rod / 1 - 6" helix 59080 & 59081
48" X 3/4" rod / 1 - 6" helix 59085 & 59094
36" X 3/4" rod / 1 - 6" helix & 1 - 4" helix 59250
The anchors above must use one of the following:
12" Stabilizer Plate 59292
Quik-Set Stabilization Plate 59291
30" X 5/8" rod / 2 - 4" helix Deepset 59091
36" X 3/4" rod / 4" & 6" helix Deepset 59092
48" X 5/8" rod / 1 - 6" helix 59080 & 59081
48" X 3/4" rod / 1 - 6" helix 59085 & 59094
36" X 3/4" rod / 1 - 6" helix & 1 - 4" helix 59250
The anchors above must use one of the following:
12" Stabilizer Plate 59292
Quik-Set Stabilization Plate 59291
ABS Stabilization Plate
(Florida Only) 59293
36" X 3/4" rod / 4" & 6" helix Deepset 59092
50" X 3/4" rod / 4" & 6" helix Deepset 59093
60" X 3/4" rod / 1 - 7" helix 59099
The anchor above must use one of the following:
17 -1/2" Stabilizer Plate 59286
ABS Stabilization Plate
59293
Cross Drive Rock Anchor 59110 & 59111
NOTE: Each State, County or Municipality may require a specific anchor from the
groups shown for each soil classification. Check local and State regulations first.
070203,215
/