Page is loading ...

INSTALLATION INSTRUCTIONS:
*Caution: Wall covering may conceal electrical wiring or pipes, which may cause damage or serious injury if punctured
by drills or fasteners. Unless you are confident that there will be no interference from such obstacles, we recommend
that you seek qualified help when installing this product.
INSTALLER: WEAR GLOVES AND PROTECTIVE EYEWEAR WHEN INSTALLING THIS PRODUCT.
*Caution: Strap coil is under tension.
HR-80-360
BOX CONTENTS:
4 - Straps
4 - Buckles
4 - Lag Bolts ¼” x 2½” Self-Drilling with ¼” Flat Washers
2 - 3/8” carriage bolts, washers, and nuts
TOOLS NEEDED:
• 3/8” Socket or Wrench for Tightening Lag Bolts at Wall
• 9/16” Wrench for Tightening Carriage Bolts at Buckles
• Optional: Drill with 1/8” Drill Bit
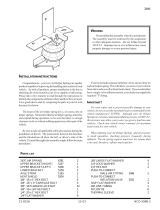
Step 1
Select water heater location
against a wood stud wall.
Positioning directly in front of
a 2” x 4” wall stud is strongly
recommended, and there must be
a stud on each side of the unit to
anchor the Straps. See Figure A.
Step 2
Straps must be installed in the upper
and lower 1/3 of the water heater body.
The lower strap must be at least 4”
above the water heater controls, See
Figure B.
Mark the wall studs on both sides of
the water heater where you will install
the straps. Drill 1/8” pilot holes if
desired.
1/3
1/3
4" Min
Fig. B
Step 5
Second Strap pair assembly: Repeat steps
2 - 4 for the second pair of Straps. Although
selecting the same hole and slot positions
as in the first installation is likely to work,
in some cases it may be necessary to
slightly reposition the Buckle or wall mount.
If necessary, trim Strap ends at the wall.
Installation complete.
Step 3
First Strap pair assembly (select either high
or low position). Select Short Strap, and
temporarily install one Buckle per Figure E1
& E2, without bending the Strap back. See Figure E3.
Hold Short Strap so the Buckle is in the approximate
front-center of the water heater. See Figure C.
Select a mounting hole at the other end of the Strap
that best aligns to the pilot mark on the stud. (Note:
Allow a slight tension rather than slack when selecting the
mounting hole.) If necessary, re-position the Buckle and re-align.
Secure the end of the Short Strap to the stud with a ¼” x 2½” lag
bolt and washer. See Figure D.
Step 4
Install Long Strap (See Figure
C, D, & E) on the opposite side
of the heater per Step 3 (See
Figure C, D, & E1-E2) above.
Select the mounting holes
which place the Buckle at
the front-center of the water
heater while aligning with
the pilot mark on the second
wall stud. It is important that,
with the Straps pulled tightly
together around the water
heater, the buckles must
end up approximately 2½”
- 3” apart. Select the buckle
and wall mounting holes
accordingly. Secure Long Strap to the second wall stud as above.
Wrap Long Strap completely around tank and slide them around to
the rear of the tank, as shown in Figure F and bring across to the
front of tank.
Bend the Strap ends that pass through the Buckles against the
back side of the Buckles, so they will press against the water
heater tank when secured (See Figure F).
Secure the two Buckles together with 3/8” carriage bolt, nut and
washer, and tighten (See Figure G).
Figure E1 Figure E2 Figure E3
Figure B
Figure A
Figure D
Figure C
Figure G
WATER HEATER RESTRAINT
Water Heater
Figure F
Water Heater
Figure F
Figure F
Fig. 4
Fig. 5
Figure G
HR80-360_bag-FINAL.indd 2 6/10/2014 08:32:25
/