Page is loading ...

1

2 DVD Recorder User’s Guide
CAUTION
THIS PRODUCT UTILIZES A LASER. USE OF CONTROLS
OR ADJUSTMENTS OR PERFORMANCE OF PROCEDURES
OTHER THAN THOSE SPECIFIED HEREIN MAY RESULT
IN HAZARDOUS RADIATION EXPOSURE. DO NOT OPEN
THE COVER AND DO NOT REPAIR YOURSELF REFER
SERVICING TO QUALIFIED PERSONNEL.
WARNING
TO REDUCE THE RISK OF FIRE, ELECTRIC SHOCK OR
PRODUCT DAMAGE, DO NOT EXPOSE THIS APPARATUS
TO MOISTURE AND ENSURE THAT OBJECTS FILLED
WITH LIQUIDS, SUCH AS VASES, SHALL BE PLACED
AWAY FROM THE APPARATUS.
Power Notice
Disconnect the AC plug to shut the power off
completely. The POWER button in any position does
not disconnect the main line. Power can be controlled
from the remote.
Laser Product Notice
1 CLASS 1 LASER PRODUCT
2 DANGER: Visible and invisible laser radiation when
open and interlock failed or defeated. Avoid direct
exposure to beam.
3 CAUTION: Do not open the top cover. There are
no user serviceable parts inside the unit; leave all
servicing to qualified service personnel.
Congratulations!
Congratulations on your purchase of this R6750 DVD Recorder. We know you will
enjoy this product for many years to come. In case service is required, please take
a moment to write down your serial number located on the rear panel of the
DVD Recorder: ______________________________________________________
FCC Notice
This equipment has been tested and found to comply
with the limits for a Class B digital device, pursuant to
part 15 of the FCC Rules.
These limits are designed to provide reasonable
protection against harmful interference in a residential
installation.
This equipment generates, uses and can radiate radio
frequency energy and, if not installed and used in
accordance with the instructions, may cause harmful
interference to radio communications. However, there
is no guarantee that interference will not occur in a
particular installation. If this equipment does cause
harmful interference to radio or television reception,
which can be determined by turning the equipment
off and on, the user is encouraged to try to correct the
interference by one or more of the following measures:
• Reorient or relocate the receiving antenna.
• Increase the separation between the equipment
and receiver.
• Connect the equipment into an outlet on a circuit
different from that to which the receiver is con-
nected.
• Consult the dealer or an experienced radio/TV tech
-
nician for help.
525P Progressive Scan Notice
CONSUMERS SHOULD NOTE THAT NOT ALL HIGH
DEFINITION TELEVISION SETS ARE FULLY COMPATIBLE
WITH THIS PRODUCT AND MAY CAUSE ARTIFACTS
TO BE DISPLAYED IN THE PICTURE. IN CASE OF
525 PROGRESSIVE SCAN PICTURE PROBLEMS, IT
IS RECOMMENDED THAT THE USER SWITCH THE
CONNECTION TO THE “STANDARD DEFINITION”
OUTPUT. IF THERE ARE QUESTIONS REGARDING OUR
TV SET COMPATIBILITY WITH THIS MODEL 525P DVD
PLAYER, PLEASE CONTACT OUR CUSTOMER SERVICE
CENTER.
Macrovision Notice
U.S. Patent Nos. 4,631,603; 4,577,216; 4,819,098;
4,907,093; and 6,516,132.
This product incorporates copyright protection
technology that is protected by U.S. patents and other
intellectual property rights. Use of this copyright
protection technology must be authorized by
Macrovision, and is intended for home and other
limited viewing uses only unless otherwise authorized
by Macrovision. Reverse engineering or disassembly is
prohibited.

3
Table of Contents
1 - Welcome
Unpacking / 7
Compatible Media / 7
Front Panel /
8
Front Panel Display / 9
Rear Panel / 10
Remote Control / 11
2 - Connections
BASIC
Antenna/Basic Cable
Connections / 13
Cable Box Connections / 14
Basic TV Connections / 15
ADVANCED
Enhanced Video Options /
16
Enhanced Audio Options / 17
Rear AV Connections / 18
Front AV Connections / 19
3 - Setup
Setup Menu Overview / 21
About Menu Navigation /
21
System Settings / 22
Language Settings / 23
Playback Settings / 24
Record Settings / 25
Audio Settings /
26
TV Tuner Settings / 27
4 - Operations
RECORD
Basic Recording / 29
Recording from an External
Source / 30
Timer Recording / 31
PLAY
DVD
Playback / 32
Special Playback Options /
33
Other Disc Playback / 34
EDIT
Editing Options / 35
Channel Editing / 36
Formatting
/Finalizing Discs / 37
5 - Help
Customer Support / 39
Troubleshooting / 39
Technical Specifications / 41
Warranty / 42
Index /
43
©2004 GoVideo. All rights reserved. Manufactured under license from Dolby Laboratories. “Dolby” and the double-D symbol are
trademarks of Dolby Laboratories. “DTS” and “DTS Digital Surround” are trademarks of Digital Theater Systems, Inc. All other brand
and product names are trademarks or registered trademarks of their respective companies.

4 DVD Recorder User’s Guide
Important Safety Instructions
1 Read Instructions - All the safety and oper-
ating instructions should be read before the
product is operated.
2 Retain Instructions - The safety and operat-
ing instructions should be retained for future
reference.
3 Heed Warnings - All warnings on the prod-
uct and in the operating instructions should
be adhered to.
4 Follow Instructions - All operating and us-
ing instructions should be followed.
5 Cleaning - Unplug this product from the
wall outlet before cleaning. Do not use liquid
cleaners or aerosol cleaners. Use a damp
cloth for cleaning.
6 Attachments - Do not use attachments not
recommended by the product manufacturer
as they may cause hazards.
7 Water and Moisture - Do not use this prod-
uct near water - for example near a bath tub,
wash bowl, kitchen sink, or laundry tub; in a
wet basement; or near a swimming pool; and
the like.
8 Accessories - Do not place this product on
an unstable cart, stand, tripod, bracket, or
table.The product may fall, causing serious
injury to a child or adult, and serious damage
to the product. Use only with a cart, stand,
tripod, bracket, or table recommended by the
manufacturer or sold with the product. Any
mounting of the product should follow the
manufacturer’s instructions and should use
a mounting accessory recommended by the
manufacturer.
9 A product and
cart combination
should be moved
with care. Quick
stops, exces-
sive force, and
uneven surfaces
may cause the
product and cart
combination to
overturn.
10 Ventilation - Slots and openings in the cabi-
net are provided for ventilation and to ensure
reliable operation of the product and to
protect it from overheating. These openings
must not be blocked or covered. The open
-
ings should never be blocked by placing the
product on a bed, sofa, rug, or other similar
surface. This product should not be placed in
a built-in installation such as a bookcase or
rack unless proper ventilation is provided or
the manufacturer’s instructions have been
adhered to.
11 Power Sources - This product should be
operated only from the type of power source
indicated on the marking label. If you are not
sure of the type of power supplied to your
home, consult your product dealer or local
power company. For products intended to
operate from battery power, or other sources,
refer to the operating instructions.
12 Grounding or Polarization - This product
may be equipped with a polarized alternat-
ing - current line plug (a plug having one
blade wider than the other). This plug will fit
into the power outlet only one way. This is a
safety feature. If you are unable to insert the
plug fully into the outlet, try reversing the
plug. If the plug should still fail to fit, contact
your electrician to replace your obsolete
outlet. Do not defeat the safety purpose of
the polarized plug.
13 Alternate Warnings - This product is
equipped with a three-wire grounding-type
plug, a plug having a third (grounding) pin.
This plug will only fit into the outlet, contact
your electrician to replace your obsolete
outlet. Do not defeat the safety purpose of
the grounding-type plug.
14 Power-Cord Protection - Power-supply
cords should be routed so that they are not
likely to be walked on or pinched by items
placed upon or against them, paying particu-
lar attention to cords at plugs, convenience
receptacles, and the point where they exit
from the product.
15 Outdoor Antenna Grounding - If an outside
antenna or cable system is connected to the
product, be sure the antenna or cable system
is grounded so as to provide some protection
against voltage surges and built-up static
charges. Section 810 of the National Electri-
cal Code, ANSI/NFPA 70 provides informa-
tion with regard to proper grounding of the

5
Important Safety Instructions
mast and supporting structure, grounding
of the lead-in wire to an antenna discharge
unit, size of grounding conductors, location
of antenna-discharge unit, connection to
grounding electrodes, and requirements for
the grounding electrode.
16 Lightning - For added protection for this
product during a lightning storm or when
it is left unattended and unused for long
periods of time, unplug it from the wall outlet
and disconnect the antenna or cable system.
This will prevent damage to the product due
to lightning and power-line surges.
17 Power Lines - An outside antenna system
should not be located in the vicinity of over
-
head power lines or other electric light or
power circuits, or where it can fall into such
power lines or circuits. When installing an
outside antenna system, extreme care should
be taken to keep from touching such power
lines or circuits as contact with them might
be fatal.
18 Overloading - Do not overload wall outlets,
extension cords, or integral convenience
receptacles as this can result in a risk of fire or
electric shock.
19 Object and Liquid Entry - Never push
objects of any kind into this product through
openings as they may touch dangerous
voltage points or short-out parts that could
result in a fire or electric shock. Never spill
liquid of any kind on the product.
20 Servicing - Do not attempt to service this
product yourself as opening or removing
covers may expose you to dangerous voltage
or other hazards. Refer all servicing to quali-
fied service personnel.
21 Damage Requiring Service - Unplug this
product from the wall outlet and refer servic-
ing to qualified service personnel under the
following conditions:
a When the power-supply cord or plug is dam-
aged.
b If liquid has been spilled or objects have
fallen into the product.
c If the product has been exposed to rain or
water.
d If the product does not operate normally by
following the operating instructions. Adjust
only those controls that are covered by the
operating instructions as an improper adjust-
ment of other controls may result in damage
and will often require extensive work by a
qualified technician to restore the product to
its normal operation.
e If the product has been dropped or damaged
in any way.
f When the product exhibits a distinct change
in performance-this indicates a need for
service.
22 Replacement Parts - When replacement
parts are required, be sure the service techni-
cian has used replacement parts specified
by the manufacturer or that have the same
characteristics as the original part. Unauthor-
ized substitutions may result in fire, electric
shock, or other hazards.
23 Safety Check - Upon completion of any ser-
vice or repairs to this product, ask the service
technician to perform safety checks to deter-
mine that the product is in proper operating
condition.
24 Heat - The product should be situated away
from heat sources such as radiators, heat
registers, stoves, or other products (including
amplifiers) that produce heat.
25 Wall or Ceiling Mounting - The product
should be mounted to a wall or ceiling only
as recommended by the manufacturer.

6 DVD Recorder User’s Guide
1
Welcome
This Chapter provides a basic introduction to the DVD
Recorder, including an overview of the front panel, rear
panel, and remote control.

7
OPEN/CLOSE
POWER
1
2
3
4
5
6
7
8
9
0
DISPLAY
TITLE
PREV
STOP
GUIDER
INPUT
RECORD
TIMER
EDIT
PLAY
OPTIONS
PLAY
PAUS
E
/
STEP
REW
FF NEXT
DISC
MENU
SETUP
CH
ENTER
Unpacking
Compatible Media
This DVD Recorder will play the following discs:
• DVD
• Audio CD
• Video CD/Super Video CD
• MP3 files on CD-R/RW
• JPEG files on CD-R/RW
• DVD-R/RW
• DVD+R/RW
This DVD Recorder will record on the following discs:
• DVD+R (Write Once)
• DVD+RW (ReWritable)
Check to make sure the following items are included with your DVD Recorder:
1 - Welcome

8 DVD Recorder User’s Guide
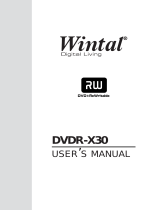
Front Panel
1 POWER button
2 OPEN/CLOSE button
3 Disc Tray
4 Front Panel Display
5 PREV/NEXT buttons
6 RECORD button
7 INPUT button*
8 PLAY button
9 STOP button
10
PAUSE button
11
DV Input
12
AV IN 1 jacks
POWER OPEN/CLOSE
R6750 DVD+R/RW RECORDER
INPUT
LINE IN 2
VIDEODV IN L - AUDIO - R
Front panel overview:
• The INPUT button allows you to easily switch among all your input sources, including
DVD, TV, AV1-Front, AV2-Rear, S-Video, and DV.

9
Front Panel Display
CD JPEG RW RDVD VCDSVCD
MP3
TIMER
1 Play indicator
2 DVD indicator
3 SVCD indicator
4 VCD indicator
5 CD indicator
6 MP3 indicator
7 JPEG indicator
8 DVD+RW indicator
9 DVD+R indicator
10
Record indicator
11
Pause Indicator
12
Status window
13
Timer recording mode
Front panel display overview:
1 - Welcome

10 DVD Recorder User’s Guide
S-VIDEO IN
AUDIO IN
S-VIDEO OUT
OPTICAL
COAXIAL
R
VIDEO
L
AUDIO OUT
R
L
VIDEO
Y
Pb
Pr
AV IN 2 AV OUT
COMPONENT OUT DIGITAL OUT
ANTENNA IN
ANTENNA
PASSTHROUGH
(NO DVD OUTPUT)
Rear Panel
1 ANTENNA IN jack
2 ANTENNA PASSTHROUGH jack*
3 S-VIDEO IN jack
4 AV IN 2 jacks
5 COMPONENT VIDEO OUT jacks
6 AV OUT jacks
7 S-VIDEO OUT jack
8 OPTICAL OUT jack
9 COAXIAL OUT jack
Rear panel overview:
• The ANTENNA PASSTHROUGH jack outputs the TV signal only, and is NOT for DVD
playback.

11
OPEN/CLOSE
POWER
1
2 3
4
5 6
7 8 9
0
DISPLAY
TITLE
PREV
STOP
GUIDER
INPUT RECORD TIMER EDIT
PLAY
OPTIONS
PLAY
PAUSE/STEP
REW FF NEXT
DISC
MENU
SETUP
CH
ENTER
Remote Control
1 OPEN/CLOSE button
2 0-9 buttons
3 TITLE button
4 PREV/NEXT buttons
5 STOP button
6 PLAY button
7 ARROW buttons
8 GUIDER button
9 INPUT button
10
RECORD button
11
POWER button
12
CH buttons
13
DISPLAY button
14
DISC MENU button
15
SETUP button
16
REW/FF buttons
17
PAUSE/STEP button
18
ENTER button
19
PLAY OPTIONS button
20
EDIT button
21
TIMER RECORD button
Remote control overview:
1 - Welcome
• The GUIDER button is a fun and
easy way to record, play, format, and
finalize discs; see pages 29, 30, and 37.

12 DVD Recorder User’s Guide
2
Connections
This Chapter shows you how to connect the DVD
Recorder to your TV and other home theater com-
ponents.
• For basic connections, see pages 13-15.
• For advanced connections, see pages 16-19.

13
Antenna/Basic Cable Connections
S-VIDEO IN
AUDIO IN
S-VIDEO OUT
OPTICAL
COAXIAL
R
VIDEO
L
AUDIO OUT
R
L
VIDEO
Y
Pb
Pr
AV IN 2 AV OUT
COMPONENT OUT DIGITAL OUT
ANTENNA IN
ANTENNA
PASSTHROUGH
(NO DVD OUTPUT)
If you are using an antenna or basic cable TV service to receive TV programs:
1 Connect the RF coaxial cable from the antenna or cable wall outlet to the rear
panel of the DVD Recorder as shown.
2 Connect the DVD Recorder to your TV; see page 15.
2 - Connections
NOTE:
• Do not connect the AC power cord until all other connections have
been made.
• The DVD Recorder receives broadcast channels 1-69 and cable TV
channels 1-125.

14 DVD Recorder User’s Guide
Cable Box Connections
S-VIDEO IN
AUDIO IN
S-VIDEO OUT
OPTICAL
COAXIAL
R
VIDEO
L
AUDIO OUT
R
L
VIDEO
Y
Pb
Pr
AV IN 2 AV OUT
COMPONENT OUT DIGITAL OUT
ANTENNA IN
ANTENNA
PASSTHROUGH
(NO DVD OUTPUT)
If you are using a cable box or satellite receiver to receive TV programs:
1 Connect an RF cable from the wall outlet to the cable box.
2 Connect an RF cable from the cable box to the DVD Recorder.
3 Connect the DVD Recorder to your TV; see page 15.
NOTE:
• With this connection, you will set the DVD Recorder to channel 2, 3, or 4 and then
select channels on the cable box.

15
Basic TV Connections
S-VIDEO IN
AUDIO IN
S-VIDEO OUT
OPTICAL
COAXIAL
R
VIDEO
L
AUDIO OUT
R
L
VIDEO
Y
Pb
Pr
AV IN 2 AV OUT
COMPONENT OUT DIGITAL OUT
ANTENNA IN
ANTENNA
PASSTHROUGH
(NO DVD OUTPUT)
If your TV has standard audio/video inputs (red, white, and yellow RCA jacks):
1 Connect the supplied audio/video cables from the DVD Recorder to your TV as
shown.
2 Connect the supplied power cable from the DVD Recorder to a standard wall out-
let.
3 Press POWER to turn on the DVD Recorder.
4 Turn on your TV and select the Video input to view the DVD Recorder.
• The GoVideo splash screen appears.
5 Continue with Chapter 3 to set up your DVD Recorder.
2 - Connections
NOTE:
• The ANTENNA PASSTHROUGH cannot be used to view the DVD Recorder. This output
only passes the antenna or cable signal through to your TV.
• If your TV has S-Video or Component Video inputs, see page 16.

16 DVD Recorder User’s Guide
Enhanced Video Options
If your TV has S-Video or Component Video inputs, you can enjoy
superior picture quality.
1 Connect an S-Video cable OR set of Component Video cables
from the DVD Recorder to your TV as shown.
2 Select the S-Video or Component Video input on your TV to
view the DVD Recorder.
3 Activate the S-Video or Component/Progressive Scan Video
output in the Setup menu; see page 22.
S-VIDEO IN
AUDIO IN
S-VIDEO OUT
OPTICAL
COAXIAL
R
VIDEO
L
AUDIO OUT
R
L
VIDEO
Y
Pb
Pr
AV IN 2 AV OUT
COMPONENT OUT DIGITAL OUT
ANTENNA IN
ANTENNA
PASSTHROUGH
(NO DVD OUTPUT)
NOTE:
• If you use one of these enhanced video connections, you must enable the Video
Output in the menu system; see page 22.
• Be sure to choose one of the audio connection options on page 17.

17
Enhanced Audio Options
S-VIDEO IN
AUDIO IN
S-VIDEO OUT
OPTICAL
COAXIAL
R
VIDEO
L
AUDIO OUT
R
L
VIDEO
Y
Pb
Pr
AV IN 2 AV OUT
COMPONENT OUT DIGITAL OUT
ANTENNA IN
ANTENNA
PASSTHROUGH
(NO DVD OUTPUT)
If you have a stereo system or digital audio receiver, you can enjoy
superior sound quality.
1 Connect stereo audio cables from the DVD Recorder to your
stereo system as shown.
OR
Connect a digital optical OR coaxial cable from the DVD Re
-
corder to your digital audio receiver as shown.
2 Select the appropriate audio input on your stereo or receiver to
hear the DVD Recorder.
• If you used either of the digital connections, you just activate
the digital audio output in the Setup menu; see page 26.
2 - Connections
NOTE:
• If you use the Optical or Coaxial connection, you must set the DVD Recorder’s Audio
Output settings to match the capabilities of your receiver; see page 26.
• If your receiver is equipped with a Dolby Digital and/or DTS decoder your can enjoy
5.1 surround sound playback while watching DVD movies.

18 DVD Recorder User’s Guide
Rear AV Connections
S-VIDEO IN
AUDIO IN
S-VIDEO OUT
OPTICAL
COAXIAL
R
VIDEO
L
AUDIO OUT
R
L
VIDEO
Y
Pb
Pr
AV IN 2 AV OUT
COMPONENT OUT DIGITAL OUT
ANTENNA IN
ANTENNA
PASSTHROUGH
(NO DVD OUTPUT)
You can view and record from an external device, such as a VCR, connected to the rear
AV or S-Video inputs.
1 Connect standard audio/video cables from the outputs of the external device to
the inputs of the DVD Recorder as shown.
OR
Connect an S-Video cable and audio cables from the outputs of the external device
to the inputs of the DVD Recorder as shown.
2 Press INPUT until AV2-Rear or S-Video appears on the screen.
NOTE:
• To view the external device, press INPUT on the remote control until AV2-Rear or S-
Video appears on screen.
• To record from the external device, see page 30.

19
Front AV Connections
R6750 DVD+R/RW RECORDER
INPUT
LINE IN 1
VIDEODV IN L - AUDIO - R
You can view and record from an external device, such as a camcorder or video game,
connected to the front panel AV or DV inputs.
1 Connect standard audio/video cables from the outputs of the external device to
the inputs of the DVD Recorder as shown.
OR
Connect a DV cable from the external device to the front panel of the DVD Record
-
er as shown.
2 Press INPUT until AV1-Front or DV appears on the screen.
2 - Connections
NOTE:
• To view the external device, press INPUT on the remote control until AV1-Front or DV
appears on screen.
• To record from the external device, see page 30.

20 DVD Recorder User’s Guide
3
Setup
This Chapter shows you customize the DVD Re-
corder to meet your personal requirements and
preferences.
Key settings:
• To set the date and time, see page 22.
• To set your TV aspect ratio, see page 24
• To search for TV channels, see page 27.
/