Page is loading ...

INSTRUCTION MANUAL
PLEASE READ BEFORE USE AND SAVE
Remote Control
Wall / Ceiling

CONTENTS
MODEL OCWR161
Before Initial Use 2
For Your Safety 3
Parts and Assembly 4
Fan and Remote Controls 5
Operation 6
Maintenance 7
and Cleaning
Limited Warranty 8
Remote Control
Fan
Wall/Ceiling

Read this Entire Instruction Manual Before Use!
Thank You for Purchasing Your New WindChaser
®
Product.
For your reference:
Serial No. Date of Purchase
Name and Address of Dealer

FOR YOUR SAFETY
READ AND SAVE THESE IMPORTANT INSTRUCTIONS
When using electrical appliances, basic safety precautions should always
be followed including the following:
1. Use fan only as described in this manual. Other uses not
recommended may cause fire, electric shock or injury.
2. This product is intended for household use only and not for
commercial or industrial use.
3. To protect against electrical shock, do not immerse unit, plug, or cord
in water or spray with liquids.
4. Close supervision is necessary when any appliance is used near
children.
5. Unplug fan from outlet when not in use, when moving fan from one
location to another or before cleaning.
6. Avoid contact with moving parts.
7. Do not operate in the presence of explosives and/or flammable fumes.
8. Do not place fan or any parts near an open flame, cooking or heating
appliance.
9. Do not operate fan with a damaged cord, plug or after the fan
malfunctions or has been dropped or damaged in any manner.
10. Do not use outdoors.
11. Do not let cord hang over the edge of a table or counter, or let it touch
hot surfaces.
12. To disconnect, grip plug and pull from wall outlet. Never yank on cord.
13. Always use on a dry, level surface.
14. Do not hang or mount fan on a wall or ceiling.
15. Do not operate without fan grills properly in place.
16. This appliance has a polarized plug (one blade is wider than the
other). To reduce the risk of electric shock, this plug is intended to fit in a
polarized outlet only one way. If the plug does not fit fully in the outlet,
reverse the plug. If it still does not fit, contact a qualified electrician.
Do not attempt to defeat this safety feature.
SAVE THESE IMPORTANT SAFETY
INSTRUCTIONS.
WARNING: To Reduce The Risk Of Fire Or Electrical
Shock And Injury To Persons, Do Not Use In A Window.
WARNING: Do Not Use This Fan with Any Solid State
Speed Control Device.

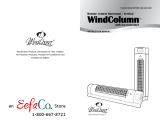
STEP 1: Plug the control panel cable into the motor base. (Arrow
direction as figure)
STEP 2: Assemble the receiver onto the motor base. Then turn screw A
clockwise tightly.
STEP 3: Mount the rear guard to the motor housing by matching the 4
holes in back to the 4 slots on the front cover. Then install 4 screws to
lock the rear guard and the front cover.
STEP 4: Insert the blade onto the motor shaft by matching the slots of
the blade with the pins in the shaft. Tighten the blade with the blade
cap by turning it counter-clockwise. Loosen and remove the screw from
the front guard. Then assemble the front guard with the rear guard.
Resecure the screw.
PARTS
ASSEMBLY
Mounting Bracket
Motor Base
Setting Screw
Rotator Arm
Motor Housing
Cover
Power Cord
Rock Frame
Guard Ring
Blade
Blade Cap
Guard Mark
Control Panel
Guard Lock
Ring
Remote Control
Front/Rear Guard
STEP 1
STEP 2
STEP 3

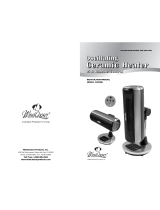
STEP 5: Mount the bracket onto the ceiling or wall using screw C
STEP 6: Insert the fan motor base onto the mounting bracket and twist it
on.
STEP 7: Turn the set screw to secure the motor base to bracket.
PREPARATION
1) Remote Control: Open the battery compartment and
insert two AAA batteries. If possible, use leak-proof
alkaline batteries.
2) Connect the power cord plug to a 120VAC power outlet.
You can now operate the fan by means of remote control.
3) A change in the function is usually indicated by a beep.
All functions are enabled when the
ON/OFF button is pushed on the
remote control. When power is off,
the last operation is memorized.
FAN & REMOTE CONTROL
STEP 4
STEP 5
STEP 6
STEP 7

On/Off:1) The factory presets the fan to turn on at High speed and can be
adjusted to the preferred setting.
2) After switching off the fan, the last function will be saved in the mem-
ory. When switching on the fan, the operation will start at this saved
function.
3) Once the power cord plug has been removed from the outlet the mem-
ory function will be lost and the fan will reset to the original factory
settings.
OSCILLATION
Press the OSC button (on control panel or by remote control) to set oscil-
lation
.
UP/DOWN (Speed Settings)
1) You can choose 1-10 variable speeds.
2)The LED lights on the control panel indicate the selected
speed setting.
TIMER
1, 2, 4 AND 8 HOURS
1) You can choose (4) different time settings by pressing the timer
button.
2) The LED light on the timer indicates the selected timer setting.
3) If you choose Timer Off , the LED light will turn Off.
WIND MODE
1) Press the Wind Button to choose different wind modes.
2) Normal-wind-mode stays constant at the speed chosen.
3) Rythm-wind-mode will vary from the selected speed through low
speeds (Example: If speed setting is on position 5, the wind mode will
vary between 5,4,3,2 & low at random times between
selected settings).
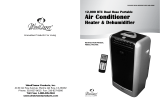
OPERATING INSTRUCTIONS
Down
Decrease Speed
On/Off
Up
Increase Speed
Wind Mode
Rhythm-Wind Normal-Wind
OSC
Timer
1Hr - 2Hr - 4Hr - 8Hr - Off
Oscillation-On Oscillation-Off

CLEANING AND STORAGE
1. Turn the Fan OFF and unplug the fan before cleaning.
2. Use only a soft, damp cloth to clean the fan.
3. Do not immerse the fan in water and never allow water to drip into the
Motor Housing.
4. Do not use gasoline, paint thinner or other chemicals to clean the fan.
1) To clean the Fan Blade, use 2 screw-drivers to disengage the hooks
holding the Front Grill to the Rear Grill (Fig. 1)
2) Remove the Front Grill.
3) Wipe the Blade and Grills.
4) Reassemble the fan by snapping the Front Grill into place.
5) Store the fan in it original box or cover the fan to protect it from dust.
Store it in a cool, dry place.
NOTE: If you experience a problem, please return the fan to the
place of the original purchase or see your warranty. Do not
attempt to open the motor housing yourself. Doing so may void
your warranty and cause dammage to the fan or personal injury.
MAINTENANCE INSTRUCTIONS

LIMITED WARRANTY
Limited Warranty Terms and Conditions
Three (3) Year Limited Warranty on Motor and One (1) Year Limited
Warranty on All Other Parts
This limited warranty applies to repair or replacement if a product is found
to be defective in material or workmanship. This warranty does not apply
to any damage resulting from commercial, abusive and/or unreasonable
use or supplemental damage. Defects as a result of
normal wear and tear will not be considered manufacturing defects under
this warranty. Read the instruction manual before attempting to use this
product. WindChaser Products, Inc. is not liable for incidental
or consequential damages of any nature. Any implied warranty of
merchantability or fitness for a particular purpose on this product is
limited in duration to the duration of this warranty. Some states do not
allow the exclusion or limitation of incidental or consequential damages or
limitations on how long an implied warranty lasts, so the above
limitations or exclusions may not apply to you. This warranty gives you
specific legal rights, and you also may have other rights which vary from
state to state. This warranty applies only to the original purchaser of this
product. WindChaser Products, Inc. will repair or replace this product
if it is found to be defective in material and/or workmanship. Defective
product should be returned to the place of purchase in accordance with
store policy.
/