Page is loading ...

Innovative Products For Living
©2006 WindChaser Products, Inc.
PLEASE READ BEFORE USE AND SAVE
WindChaser Products, Inc.
4130 Del Rey Avenue, Marina del Rey, CA 90292
Phone: 310-827-8615 Fax: 310-827-8566
Toll Free: 1-800-405-2943
www.windchaserproducts.com
INSTRUCTION MANUAL
MODEL CER95R
O
O
s
s
c
c
i
i
l
l
l
l
a
a
t
t
i
i
n
n
g
g
C
C
e
e
r
r
a
a
m
m
i
i
c
c
H
H
e
e
a
a
t
t
e
e
r
r
w
w
i
i
t
t
h
h
R
R
e
e
m
m
o
o
t
t
e
e
C
C
o
o
n
n
t
t
r
r
o
o
l
l

Thank you for choosing WindChaser
®
Products. Please read all
instructions before assembly and use. Please empty all items from
carton and save carton for future use. If you have any questions or
require assistance, please contact WindChaser customer service at:
www.windchaserproducts.com or 1-800-405-2943.
LIMITED WARRANTY
WindChaser Products, Inc.
4130 Del Rey Avenue, Marina del Rey, CA 90292
Phone: 310-827-8615 Fax: 310-827-8566
Toll Free: 1-800-405-2943
www.windchaserproducts.com
One (1) Year Limited Warranty
One (1) Year Limited Warranty Terms and Conditions: This warranty
applies to repair or replacement if a product is found to be defective in
material or workmanship. This warranty does not apply to any damage
resulting from commercial, abusive and/or unreasonable use or
supplemental damage. Defects as a result of normal wear and tear will
not be considered manufacturing defects under this warranty. Read the
instruction manual before attempting to use this product. WindChaser
Products, Inc. is not liable for incidental or consequential damages of any
nature. Any implied warranty of merchantability or fitness for a particular
purpose on this product is limited in duration to the duration of this war-
ranty. Some states do not allow the exclusion or limitation of incidental or
consequential damages or limitations on how long an implied warranty
lasts, so the above limitations or exclusions may not apply to you. This
warranty gives you specific legal rights, and you also may have other
rights which vary from state to state. This warranty applies only to the
original purchaser of this product. WindChaser Products, Inc. will repair
or replace this product if it is found to be defective in material and/or work-
manship. Defective product should be returned to the place of purchase
in accordance with store policy. Thereafter, while within the warranty peri-
od, any defective product should be returned to WindChaser Products,
Inc.. This warranty does not cover damage resulting from unauthorized
attempts to repair or from any use not in accordance with its manual.
Return defective product to WindChaser Products, Inc., 4130 Del Rey
Avenue, Marina del Rey, CA 90292. Freight prepaid with proof of
purchase and $15 (USD) for handling, return packing and shipping
charges. Due to the possibility of running design changes, the actual
product may differ slightly from the image on packaging. This warranty is
valid only in the United States and Canada.
BEFORE RETURNING DEFECTIVE PRODUCT,
CONTACT CUSTOMER SERVICE BY
E-MAIL (custserv@windchaserproducts.com)
OR PHONE: 1-800-405-2943
CONTENTS
Before Initial Use 2
For Your Safety 3
Parts 4
Preparation 5
Operating Instructions 5-8
Specifications 9
Cleaning and Storage 9
Limited Warranty 10
MODEL
CER95R
Oscillating
Ceramic Heater
with Remote Control
1
10

1. Turn the unit off and unplug the unit before cleaning.
2. Use only a soft cloth to clean the exterior. A can of compressed air
or a vacuum cleaner can be used to clean the heater grill and
any air outlet or inlet sections.
3. Do not immerse the unit in water and never allow water to drip into
the motor housing.
4. Do not use gasoline, paint thinner or other chemicals to clean the
heater.
5. Store the heater in it’s original box and store in a cool, dry place.
6. Service must be performed by an authorized factory representative.
7. To prevent any damage to the cord when the unit is not in use,
please bundle the cord and secure to prevent damage.
NOTE: If you experience a problem, please return the unit to the
place of the original purchase or see your warranty. Do not
attempt to open the motor housing yourself. Doing so may void
your warranty and cause damage to the heater or personal injury.
CLEANING AND STORAGE
SPECIFICATIONS
Voltage:
Frequency:
Output Power:
Dimensions:
Weight:
120V~
60Hz
1000W / 1500W
9” (W) x 9” (D) x 19.125” (H)
6 lbs (2.73 kgs)
Read this entire instruction manual before use.
For your reference:
Serial No. Date of Purchase
Name and Address of Dealer
BEFORE INITIAL USE
2
Attach your purchase receipt here.
PLEASE KEEP YOUR RECEIPT.
YOUR RECEIPT IS YOUR PROOF OF
PURCHASE AND IS NECESSARY FOR
WARRANTY SERVICE.
9

FOR YOUR SAFETY
3
IMPORTANT INSTRUCTIONS
When using electrical appliances, basic precautions should always be followed
to reduce the risk of fire, electrical shock and injury to persons, including
the following:
READ ALL INSTRUCTIONS BEFORE OPERATING THIS HEATER.
1) This heater is hot when in use. To avoid burns, do not let bare skin touch hot surfaces.
Use handle when moving this heater. Keep combustible materials, such as
furniture, pillows, bedding, papers, clothes and curtains at least 3 feet (0.9m) from the
front of this heater and away from the sides and rear.
2) Extreme caution is necessary when any heater is used near a child or physically
disabled person. NEVER LEAVE THE HEATER UNATTENDED WHILE OPERATING.
3) ALWAYS UNPLUG HEATER WHEN NOT IN USE.
4) Do not operate any heater with a damaged power cord or plug or after the heater
malfunctions or if it has been dropped or damaged in any manner. Return the heater
to WindChaser for examination in case of need for electric or mechanical adjustment
and repair.
5) DO NOT USE OUTDOORS.
6) This heater is not intended for use in bathrooms, laundry areas or similar indoor
locations where there may be moisture. Never place heater where it may fall into a
bathtub or other water receptacle.
7) Do not run power cord under carpeting. Do not cover cord with throw rugs, runners or
the like. Arrange cord away from traffic area to avoid tripping over it.
8) To disconnect heater, turn controls to off, then remove plug from outlet.
9) Do not insert or allow foreign objects to enter any ventilation or exhaust opening as this
may cause electric shock, fire or damage to the heater.
10) To prevent possible fire, do not block air intakes or exhaust openings in any manner.
Do not use on soft surfaces, like a bed, where openings may become blocked.
11) A heater has hot, arcing or sparking parts inside. Do not use it in areas where
gasoline, paint or flammable liquids are used or stored.
12) Use this heater only as described in this manual. Any other use not recommended by
the manufacturer may cause fire, electric shock or injury to persons.
13) The heater is not intended for use with an extension cord. Plug the cord directly into
an appropriate wall receptacle. However, if an extension cord is needed, the cord
should be No. 14 AWG minimum size and rated no less than 1875W.
14)
THIS PRODUCT IS EQUIPPED WITH A POLARIZED A.C.
(Alternating Current) PLUG — a plug having one prong wider than the other.
This plug will fit into the power outlet only one way. This is the safety feature.
If you are unable to insert the plug fully into the outlet, try reversing the plug.
If the plug should still fail to fit, contact an electrician to replace the obsolete
outlet.
DO NOT DEFEAT THE SAFETY PURPOSE OF THIS POLARIZED PLUG.
SAVE THESE INSTRUCTIONS
Oscillation function:
1. Press the Oscillate button to allow the unit to oscillate. To turn off the
oscillation function, press the Oscillate button again.
NOTE: THE UNIT CAN OSCILLATE IN BOTH VERTICAL AND
HORIZONTAL POSITIONS.
Safety features:
Auto thermal cut-off
1. If the heater experiences excessive heat , the auto thermal cut-off will shut
the unit off.
2. Be sure that the front grill is not blocked and nothing is restricting any airflow.
3. Unplug the unit and let it cool down for 10 minutes before plugging the unit
back in again. If the heater fails to operate after 10 minutes, it may have
internal damage. Please contact WindChaser Products customer service at
1-800-405-2943 or email: [email protected].
Safety tip over switch
1. Heater is designed to automatically shut-off when tipped forwards or
backwards.
2. Return the heater to its normal upright position on a level surface to
operate again.
8

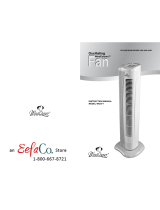
PARTS
4
Fig. 1
Carrying slot
Front grill
Remote control
Base
Control panel
Remote
control
compartment
7
Timer button (1st press): 1 hr LED on 1hr
Timer button (2nd press): 2 hrs LED on 2 hrs
Timer button (3rd press): 3 hrs LED on 3 hrs
Timer button (4th press): 4 hrs LED on 4 hrs
Timer button (5th press): 1 hr & 4 hrs LED on 5 hrs
Timer button (6th press): 2 hrs & 4 hrs LED on 6 hrs
Timer button (7th press): 3 hrs, 4 hrs on 7 hrs
Timer button (8th press): 1 hr, 3 hrs & 4 hrs on 8 hrs
Timer button (9th press): 2 hrs, 3 hrs & 4 hrs on 9 hrs
Timer button (10th press): 1 hr, 2 hrs, 3 hrs & 4 hrs on 10 hrs
Timer button (11th press): Timer function off
Timer indicator lights functions:
Adjustable pre-set thermostat:
1. Press the Temp. button to set the desired temperature while the heater is
on.
2. The heater will turn off as soon as the desired temperature is reached.
Once the temperature drops below the desired temperature, the unit
will automatically turn on again.
3. The desired temperature setting can be turned off by pressing the TEMP.
button and assuring all temperature indicator lights are off.
Frost watch feature:
Press the Temp. button selecting the frost watch mode. The unit will remain
dormant until the temperature drops below 40°F and will automatically turn
on, cycling the heater.
Timer setting:
1. Press the timer button to set the desired shut-off time of the unit.
2. The shut-off time can be set from 1-10 hours. The LED timer lights will
indicate the selected time.
3. To turn off the shut-off time function, press the timer button until all LED
timer lights are disabled.
Temp. button (1st press): 80°F LED on 80°F
Temp. button (2nd press): Temp. LED lights off
Temp. button (3rd press): Frost watch LED on 40°F
Temp. button (4th press): 65°F LED on 65°F
Temp. button (5th press): 70°F LED on 70°F
Temp. button (6th press): 75°F LED on 75°F
Timer indicator light
Time selected
Temp. indicator light
Temp. selected

All operations can be set by remote control or control panel.
1. Press the ON / FAN / HEAT button to start the heater in fan mode only.
The power indicator light will light up and the HEAT LED light will light up
in green.
2. Press the ON / FAN / HEAT button again to change heat setting to
low (1000W) on 75°F temperature setting. The HEAT LED light will
change to orange and the temperature 75°F LED light will also light
up. To remove the default temperature setting of 75°F, press the Temp.
button until all temperature LED lights are off.
3. Press the button a third time to change to the heat setting to high
(1500W) on 75°F temperature setting. The HEAT LED light will change
to red. To remove the default temperature setting of 75°F, press the
Temp. button until all temperature LED lights are off.
4. To turn the unit off, press the ON / FAN / HEAT button again.
5
PREPARATION
1. Remove battery cover from remote control
2. Remove the insulation tab from the battery compartment.
3. Place two AG13 or LR44 cell batteries (included) into the battery slots.
4. Place the battery cover onto the remote control
When remote control is not in use, place into the remote control compartment.
OPERATING INSTRUCTIONS
Always rotate the heater body clockwise from vertical to horizontal. Never
rotate the heater body counter-clockwise from vertical to horizontal. AS THIS
MAY CAUSE DAMAGE TO THE SWIVEL ASSEMBLY.
OPERATING INSTRUCTIONS
6
Temperature
indicator lights
Frost watch
indicator light
Timer indicator lights
Power indicator
light
Heat indicator
light
Remote control
Control panel
/