Page is loading ...

SnapGear VPN Appliance Family
User Manual
Rev: 1.7.8
May 2nd, 2003
SnapGear, Inc.
7984 South Welby Park Drive #101
Salt Lake City, Utah 84084
Email: [email protected]
Web: www.snapgear.com
Introduction

Table of contents
1. Introduction...............................................................................................1
Document conventions ..........................................................................................4
Installing and configuring your SnapGear appliance .............................................5
Your SnapGear appliance .....................................................................................6
SnapGear appliance features ................................................................................9
2. Getting started ........................................................................................12
Static IP reset ......................................................................................................12
New Networks......................................................................................................13
Configuring the SnapGear appliance on your network ........................................ 15
Initial setup using Linux .......................................................................................21
SnapGear Quick Setup........................................................................................24
Configuring the PCs on your network .................................................................. 28
3. Connecting to the Internet .....................................................................30
Physically connect modem device....................................................................... 30
Select Internet connection ................................................................................... 31
Internet failover ....................................................................................................34
Configure PCs to use SnapGear appliance Internet gateway ............................. 37
Establishing the connection ................................................................................. 37
4. Dial-in server configuration ...................................................................38
Dial-in setup.........................................................................................................40
Dial-in user accounts ........................................................................................... 42
Remote user configuration...................................................................................45
5. Network configuration............................................................................51
IP configuration....................................................................................................51
Advanced IP configuration................................................................................... 53
DHCP server........................................................................................................55
Advanced networking ..........................................................................................57
Introduction

6. Firewall ....................................................................................................58
Incoming access ..................................................................................................58
Outgoing access ..................................................................................................62
Firewall rules........................................................................................................63
Intrusion detection and blocking .......................................................................... 64
Content filtering....................................................................................................66
7. Virtual Private Networking .....................................................................69
PPTP client setup ................................................................................................ 70
PPTP server setup............................................................................................... 72
IPSec setup ......................................................................................................... 85
IPSec interoperability...........................................................................................90
8. System.....................................................................................................91
Time server.......................................................................................................... 91
Password .............................................................................................................91
Diagnostics .......................................................................................................... 92
Advanced............................................................................................................. 92
Flash upgrade......................................................................................................93
RESET button...................................................................................................... 93
9. Technical support .......................................................................................94
Appendix A – LED status patterns.................................................................95
Appendix B – System Log ..............................................................................96
Access Logging ................................................................................................... 96
Creating Custom Log Rules................................................................................. 98
Rate Limiting...................................................................................................... 101
Administrative Access Logging.......................................................................... 101
Boot Log Messages ...........................................................................................102
Introduction

1. Introduction
This chapter provides an overview of your SnapGear appliance’s features and
capabilities, and explains how to install and configure your SnapGear appliance.
The SnapGear appliance enables small to medium-sized businesses to securely
interconnect computers on your office network to the Internet. The SnapGear appliance
has all the features a business needs to take full advantage of the Internet. Regardless of
whether you are connecting to the Internet for the first time or looking for a cost-effective
and safe VPN solution, the SnapGear appliance will meet your needs.
The SnapGear appliance simply and securely interconnects your network to the Internet
using a robust embedded firewall. Shielded behind a NAT gateway, your office
computers are protected from outside threats. The SnapGear appliance filters and
checks data packets to prevent unauthorized Internet applications accessing your
network.
The SnapGear appliance provides your network with a Virtual Private Network (VPN)
server. A VPN enables remote workers or branch offices to securely access your
company network to send and receive data at a very low cost. With the SnapGear
appliance, you can remotely access your office network securely using the Internet. The
SnapGear appliance can also connect to external VPNs as a client.
Using your SnapGear appliance, everyone on your office LAN can access the Internet
using a single connection. Your entire network can log on to the Internet using only one
ISP account through one analog modem, DSL or ISDN line. This eliminates separate
connections and ISP charges for each individual user. Using a dial-in modem connected
to your SnapGear appliance, your remote staff can also securely access your office
network using direct-dial.
This manual describes how to take advantage of the features of your SnapGear
appliance, including setting up an Internet connection, a secure firewall and a VPN. It
also describes how to set up the SnapGear appliance on your existing or new network
using the web configuration interface.
Installing your SnapGear appliance into a well-planned network is quick and easy.
Although network planning and design is outside the scope of this manual, please take
the time to plan your network prior to installing your SnapGear appliance.
Introduction
1

Terminology
This section explains terms that are commonly used in this document.
Term Meaning
ADSL Asymmetric Digital Subscriber Line. A technology allowing high-
speed data transfer over existing telephone lines. ADSL supports
data rates between 1.5 and 9 Mb/s when receiving data and between
16 and 640 Kb/s when sending data.
BOOTP Bootstrap Protocol. A protocol that allows a network user to
automatically receive an IP address and have an operating system
boot without user interaction. BOOTP is the basis for the more
advanced DHCP.
DHCP Dynamic Host Configuration Protocol. A communications protocol
that assigns IP addresses to computers when they are connected to
the network.
DNS Domain Name System that allocates Internet domain names and
translates them into IP addresses. A domain name is a meaningful
and easy to remember name for an IP address.
DUN Dial Up Networking.
Ethernet A physical layer protocol based upon IEEE standards.
Extranet A private network that uses the public Internet to securely share
business information and operations with suppliers, vendors,
partners, customers, or other businesses. Extranets add external
parties to a company’s intranet.
Failover A method for detecting that the main Internet connection (usually a
broadband connection) has failed and the SnapGear apliance cannot
communicate with the Internet. If this occurs, the SnapGear appliance
automatically moves to a lower speed, secondary Internet
connection.
Fall-forward A method for shutting down the failover connection when the main
Internet connection can be re-established.
Firewall A network gateway device that protects a private network from users
on other networks. A firewall is usually installed to allow users on an
intranet access to the public Internet without allowing public Internet
users access to the intranet.
Gateway A machine that provides a route (or pathway) to the outside world.
Hub A network device that allows more than one computer to be
connected as a LAN, usually using UTP cabling.
IDB Intruder Detection and Blocking. A feature of your SnapGear VPN
appliance that detects connection attempts from intruders and can
also optionally block all further connection attempts from the
intruder’s machine.
Internet A worldwide system of computer networks - a public, cooperative,
and sel
f
-sustainin
g
network of networks accessible to hundreds of
Introduction
2

Term Meaning
millions of people worldwide. The Internet is technically distinguished
because it uses the TCP/IP set of protocols.
Intranet A private TCP/IP network within an enterprise.
IPSec Internet Protocol Security. IPSec provides interoperable, high quality,
cryptographically-based security at the IP layer and offers protection
for network communications.
LAN Local Area Network.
LED Light-Emitting Diode.
MAC address The hardware address of an Ethernet interface. It is a 48-bit number
usually written as a series of 6 hexadecimal octets, e.g.
00:d0:cf:00:5b:da. A SnapGear appliance has a MAC address for
each Ethernet interface. These are listed on a label on the
underneath of the device.
Masquerade The process when a gateway on a local network modifies outgoing
packets by replacing the source address of the packets with its own
IP address. All IP traffic originating from the local network appears to
come from the gateway itself and not the machines on the local
network.
NAT Network Address Translation. The translation of an IP address used
on one network to an IP address on another network. Masquerading
is one particular form of NAT.
Net mask The way that computers know which part of a TCP/IP address refers
to the network, and which part refers to the host range.
NTP Network Time Protocol (NTP) used to synchronize clock times in a
network of computers.
PAT Port Address Translation. The translation of a port number used on
one network to a port number on another network.
PPP Point-to-Point Protocol. A networking protocol for establishing simple
links between two peers.
PPPoE Point to Point Protocol over Ethernet. A protocol for connecting users
on an Ethernet to the Internet using a common broadband medium
(e.g. single DSL line, wireless device, cable modem, etc).
PPTP Point to Point Tunneling Protocol. A protocol developed by
Microsoft™ that is popular for VPN applications. Although not
considered as secure as IPSec, PPP is considered “good enough”
technology. Microsoft has addressed many flaws in the original
implementation.
Road warrior A remote machine with no fixed IP address.
Router A network device that moves packets of data. A router differs from
hubs and switches because it is “intelligent” and can route packets to
their final destination.
Subnet mask See “Net mask”.
Switch A network device that is similar to a hub, but much smarter. Although
Introduction
3

Term Meaning
not a full router, a switch partically understands how to route Internet
packets. A switch increases LAN efficiency by utilizing bandwidth
more effectively.
TCP/IP Transmission Control Protocol/Internet Protocol. The basic protocol
for Internet communication.
TCP/IP address Fundamental Internet addressing method that uses the form
nnn.nnn.nnn.nnn.
UTC Coordinated Universal Time.
UTP Unshielded Twisted Pair cabling. A type of Ethernet cable that can
operate up to 100Mb/s. Also known as Category 5 or CAT 5.
VPN Virtual Private Networking. When two locations commmunicate
securely and effectively across a public network (e.g. the Internet).
The three key features of VPN technology are privacy (nobody can
see what you are communicating), authentication (you know who you
are communicating with), and integrity (nobody can tamper with your
messages/data).
WAN Wide Area Network.
WINS Windows Internet Naming Service that manages the association of
workstation names and locations with IP addresses.
Document conventions
This document uses different fonts and typefaces to show specific actions.
Warning
Warning text like this highlights important issues.
Bold text in procedures indicates text that you type, or the name of a screen object (e.g.
a menu or button).
Introduction
4

Installing and configuring your SnapGear appliance
This manual contains instructions for installing and configuring your SnapGear appliance
on your network. The basic steps and related chapters are:
Step Chapter
1. Interconnect the SnapGear appliance
and PCs on a local area network.
Chapter 2, Getting started
2. Connect the telecommunications
hardware/modem for dial-in/dial-out
Internet access.
Chapter 3, Connecting to the Internet
3. Set up the network IP addresses and
firewall.
Chapter 2, Getting started
4. Set up Internet hardware and Internet
account and connect to the Internet.
Chapter 3, Connecting to the Internet
5. Set up users’ security dial-in/dial-out
VPN.
Chapter 4, Dial-in server configuration
Chapter 6, Firewall
Chapter 7, Virtual Private Networking
Introduction
5

Your SnapGear appliance
The following items are included with your SnapGear appliance:
• Power adapter
• Installation CD
• Printed Quick Install guide
• Cabling including
o 1 normal “straight through” UTP cable (blue color).
o 1 “cross-over” UTP cable (either gray or red color). If you have the LITE+
or LITE2+ you will receive two straight through cables (blue color).
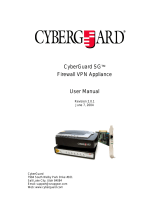
LEDs
The front and rear panels contain LEDs indicating status. The front panel LEDs are
illustrated in the following figure and detailed in the following table.
Figure 1.1 SnapGear SOHO+/PRO front panel LEDs
Label Activity Description
POWER/PWR On Power is supplied to the SnapGear appliance.
Flashing System flashes once every second when the
SnapGear appliance is operating correctly.
System/SYSTEM
On If the System LED is on and not flashing, an operating
error has occurred. In this situation, the other LEDs
form a diagnostic pattern indicating the failure.
Online/ONLINE On Indicates a valid Internet connection is present.
COM 1, 2 Flashing For either of the SnapGear appliance COM ports,
these LEDs indicate receive and transmit data.
VPN On Virtual Private Networking is enabled.
Introduction
6

The rear panel contains the connector ports for the LAN (LAN) and modem (COM1,
COM2), LAN 10BaseT status LEDs, WAN 10BaseT status LEDs, the reset button and
power inlet.
For units with LAN/Internet status LEDs, one LED represents the link condition (upper on
SME530, SME550 and PRO+, lower on PRO and SOHO+), where a cable is connected
correctly to another device (e.g. a cable modem). The other light represents the activity
as per the front panel.
Figure 1.2 SnapGear appliance back panels
The following figure shows how your SnapGear appliance interconnects . If you are using
the SnapGear LITE+ or LITE2+, a secondary hub/switch is not required as this unit has a
4-port Ethernet switch.
Introduction
7

Figure 1.3 Network interconnections
Introduction
8

SnapGear appliance features
• Software features
• Network Address Translation (NAT) firewall that isolates the LAN from the Internet
and offers network access control and filtering. Usually a simple form of NAT
called masquerading is used.
• DHCP server and client that ensure simple and flexible IP network configuration.
• PPTP VPN server that provides communications to remote users running
standard Windows VPN client software.
• PAP, CHAP, MSCHAPv2, RADIUS and TACACS+ tunnel authentication
(RFC1334, RFC1994).
• Transparent tunnel support for PPTP. IPSec pass through.
• Dial-in remote access with PAP, CHAP, MSCHAPv2, RADIUS and TACACS+
authentication.
• Dial-on-demand for outgoing Internet connections.
• Wizard setup and browser-based management and configuration.
• Flash upgradeable firmware that allows you to download and install the latest
protocols and security software using the web. This option is not available for the
LITE and LITE+ models.
• Connect Windows PCs, Macintoshes, Linux and Unix workstations - basically
anything that talks IP - to the Internet.
Introduction
9

Internet link features
• Connect to the Internet using an external cable modem, DSL, dial-up or ISDN
modem.
• Serial ports connect to the Internet using an external modem or ISDN T/A. The
LITE2, LITE2+, SME530 and SME550 models have a single serial port.
• 10baseT Ethernet port (Internet) that connect to the Internet using a cable or
ADSL modem.
• Front panel serial status LEDs (for TXD/RXD).
• Online status LEDs (for Internet/VPN).
• Rear panel Ethernet LEDs (Link Transmit/Receive).
LAN link features
• 10/100BaseT LAN port to connect to the local network Ethernet on PRO+, LITE2,
LITE2+, SME530 and SME550 models, 10BaseT on other models.
• Rear panel Ethernet LEDs (Link Transmit/Receive) on all models but LITE2 and
LITE2+.
Dial-in connection features
If you are using the SnapGear PRO+, PRO, SOHO+, SME530 or SME550, external
modems may be attached via serial port for dial-in connections. Additionally, the
SnapGear PRO+ has an internal modem that can be used for dial-in connections.
Introduction
1
0

Environmental features
• External power adaptor (voltages/current depend on individual models).
• Front panel status LEDs: Power Test.
• Operating temperature between 0° C and 40° C.
• Storage temperature between -20° C and 70° C.
• Humidity between 0 to 95% (non-condensing).
Introduction
11

2. Getting started
Your SnapGear appliance provides a secure, simple gateway to connect PCs and other
devices on your local network to the outside world. This chapter provides step-by-step
instructions for connecting the SnapGear appliance to your LAN. The procedures in this
section expand on the steps in the SnapGear Quick Install Guide, which you may prefer
to use if you are in a hurry.
If you are connecting the SnapGear appliance to an established LAN, use a standard
Ethernet cable to connect the SnapGear LAN port to a spare port on the network’s hub.
If you are connecting your SnapGear appliance to a single PC, use the provided Ethernet
crossover cable to interconnect them directly. In the case of the SnapGear LITE+ and
LITE2+, use a standard Ethernet cable to connect any one of its four LAN switch ports to
a single PC, or an Ethernet crossover cable to connect to another hub.
The SnapGear appliance comes with an in-built DHCP server that can automatically
assign IP addresses to other devices on the network. If you have an existing network,
you may already have an active DHCP server and the PCs and devices on the network
may already have IP addresses assigned. To simplify the installation in existing
networks, the SnapGear appliance ships without an initial IP address and without the
DHCP server activated by default.
If your network does not have an active DHCP server, it is recommended that you take
advantage of using the SnapGear appliance as a DHCP server and setup the PCs on
your network to dynamically receive TCP/IP configuration information.
Static IP reset
Although it is not the default behaviour, it is also possible to boot the SnapGear appliance
with an initial, static IP address of 192.168.0.1 (netmask 255.255.255.0). While the
SnapGear appliance is running (i.e. System/TST/Heart Beat is blinking), press the black
RESET button twice within 3 seconds.
Note that this will reset any existing configuration options back to their factory defaults.
Additionally, your network must (at least initially) be on the 192.168.0.0/255.255.255.0
subnet, as per step 6 of New Networks.
Getting started
12

Note
The following steps detail the initial setup procedure for networks with at least one
Windows workstation. If you wish to perform the setup procedure using a Linux box, skip
to the section called later in this chapter.
New Networks
If you do not have an existing LAN, you need to configure one networked PC to get
started:
1. Install an Ethernet adapter and software driver in at least one of the PCs to be
networked.
2. Assign an IP address for your PC so the SnapGear appliance can be configured
on the network. From the Start menu, select Settings, Control Panel, Network and
click the Configuration tab (or Protocols if using NT).
3. Ensure that the TCP/IP networking protocol is installed. If not, click Add (then
Protocol if using Windows 95/98, Microsoft then TCP/IP). Your PC will then
reboot.
4. Highlight TCP/IP (followed by your Ethernet adapter’s name if using Windows
95/98) and click Properties.
5. In the IP Address panel, select Specify an IP Address. Private network addresses
should be in the ranges:
10.0.0.0 - 10.255.255.255 (10/8 prefix)
172.16.0.0 - 172.31.255.255 (172.16/12 prefix)
192.168.0.0 - 192.168.255.255 (192.168/16 prefix)
Getting started
13

6. If you have chosen to use the static IP reset feature of the SnapGear appliance,
choose an address in the range:
192.168.0.0 - 192.168.0.255 (192.168.0/24 prefix)
Enter the value into the IP Address field followed by a number (1-254) to identify
your PC (e.g. 192.168.0.2). You may have to reboot at this point.
7. Connect the SnapGear appliance and the PC to the hub and continue with the
following steps.
Note
Your SnapGear appliance ships with a Windows installation program called the
SnapGear Setup Wizard. If you are using statically pre-assigned IP addresses on your
network (i.e. there is a static network with no active DHCP server), the Setup Wizard will
help assign an IP address to the SnapGear appliance.
On DHCP enabled (i.e. dynamic) networks, or if you have performed a static IP reset,
the Setup Wizard will locate the IP address assigned to your SnapGear appliance. The
Setup Wizard will also provide the option to change the SnapGear appliance
administrative password.
You can run the Setup Wizard from any PC on the network running Windows 2000,
Windows XP, Windows ME, Windows NT 4 or Windows 95/98.
If you are using Windows 95 you must have the MS Dial Up Networking 1.3 update
(msdun13.exe) installed.
If you are using an early version of Windows 95 (i.e. pre-OSR2), you must install the
Winsock 2.0 update (w95w2setup.exe). If you are using Windows NT, Windows 2000,
or Windows XP Professional you must be logged in as administrator to run the Setup
Wizard.
Getting started
14

Configuring the SnapGear appliance on your network
Below is an overview of the steps in initial setup of the SnapGear appliance on your
network:
1. Apply power to the SnapGear appliance. When the SnapGear appliance is
powered on in factory default mode, it has no LAN IP address. This state is
indicated by all front panel LEDs except Power flashing (except on LITE+ and
LITE2+). The LEDs remain flashing until a LAN IP address is acquired.
Note
If the LEDs on the front of the unit are not initially flashing, try pressing the
Reset/ERASE button on the back panel of the unit. This does not apply to the
LITE+ and LITE2+ models, which do not flash their LEDs. If after doing this all
the LEDs on the front on the unit do not flash, then you may need to contact
customer support.
However, the SnapGear appliance may be acquiring an initial IP address from
another DHCP server on the LAN, causing its LEDs to stop flashing soon after
booting. In this case, the SnapGear Setup Wizard will detect this address, as
detailed in the following steps.
2. Insert the Installation CD into the CD drive of any Windows PC on your network
that meets the system requirements. If the setup program does not run
automatically, select Run from the Start menu and type z:\setup (where z is
the letter of your CD drive).
3. Select the directory and Start menu group where the software utilities for your
SnapGear appliance will be installed.
4. The wizard will search the network for your device. If your SnapGear appliance
does not yet have an IP address assigned to it, you will be asked to enter one
now. The next section, Set up an IP address, describes this scenario in more
detail.
Getting started
1
5

Note
The front of the SnapGear appliance contains activity LEDs that vary slightly
between models. These provide information on the operating status of your
SnapGear appliance. In particular you should note:
The Power/PWR LED is on when power is applied (use only the SnapGear Power
Adapter packaged with the unit).
The System/TST/Heart Beat LED blinks when the SnapGear appliance is running.
For all modes except the LITE+ and LITE2+, all LEDs (except Power/PWR) will
flash when your SnapGear appliance is powered on for the first time in factory
default mode. These LEDs stop flashing when the device has been assigned an
IP address, or if a static IP reset is performed.
Getting started
1
6

Set up IP addresses
To communicate on your network the SnapGear appliance will need an IP address. This
is accomplished using the SnapGear Setup Wizard application that ships with your
SnapGear CD. If the SnapGear appliance has already been assigned an IP address
Note
The WAN interface is by factory default inactive in that there are no network services
such as DHCP in operation, and no IP address is configured. The LAN interface is set up
as a DHCP client, and will not initially have an assigned IP address. This is deliberately
set to be passive so as not to interfere with your existing LAN. All of this will be
configured later in the installation process but to get you up and running the setup.exe
application is simply a miniature DHCP server that will give the SnapGear appliance a
known IP address. If you use Linux, Unix, Macintosh or another operating system you
may either use a DHCP server application to assign an IP address.
The SnapGear Setup Wizard can be run from any PC on the network that is running
Windows. To run SnapGear Setup Wizard:
Insert the SnapGear Installation CD into your CD drive.
The Setup Wizard should automatically run, but if not then select Run from the Start
menu and type z:\setup.exe (where z is the letter of your CD drive), or use Windows
Explorer to find the program.
SnapGear Setup Wizard will install some files onto your PC, then attempt to find your
SnapGear appliance on the network. At this point, the installation procedure diverges and
a popup window will display either A, B or C.
Getting started
1
7
/